How To Feed A Loon

  • About Us
  • Recipe Index
    • Appetizers
    • Asian
    • Breads and Doughs
    • Cajun / Creole / Louisiana
    • Breakfast / Brunch
    • Comfort Food
    • Delectable Desserts
    • Entrees / Mains
    • Instant Pot
    • Italian
    • Pizza
    • Rubs, Spices and Sauces
    • Soups & Salads
    • Sides
    • Seafood
    • Southern
    • Mexican / Tex-Mex / Cal-Mex
    • Thanksgiving
    • Vegetarian
  • Videos
    • Recipe Videos
    • Web Stories
  • Work With Us
  • Contact
  • **Premium Access**
  • Recipes
menu icon
go to homepage
  • Holiday Favorites
  • Recipes
  • About Us
  • Work With Us
  • Premium
subscribe
search icon
Homepage link
  • Holiday Favorites
  • Recipes
  • About Us
  • Work With Us
  • Premium
×
Home » Recipe Index

Steak Fajita Quesadilla

December 28, 2025 by Kris Longwell Leave a Comment

A stack of six steak fajita quesadillas that have been cut in half, revealing the steak, caramelized onions, and melty Monterey Jack cheese.

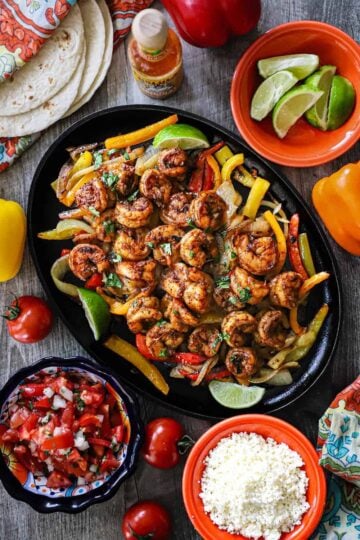
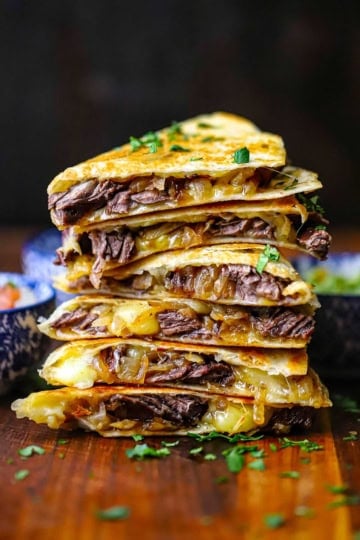
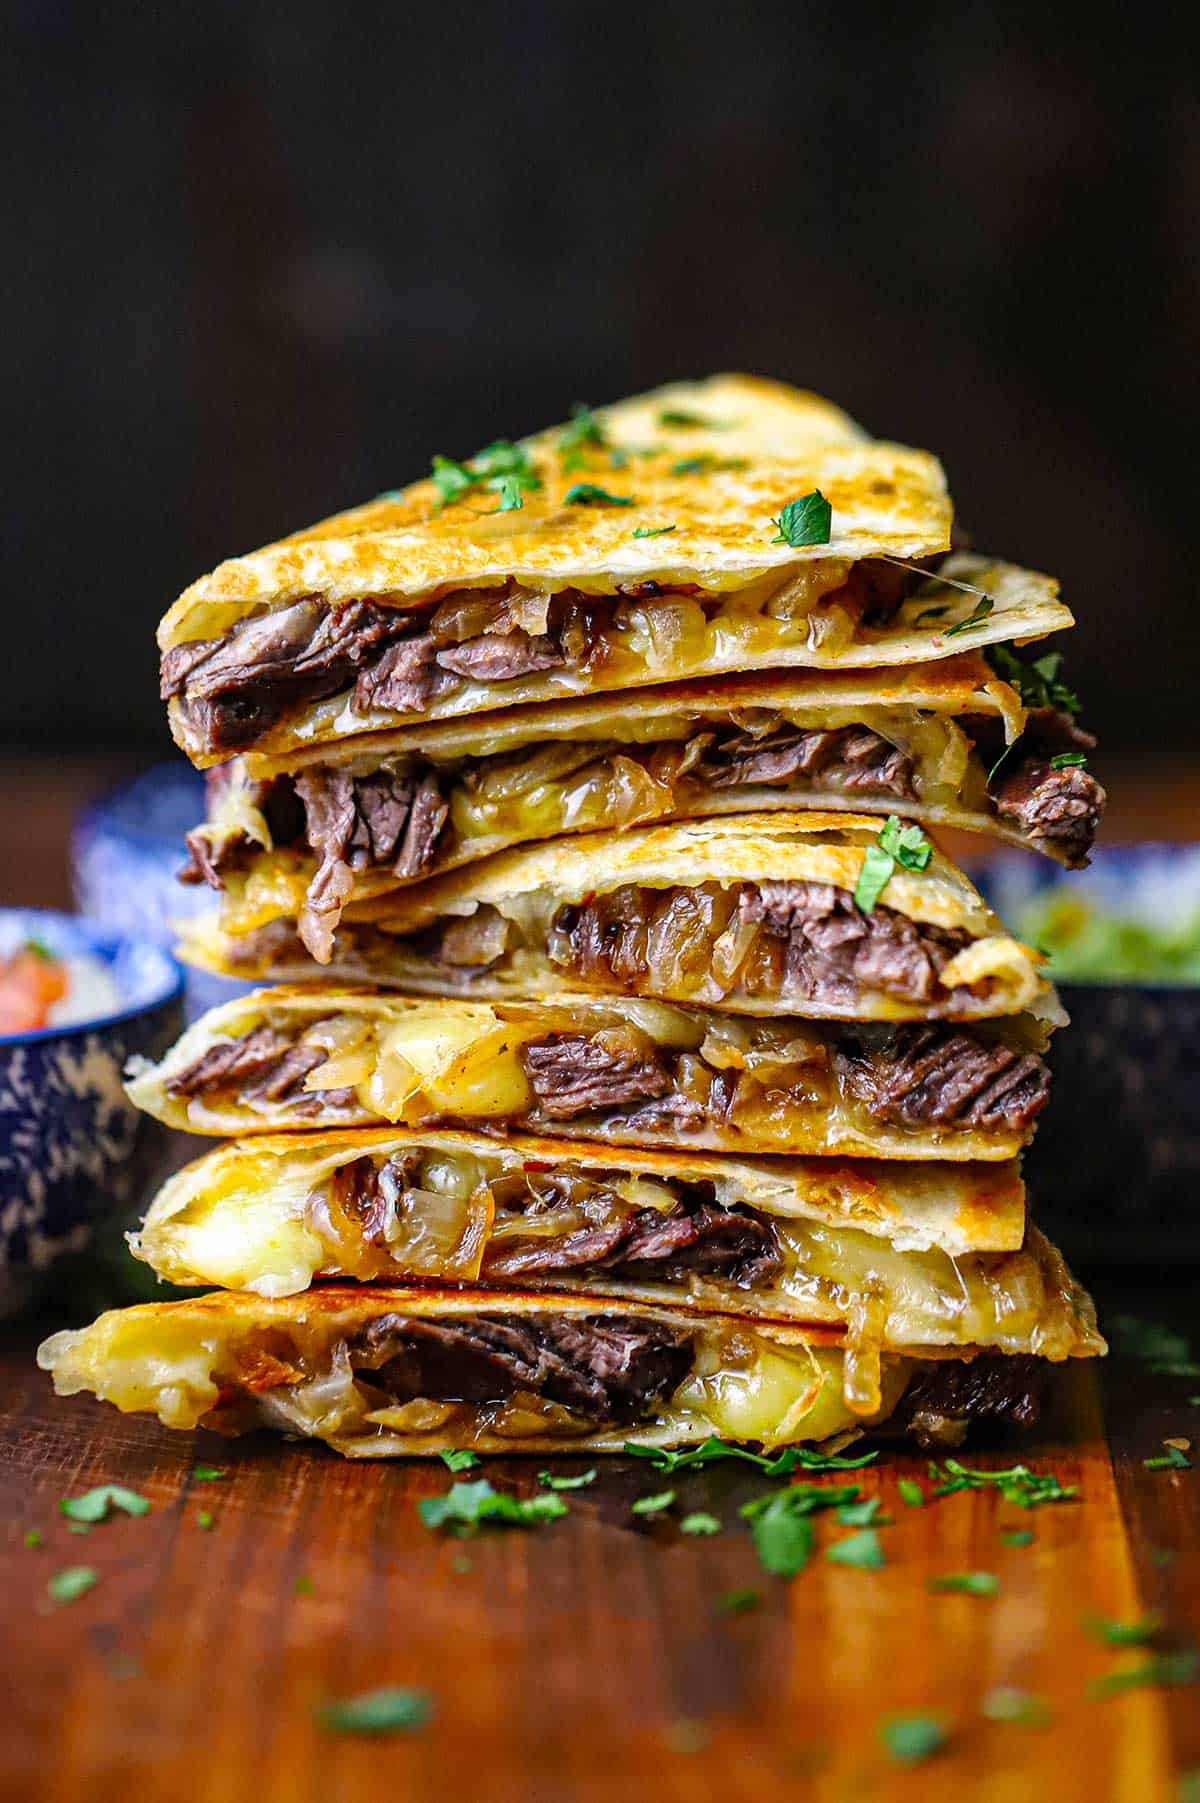
This steak fajita quesadilla is packed with tender, seasoned steak, sautéed onions, and plenty of melty cheese, all folded into a golden, crispy tortilla. It’s an easy, satisfying meal that’s even better when served with homemade pico de gallo and best‑ever guacamole for dipping or topping.
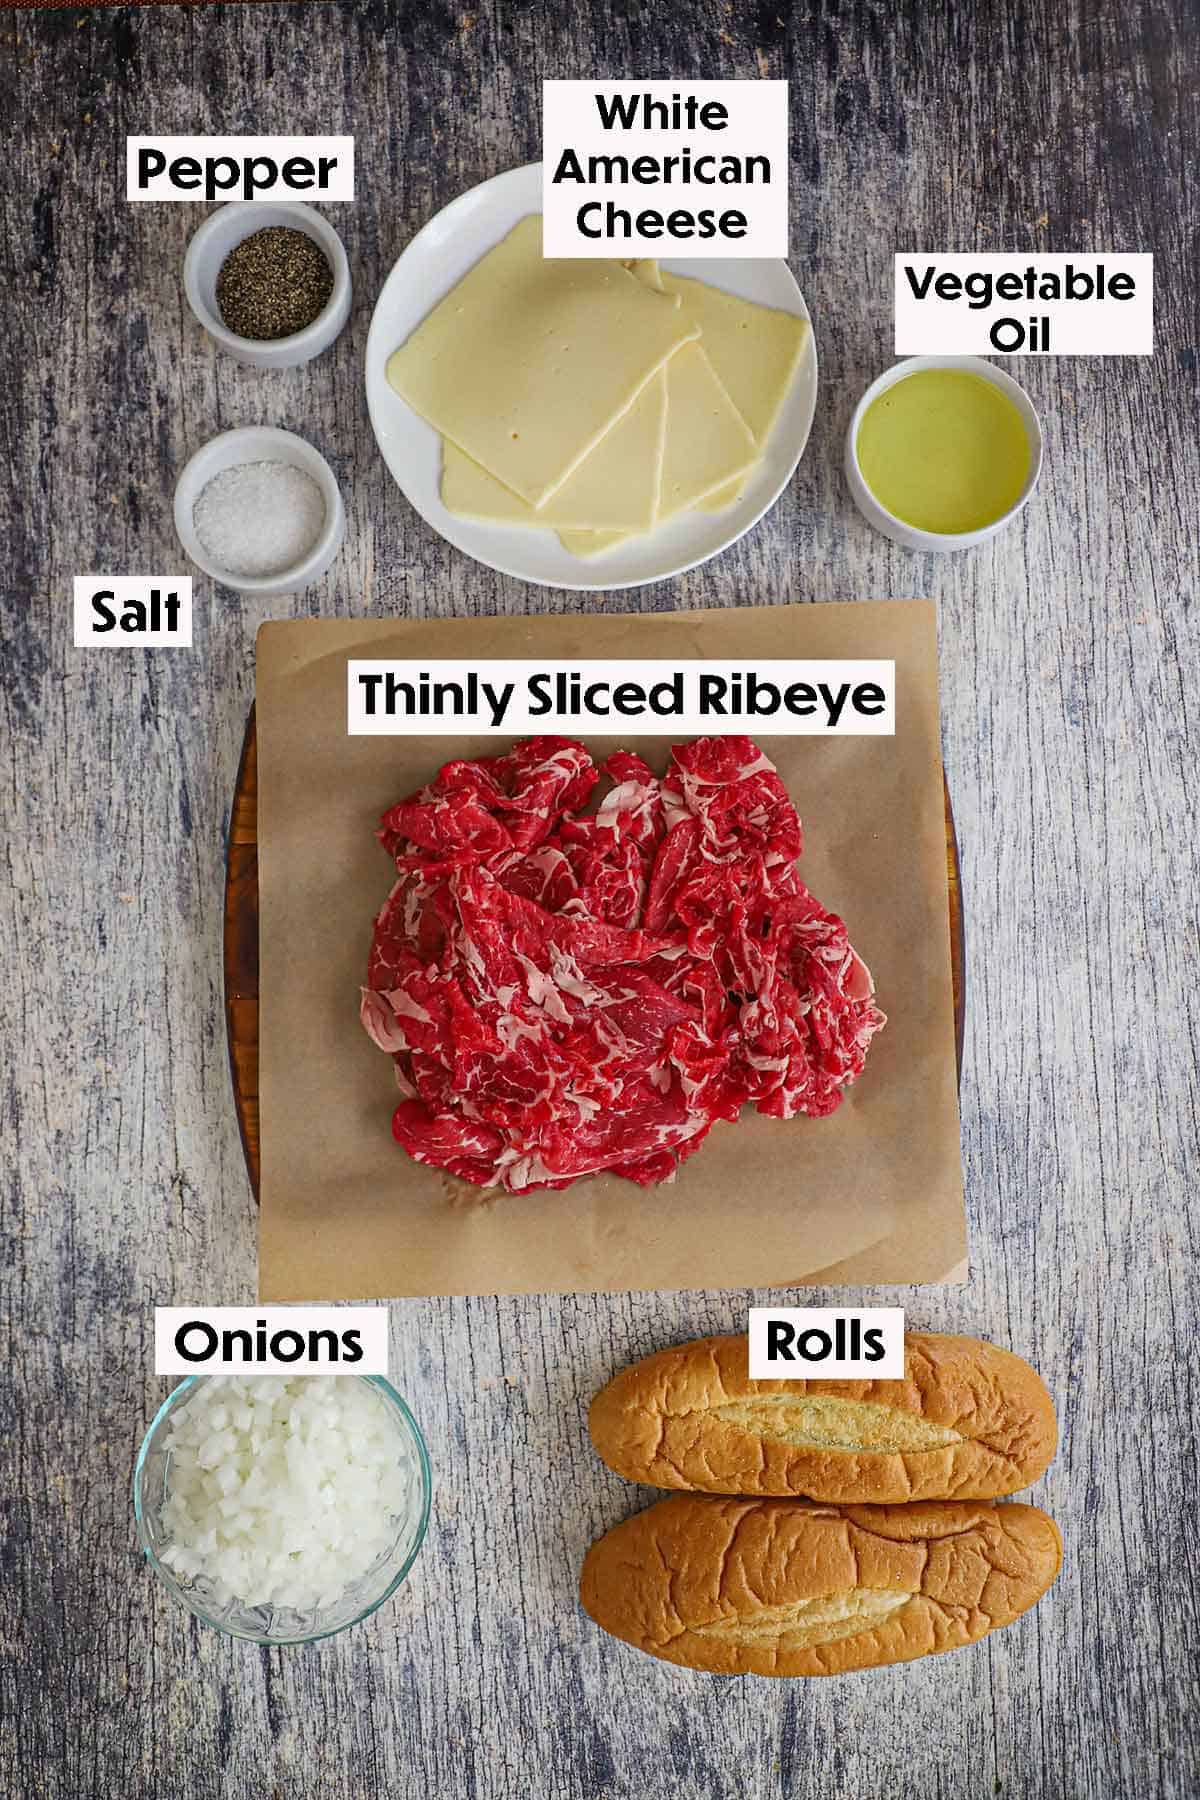
A stack of six steak fajita quesadillas that have been cut in half, revealing the steak, caramelized onions, and melty Monterey Jack cheese.
[feast_advanced_jump_to]

🥩 The Ingredients

This quesadilla layers boldly marinated and seasoned grilled steak with melty cheese and caramelized onions inside a crispy, golden tortilla, then finishes with fresh, classic toppings for the perfect balance of flavor and texture. Find ingredient notes (including substitutions and variations) below.

An arrangement of ingredients for Steak Fajita Quesadilla on a grey wooden background including skirt steak, lime juices, cilantro, garlic, oil, seasoning, tortillas, shredded cheese, onion slices, guacamole, and pico de gallo.

📝 Ingredient Notes with Substitutions and Variations

  • Steak: Skirt steak delivers the most authentic fajita flavor, but flank steak or flat iron steak works well if needed.
  • Marinade: A citrus‑forward marinade keeps the steak tender and flavorful; if short on time, even 30 minutes makes a difference.
  • Fajita Seasoning: Homemade seasoning allows you to control the salt and heat, but a good store‑bought blend can be used in a pinch.
  • Cooking Fat: Pork lard adds classic depth to the onions, though vegetable and avocado oil are great alternatives.
  • Cheese: Monterey Jack melts beautifully; pepper jack adds a little heat, while a blend with mozzarella creates extra stretch.
  • Tortillas: Burrito‑size flour tortillas are easiest to fill and fold, but standard flour tortillas work for smaller portions.
  • Heat Level: Adjust the spice by adding more red pepper flakes to the marinade or serving with a spicy salsa.
  • Serving Variations: Turn these into quesadilla wedges for sharing or make them heartier by adding sautéed bell peppers.

See the recipe card (with video) below for a full list of ingredients and measurements.

🔥 Tips & Tricks

  • Marinate for flavor, not too long: A few hours is ideal; avoid overnight marinating with citrus, which can break down the steak too much.
  • Bring the steak to room temperature before grilling so it cooks evenly and stays juicy.
  • Grill hot and fast: High heat gives you a flavorful sear while keeping the steak tender.
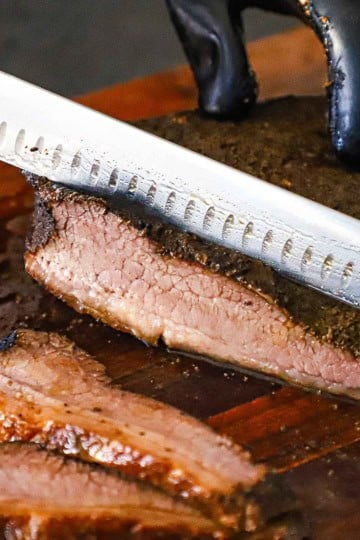
  • Slice the steak against the grain for the most tender bite.
  • Cook the onions low and slow to develop sweetness without burning.
  • Use freshly shredded cheese, so it melts smoothly and evenly.
  • Don’t overfill the tortilla, which makes flipping harder and prevents crisping.
  • Cook quesadillas in a little oil rather than dry for extra‑crispy, golden tortillas.
  • Let the quesadilla rest briefly before slicing so the filling stays in place.

👩🏼‍🍳 How to Prepare Steak Fajita Meat

A person using a whisk to mix the marinade for a steak fajita quesadilla.
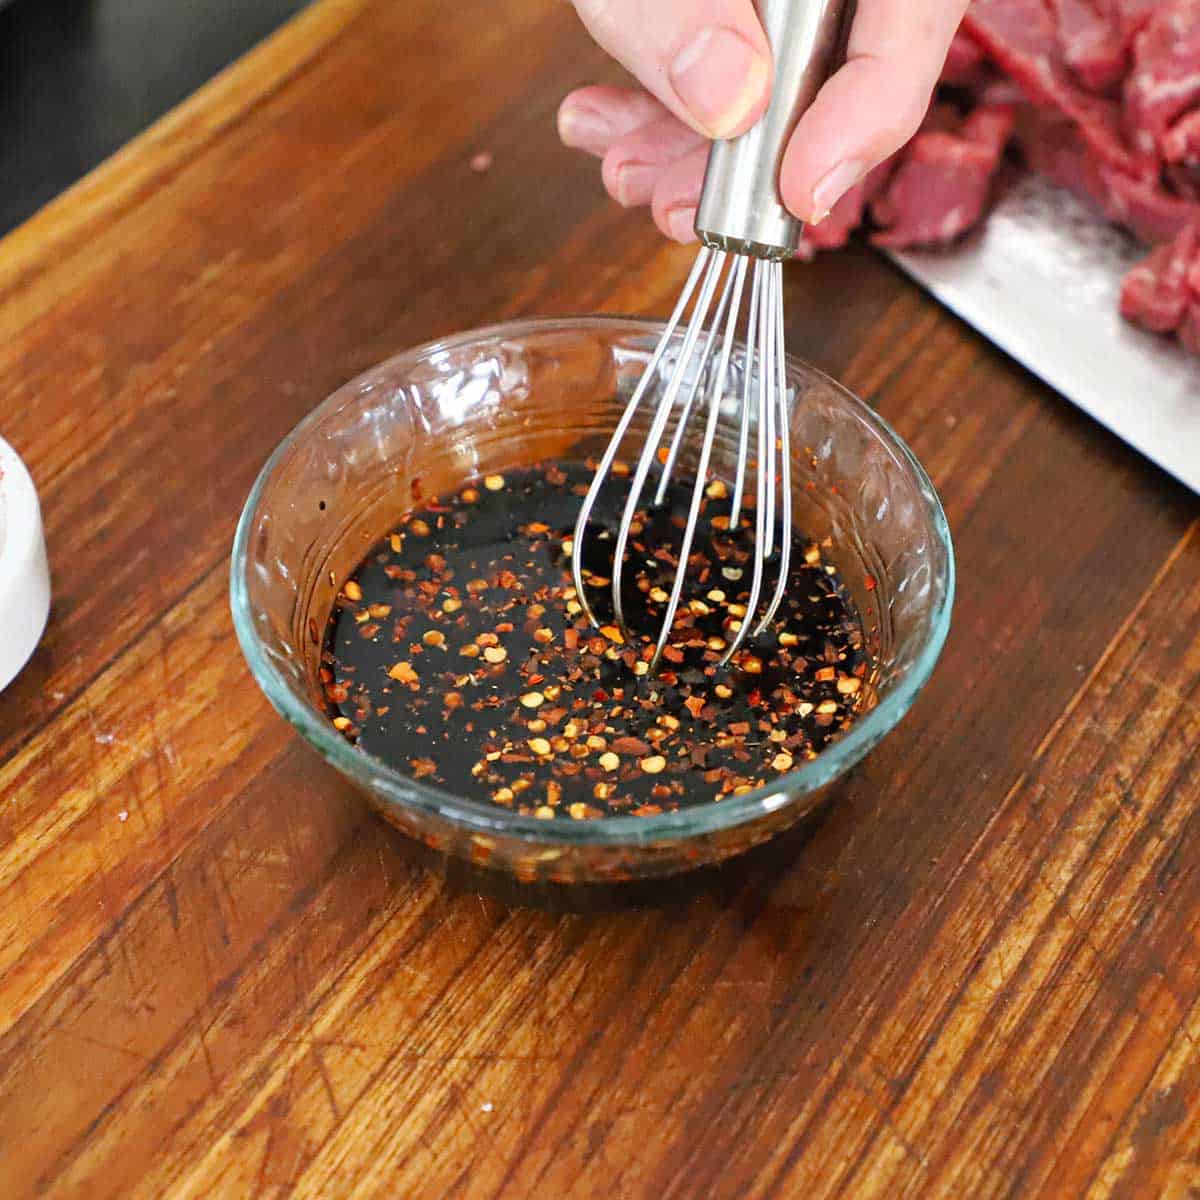
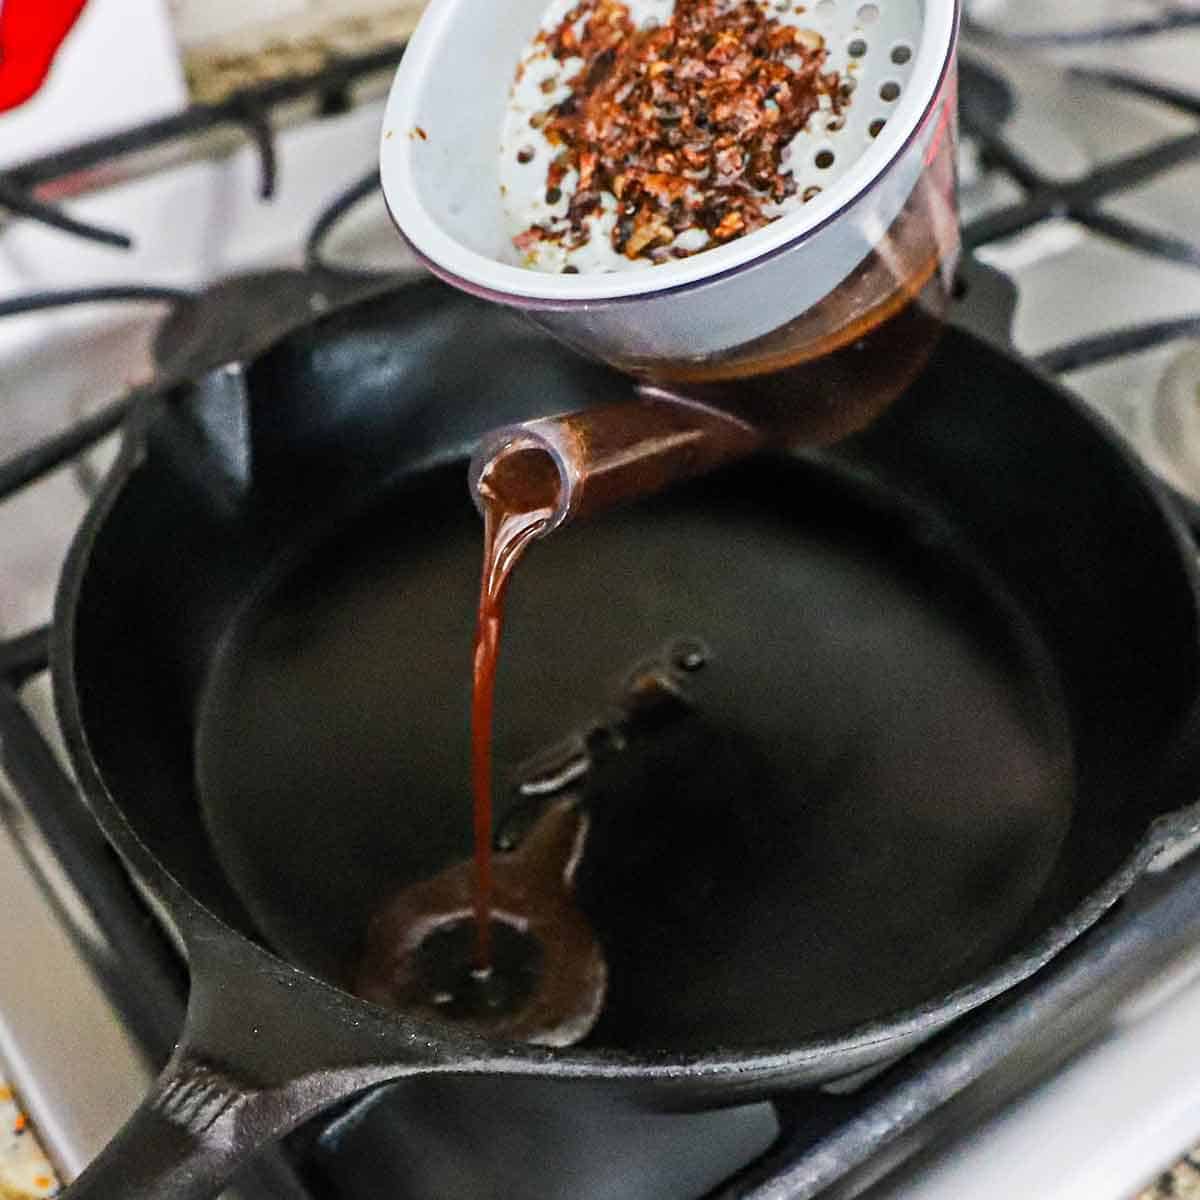
  1. Step 1: In a medium-sized bowl, add all of the marinade ingredients and whisk to combine.
A person pouring a cilantro and lime marinade into a freezer baggie holding a skirt steak.
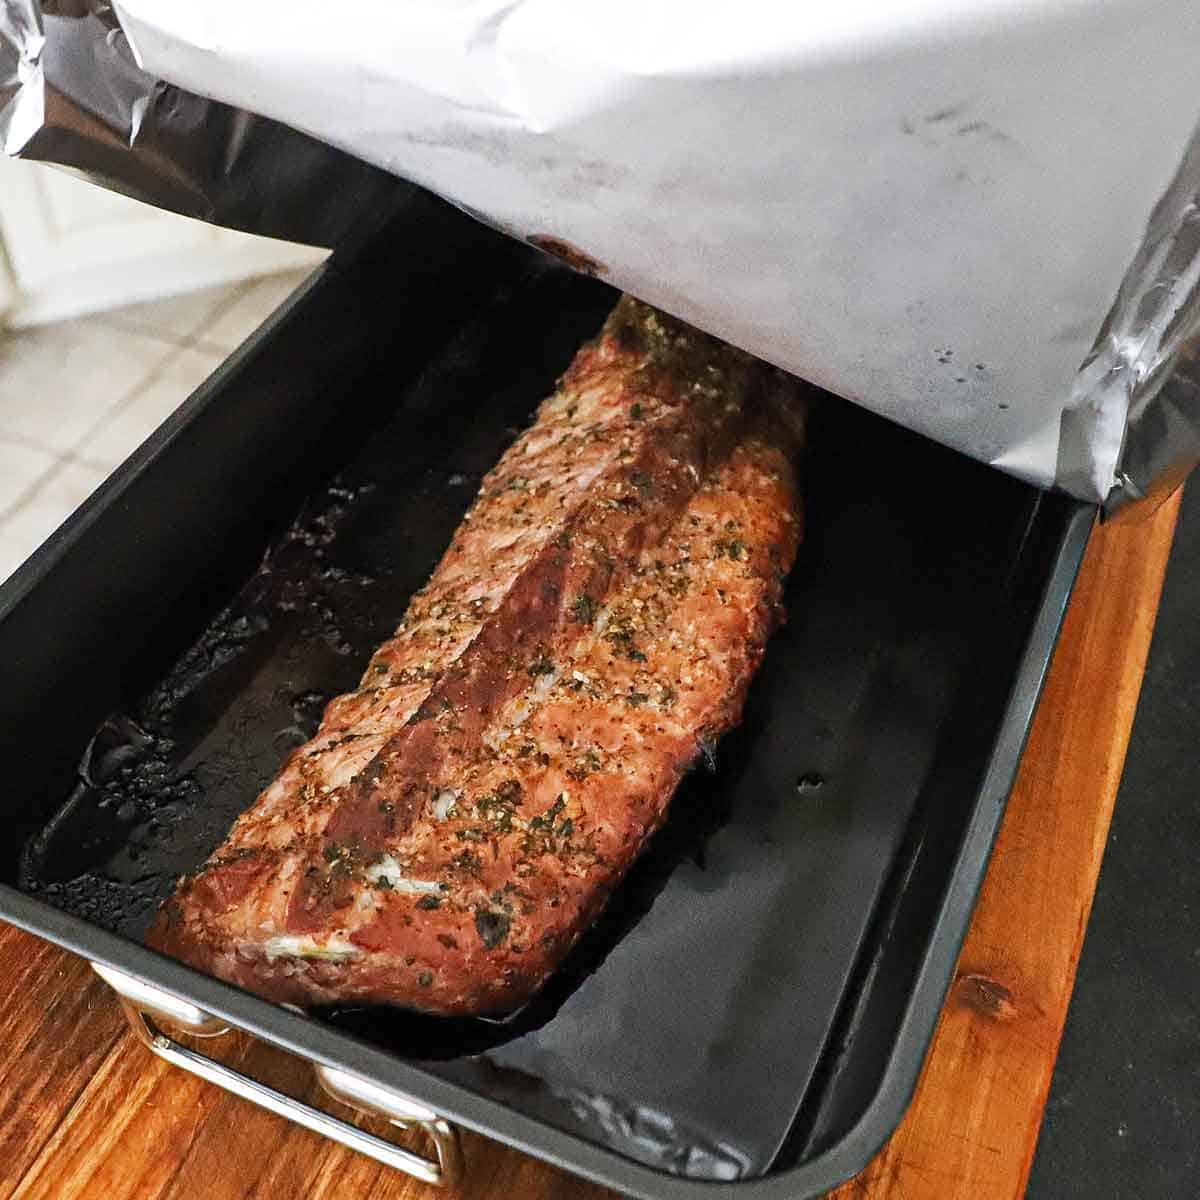
  1. Step 2: Place the skirt steak in a large freezer baggie (or in a shallow dish), and pour the marinade over it. Seal (or cover the dish) and chill for 2 to 4 hours.
A person sprinkling fajita seasoning over the surface of an uncooked marinated skirt steak that is resting on a large white platter on a cutting board.
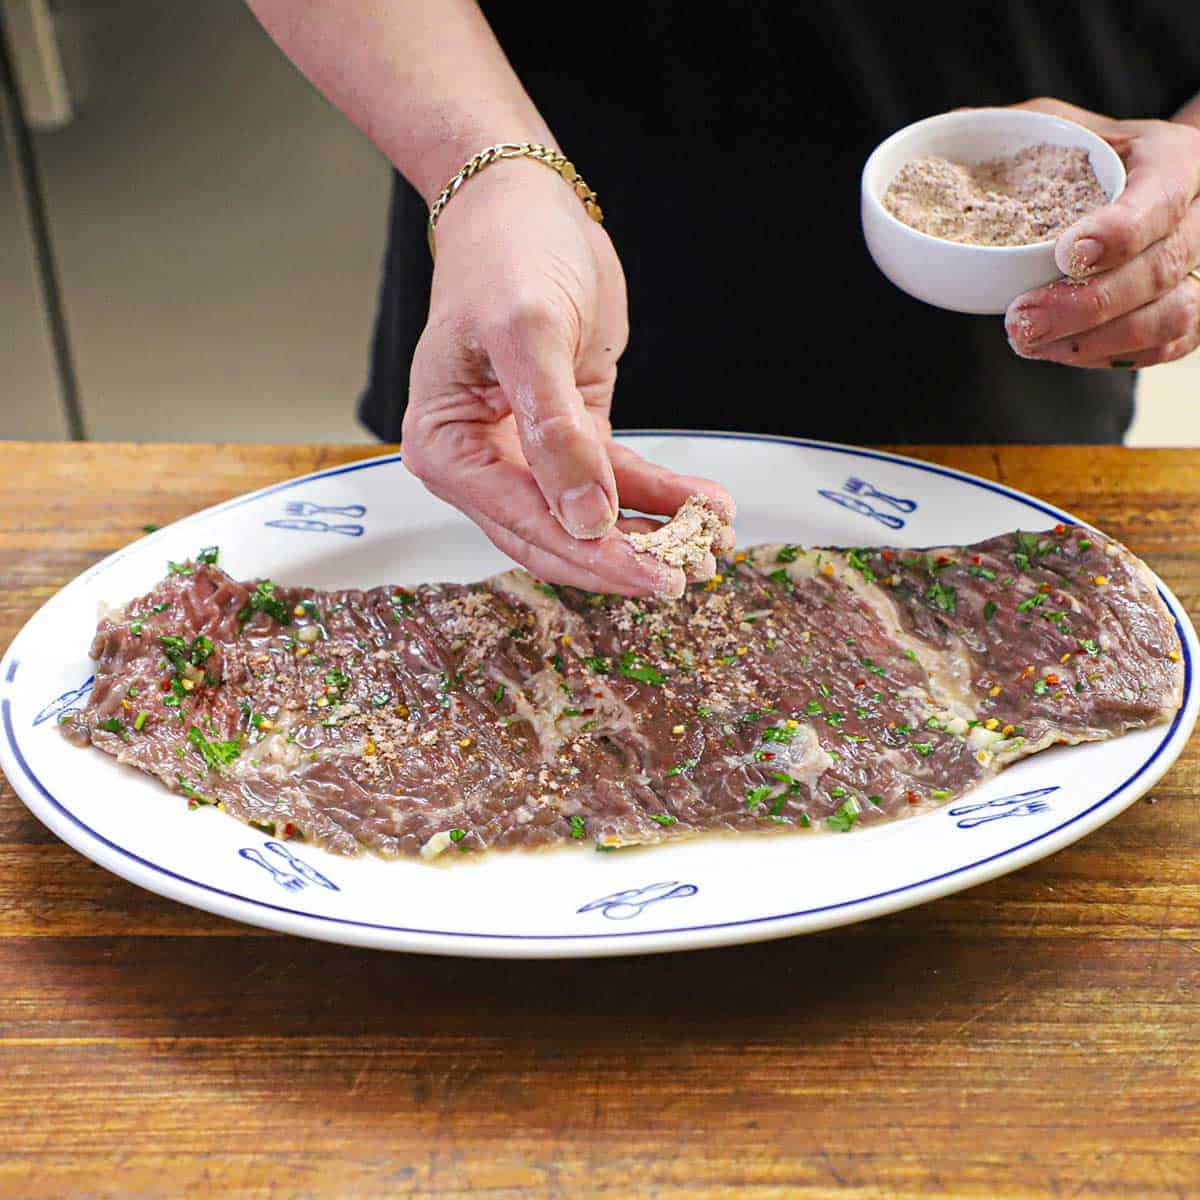
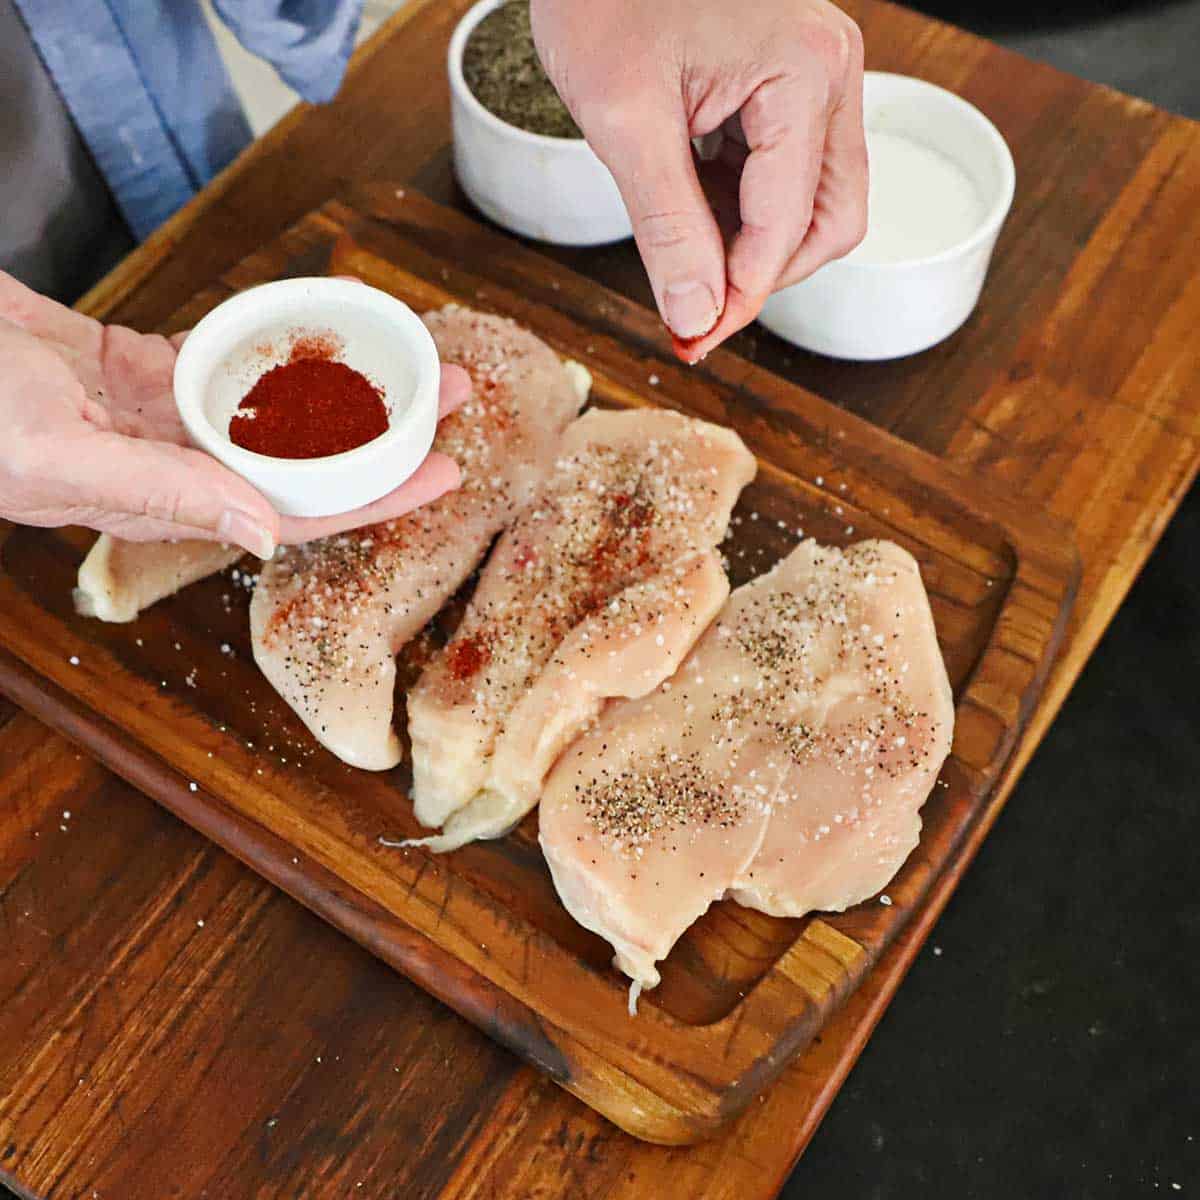
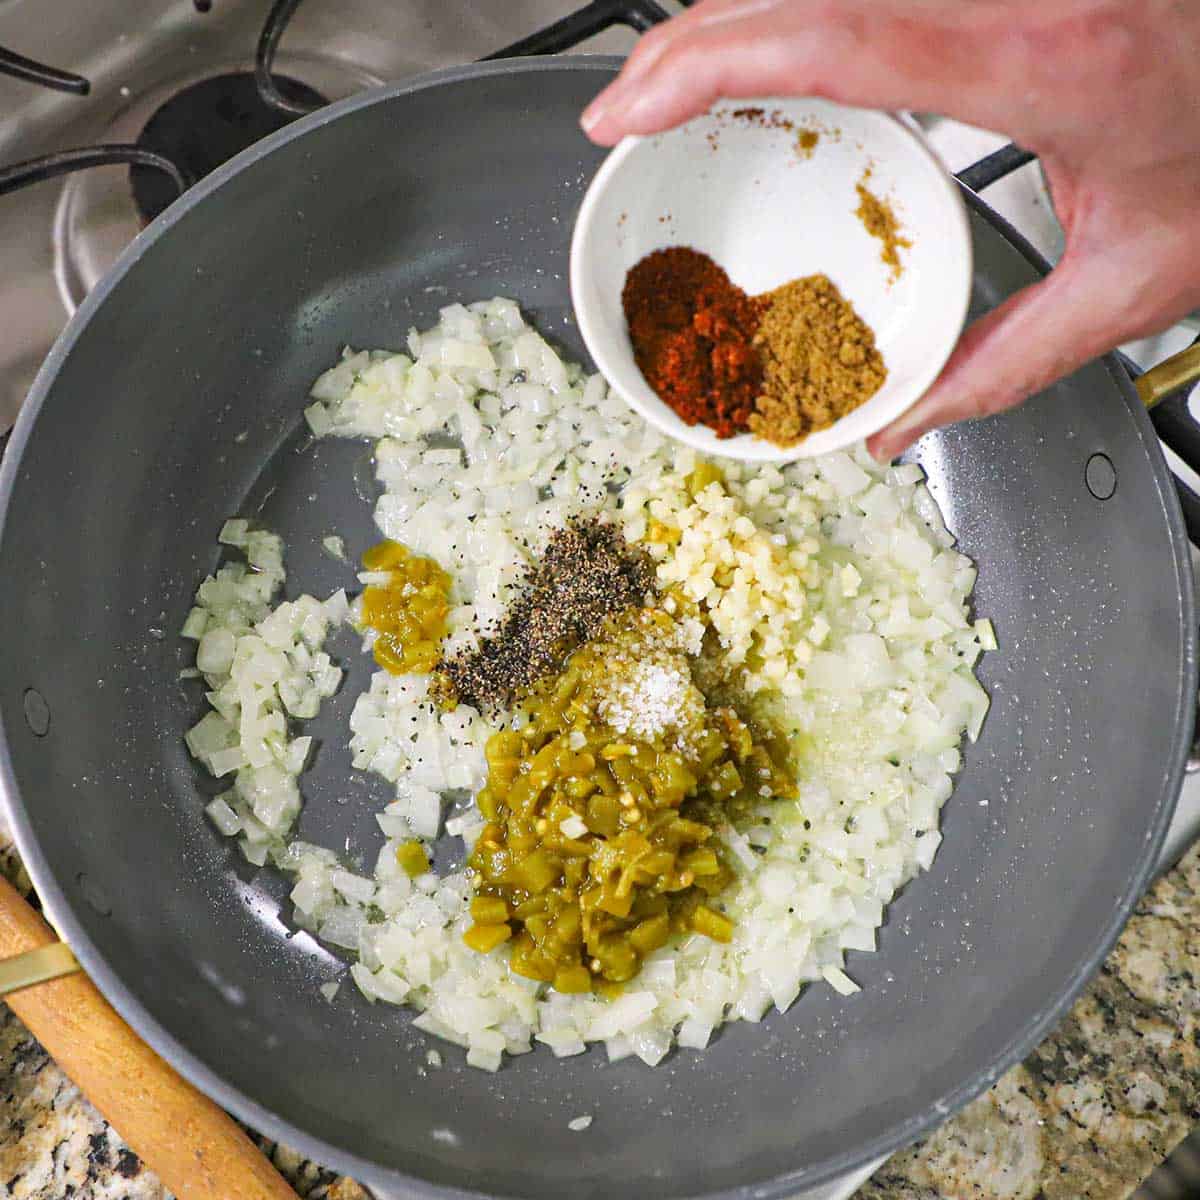
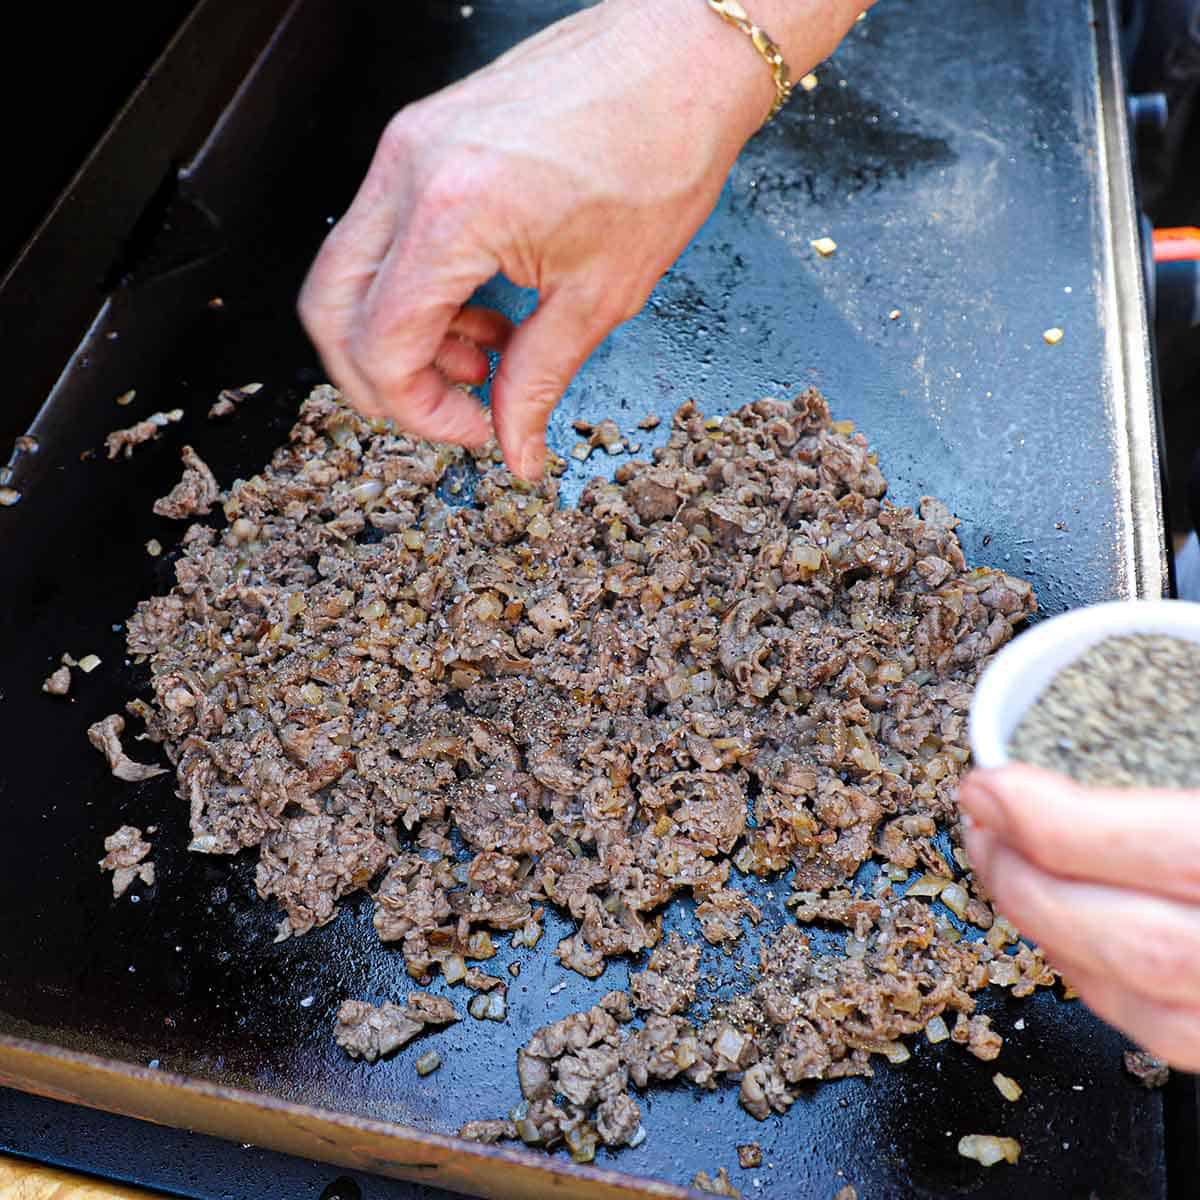
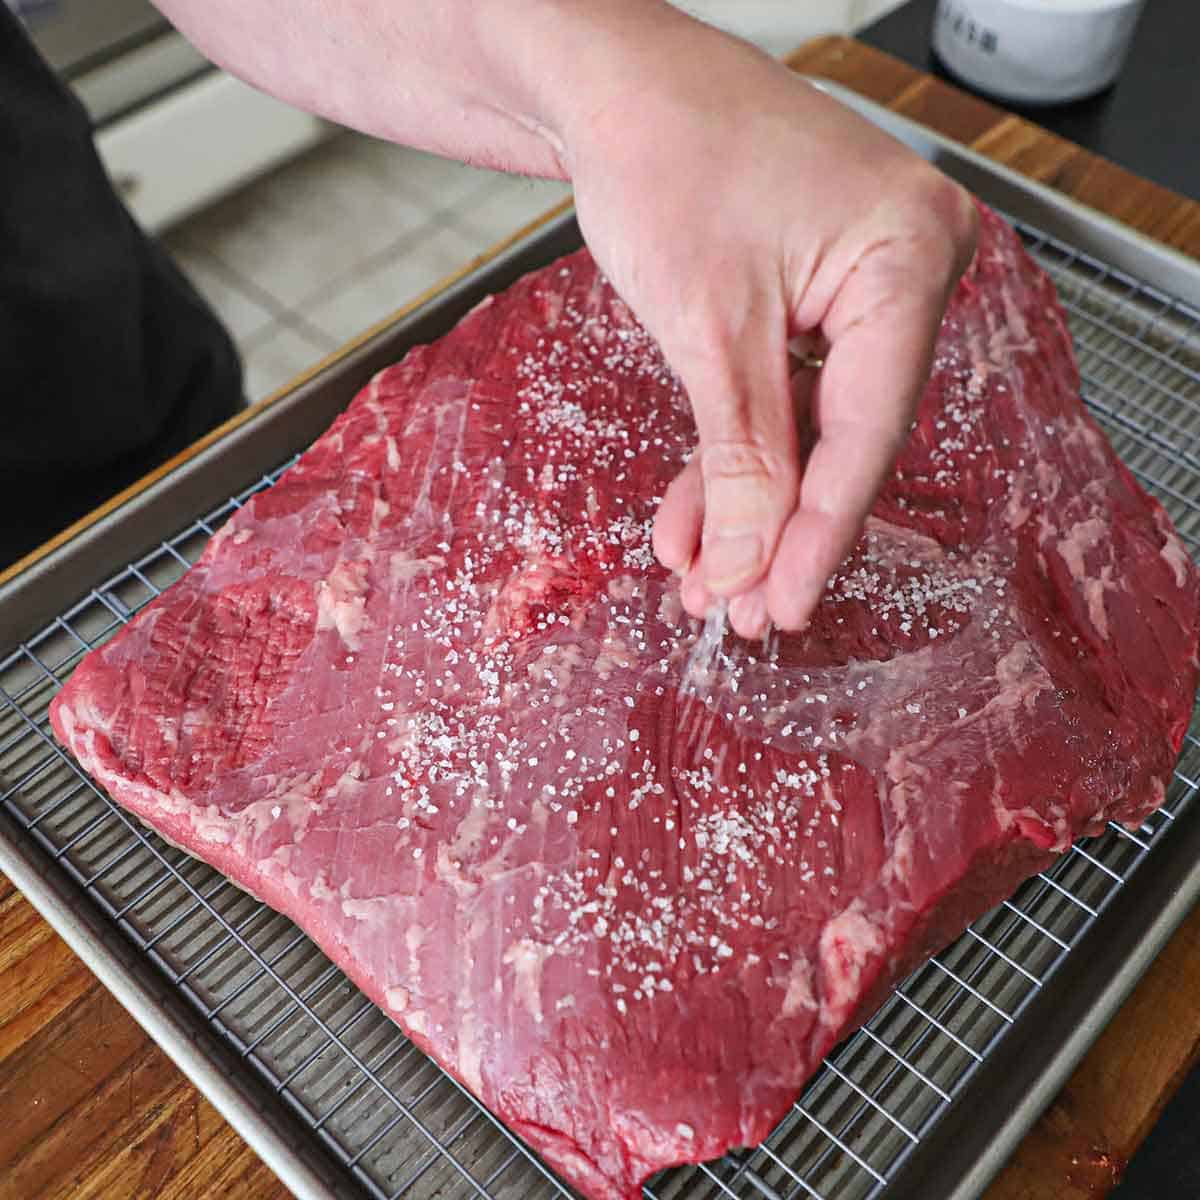
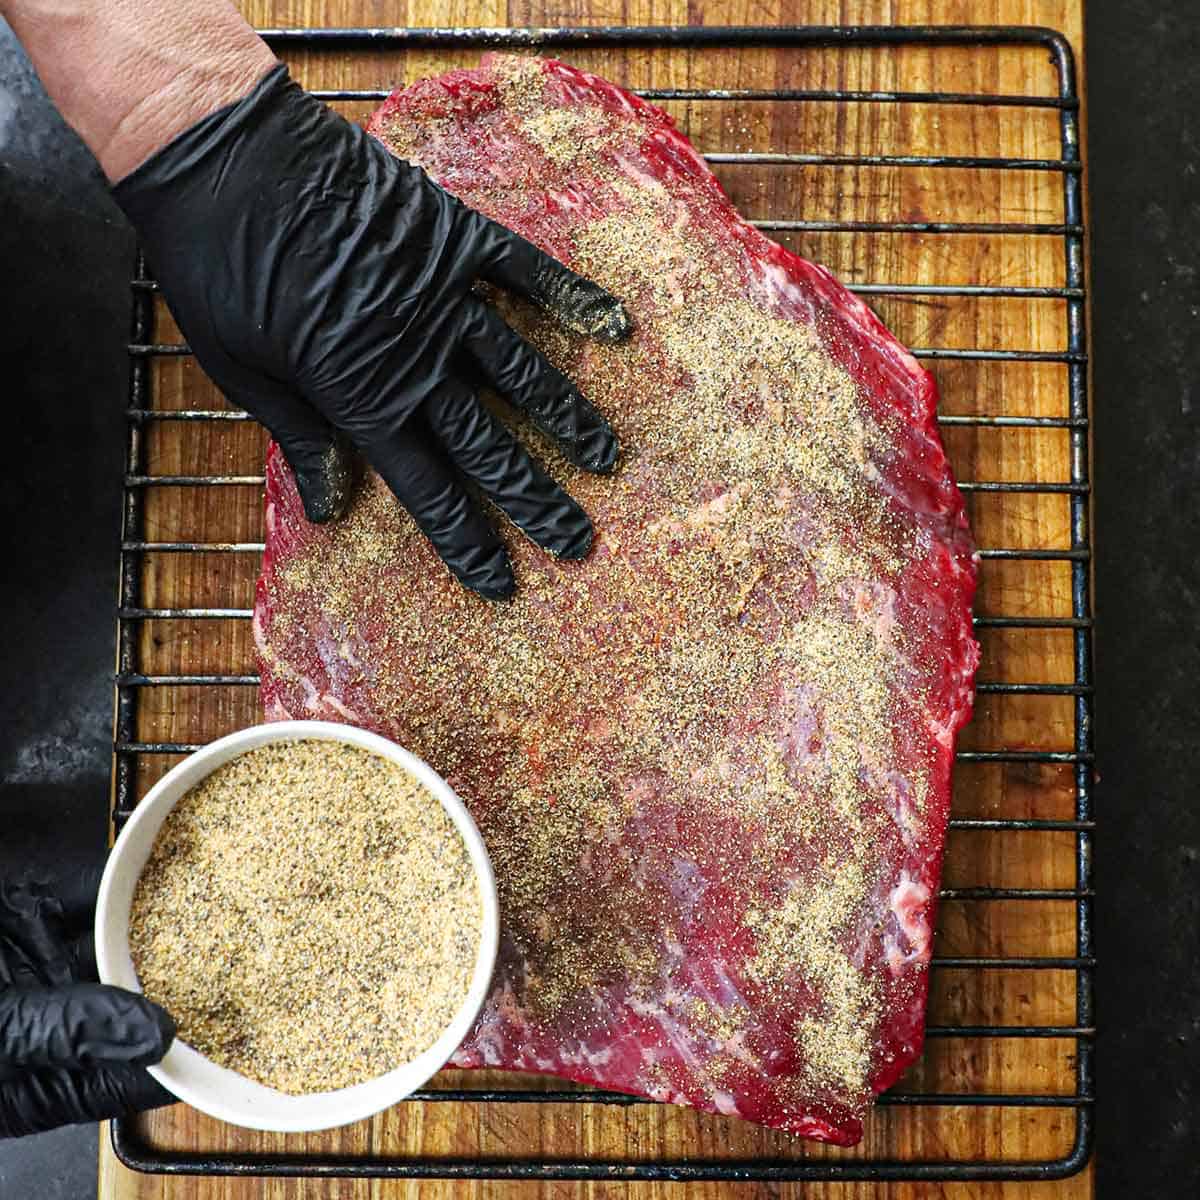
  1. Step 3: Put together the fajita seasoning (or use purchased) and sprinkle all over the marinated steak (after being removed from the baggie or dish).
A close-up view of marinated skirt steak being grilled on a gas grill.
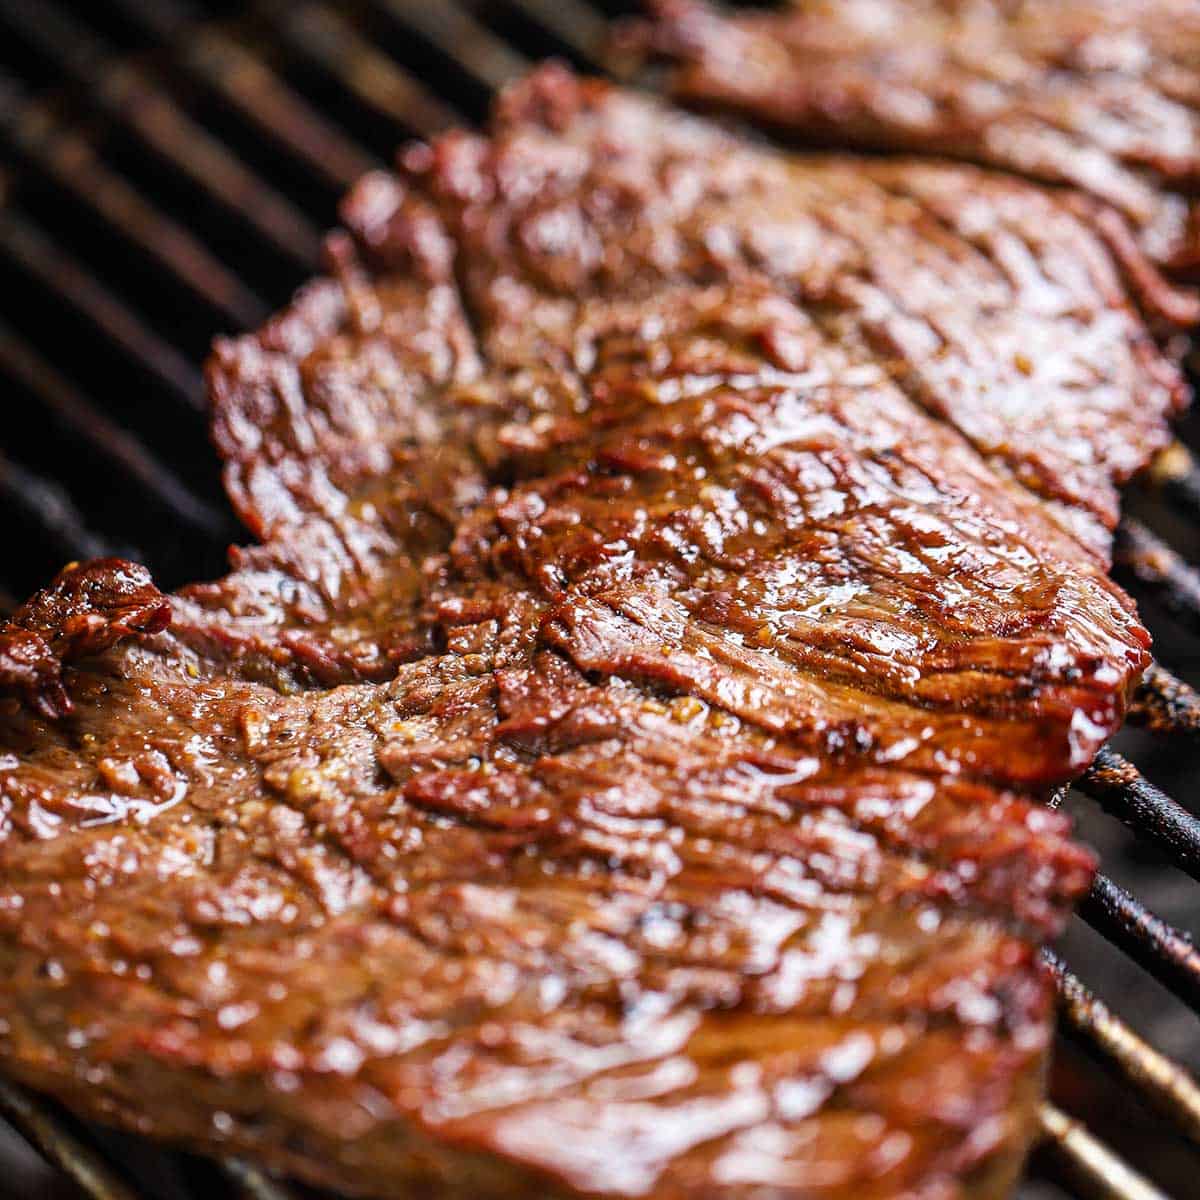
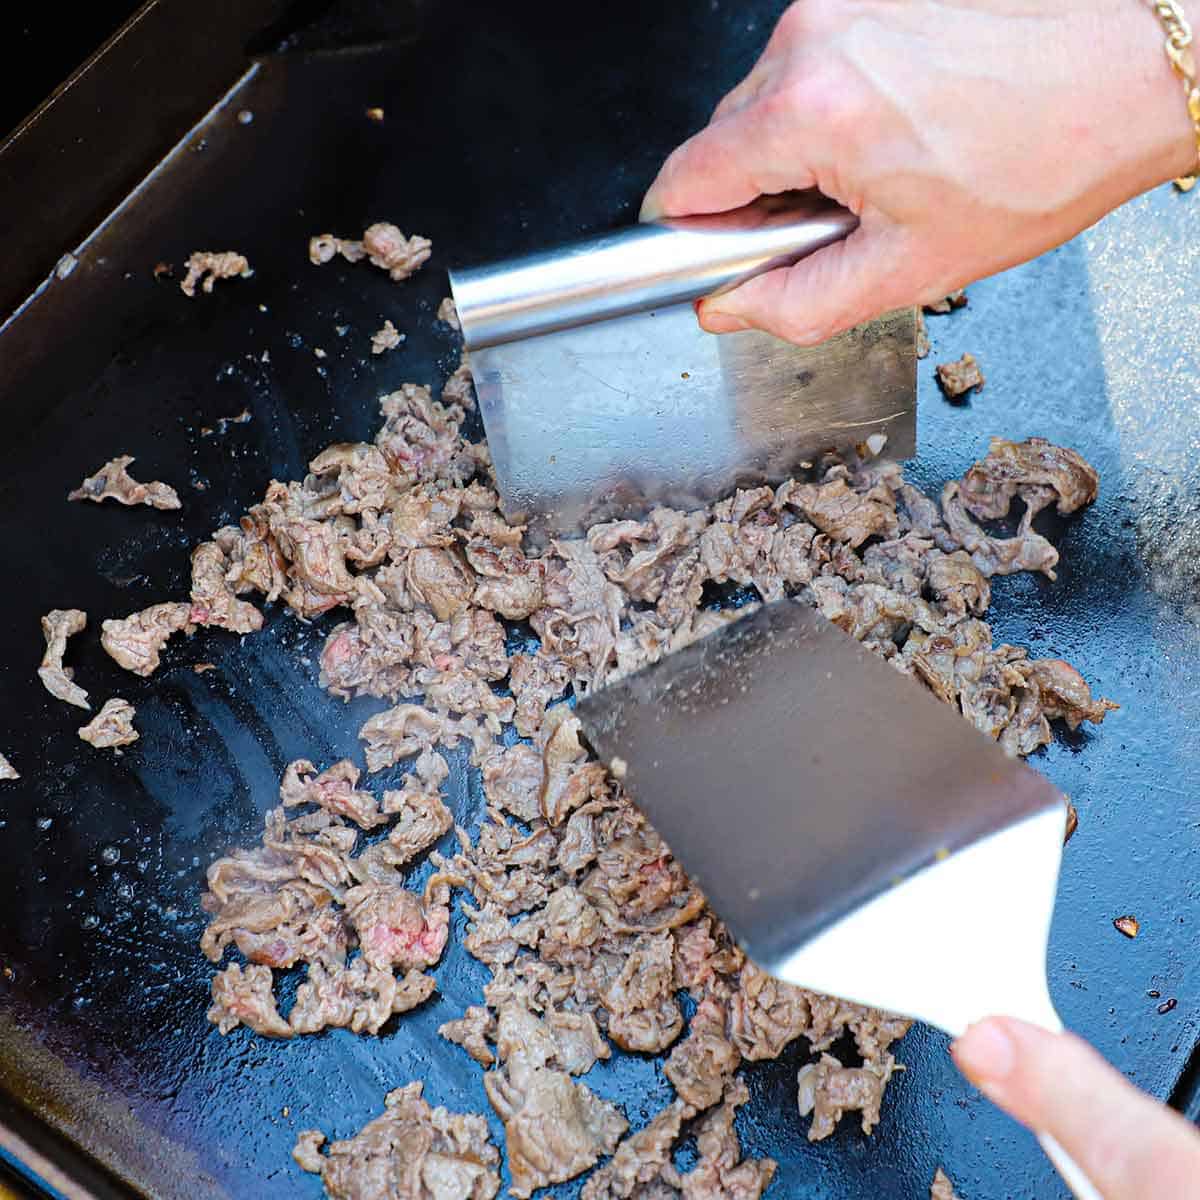
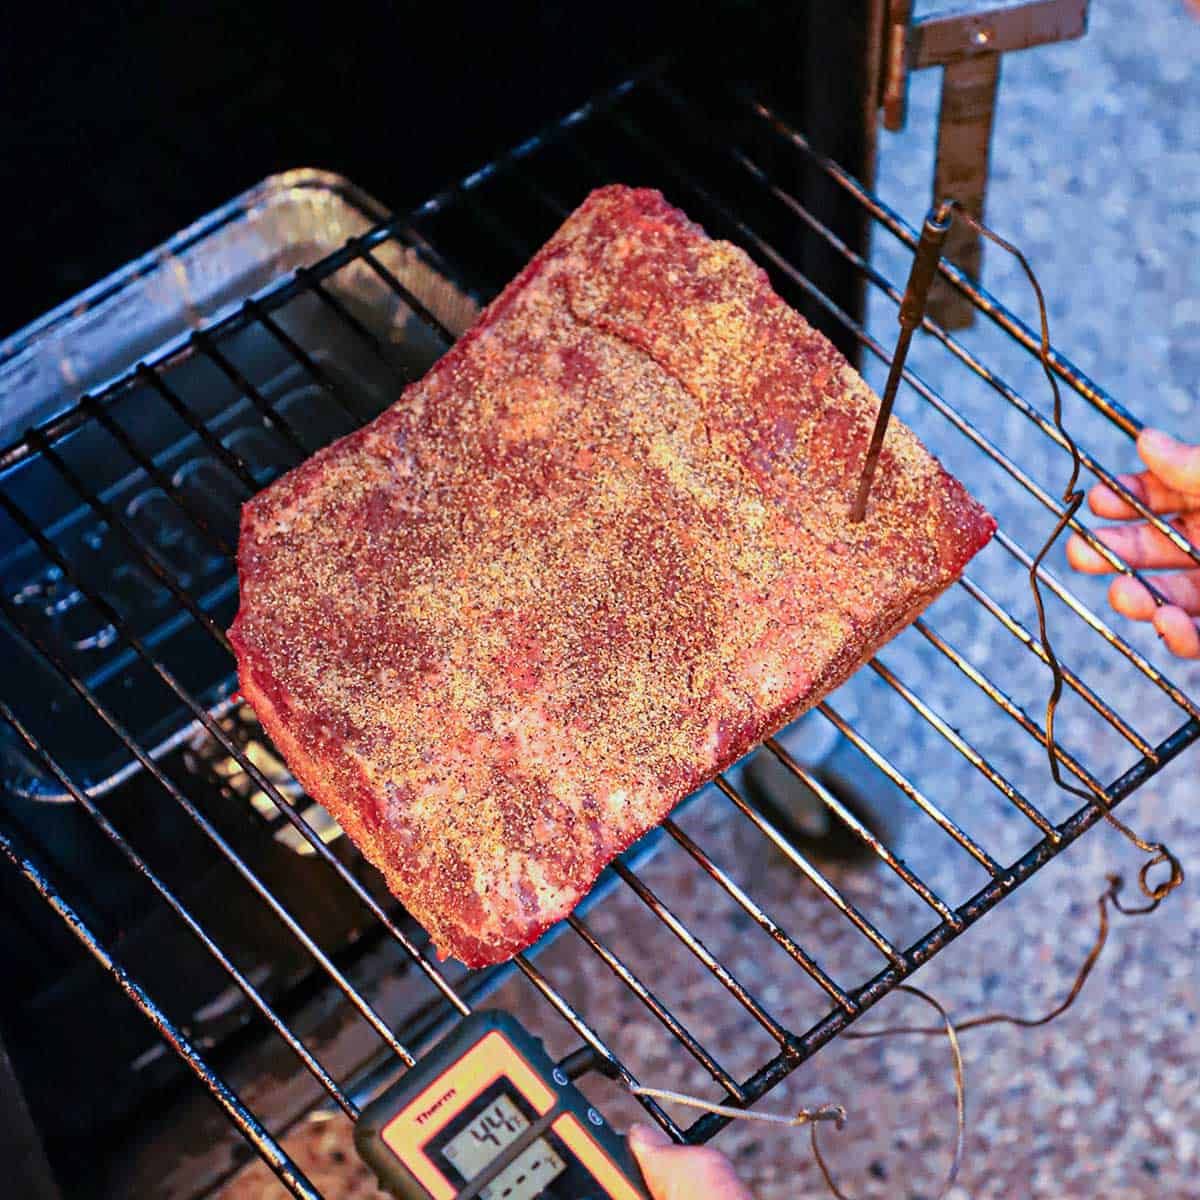
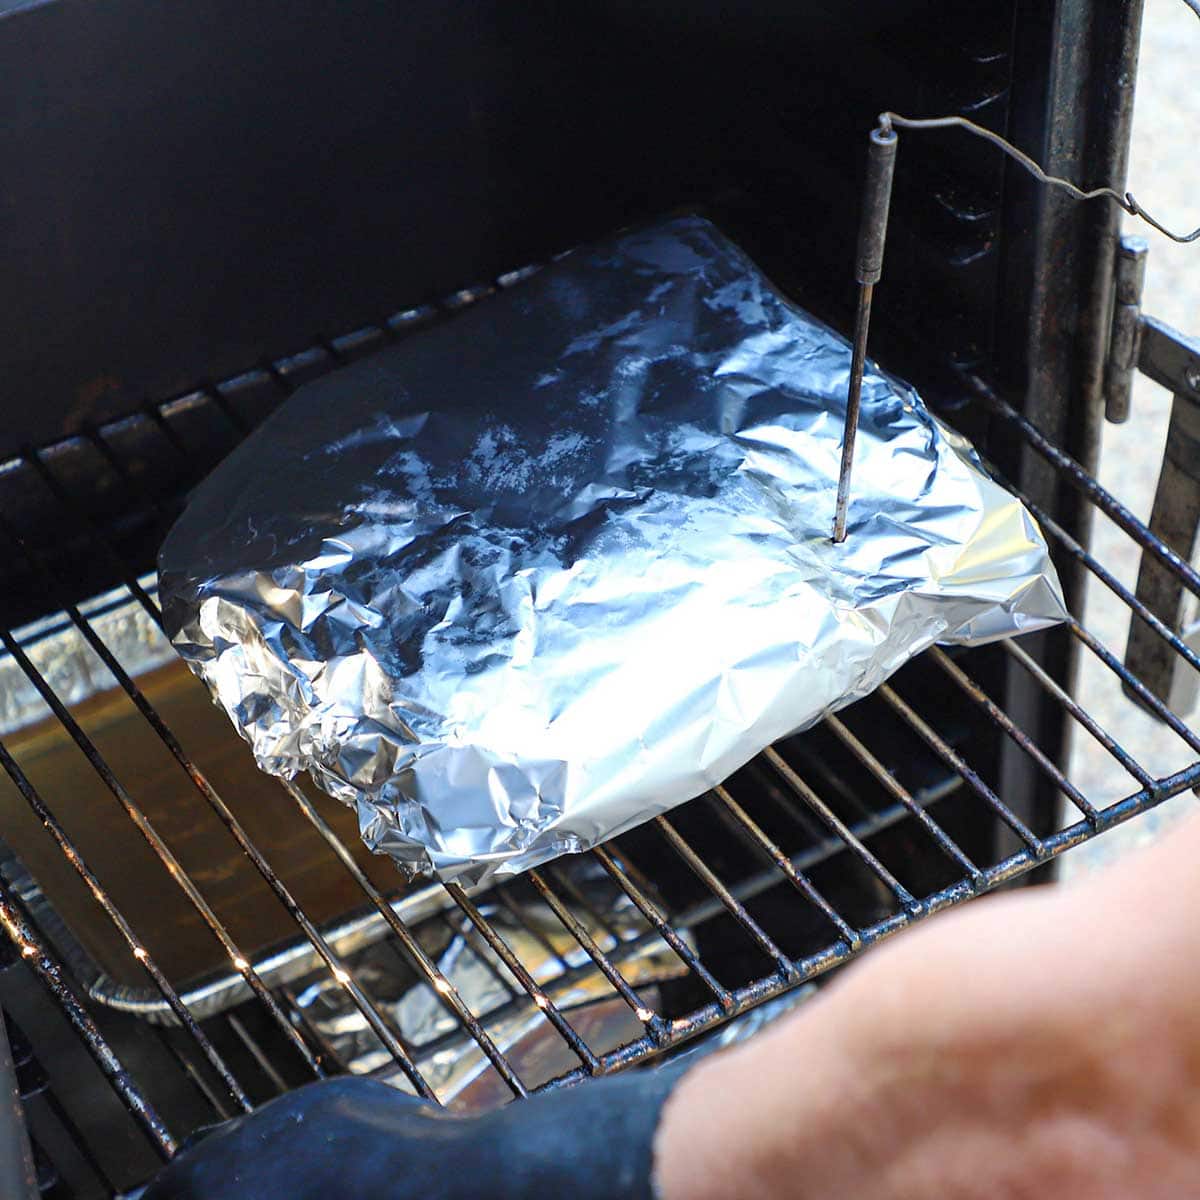
  1. Step 4: Grill over direct heat for about 5 minutes per side.
A close-up view of a person using a large fork and chef's knife to slice freshly grilled fajita steak on a wooden cutting board.
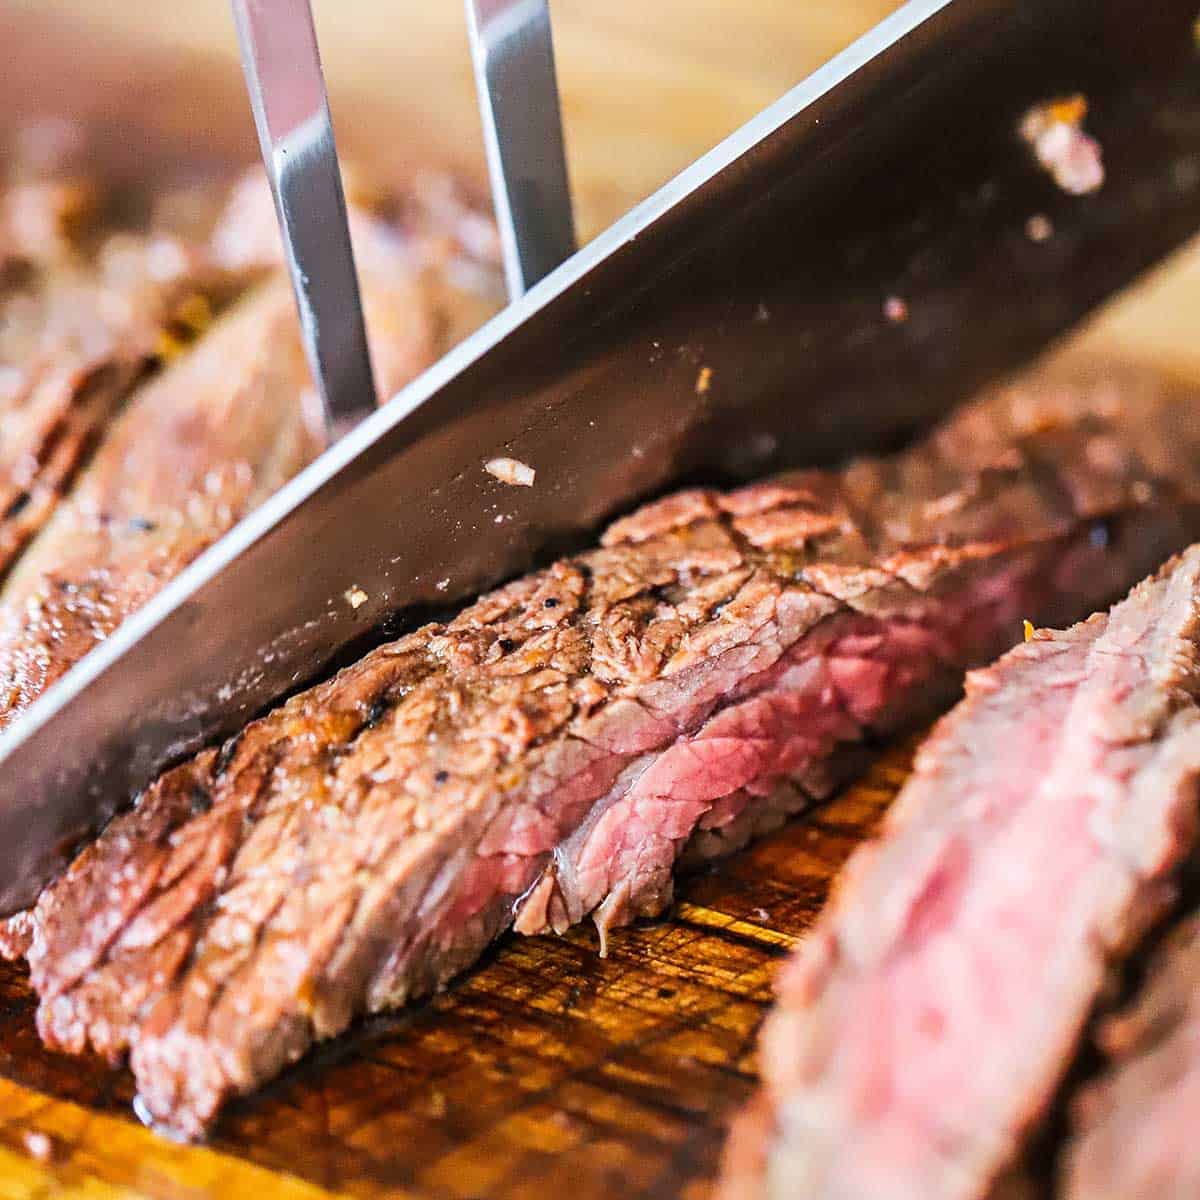
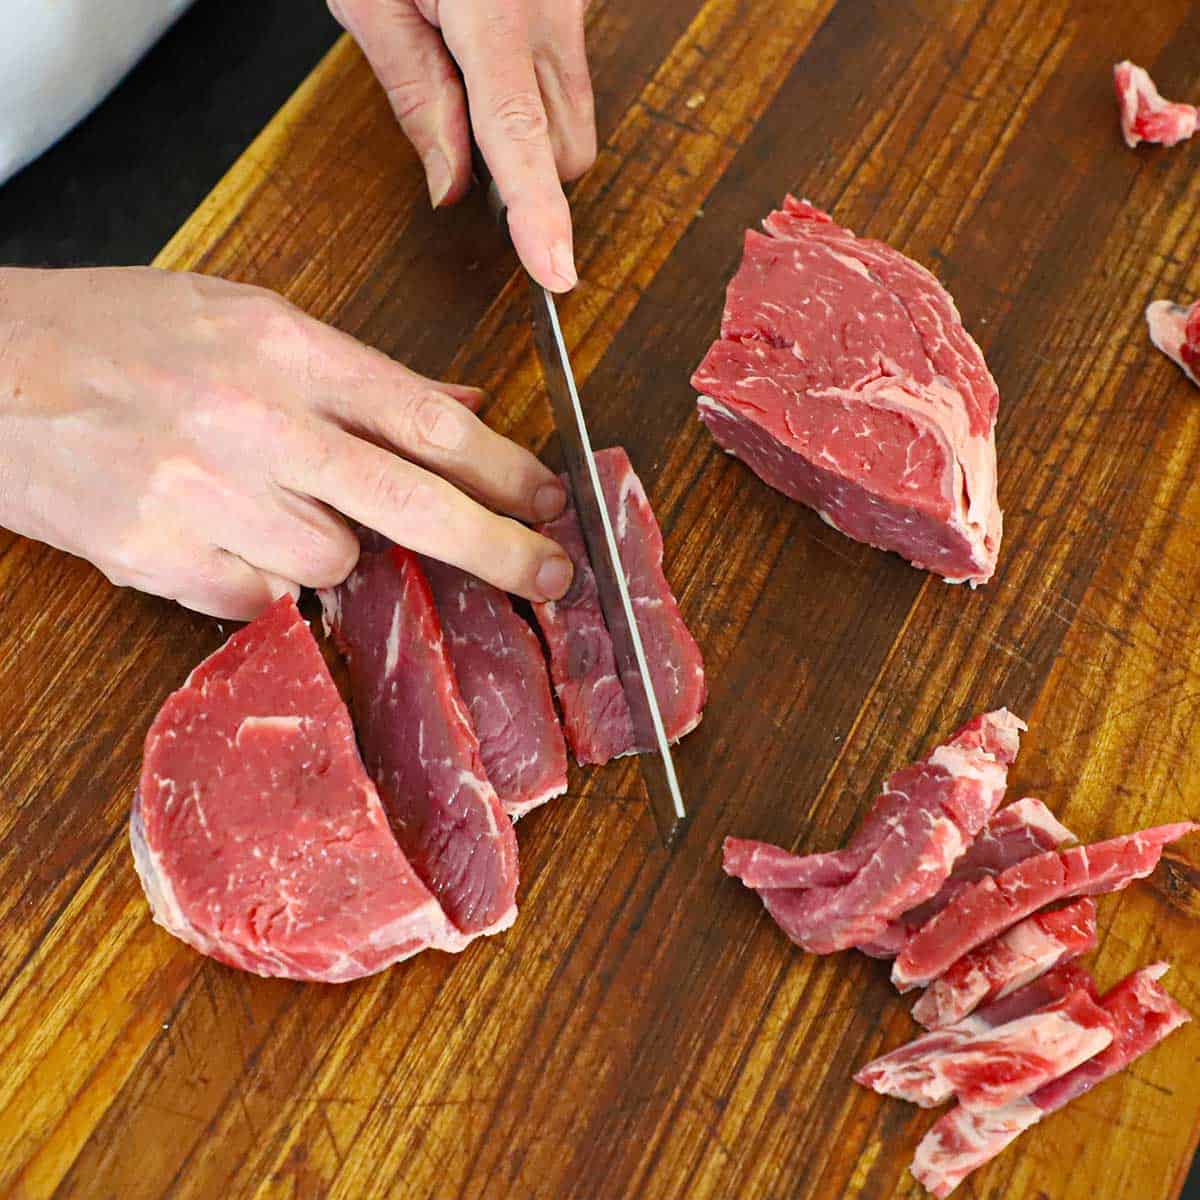
  1. Step 5: Slice against the grain and then cut into bite-sized pieces.
A person pouring a small amount of soy sauce over sliced onions that are being sautéed in a small black cast-iron skillet on a gas stove.
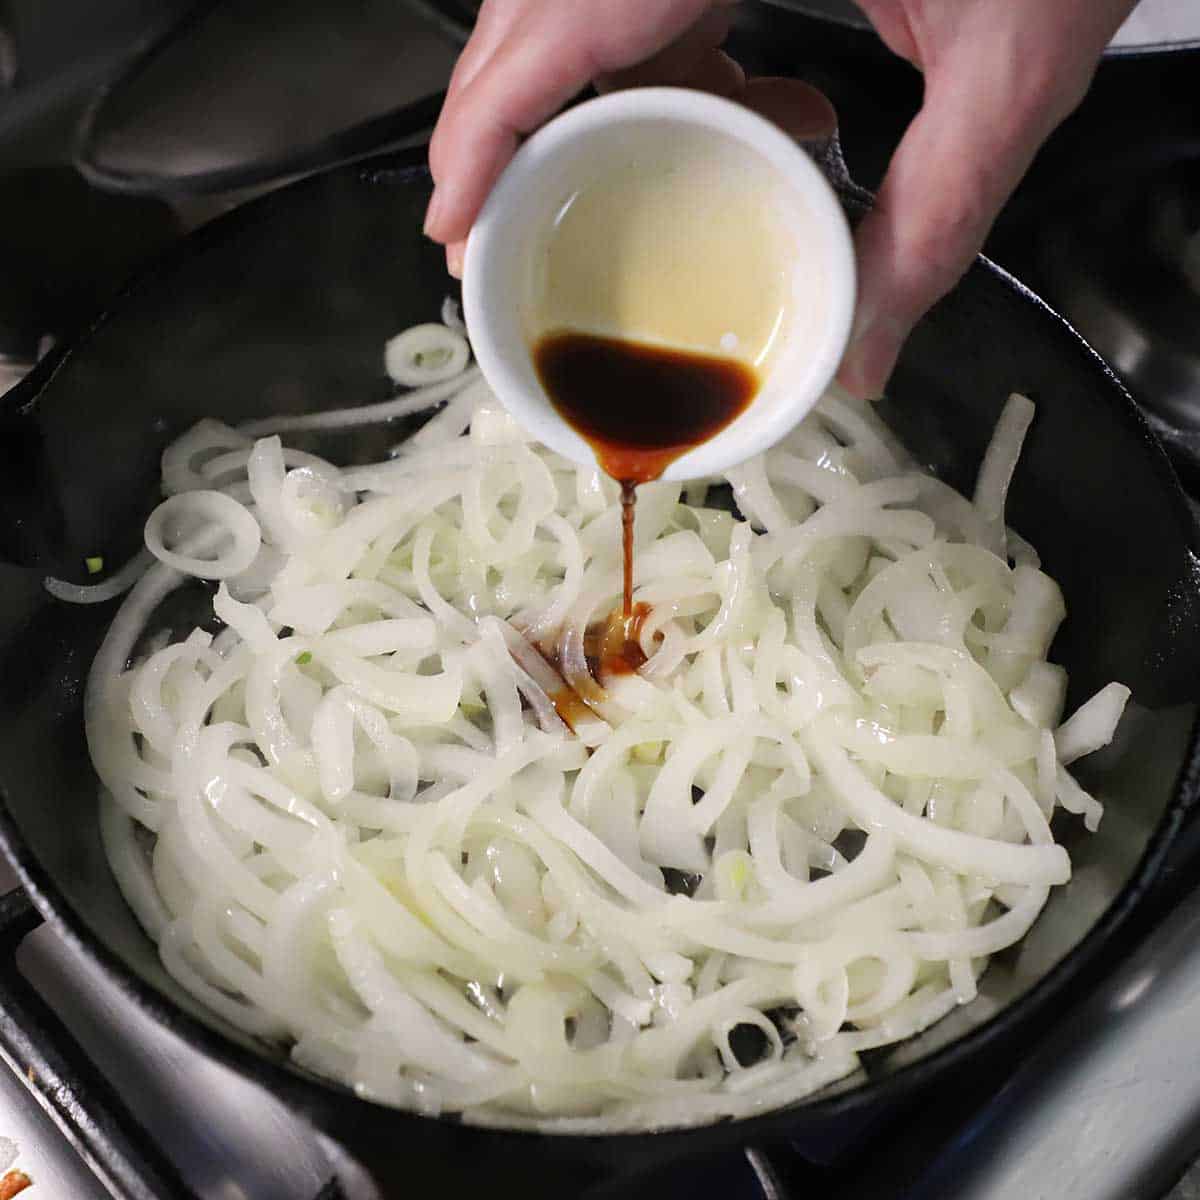
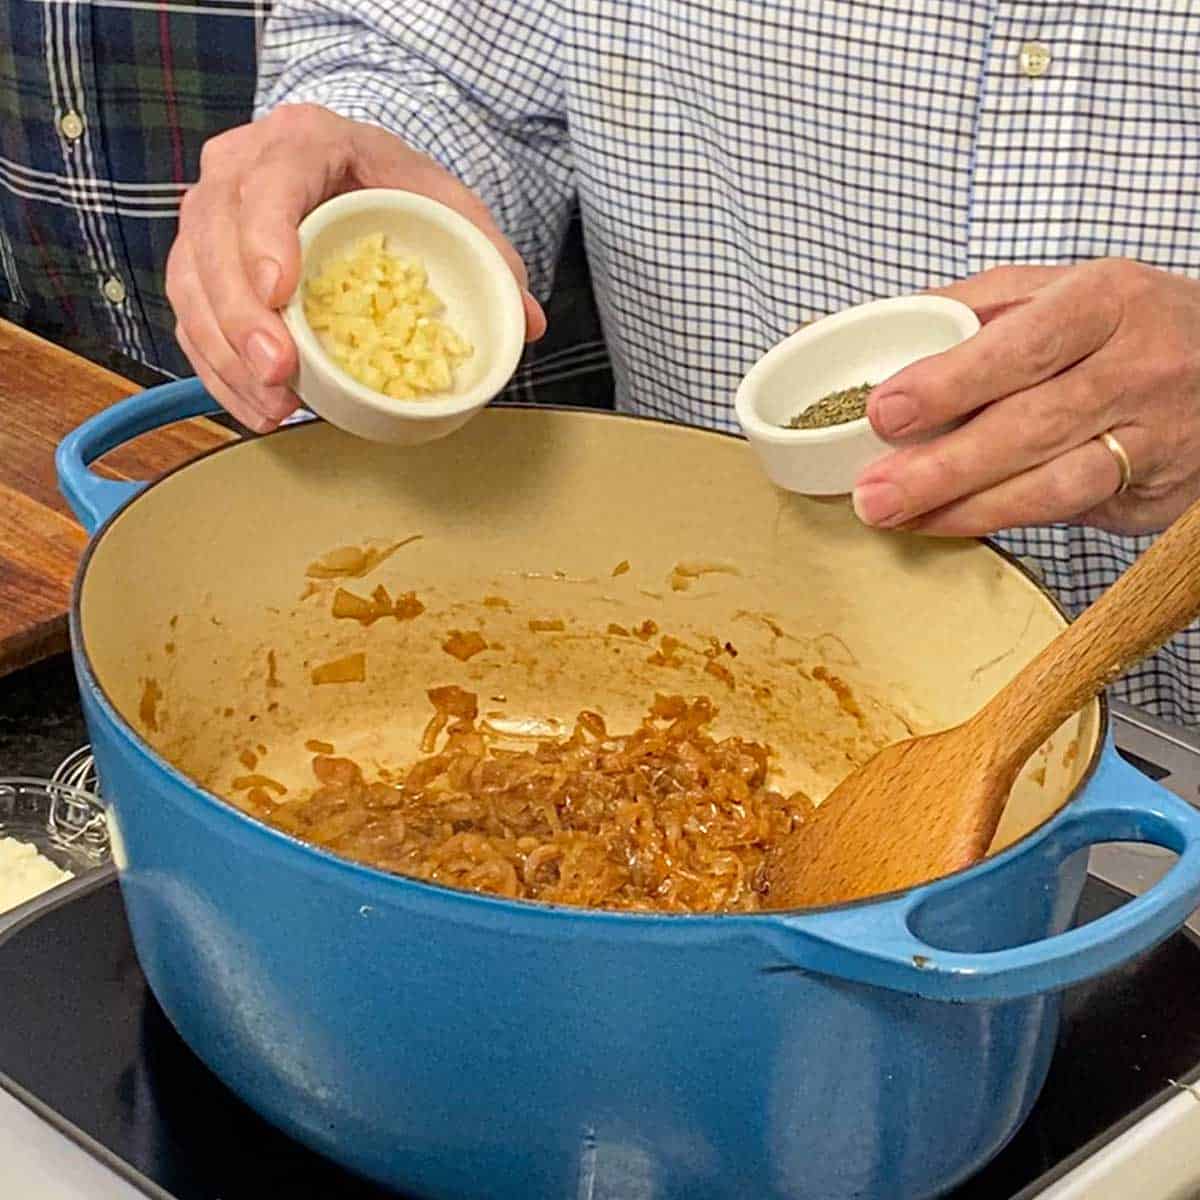
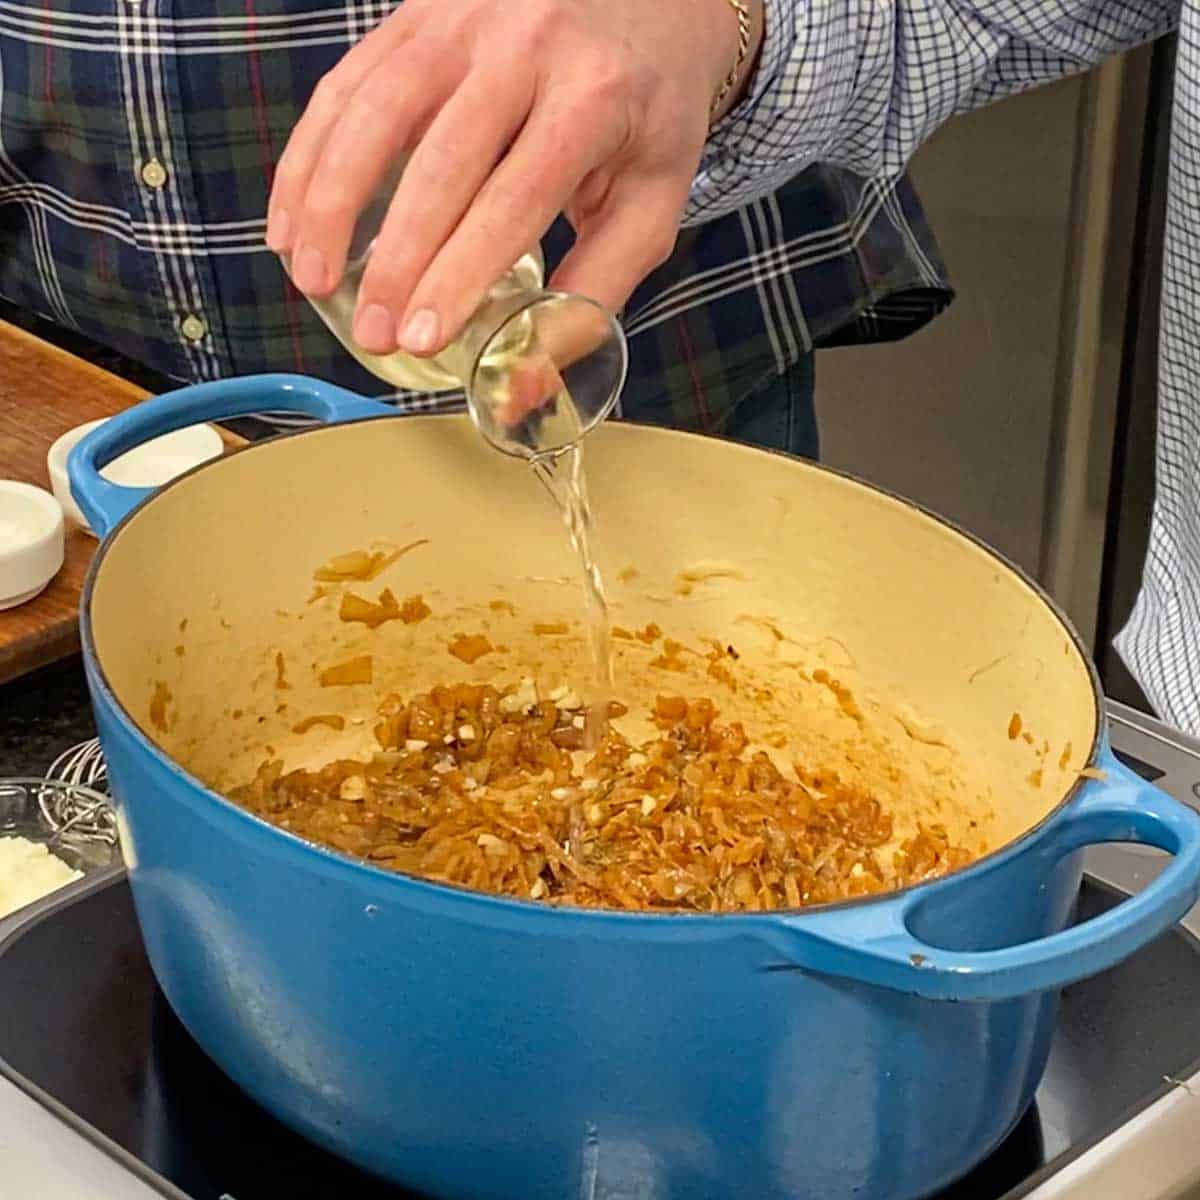
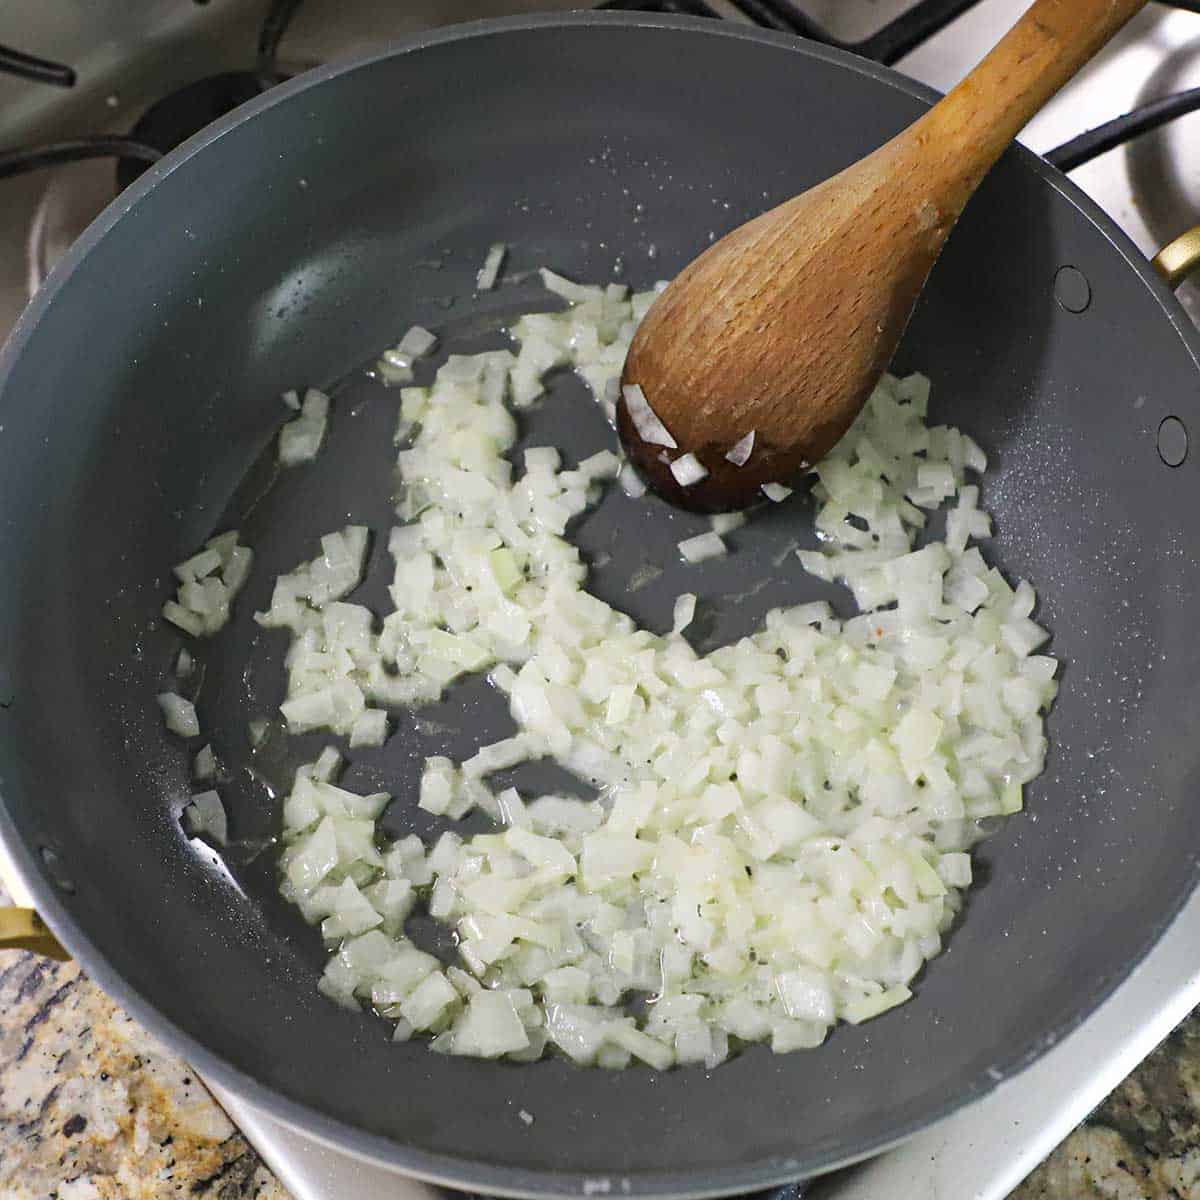
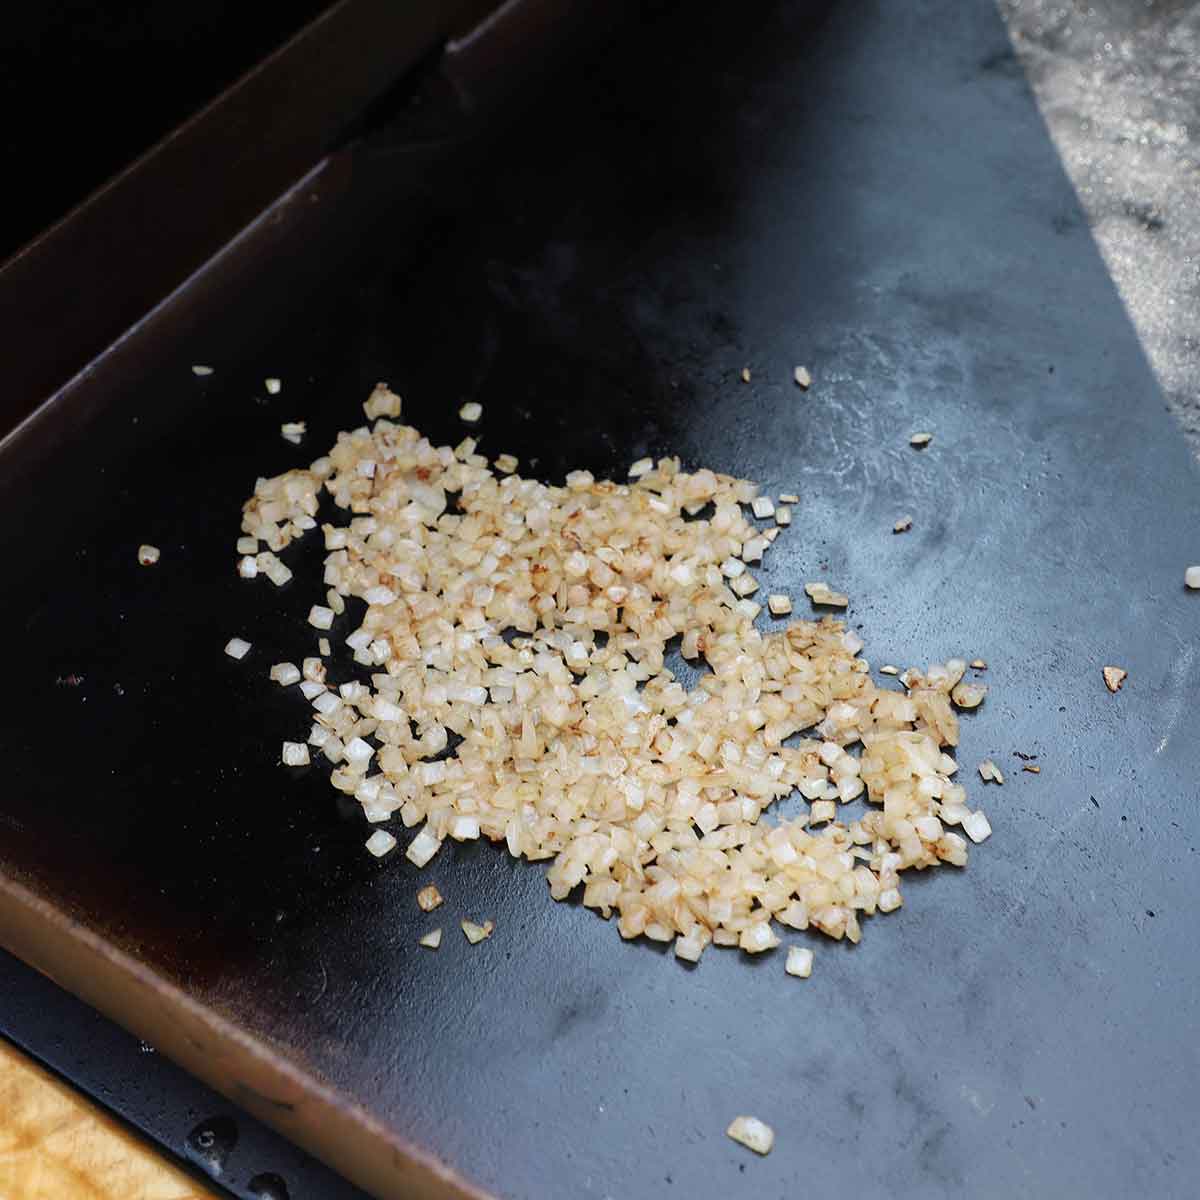
  1. Step 6: While the steak is chilling, sauté the onion slices with pork lard (or oil) and a splash of soy sauce until very tender and lightly browned, about 20 to 25 minutes

Expert Tip

For the most tender steak fajita meat, grill the steak quickly over high heat and let it rest for a few minutes before slicing thinly against the grain, which shortens the muscle fibers and keeps each bite juicy.

👨‍🍳 How to Make a Steak Fajita Quesadilla

A person placing shredded Monterey Jack cheese on one side of a large flour tortilla that is in a large non-stick skillet on a gas stove.
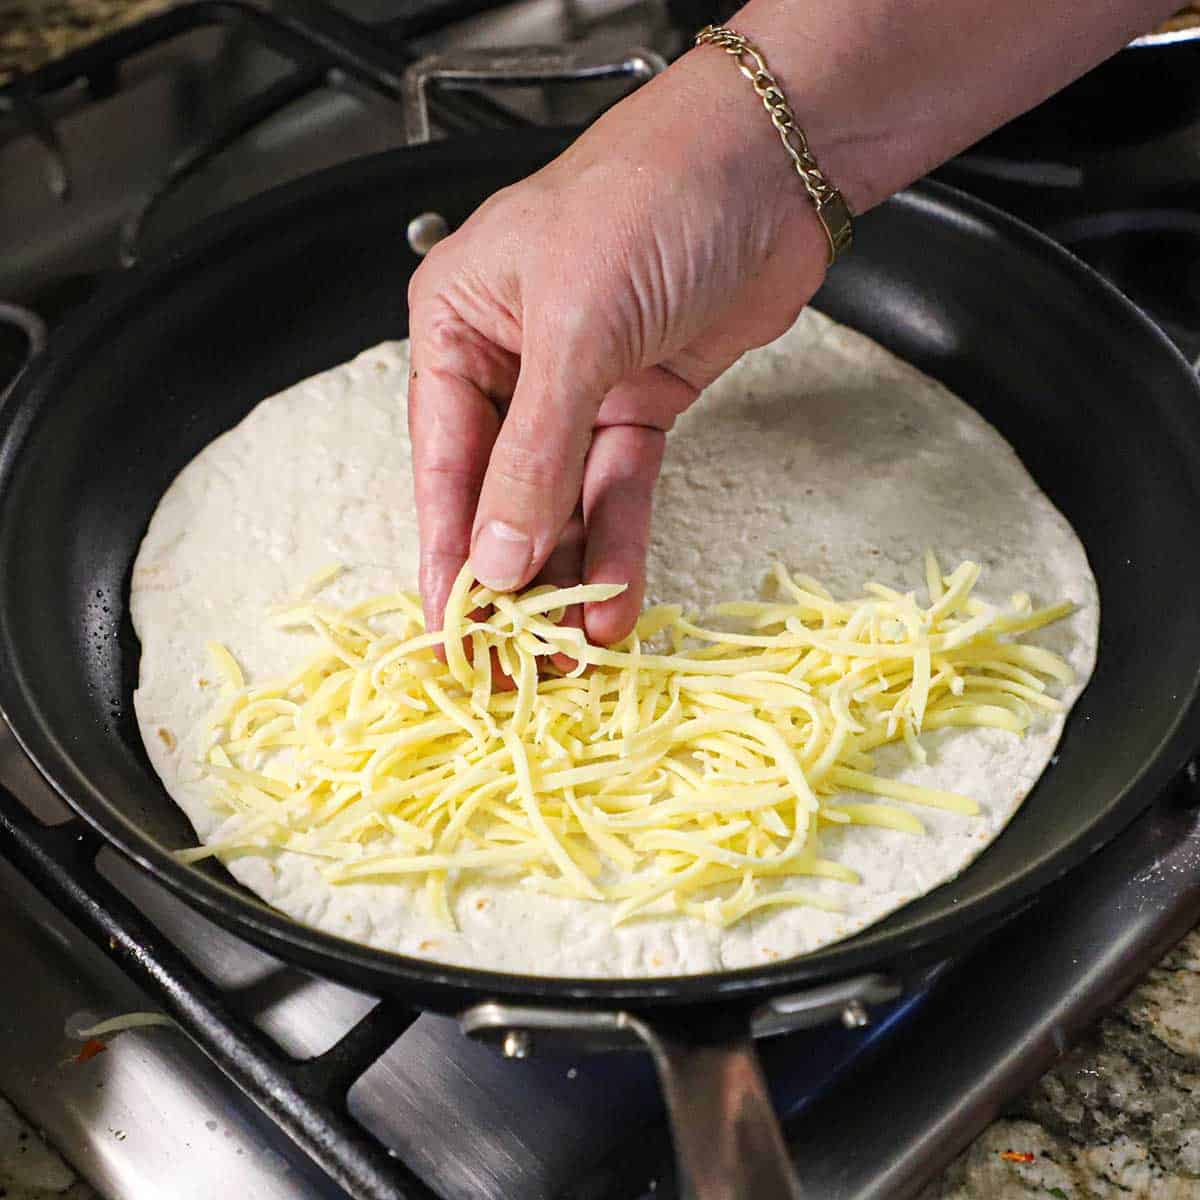
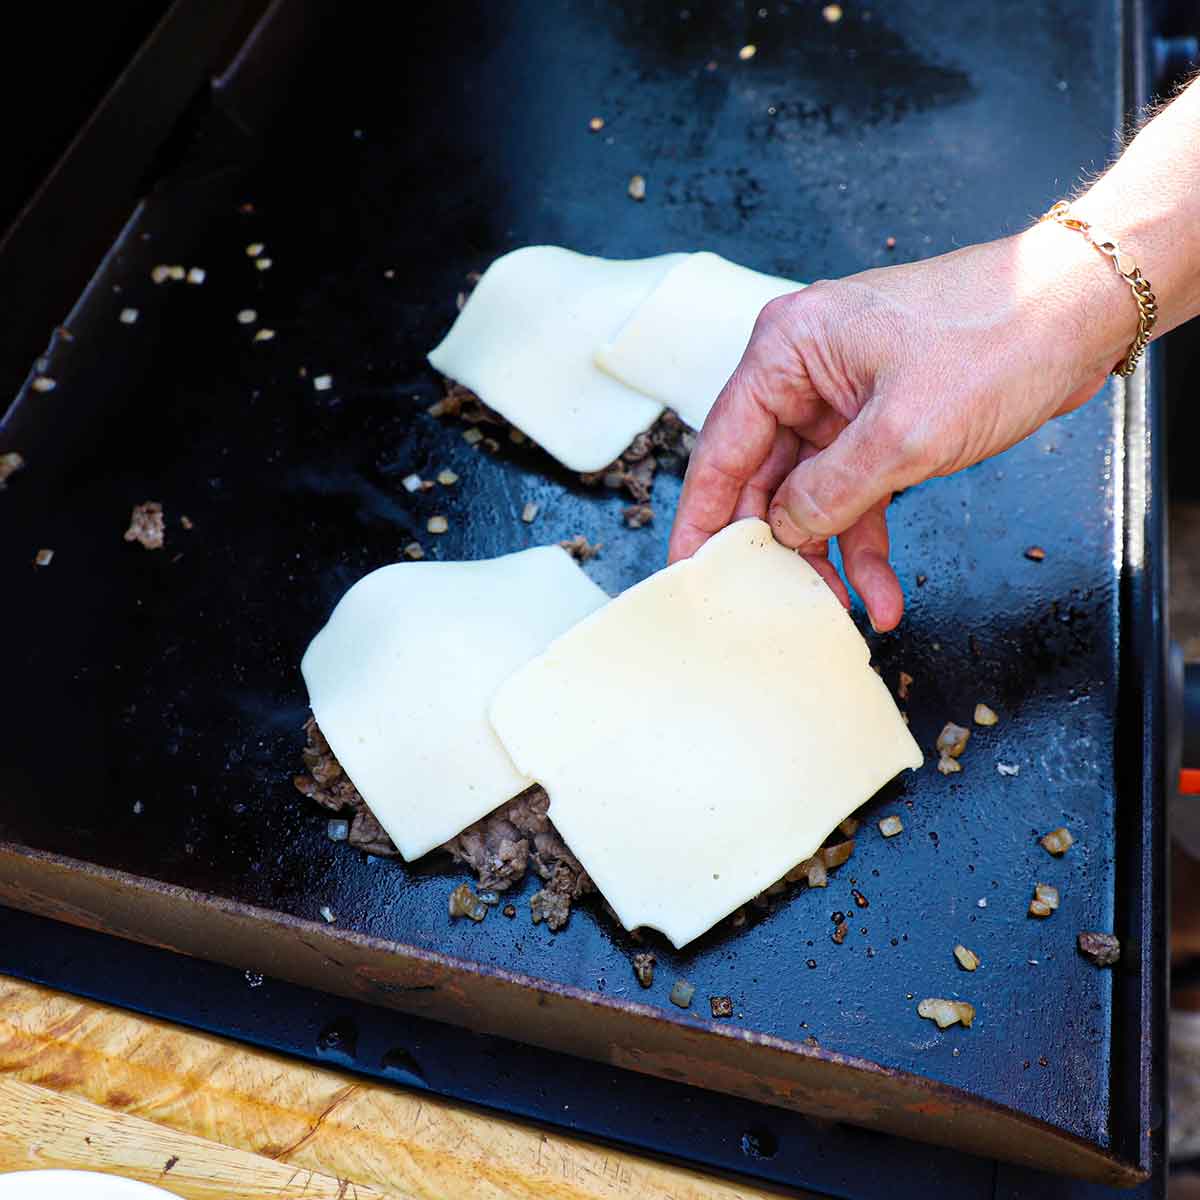
  1. Step 1: Heat a splash of vegetable oil in a large non-stick skillet. Place the tortilla in the skillet and add half a cup of shredded cheese on one half of it.
A person using a fork to place caramelized onions over slices of grilled steak fajita on top of shredded cheese on one half of a flour tortilla in a non-stick skillet.
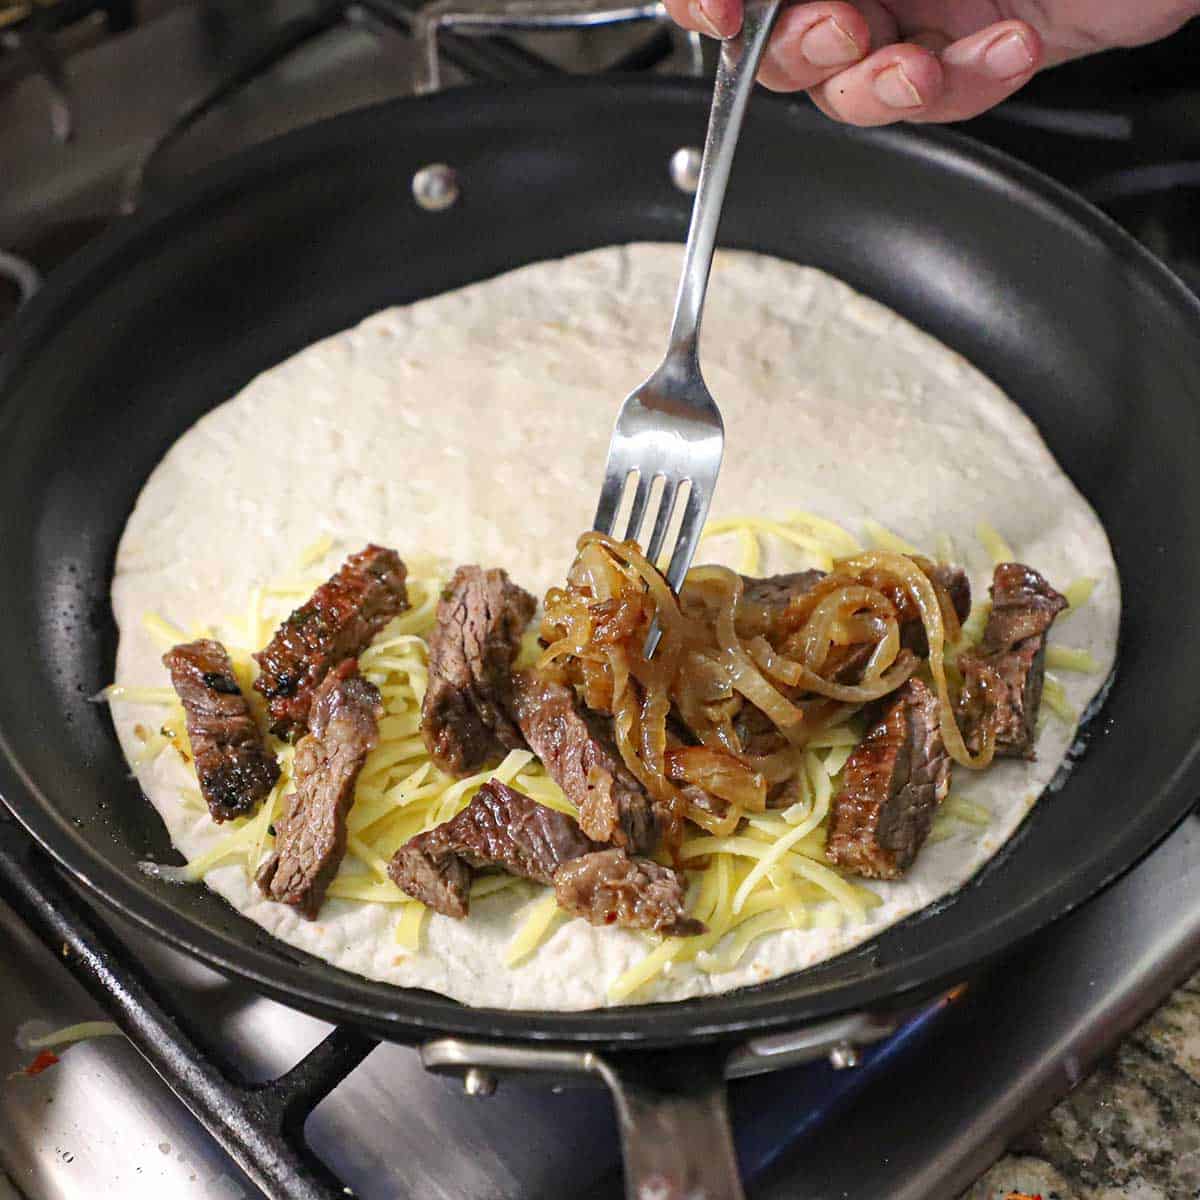
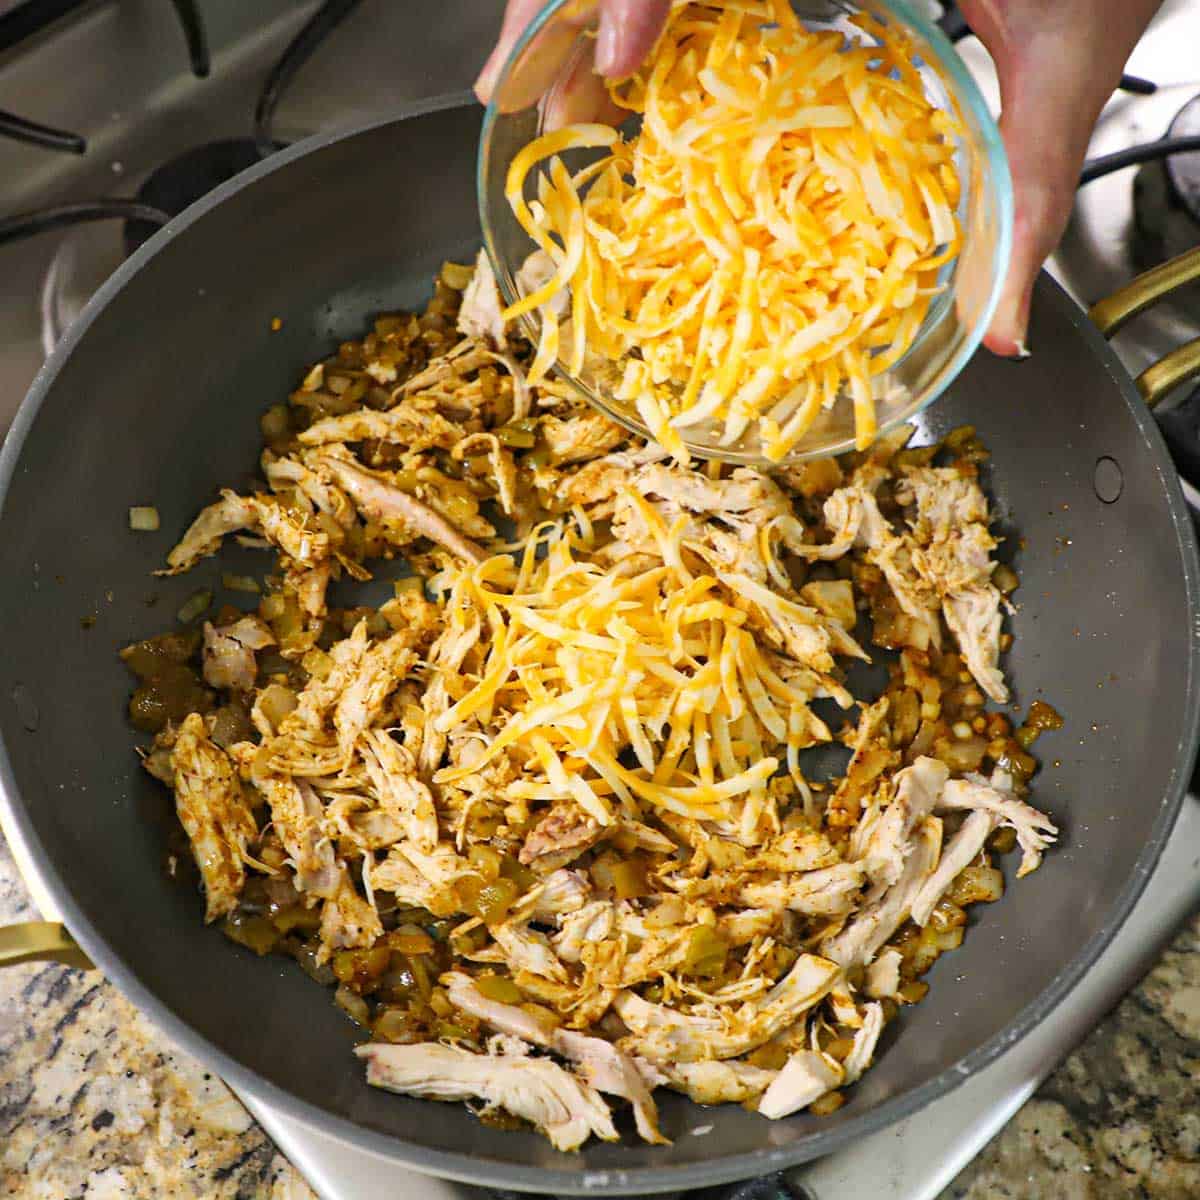
  1. Step 2: Add a layer of the cooked steak fajita meat and a thin layer of the caramelized onions.
A person placing shredded Monterey Jack cheese over the top of sliced steak fajita meat, caramelized onions, and more melty cheese on a flour tortilla in a skillet over a gas flame.
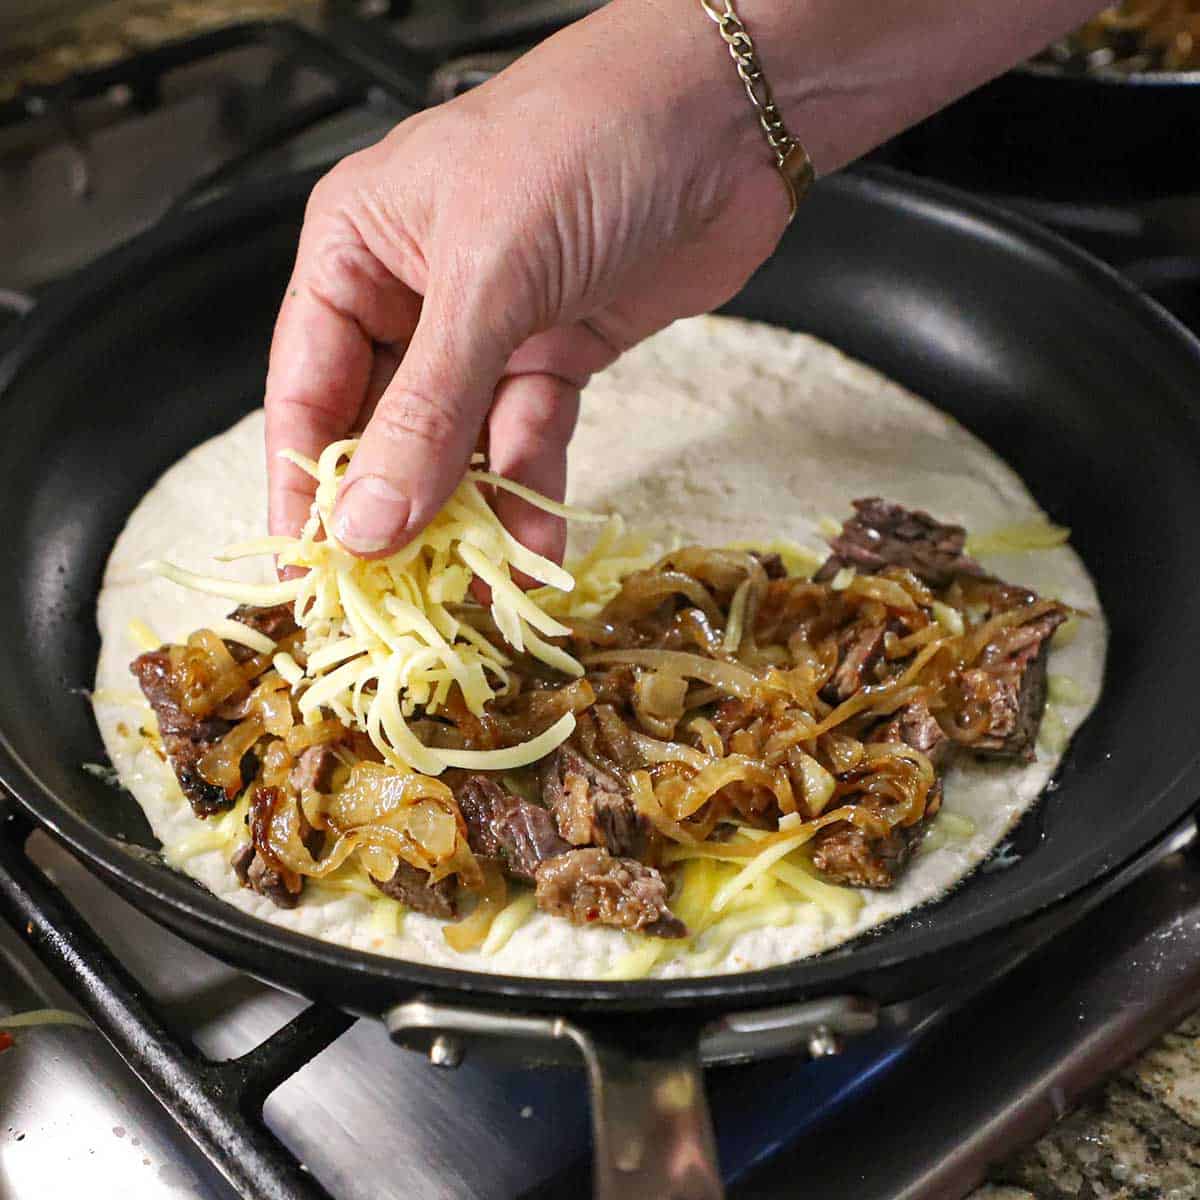
  1. Step 3: Top with a little more shredded cheese.
A person using a fork to press down one side of a flour tortilla that has been folder over steak fajita meat, caramelized onions, and cheese to for a taco-shaped quesadilla.
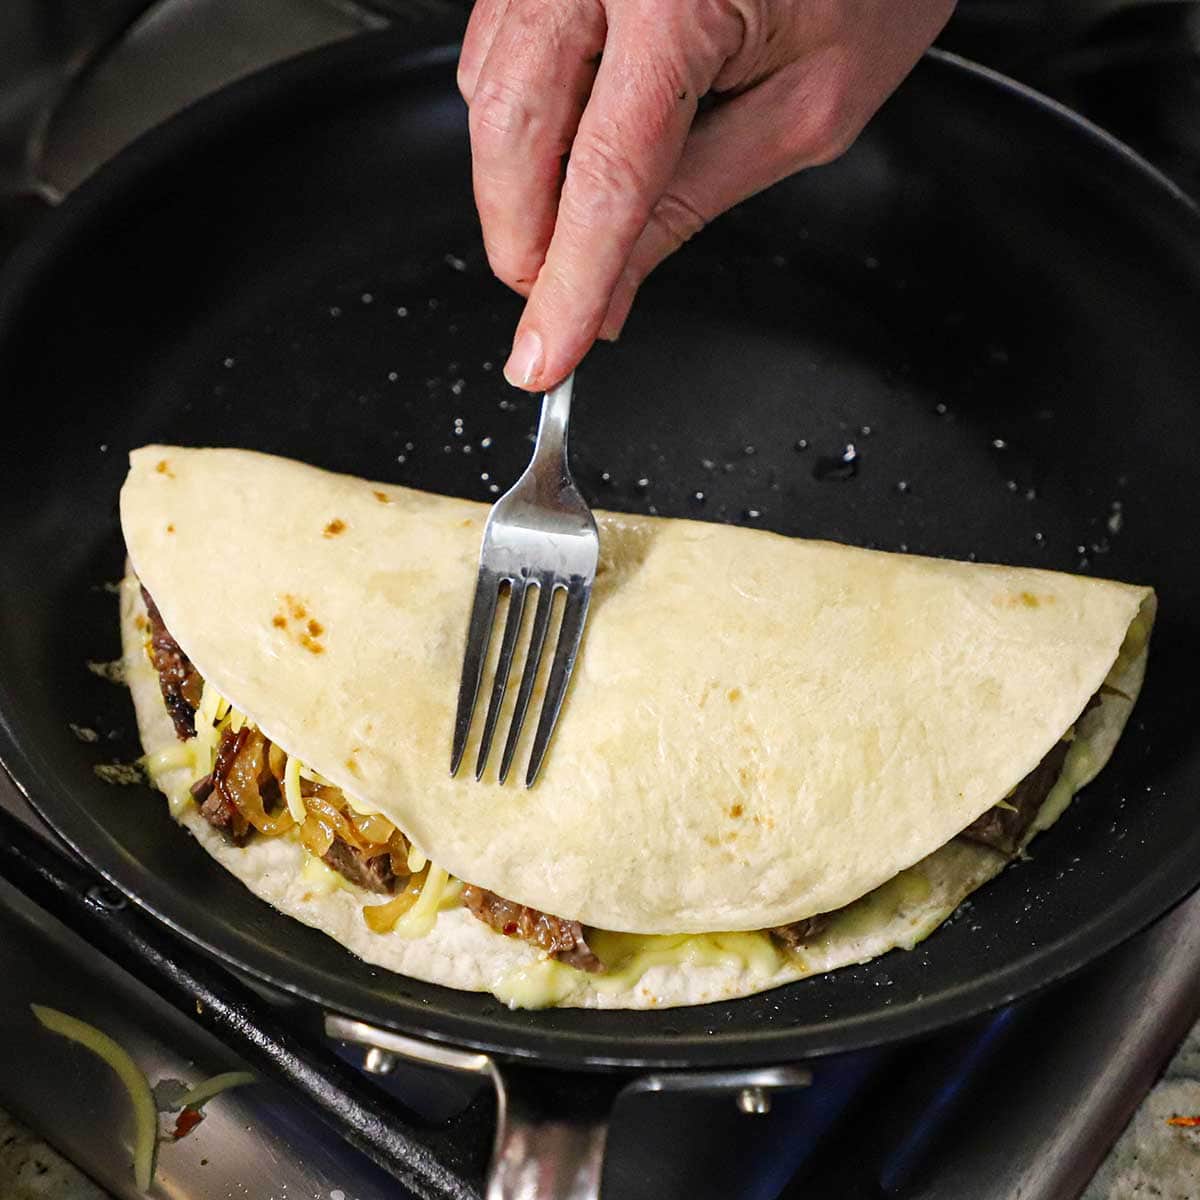
  1. Step 4: Fold the tortilla over and press it into the cheese.
A large steak fajita quesadilla that is being lightly browned in a large non-stick skillet with a little oil over a gas flame.
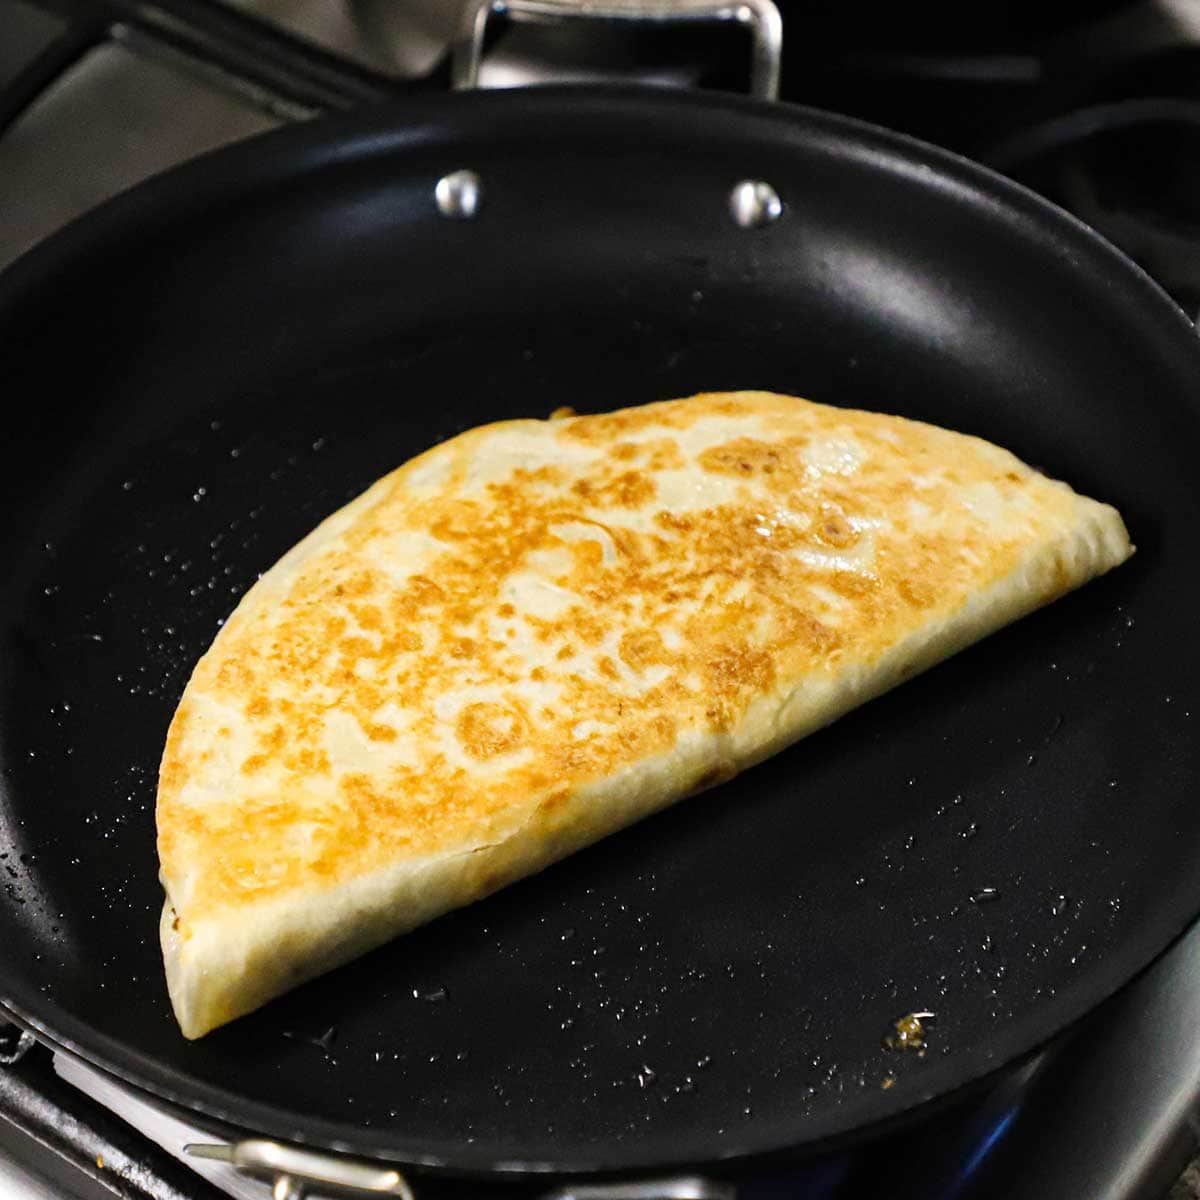
  1. Step 5: Cook on both sides until lightly browned and the cheese is melty.
A person using a large chef's knife to cut a freshly prepared steak fajita quesadilla into thirds on a large wooden cutting board.
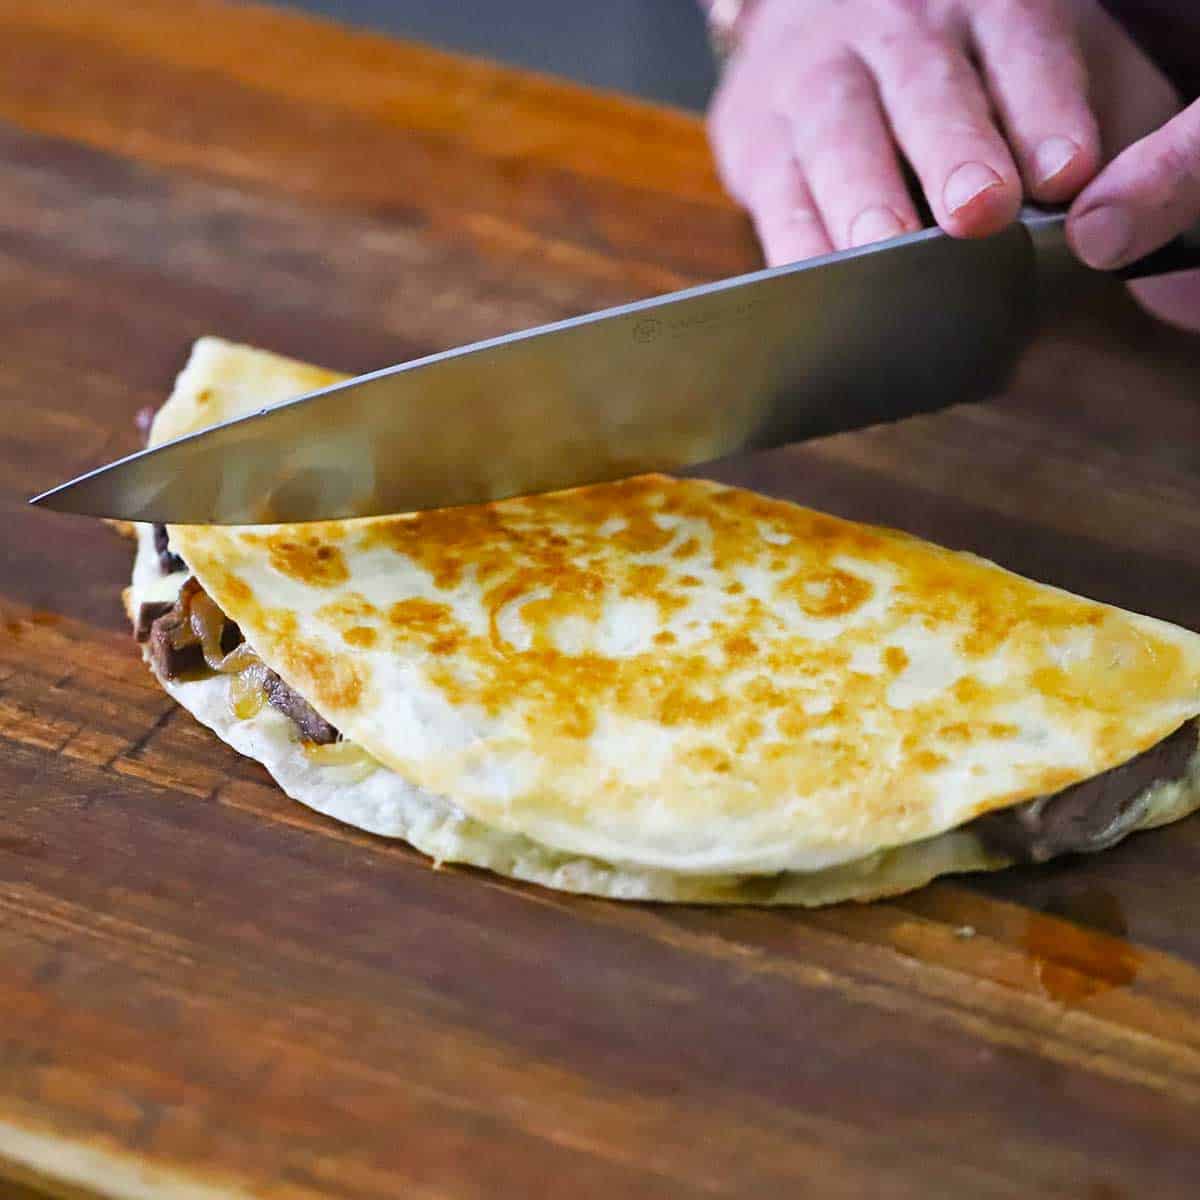
  1. Step 6: Cut into thirds and serve at once.

Expert Tip

For easier skillet handling, fold a large tortilla over the filling into a taco‑shaped half‑moon and cook until crisp, then cut into thirds; for classic wedges, use fajita‑size tortillas and carefully flip the whole quesadilla to create six evenly browned, perfectly sliced triangles. This is how we prepare our Best-Ever Chicken Quesadilla.

🍽️ How to Serve

  • Slice the quesadilla into three or six triangles for easy sharing.
  • Serve hot with sour cream on the side for dipping.
  • Add homemade pico de gallo and restaurant-style salsa for freshness and acidity.
  • Include best‑ever guacamole for a creamy, flavorful contrast.
  • Garnish with extra chopped cilantro or a squeeze of fresh lime, if desired.
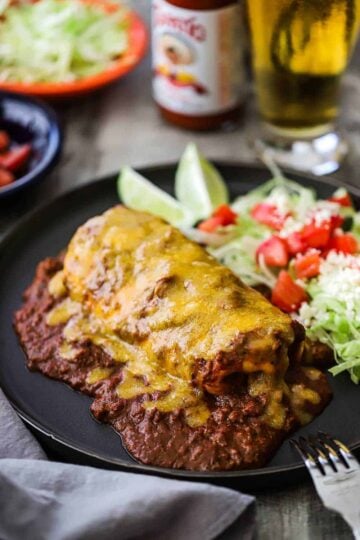
  • Pair with Mexican rice and authentic refried beans to turn it into a full meal.

🙋🏽‍♂️ Frequently Asked Questions

What cut of steak works best for Steak Fajita Quesadilla?

Skirt steak is ideal because of its bold flavor and tender texture when sliced properly, though flank steak, flap steak, or flat-iron are all good alternatives.

Can Steak Fajita Quesadilla be made ahead of time?

The components can be prepared in advance, but assembling and cooking just before serving gives the best texture.

How do I keep Steak Fajita Quesadilla from getting soggy?

Make sure the fillings aren’t overly wet, and cook the quesadilla in a lightly oiled skillet until crisp and golden.

Can Steak Fajita Quesadilla be cooked on the stovetop instead of grilled?

Yes, the steak can be cooked in a hot skillet or grill pan with great results.

What cheese melts best in a Steak Fajita Quesadilla?

Cheeses that melt smoothly, such as Monterey Jack or a mild pepper jack, work best.

Can Steak Fajita Quesadilla be made spicier?

Increase the heat by adding extra red pepper flakes, spicy seasoning, or serving with a hot salsa. Or, sauté the onions with chopped fresh jalapeños or serrano peppers

🌮 Other Classic Tex-Mex Favorites

  • An oval white platter with a layer of shredded lettuce on the bottom topped with a row of chicken flautas surrounded by bowls of salsa, guacamole, and pico de gallo.
    Chicken Flautas
  • A blue plate filled with a smothered beef burrito with chili con carne sitting next to a salad topped with diced tomatoes.
    Smothered Beef Burritos with Chili Con Carne
  • A nine by thirteen inch white casserole dish filled a row of chicken enchiladas with sour cream sauce.
    Chicken Enchiladas with Sour Cream Sauce
  • Two rows of crispy beef tacos resting on two taco holders with chopped tomatoes and shredded cheese scattered around them.
    Authentic Tex-Mex Beef Tacos

Ready to make the best quesadilla this side of San Antonio? Go for it!

And when you do, be sure to take a photo of it, post it on Instagram, and tag @HowToFeedaLoon and hashtag #HowToFeedaLoon!

A stack of three freshly prepared fajita steak quesadillas sitting on a wooden cutting board next to a small bowl filled with homemade guacamole.
Print Recipe
No ratings yet

Steak Fajita Quesadilla

This steak fajita quesadilla is filled with boldly marinated, perfectly grilled steak, melty cheese, and caramelized onions, all tucked inside a crispy, golden tortilla and served with fresh, classic toppings.
Prep Time20 minutes mins
Cook Time30 minutes mins
Chill time2 hours hrs
Total Time2 hours hrs 50 minutes mins
Course: Appetizer / Entree
Cuisine: Tex-Mex, Mexican
Servings: 4
Calories: 487kcal
Author: Kris Longwell

Equipment

  • Gas, charcoal, or electric grill see NOTES for alternatives
  • 1 Large skillet (12-inch) preferably non-stick

Ingredients

For the Marinade and Steak Fajitas

  • ½ cup lime juice
  • 3 cloves garlic minced
  • 3 tablespoon cilantro fresh, chopped
  • 2 tablespoon vegetable oil
  • ½ teaspoon red pepper flakes
  • 1 lb skirt steak

For the Fajita Seasoning

  • 1 tablespoon cornstarch
  • 2 teaspoon chili powder
  • 1 tablespoon salt
  • 1 teaspoon smoked paprika
  • ½ teaspoon onion powder
  • ½ teaspoon garlic powder
  • ½ teaspoon ground cumin
  • ¼ teaspoon ground cayenne

For the Caramelized Onions

  • 2 large onions yellow or white, thinly sliced
  • 2 tablespoon pork lard or vegetable oil

For the Quesadillas

  • vegetable oil for lightly browning the quesadillas
  • 2 flour tortillas burrito size
  • 2 cups Monterey Jack cheese shredded, preferably from a block
  • fresh pico de gallo for serving
  • sour cream for serving
  • homemade guacamole

Instructions

Marinate the Steak

  • Mix together the ingredients for the marinade in a medium-sized bowl. Place the steak in a large freezer baggie or a shallow dish and pour the marinade over it. Seal the baggie (or cover the dish) and refrigerate for at least 30 minutes, or even better, 2 to 3 hours (no more than 4 hours).
    ½ cup lime juice, 3 cloves garlic, 3 tablespoon cilantro, 2 tablespoon vegetable oil, ½ teaspoon red pepper flakes, 1 lb skirt steak
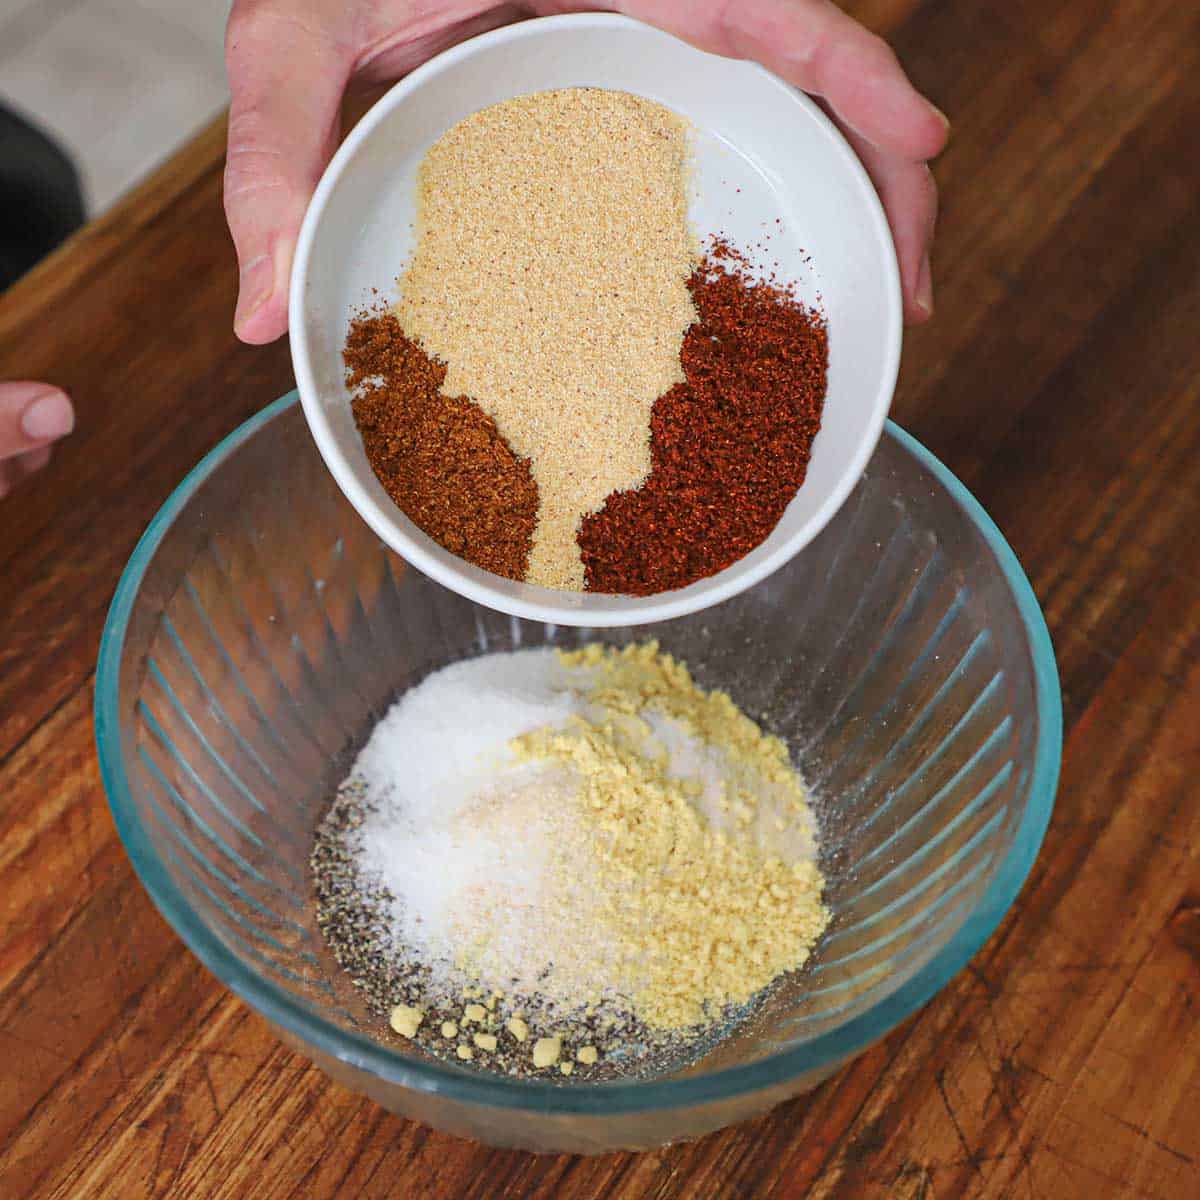
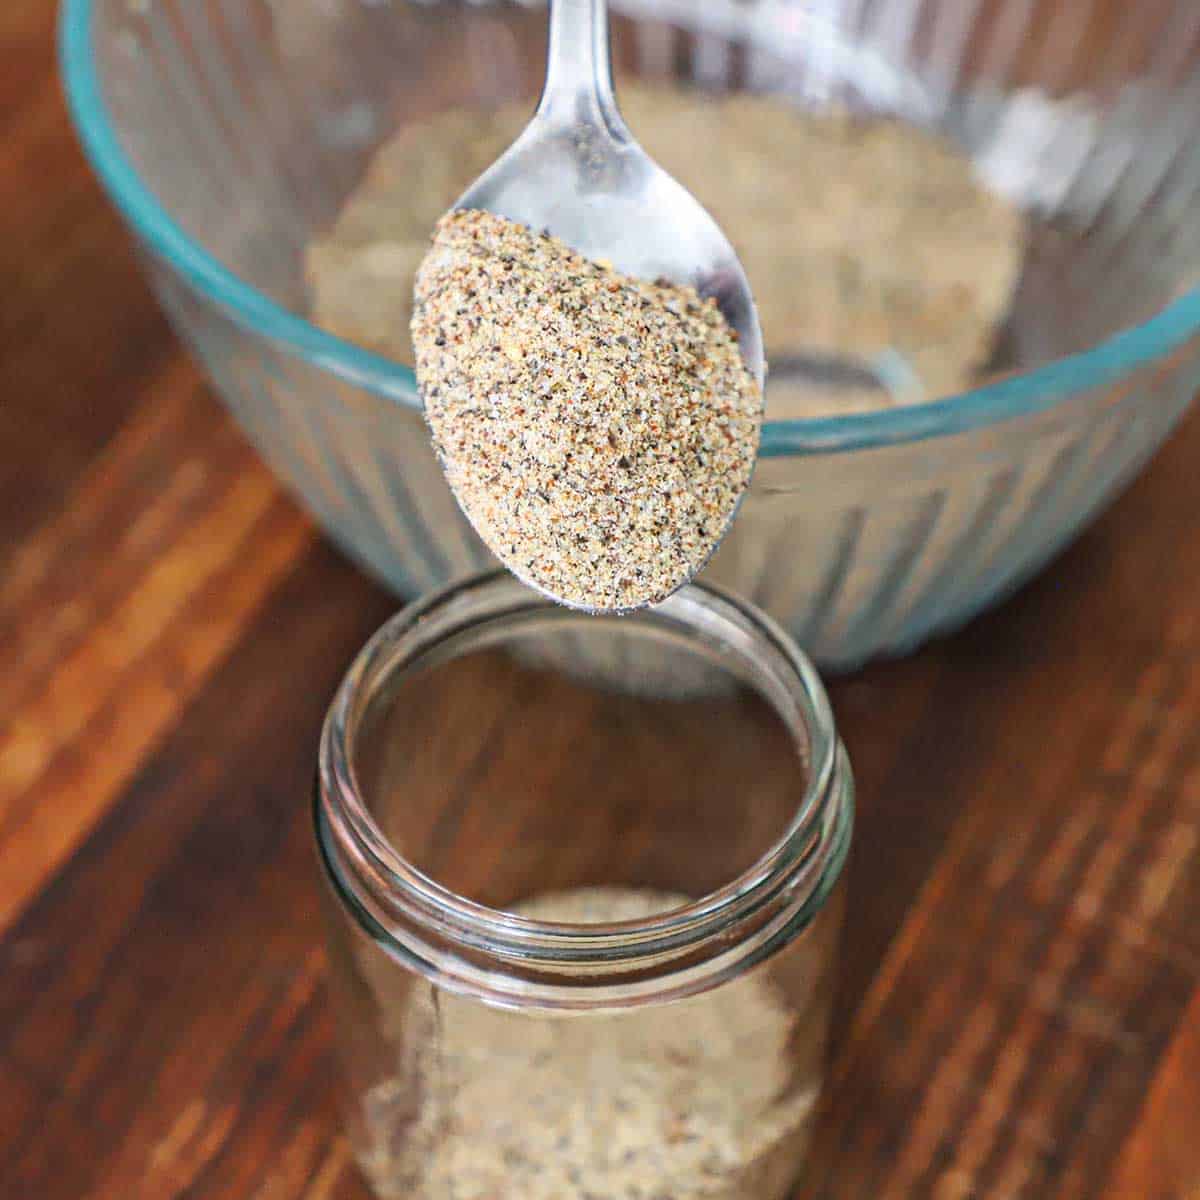
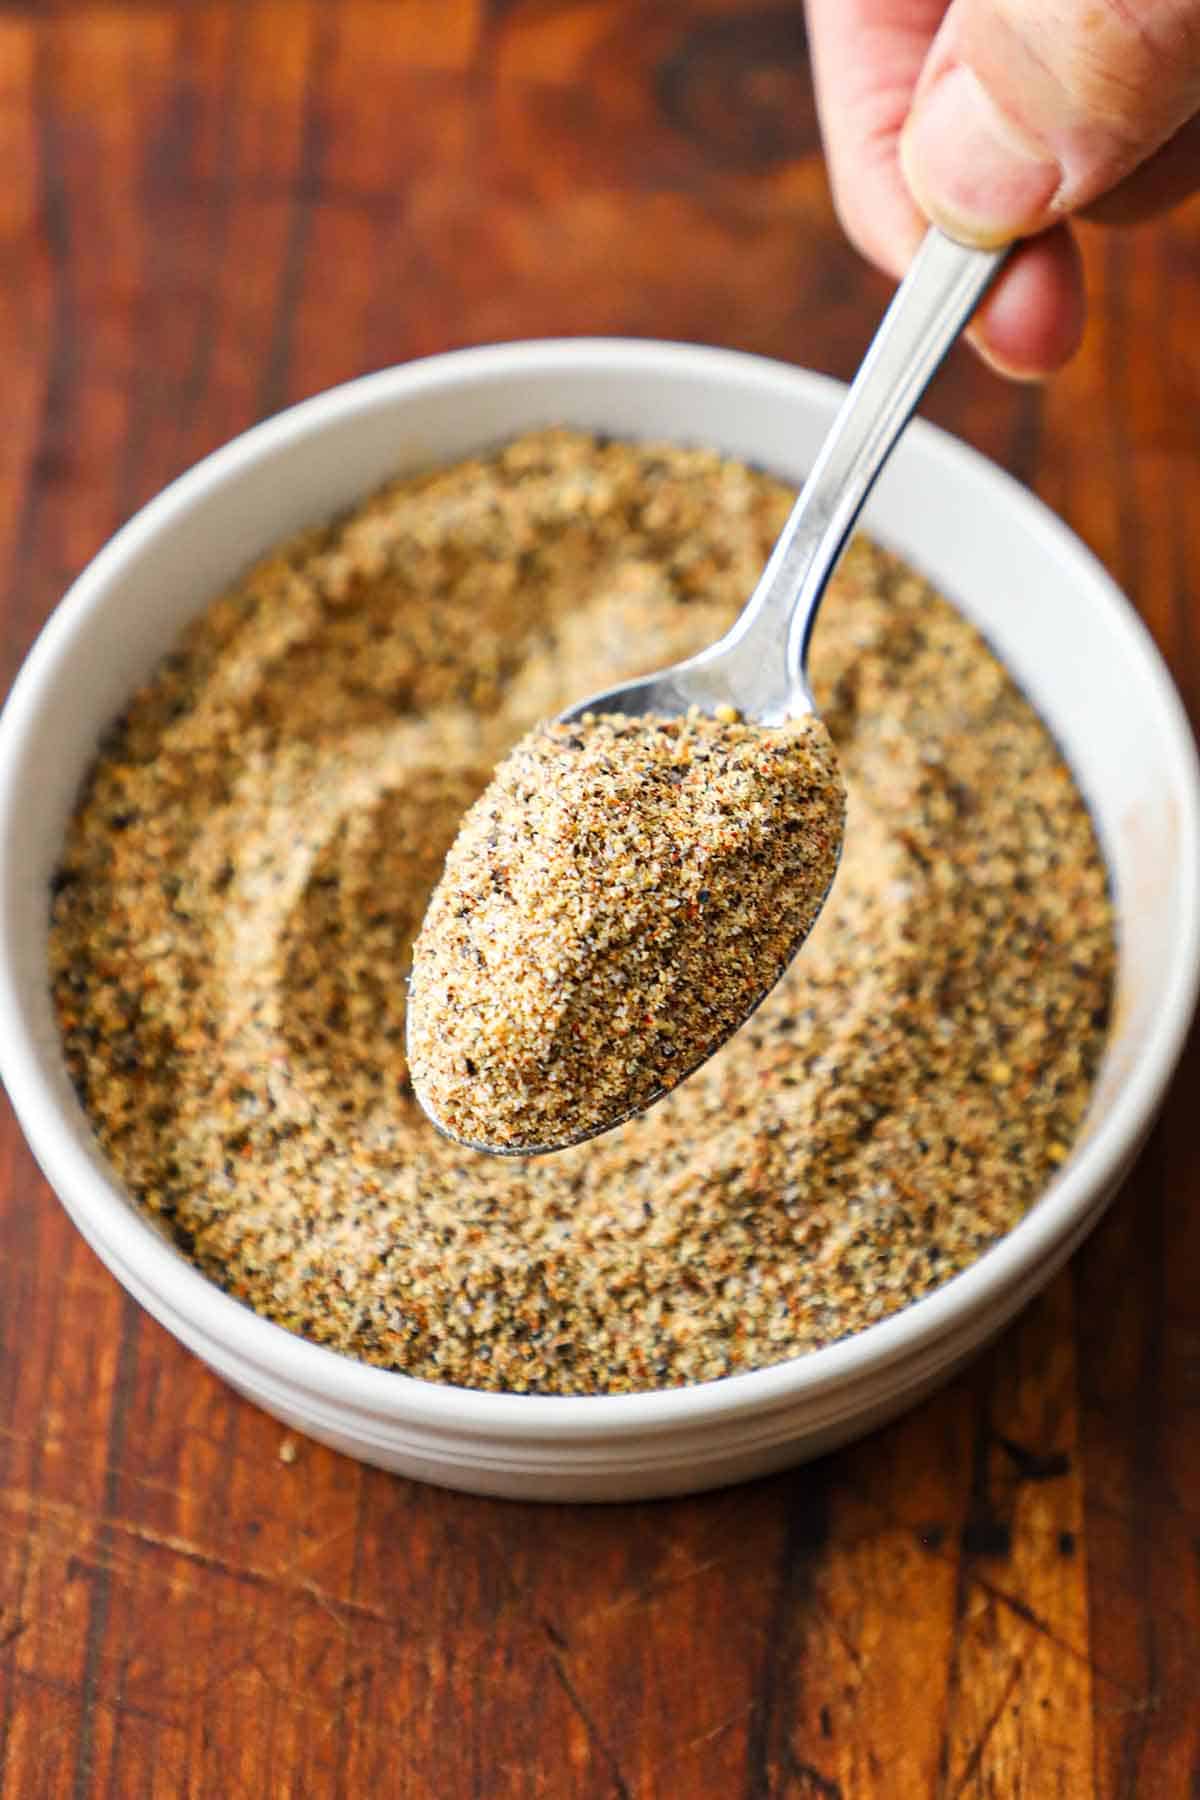
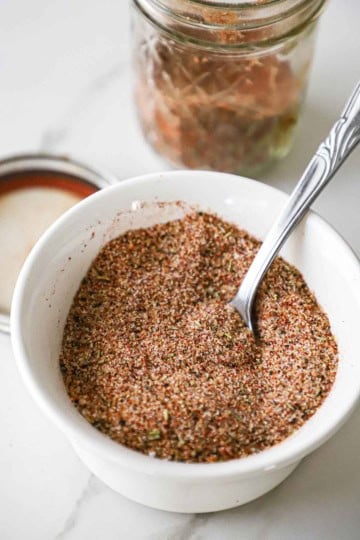
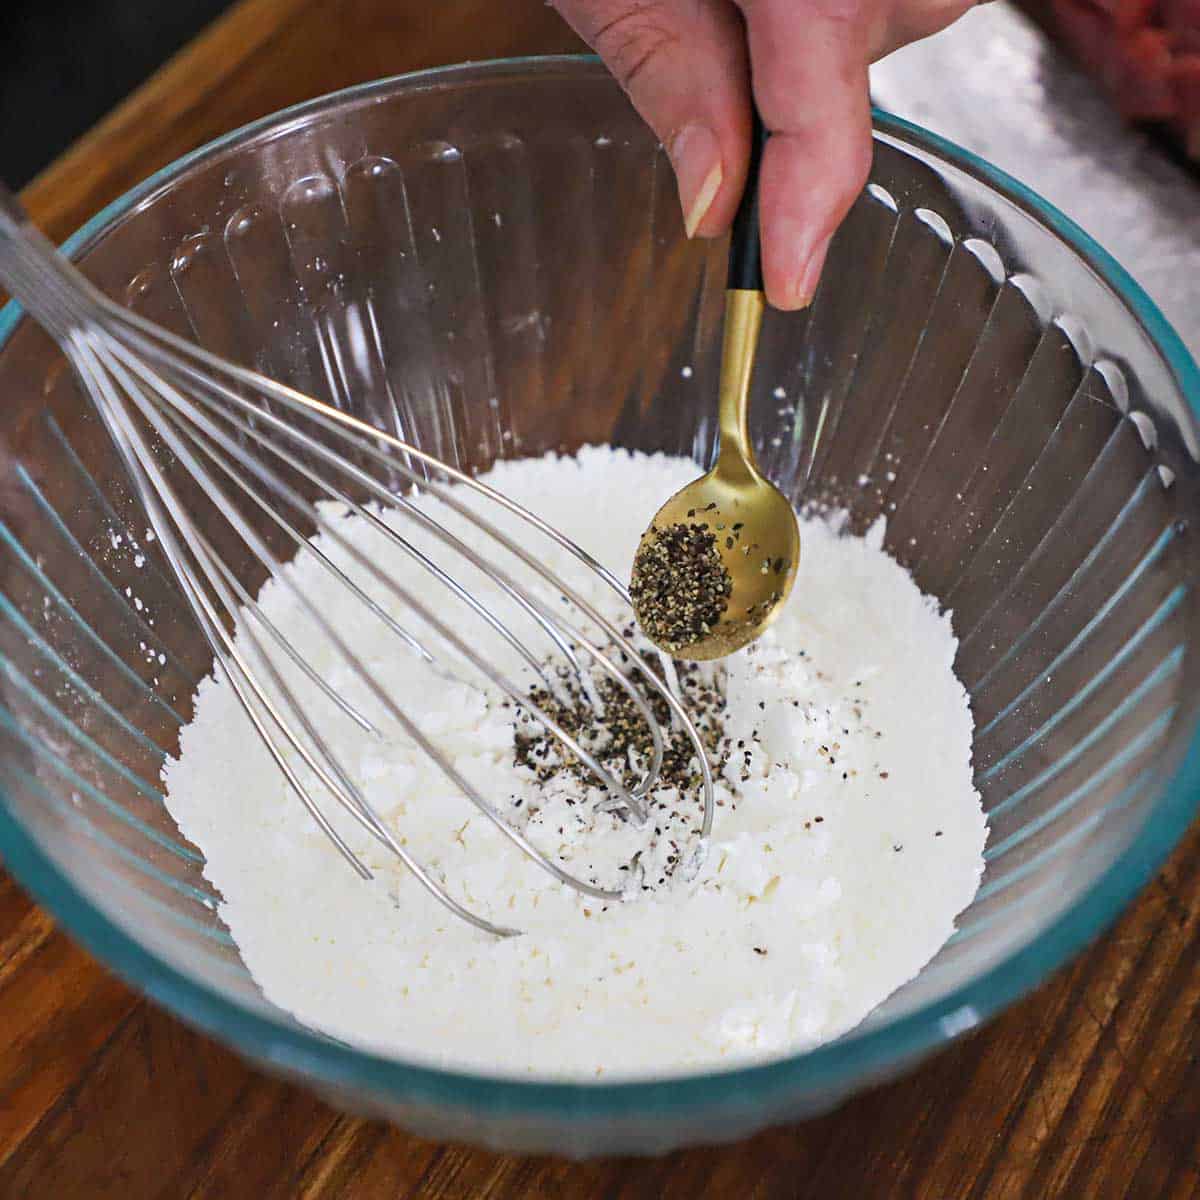
  • Meanwhile, combine the fajita seasoning in a small bowl. Cover and set aside.
    1 tablespoon cornstarch, 2 teaspoon chili powder, 1 tablespoon salt, 1 teaspoon smoked paprika, ½ teaspoon onion powder, ½ teaspoon garlic powder, ½ teaspoon ground cumin, ¼ teaspoon ground cayenne

Grill the Seak and Prepare the Quesadillas

  • Add the pork lard (or vegetable oil) to a medium skillet over medium heat. Add the onions and sauté for 15 minutes. Stir in the soy sauce, and sauté for another 10 to 15 minutes, until very soft and starting to darken. Set aside (this can be done up to 1 day in advance).
    2 large onions, 2 tablespoon pork lard
  • Remove the steak from the marinade, shaking off excess. Discard the marinade.
  • Liberally sprinkle the steak all over with the fajita seasoning.
  • Prepare your grill for direct heat. Add the skirt steak over direct heat and cook for about 5 minutes per side, or until an internal temperature of 135 to 140°F for medium. Remove from the grill and let the meat rest on a cutting board for 5 to 10 minutes. Slice the meat into thin strips, against the grain. If desired, cut the strips into smaller bite-sized pieces. Set aside.
  • Preheat oven to 225°F.
  • Heat about 1 tablespoon of oil in a large skillet, preferably non-stick, over medium heat. Place a tortilla in the skillet and spin it around to fully coat the underside with the oil. Place about ½ cup of shredded cheese on one half of the tortilla. Top that with a layer of the chopped steak fajita meat. Spoon on a thin layer of caramelized onions. Top with ¼ cup of cheese. Fold the other half of the tortilla over and cook until the underside is brown and starting to crisp up.
    vegetable oil, 2 flour tortillas, 2 cups Monterey Jack cheese
  • Flip the quesadilla (it will resemble a large soft flour taco) and cook until browned on the other side. Keep warm in the oven (on a baking sheet) while you prepare the other quesadilla.
  • Use a sharp knife (or pizza cutter) to cut the quesadillas into three triangles. Serve at once with sour cream, pico de gallo, and guacamole.
    fresh pico de gallo, sour cream, homemade guacamole

Video

Notes

NOTE: Watch the video in the recipe card for visual guidance.
  • Seasoning & Salt: If using a store‑bought fajita seasoning, check whether it contains salt before adding extra; our homemade fajita seasoning already includes salt.
  • Marinating Time: A few hours is ideal for flavor without compromising texture; avoid overnight marinating due to the lime juice.
  • Cheese Tip: Shred cheese fresh for the smoothest melt and best coverage.
  • Steak Slicing: Always slice the steak thinly and against the grain for maximum tenderness.
  • Skillet Cooking: Use a little oil in the skillet to achieve a crispy, golden tortilla.
  • Heat Level: Adjust spice to taste by increasing or decreasing the red pepper flakes or serving with a spicier salsa.
  • Serving Timing: Quesadillas are best served immediately while the tortillas are crisp and the cheese is fully melted.

Nutrition

Calories: 487kcal | Carbohydrates: 21g | Protein: 41g | Fat: 27g | Saturated Fat: 14g | Polyunsaturated Fat: 1g | Monounsaturated Fat: 9g | Trans Fat: 0.4g | Cholesterol: 122mg | Sodium: 2294mg | Potassium: 601mg | Fiber: 3g | Sugar: 5g | Vitamin A: 1153IU | Vitamin C: 16mg | Calcium: 486mg | Iron: 4mg

Homemade Lobster Mac and Cheese

December 23, 2025 by Kris Longwell 2 Comments

An overhead view of an oval baking dish filled with homemade lobster mac and cheese topped with pink lobster claw meat and chopped parsley.

This homemade lobster mac and cheese takes a comfort‑food classic and turns it into something truly special. Tender chunks of lobster are folded into a rich, creamy cheese sauce and baked until bubbly and golden, making it perfect for special occasions, holidays, or when you’re craving an indulgent, restaurant‑quality meal at home.

An overhead view of an oval baking dish filled with homemade lobster mac and cheese topped with pink lobster claw meat and chopped parsley.
[feast_advanced_jump_to]

🦞 The Ingredients

This recipe combines buttery lobster and hearty pasta with a luxuriously creamy cheese sauce and a crisp, golden breadcrumb topping for the perfect balance of richness and texture. Find ingredient notes (including substitutions and variations) below.

📝 Ingredients Notes with Substitutions and Variations

  • Lobster Meat: Use freshly cooked lobster for the best flavor, but high‑quality frozen lobster meat (thawed and patted dry) works well. You can also substitute shrimp or crab for a different seafood twist.
  • Pasta Shape: Cavatappi holds the creamy sauce beautifully, but elbow macaroni, shells, or orecchiette are great alternatives.
  • Cheese Blend: Gruyere, Fontina, and white cheddar create a rich, smooth sauce; feel free to swap in Havarti, Monterey Jack, or a bit of sharp cheddar based on what you have.
  • Milk & Cream: Using both whole milk and heavy cream keeps the sauce luscious, but you can use all whole milk for a slightly lighter version.
  • Breadcrumb Topping: Panko adds extra crunch; crushed buttery crackers or homemade breadcrumbs can be used instead.
  • Flavor Boosts: A pinch of paprika, cayenne, or a touch of Dijon mustard can be added to the sauce for extra depth.
  • Herbs: Fresh parsley brightens the dish, but chives or thyme work nicely as well.

See the recipe card (with video) below for a full list of ingredients and measurements.

🔥 Tips & Tricks

  • Cook the pasta just shy of al dente, since it will continue to cook while baking and absorb more sauce.
  • Warm the milk and cream slightly before adding them to the roux to help prevent lumps and create a smoother sauce.
  • Add the cheese over low heat and stir gently so it melts smoothly without becoming grainy.
  • Fold in the lobster at the end, just before baking, to keep it tender and prevent it from overcooking.
  • Toss the lobster in melted butter first to enhance flavor and help keep it juicy.
  • Use freshly grated cheese for the creamiest texture—pre‑shredded cheeses don’t melt as well.
  • Bake uncovered until bubbly and golden, then let the mac and cheese rest for a few minutes before serving so it sets slightly.

👩🏼‍🍳 How to Make Homemade Lobster Mac and Cheese

A person pouring melted butter from a small glass bowl over chopped cooked lobster meat in a white bowl on a cutting board.
  1. Step 1: Toss the cooked lobster meat with melted unsalted butter. Set aside.
A person transferring all-purpose flour from a small glass bowl into a skillet with simmering melted butter with a person whisking the flour into the butter.
  1. Step 2: Melt unsalted butter (2 tbsp) over medium heat in a large skillet. Stir in the flour and stir for 1 minute to create a roux.
A person whisking whole milk that is poured into a skillet filled with an amber roux on a gas stove.
  1. Step 3: Whisk in the milk and cream and continue stirring until smooth and slightly thickened.
A person transferring shredded white cheese from two small bowls into a skillet that is filled with a béchamel sauce.
  1. Step 4: Turn the heat to low and gently stir in the cheddar, Fontina, and Gruyere cheeses.
A person transferring cooked cavapatti pasta fro a pasta pot into a skillet filled with a creamy cheese sauce.
  1. Step 5: Gently fold the cooked pasta into the cheese sauce. Stir until completely combined.
A person using his hand to drop chopped cooked lobster meat into a skillet filled with creamy mac and cheese.
  1. Step 6: Turn off the heat and fold in the lobster meat, leaving some large chunks for placing on the top of the casserole.
A person using his hand to sprinkle a buttery Panko and Parmesan mixture over the top of a dish filled with homemade lobster mac and cheese that has not been baked yet.
  1. Step 7: Transfer to a buttered baking dish. Combine the Panko, melted butter (2 tbsp), and Parmesan cheese, and then top the mac and cheese with it.
A person sprinkling chopped Italian parsley over the top of a freshly baked homemade lobster mac and cheese in an oval baking dish.
  1. Step 8: Place the large pieces of lobster meat on the top and then bake for 20 minutes. Turn the broiler on HIGH for the last minute or two (keep an eye on it!). Garnish with chopped parsley and serve at once.

Expert Tip

For the creamiest lobster mac and cheese, remove the sauce from the heat before stirring in the cheese and lobster—this prevents the sauce from breaking and keeps the lobster tender and buttery.

🙋🏽‍♂️ Frequently Asked Questions

Can Homemade Lobster Mac and Cheese be made ahead of time?

Yes, it can be assembled in advance, covered, and refrigerated before baking.

Does Homemade Lobster Mac and Cheese taste fishy?

No—when made properly, it tastes rich and creamy with a mild, slightly sweet lobster flavor, not fishy, especially when using fresh lobster and a balanced cheese sauce.

What type of lobster works best for Homemade Lobster Mac and Cheese?

Both fresh lobster tails and whole lobsters work well, as long as the meat is fully cooked before adding it to the dish.

How do I keep Homemade Lobster Mac and Cheese from drying out?

Avoid overbaking and make sure there is plenty of sauce before it goes into the oven.

Can Homemade Lobster Mac and Cheese be frozen?

It can be frozen, though the texture is best when enjoyed fresh or reheated gently.

What’s the best pasta shape for Homemade Lobster Mac and Cheese?

Short pasta shapes that hold sauce well, such as elbows or spirals, are ideal. Our favorite is cavapatti, which can be found in the dried pasta section of most well-stocked supermarkets.

Can I make Homemade Lobster Mac and Cheese without baking it?

Yes, it can be served straight from the stovetop once the sauce and pasta are fully combined. If desired, place under the broiler for 1 to 2 minutes to lightly brown the topping (keep an eye on it!).

A large serving spoon being used to raise a serving of homemade lobster mac and cheese over a dish of the same.

😋 Other Amazing Side Dish Recipes

  • An overhead view of a large oval white platter holding green beans almondine with a bottle of wine and two glass of white wine nearby.
    Green Beans Almondine (Classic French Green Bean Recipe)
  • An overhead view of a white bowl filled with a wild rice pilaf with pecans and cranberries, as well as cubed apples, pancetta, and herbs.
    Wild Rice Pilaf with Pecans and Cranberries
  • A white oval serving bowl filled with creamed spinach.
    Creamed Spinach
  • A large cast-iron skillet filled with sautéed mushrooms that have been sprinkled with fresh chopped parsley.
    Sautéed Mushrooms – Steakhouse Style

Ready to make a restaurant-quality mac and cheese dish at home? Go for it!

And when you do, be sure to take a photo of it, post it on Instagram, and tag @HowToFeedaLoon and hashtag #HowToFeedaLoon!

A large serving spoon being used to raise a serving of homemade lobster mac and cheese over a dish of the same.
Print Recipe
5 from 1 vote

Homemade Lobster Mac and Cheese

This homemade lobster mac and cheese features tender lobster folded into a rich, creamy cheese sauce, topped with a golden, crunchy breadcrumb crust for an indulgent, restaurant‑quality comfort dish.
Prep Time15 minutes mins
Cook Time45 minutes mins
Total Time1 hour hr
Course: Side Dish or Entree
Cuisine: American / French
Servings: 8
Calories: 395kcal
Author: Kris Longwell

Equipment

  • 1 9"x13" baking dish or similar size
  • Pot for boiling pasta

Ingredients

For the Lobster and Pasta

  • 1 lb cooked lobster roughly chopped, see NOTES
  • 2 tablespoon unsalted butter melted
  • Kosher salt for the pasta water
  • 12 oz dried pasta cavatappi or elbow

For the Cheese Sauce

  • 4 tablespoon unsalted water
  • ¼ cup all-purpose flour
  • 3 cups whole milk warmed
  • ½ cup heavy cream
  • 1 cup white cheddar cheese shredded (preferably from a block)
  • 1 cup Fontina cheese shredded
  • 1 cup Gruyere cheese shredded
  • 1 teaspoon Kosher salt
  • ½ teaspoon white pepper or ground black pepper

For the Topping

  • ¾ cup Panko breadcrumbs
  • 2 tablespoon unsalted butter melted, plus extra for greasing the dish
  • ¼ cup Parmesan cheese grated
  • 1 tablespoon Italian parsley chopped, for garnish (optional)

Instructions

For the Lobster

  • Cut the lobster into bite-sized pieces. Place the lobster in a bowl and pour the melted butter (2 tbsp) over the meat. Gently toss to coat. Remove four or five larger pieces of the lobster (preferably claw meat) to place on the top of the dish for baking. Set aside.
    1 lb cooked lobster, 2 tablespoon unsalted butter
  • Meanwhile, bring a pot of salted water (about 1 tablespoon of salt) to a boil. Add the pasta and cook according to package instructions, usually about 10 minutes, until just al dente.
    Kosher salt, 12 oz dried pasta

Make the Sauce and Bake the Mac n Cheese

  • Preheat oven to 375°F.
  • In a large saucepan over medium heat, melt the butter (4 tbsp). Whisk in the flour and cook for 3 to 4 minutes, until just lightly golden.
    4 tablespoon unsalted water, ¼ cup all-purpose flour
  • Be sure to warm the milk before adding it to the roux (this can be done in the microwave). Whisk in the warm milk and heavy cream (it doesn't need to be warmed) to the flour/butter mixture (roux). Continue whisking and stirring until smooth and thickened, about 3 to 5 minutes.
    3 cups whole milk, ½ cup heavy cream
  • Lower the heat to very low and stir in the white cheddar, Fontina, and Gruyere cheeses. Stir until fully melted and silky. Stir in the salt and white pepper. Turn off the heat.
    1 cup white cheddar cheese, 1 cup Fontina cheese, 1 cup Gruyere cheese, 1 teaspoon Kosher salt, ½ teaspoon white pepper
  • Drain the pasta and then gently fold it into the sauce. Stir to fully combine and coat the pasta. Working in batches, fold in most of the lobster, leaving a few larger pieces to place on top of the dish.
  • Grease the dish with softened butter or cooking spray. Transfer the mixture to the prepared dish.
  • In a medium bowl, mix together the Panko breadcrumbs, melted butter (2 tbsp), and Parmesan cheese. Sprinkle the breadcrumb mixture over the top of the mac and cheese. Nestle the reserved lobster pieces into the top of the casserole.
    ¾ cup Panko breadcrumbs, 2 tablespoon unsalted butter, ¼ cup Parmesan cheese
  • Bake for 20 to 25 minutes, or until bubbly and lightly golden on top. If desired, turn the broiler on HIGH (keeping the dish 6 inches from the heating element) for 1 to 2 minutes, until the topping is lightly browned and toasty. Keep an eye on it! Don't let it burn.
  • Remove the dish from the oven and let it rest for 5 minutes. Garnish with chopped Italian parsley and serve at once.
    1 tablespoon Italian parsley

Video

Notes

NOTE: Watch the video in the recipe card for visual guidance.
  • The lobster must be fully cooked before adding to the mac and cheese; it can be boiled, steamed, or roasted just until opaque, then chopped and tossed in melted butter to keep it tender and flavorful. Or, purchase quality, cooked lobster meat. We get ours from Wild Fork. 
  • Cook the pasta just shy of al dente, as it will continue to soften while baking.
  • Lower the heat to very low (or remove from heat) for the cheese sauce before stirring in the cheese to ensure a smooth, creamy texture.
  • Fold the lobster into the sauce gently and at the end to prevent overcooking.
  • If the top begins to brown too quickly, tent loosely with foil during baking.
  • Let the mac and cheese rest for a few minutes after baking so the sauce thickens slightly before serving.
  • Storing & reheating: Store leftovers covered in the refrigerator for up to 3 days; reheat gently in the oven or microwave with a splash of milk or cream to loosen the sauce.
  •  
 

Nutrition

Calories: 395kcal | Carbohydrates: 13g | Protein: 18g | Fat: 30g | Saturated Fat: 18g | Polyunsaturated Fat: 1g | Monounsaturated Fat: 8g | Trans Fat: 0.2g | Cholesterol: 96mg | Sodium: 764mg | Potassium: 209mg | Fiber: 0.4g | Sugar: 6g | Vitamin A: 1057IU | Vitamin C: 1mg | Calcium: 530mg | Iron: 1mg

Honey Mustard-Glazed Smoked Ham

December 21, 2025 by Kris Longwell 2 Comments

A large white platter filled with a honey mustard glazed smoked ham with two glasses of white wine and a bottle of wine nearby.

This honey mustard-glazed smoked ham is an ideal centerpiece for any holiday or special meal. Made with a bone‑in spiral cut Berkshire ham, it’s slow‑smoked and finished with a sweet, tangy glaze that caramelizes beautifully. Pair it with French onion au gratin potatoes and green beans almondine for a classic, crowd‑pleasing dinner.

A large white platter filled with a honey mustard glazed smoked ham with two glasses of white wine and a bottle of wine nearby.
[feast_advanced_jump_to]

🍯 The Ingredients

This recipe uses a fully cooked, bone‑in spiral ham layered with a flavorful pork rub and finished with a sweet‑tangy honey mustard glaze warmed by subtle spices for depth and balance. Find ingredient notes (including substitutions and variations) below.

An arrangement of ingredients for a honey mustard glazed smoked ham on a grey wooden background including a cooked spiral ham, honey, brown sugar, apple cider, spices, Dijon mustard, yellow mustard, and apple cider vinegar.

📝 Ingredients Notes with Substitutions and Variations

  • Spiral‑Cut Ham: A fully cooked, bone‑in spiral ham works best for even glazing and easy serving, but a non‑spiral bone‑in ham will also work—just score the surface before smoking.
  • Mustard (for Rub & Glaze): Yellow mustard helps the rub adhere and adds tang, but you can substitute Dijon for a slightly sharper flavor or use a mix of both.
  • Pork Rub: A homemade pork rub adds depth, but a store‑bought BBQ or pork seasoning works well if you’re short on time.
  • Sweetener: Dark brown sugar provides rich molasses flavor; light brown sugar can be used for a milder sweetness, or maple syrup can replace some of the honey for a different twist.
  • Honey: Regular honey works perfectly, but hot honey can be used for a subtle kick of heat.
  • Spices: Warm spices like cinnamon, cloves, and nutmeg add holiday flavor—adjust the amounts to taste or omit one if you prefer a simpler glaze.
  • Acid: Apple cider vinegar balances the sweetness; white wine vinegar or a splash of apple juice can be used in a pinch.

See the recipe card (with video) below for a full list of ingredients and measurements.

📌 Tips and Tricks

  • Bring the ham closer to room temperature before smoking so it heats evenly and stays juicy.
  • Use mustard as a binder, not a flavor base—it helps the rub stick and won’t overpower the finished ham.
  • Keep the smoker temperature steady and avoid high heat, since spiral‑cut hams can dry out more quickly.
  • Glaze in layers, brushing on the honey mustard glaze during the final stages of cooking to build flavor without burning the sugars.
  • Tent loosely with foil if needed to prevent over‑browning while still allowing the glaze to set.
  • Save some glaze for serving, warming it gently to drizzle over sliced ham at the table.
  • Let the ham rest before slicing, even though it’s fully cooked, to help retain moisture and improve texture.

Expert Tip

Because spiral‑cut hams are already fully cooked, use the smoker primarily for flavor, not heat—keep the temperature low and steady and focus on gently warming the ham while allowing the glaze to set without burning.

🔥 How to Make Honey Mustard-Glazed Smoked Ham

A person wearing latex gloves rubbing yellow mustard and a pork rub all over the surface of a smoked Berkshire ham resting on a baking sheet pan.
  1. Step 1: Mix together the pork rub and then smear yellow mustard all over the ham. Liberally sprinkle on the rub and use your hands to press it into the mustard.
An eight pound Berkshire spiral-cut ham that has been coated with yellow mustard and pork rub sitting inside an electric smoker with a digital thermometer stuck in the middle and the door of the smoker open.
  1. Step 2: Place the ham in the smoker (preferably with a water/steam pan) and smoke at 350°F. Spritz with apple cider after one hour.
A person using a metal whisk to stir a honey mustard glaze for ham in a saucepan on a gas stove.
  1. Step 3: Add all of the glaze ingredients to a saucepan and heat over medium heat. Whisk until the sugar has dissolved. Se aside.
A person using a large grill brush to apply a honey mustard glaze over the surface of a Berkshire ham being cooked inside an electric smoker.
  1. Step 4: Apply the glaze to the ham after 2 hours. Repeat this every hour.
A person using a large grill brush to apply a thick layer of glaze over a smoked spiral-sliced ham being smoked inside an electric smoker.
  1. Step 5: Add a final thick layer of glaze in the final hour of cooking. The internal temperature should reach 135°F to 140°F.
A person wearing a Smokin' Tex apron standing behind a honey mustard smoked ham that is resting on a sheet.
  1. Step 6: Remove from the smoker and allow the ham to rest for at least 10 minutes before slicing and serving.

Expert Tip

If you don’t have a smoker, bake the ham at 275°F, tightly tented with foil, for about 12–15 minutes per pound until warmed through, then uncover during the last 30 minutes to brush on the glaze and let it caramelize without drying out the meat.

🍽️ How to Serve

  • Slice along the spiral cuts and transfer the ham to a serving platter while it’s still warm.
  • Drizzle with extra warm glaze or serve it on the side so guests can add more to taste.
  • Pair with classic sides like Dauphinoise potatoes (French au gratin potatoes) and maple-glazed carrots for a balanced, holiday‑ready meal.
  • Add fresh herbs or citrus slices to the platter for a simple, elegant presentation.
  • Serve family‑style or buffet‑style, making it easy for guests to help themselves.
  • Save leftovers for sandwiches, omelets, soups, or casseroles the next day.

🙋🏽‍♂️ Frequently Asked Questions

What makes this Honey Mustard Glazed Smoked Ham different from other ham recipes?

This recipe emphasizes gentle smoking and a balanced sweet‑tangy glaze that enhances the ham without overpowering it.

Is this ham fully cooked or raw before smoking?

The ham starts fully cooked and is smoked to warm it through while adding flavor.

What type of smoker should I use for Honey Mustard Glazed Smoked Ham?

We use and love our Smokin’ Tex electric smoker—it’s incredibly consistent, easy to use, and perfect for low‑and‑slow recipes like this. If you’re shopping for one, use code LOON10 to get 10% off your entire order.

Can I make this recipe in the oven instead of a smoker?

Yes, the ham can be prepared in the oven using low heat and foil to retain moisture, then glazed at the end for caramelization.

How far in advance can I make Honey Mustard Glazed Smoked Ham?

You can prepare it ahead of time and gently reheat it before serving, adding extra glaze if needed.

How do I keep a spiral‑cut ham from drying out?

Maintaining low heat, tenting with foil, and glazing toward the end all help retain moisture.

What’s the best way to reheat leftovers?

Reheat slices gently, covered, with a bit of extra glaze or moisture to prevent drying.

A white dinner plated filled with three slices of honey mustard glazed smoked turkey, mashed potatoes, and green beans almondine.

🍠 More Show-Stopper Roast Recipes

  • An oval white platter filled with slices of beef tenderloin with sprigs of rosemary along the edge and a glass or red wine sitting in the rear.
    Beef Tenderloin with Red Wine Sauce
  • Two racks of lamb persillade standing upright on a white platter with the French bones intersecting each other in a "cathedral" style presentation.
    Roast Rack of Lamb Persillade
  • A fully cooked standing prime rib roast sitting upright on a white platter surrounded by fresh herbs.
    Standing Prime Rib Roast
  • A person pouring brown gravy from a gravy boat onto a plate holding two slices of herb-stuffed pork loin.
    Herb-Stuffed Pork Loin

Ready to make a show-stopper ham for that special occasion? Go for it!

And when you do, be sure to take a photo of it, post it on Instagram, and tag @HowToFeedaLoon and hashtag #HowToFeedaLoon!

A large white platter filled with a honey mustard glazed smoked ham that has been partially sliced and with fresh herbs and orange slices garnishing the sides of the dish.
Print Recipe
5 from 1 vote

Honey Mustard-Glazed Smoked Ham

This honey mustard-glazed smoked ham features a bone‑in spiral cut ham gently smoked and finished with a sweet, tangy glaze that caramelizes beautifully—perfect for holiday meals, special occasions, or an easy show‑stopping centerpiece.
Prep Time15 minutes mins
Cook Time5 hours hrs
Resting time10 minutes mins
Total Time5 hours hrs 25 minutes mins
Course: Main Course
Cuisine: American
Servings: 12
Calories: 354kcal
Author: Kris Longwell

Equipment

  • 1 Smoker electric or pellet. See NOTES.
  • 3 oz wood chips apple, cherry, pecan, or hickory
  • digital meat thermometer

Ingredients

For the Ham

  • 1 7 – 8 lb ham fully cooked, bone-in, whole or spiral cut
  • yellow mustard for smearing on the ham
  • ½ cup pork rub
  • ⅓ cup apple cider for spritzing the ham (optional)

For the Glaze

  • 1 cup brown sugar dark
  • ½ cup granulated sugar
  • ½ cup honey
  • ½ cup Dijon mustard
  • ¼ cup yellow mustard
  • ¼ cup apple cider vinegar
  • 1 teaspoon ground cinnamon
  • ½ teaspoon ground nutmeg
  • ½ teaspoon ground cloves
  • fresh herbs and sliced fruit for garnish (optional)

Instructions

  • Remove the ham from the packaging and pat it dry with paper towels.
    1 7 – 8 lb ham
  • Rub the yellow mustard all over the ham and then liberally sprinkle the rub all over.
    yellow mustard, ½ cup pork rub
  • In a medium saucepan, combine the brown sugar, sugar, honey, Dijon mustard, yellow mustard, apple cider vinegar, cinnamon, nutmeg, and cloves. Warm over medium heat, stirring until the sugar dissolves and the glaze is smooth. Remove from the heat and set aside.
    1 cup brown sugar, ½ cup granulated sugar, ½ cup honey, ½ cup Dijon mustard, ¼ cup yellow mustard, ¼ cup apple cider vinegar, 1 teaspoon ground cinnamon, ½ teaspoon ground nutmeg, ½ teaspoon ground cloves
  • Prepare your smoker for smoking the ham. Place a water bath on the bottom grate, if possible. Add the apple cider to a spritzer bottle (if using). Add chips or pellets for smoking.
    ⅓ cup apple cider
  • Place on the smoker rack, fat side up. Smoke the ham for about 4 to 5 hours, spritzing with apple cider (if using) once every hour. After two hours of smoking, liberally brush on the glaze. Repeat this process until an internal temperature of 135°F to 140°F is reached. During the last 30 minutes of smoking, apply a thick layer of the glaze to the ham.
  • Remove the ham from the smoker and let it rest for at least 10 minutes, preferably 20 minutes. Transfer to a platter and garnish with herbs and sliced fruit, if desired.
    fresh herbs and sliced fruit

Video

Notes

NOTE: Watch the video in the recipe card for visual guidance.
  • This recipe uses a fully cooked, bone‑in spiral ham, so the goal is to gently warm it through while adding smoke and flavor, not to cook it from raw.
  • Apple wood chips provide a mild, slightly sweet smoke that pairs well with the honey mustard glaze, but cherre]y or pecan wood are great alternatives.
  • We prepare this ham in our Smokin’ Tex electric smoker, which delivers steady, consistent heat and clean smoke—perfect for low‑and‑slow recipes like this one. Use code LOON10 for a 10% discount on your entire order! 
  • Apply the glaze during the final stage of cooking to prevent the sugars from burning and to help them caramelize beautifully.
  • Tent loosely with foil if the ham begins to brown too quickly, especially toward the end of the cook.
  • Leftovers store well in the refrigerator and are excellent for sandwiches, breakfast dishes, or soups the next day.

Nutrition

Calories: 354kcal | Carbohydrates: 46g | Protein: 12g | Fat: 21g | Saturated Fat: 3g | Polyunsaturated Fat: 2g | Monounsaturated Fat: 1g | Trans Fat: 0.003g | Cholesterol: 0.1mg | Sodium: 657mg | Potassium: 135mg | Fiber: 2g | Sugar: 39g | Vitamin A: 271IU | Vitamin C: 1mg | Calcium: 127mg | Iron: 4mg

Green Beans Almondine (Classic French Green Bean Recipe)

December 18, 2025 by Kris Longwell Leave a Comment

An overhead view of a large oval white platter holding green beans almondine with a bottle of wine and two glass of white wine nearby.

Green Beans Almondine is a timeless, elegant side dish made with tender green beans, butter, toasted almonds, and a touch of lemon. It pairs beautifully with classic mains like Standing Prime Rib, Authentic Beef Wellington, or Classic Glazed Cornish Game Hens, making it perfect for holidays and special occasions.

An overhead view of a large oval white platter holding green beans almondine with a bottle of wine and two glass of white wine nearby.
[feast_advanced_jump_to]

🫛 The Ingredients

This recipe uses simple, fresh components that come together to create a buttery, nutty, and bright side dish with perfectly balanced flavor. Find ingredient notes (including substitutions and variations) below.

An arrangement of ingredients for green beans almondine on a grey wooden background including a glass bowl of fresh green beans, lemon zest, lemon juice, butter, almonds, garlic, olive oil, and seasonings.

📝 Ingredients Notes With Substitutions and Variations

  • Green Beans: Fresh green beans offer the best texture and color, but frozen green beans can be used in a pinch—just thaw and pat them dry before cooking.
  • Butter & Olive Oil: Using both adds rich flavor while preventing the butter from burning; you can use all butter for extra richness or all olive oil for a lighter version.
  • Almonds: Sliced almonds toast evenly and add classic crunch; slivered almonds work well, or substitute chopped hazelnuts or pecans for a twist.
  • Garlic: Fresh garlic gives the best flavor, but a small pinch of garlic powder can be used if needed.
  • Lemon: Fresh lemon zest and juice add brightness; if unavailable, a splash of white wine or a drizzle of balsamic vinegar makes a nice alternative.
  • Seasoning: Simple salt and pepper let the flavors shine, but a pinch of red pepper flakes adds gentle heat, or fresh herbs like thyme or parsley add a fresh finish.

Refer to the recipe card (with video) below for a full list of ingredients and measurements.

⭐️ Tips and Tricks

  • Salt the water well: If blanching the green beans, generously salt the water to enhance flavor from the inside out.
  • Don’t overcook: Green beans should be tender but still crisp to maintain their bright color and fresh texture.
  • Toast the almonds separately: Toasting almonds before adding them ensures even browning and maximum nutty flavor.
  • Watch the garlic closely: Garlic cooks quickly, so add it near the end to prevent burning and bitterness.
  • Finish with lemon: Add lemon zest and juice just before serving to keep the dish bright and fresh.
  • Serve immediately: Green Beans Almondine tastes best when served warm, right after tossing everything together.

👩🏼‍🍳 How to Make Green Beans Almondine

A large white pot filled with fresh green beans simmering in water on a gas stove.
  1. Step 1: Bring a pot of salted water to a boil and carefully add the trimmed green beans.
A person holding a large glass bowl filled with simmered fresh green beans in an ice bath.
  1. Step 2: Simmer the beans for 5 minutes after the water returns to a boil, and then transfer them to an ice bath.
A large non-stick skillet filled with sliced almonds being lightly browned in oil and melted butter on a gas stove.
  1. Step 3: Heat the butter (1 tbsp) and oil in a large skillet over medium heat. Add the almonds and cook, stirring often, until lightly browned, about 3 to 4 minutes.
A large non-stick skillet holding simmering browned butter that has minced garlic being sautéed in it.
  1. Step 4: Remove the almonds (set aside) and in the same skillet, melt the remaining 2 tablespoon of butter and then sauté the garlic for about 30 seconds.
A person transferring steamed fresh green beans from a large colander into a large non-stick skillet filled with simmering butter and garlic.
  1. Step 5: Add the cooked green beans and toss to coat.
A person using two wooden spoons to toss green beans almondine in a large non-stick skillet on a gas stove.
  1. Step 6: Add the lemon zest, lemon juice, toasted almonds, salt, and pepper. Toss until well coated and heated through. Serve immediately.

Expert Tip

Be sure to shock the green beans in an ice bath after blanching to lock in their vibrant color and crisp texture, then finish them quickly in the pan so they stay bright, fresh, and never mushy.

🍽️ How to Serve

  • Serve warm: Transfer to a serving platter immediately after cooking to preserve the bright color and buttery flavor.
  • Pair with classic mains: This dish pairs perfectly with beef fenderloin with red wine sauce, roasted chicken, or classic leg of lamb.
  • Serve with classic sides: Round out the meal with other timeless sides such as French onion au gratin potatoes, maple‑glazed carrots, or creamy cauliflower gratin.
  • Add a finishing touch: Sprinkle with extra toasted almonds or a bit of fresh lemon zest just before serving for added texture and brightness.
  • Holiday‑ready: Serve family‑style for holiday dinners or plate individually for a more elegant presentation.
  • Make‑ahead friendly: Blanch the green beans in advance, then sauté with butter, garlic, and almonds just before serving for best results.

🙋🏽‍♂️ Frequently Asked Questions

Can Green Beans Almondine be made ahead of time?

Yes, you can blanch the green beans in advance and finish the dish just before serving for the best texture and flavor.

What type of green beans work best for Green Beans Almondine? Can I use frozen or canned?

Fresh green beans or haricots verts work best, but frozen green beans can be used if thawed and dried first; canned green beans are not recommended due to their softer texture.

Can I make Green Beans Almondine dairy‑free?

Yes, substitute the butter with additional olive oil or a plant‑based butter alternative.

How do I store and reheat leftover Green Beans Almondine?

Store leftovers in an airtight container in the refrigerator and reheat gently in a skillet to avoid overcooking.

Can I add other ingredients to Green Beans Almondine?

Absolutely—ingredients like fresh herbs, shallots, or a pinch of red pepper flakes make great additions.

A person using a gold serving utensil to lift a serving of green beans almondine from a white platter of the dish.

😋 More Classic Side Dishes

  • A close-up view of sautéed white beans and spinach on a white dinner plate resting next to sliced pork tenderloin.
    Sautéed White Beans and Spinach
  • A square slice of potatoes dauphinoise on a white plate and is garnished with chopped Italian parsley.
    Potatoes Dauphinoise
  • A white bowl holding stewed okra and tomatoes.
    Stewed Okra and Tomatoes
  • An overhead view of a white bowl filled with a wild rice pilaf with pecans and cranberries, as well as cubed apples, pancetta, and herbs.
    Wild Rice Pilaf with Pecans and Cranberries

Ready to make your special dinner even more special with green beans? Go for it!

And when you make it, be sure to take a photo, post it on Instagram, and tag @HowToFeedaLoon and hashtag #HowToFeedaLoon!

An overhead view of a large white platter holding green beans almondine topped with lightly browned sliced almonds.
Print Recipe
No ratings yet

Green Beans Almondine (Classic French Green Beans Recipe)

A classic and elegant Green Beans Almondine made with tender green beans, buttery garlic, toasted almonds, and bright lemon—perfect for holidays or any special meal.
Prep Time15 minutes mins
Cook Time15 minutes mins
Total Time30 minutes mins
Course: Side Dish
Cuisine: French
Servings: 8
Calories: 160kcal
Author: Kris Longwell

Equipment

  • Pot for blanching beans
  • 1 large skillet for sautéing

Ingredients

  • Kosher salt for blanching
  • 1½ lbs green beans fresh, trimmed
  • 1 tablespoon olive oil
  • 3 tablespoon unsalted butter divided
  • ¾ cup almonds sliced
  • 3 cloves garlic minced
  • 1 teaspoon lemon zest from one lemon
  • 1 tablespoon lemon juice fresh, usually from 1 lemon
  • 1½ teaspoon Kosher salt plus more, if needed
  • 1 teaspoon black pepper ground

Instructions

  • Bring a pot of water to a boil. Stir in about 1 tablespoon of salt. Carefully add the trimmed green beans, and bring back to a boil. Simmer, stirring occasionally, for 4 to 5 minutes, or until the beans are just tender. Immediately transfer to a large bowl of ice water. Drain the beans and dry them with a kitchen towel or paper towels. Set aside.
    Kosher salt, 1½ lbs green beans
  • In a large skillet, heat the oil and 1 tablespoon of the butter over medium heat. Add the almonds and cook, stirring often, until lightly browned, about 5 minutes. Use a spoon to transfer them to a small, heatproof bowl.
    1 tablespoon olive oil, 3 tablespoon unsalted butter, ¾ cup almonds
  • Add the remaining two tablespoons of butter to the skillet and melt over medium heat. Add the garlic and sauté for 30 seconds. Carefully add the green beans and stir and toss to coat. Cook for about 4 minutes, stirring often.
    3 cloves garlic
  • Stir in the lemon zest, lemon juice, most of the toasted almonds, salt (1½ tsp), and pepper (1 tsp). Cook, stirring often, until heated through, about 2 to 3 more minutes. Taste and add more salt, if desired. Serve at once, sprinkling extra almonds over the top.
    1 teaspoon lemon zest, 1 tablespoon lemon juice, 1½ teaspoon Kosher salt, 1 teaspoon black pepper

Video

Notes

NOTE: Watch the video in the recipe card for visual guidance.
  • Fresh green beans give the best texture, but frozen beans can be used if thawed and well‑dried.
  • Avoid canned green beans, as they are too soft for this recipe.
  • Toast the almonds separately for the best flavor and even browning.
  • Do not overcook the green beans; they should be tender‑crisp and bright green.
  • Add lemon zest and juice just before serving for the freshest flavor.
  • Blanched green beans can be prepared ahead and finished just before serving.

Nutrition

Calories: 160kcal | Carbohydrates: 10g | Protein: 5g | Fat: 13g | Saturated Fat: 3g | Polyunsaturated Fat: 2g | Monounsaturated Fat: 7g | Trans Fat: 0.2g | Cholesterol: 11mg | Sodium: 442mg | Potassium: 289mg | Fiber: 4g | Sugar: 3g | Vitamin A: 720IU | Vitamin C: 12mg | Calcium: 73mg | Iron: 1mg

Homemade Peppermint Bark

December 14, 2025 by Kris Longwell 2 Comments

A circular tin lined with brown paper filled with homemade peppermint bark, surrounded by holiday garland and more pieces of bark.

Nothing says the holidays like homemade peppermint bark. Layers of rich chocolate and crunchy peppermint create the perfect festive treat—easy to make, delicious to share, and ideal for gifting or indulging this season.

A circular tin lined with brown paper filled with homemade peppermint bark, surrounded by holiday garland and more pieces of bark.
[feast_advanced_jump_to]

🍫 The Ingredients

The ingredients combine rich chocolate, refreshing peppermint flavor, and a crunchy candy topping to create a festive homemade treat. Find ingredient notes (including substitutions and variations) below.

An arrangement of ingredients for homemade peppermint bark resting in a metal sheet pan including a blocks of semi-sweet chocolate, white chocolate, a bowl of candy canes, and a small white bowl filled with peppermint extract.

📝 Ingredients Notes with Substitutions and Variations

  • Chocolate: Semi-sweet chocolate bars can be substituted with dark chocolate or milk chocolate, depending on your taste preference. For a dairy-free option, use vegan or dairy-free chocolate.
  • White Chocolate: If you prefer, you can use white chocolate chips or a white chocolate candy coating. For a lower-sugar alternative, try a white chocolate-flavored almond bark.
  • Peppermint Extract: If you don’t have peppermint extract, you can use crushed peppermint candies for flavor or a few drops of spearmint extract for a milder mint taste.
  • Crushed Candy Canes: Substitute with crushed peppermint candies, peppermint-flavored hard candies, or even crushed Andes mints for a different minty twist. For a nutty variation, try adding chopped nuts like almonds or pecans instead.

See the recipe card (with video) below for a full list of ingredients and measurements.

📌 Tips and Tricks for Perfect Bark

  • Use high-quality chocolate for the best flavor and smooth texture.
  • Melt the chocolate slowly over a double boiler or in short bursts in the microwave to prevent burning.
  • Spread the chocolate evenly on a parchment-lined baking sheet for uniform thickness.
  • Allow the chocolate to cool slightly before adding the peppermint extract to preserve its flavor.
  • Crush candy canes finely for a better texture and even distribution.
  • To keep the chocolate from becoming soft after chilling, make sure to fully temper the chocolate or chill it in the coldest part of your refrigerator, then store the bark in an airtight container at a cool room temperature to prevent condensation and softening.
  • Avoid exposing the bark to humidity or warm temperatures, which can cause the chocolate to bloom or soften.

👩🏼‍🍳 How to Make Homemade Peppermint Bark

A person using a wooden spoon the melt small chunks of semi-sweet chocolate in a the top vessel of a double-boiler.
  1. Step 1: Chop the semi-sweet chocolate into small chunks and gently melt in a double boiler or in the microwave with short intervals on HIGH.
A person using a red spatula to spread melted semi-sweet chocolate into a thin layer on a silicone matt that is nestled into a half sheet pan.
  1. Step 2: Spread the chocolate in a thin layer on parchment paper or a silicone mat nestled into a sheet pan. Chill for 15 minutes.
A person holding a quarter teaspoon of peppermint extract over a double boiler that is filled with melted white chocolate on a gas stove.
  1. Step 3: Clean your double boiler (or get a new clean bowl) and melt the white chocolate. Stir in the peppermint extract.
A person using a white spatula to spread melted white chocolate over the surface of a thin layer of cooled semi-sweet chocolate on a silicone matt in a half sheet pan.
  1. Step 4: Smear the melted white chocolate over the chilled semi-sweet chocolate.
A person sprinkling crushed candy canes over the surface of a rectangular shape of peppermint bark before it has been chilled.
  1. Step 5: Immediately sprinkle the crushed candy canes over the warm white chocolate. Chill for at least 1 hour.
A person using his hand to break pieces of chilled homemade peppermint bark from a large block of it that is resting in a half sheet pan on a silicone matt.
  1. Step 6: Use your fingers or a sharp knife to break the bark into pieces. Store in an air-tight container in a cool place.

Expert Tip

For a perfectly smooth and glossy finish, temper your chocolate by carefully melting and cooling it to specific temperatures before spreading—this not only prevents the bark from becoming soft or dull but also gives it a professional-quality snap and shine.
Semi-Sweet Chocolate: Melt to 115°F to 120°F.

White Chocolate: Melt to 110°F to 115°F.

🎄 How to Serve

  • Break the bark into bite-sized pieces for easy snacking and sharing.
  • Arrange the pieces on a festive platter or in a decorative tin for gifting.
  • Serve alongside hot cocoa or coffee for a cozy holiday treat.
  • Use as a topping for ice cream, yogurt, or holiday desserts to add a minty crunch.
  • Package in clear cellophane bags tied with ribbon for party favors or holiday giveaways.
  • Pair with other seasonal treats like Christmas cookies or spiced nuts for a dessert platter.

🙋🏽‍♂️ Frequently Asked Questions

Can I make homemade peppermint bark without peppermint extract?

Yes, you can skip the extract and rely on crushed candy canes for peppermint flavor, though the extract adds a stronger, more consistent mint taste.

How should I store homemade peppermint bark to keep it fresh?

Store it in an airtight container at cool room temperature or in the refrigerator to prevent melting and maintain freshness for up to two weeks.

Can homemade peppermint bark be made ahead of time?

Absolutely! It can be prepared several days or even weeks in advance and stored properly until ready to serve or gift.

Why did my homemade peppermint bark turn out soft or sticky?

This usually happens if the chocolate wasn’t tempered properly or if the bark was stored in a warm or humid environment.

Can I add other toppings or mix-ins to homemade peppermint bark?

Definitely! Nuts, dried fruit, or different crushed candies can be added for extra flavor and texture.

A person holding a piece of homemade peppermint bark over a tin filled with the same.

🎅 More Holiday Sweets!

  • An overhead view of a collection of colorful homemade Christmas cookies that in the shape of bells, ornaments, tress, snowmen, and bells.
    Homemade Christmas Cookies
  • A square slice of gingerbread cake sitting in a small pool of lemon sauce and topped with a small pile of lemon zest.
    Gingerbread Cake with Lemon Sauce
  • A straight-on view of a yule log that is sitting on a rectangular white platter and is topped with sugared cranberries and sprigs of rosemary all topped with sprinkled powdered sugar.
    Yule Log (Bûche de Noël)
  • Three red velvet sandwich cookies stacked on a piece of brown paper next to a glass of milk.
    Red Velvet Sandwich Cookies

Ready to make a treat that will have Santa coming back for more? Go for it!

And when you do, be sure to take a photo of it, post it on Instagram, and tag @HowToFeedaLoon and hashtag #HowToFeedaLoon!

A circular tin lined with brown paper filled with homemade peppermint bark, surrounded by holiday garland and more pieces of bark.
Print Recipe
5 from 1 vote

Homemade Peppermint Bark

A festive and easy-to-make treat that combines layers of rich chocolate and creamy white chocolate, infused with refreshing peppermint and topped with crushed candy canes for a crunchy, minty finish. Perfect for holiday gifting and snacking!
Prep Time10 minutes mins
Cook Time10 minutes mins
Chill time1 hour hr 15 minutes mins
Total Time1 hour hr 35 minutes mins
Course: Dessert / Snack
Cuisine: American
Servings: 12
Calories: 317kcal
Author: Kris Longwell

Equipment

  • Double boiler or microwave-safe bowl
  • 1 baking pan lined with a silicone mat or parchment paper

Ingredients

  • 12 oz semi-sweet chocolate about 2 cups
  • 12 oz white chocolate about 2 cups
  • ¼ teaspoon peppermint extract
  • 1 cup candy canes roughly crushed

Instructions

  • Line a baking sheet with parchment paper or a silicone mat.
  • In a double boiler with simmering water, or in a microwave-safe bowl, melt the semi-sweet chocolate over low heat. Stir until smooth.
    12 oz semi-sweet chocolate
  • Pour the melted semi-sweet chocolate onto the prepared baking sheet and spread it evenly with a spatula. You'll want about a 7×10" rectangle. Place in the refrigerator and chill for 15 minutes.
  • Clean out your double boiler, or get a new heatproof bowl, and gently melt the white chocolate. Once smooth, stir in the peppermint extract.
    12 oz white chocolate, ¼ teaspoon peppermint extract
  • Pour the melted white chocolate over the chilled semi-sweet chocolate and spread evenly. Immediately sprinkle the crushed candy canes evenly over the warm white chocolate.
    1 cup candy canes
  • Place the baking sheet back in the fridge for at least 1 hour, or until completely firm.
  • Once set, break the bark into irregular pieces with your hands or a knife.
  • Store in an air-tight container, preferably in the fridge, for up to 2 weeks.

Video

Notes

NOTE: Watch the video in the recipe card for visual guidance.
  • Use high-quality chocolate for the best flavor and texture.
  • Be careful not to overheat the chocolate when melting to avoid burning.
  • For a smooth, glossy finish, consider tempering the chocolate. See blog post for more details. 
  • Crush candy canes finely for even distribution and a better texture.
  • Store the bark in an airtight container at cool room temperature or in the fridge to keep it firm.
  • Feel free to customize with nuts or other toppings for added flavor.
 

Nutrition

Calories: 317kcal | Carbohydrates: 32g | Protein: 3g | Fat: 20g | Saturated Fat: 12g | Polyunsaturated Fat: 1g | Monounsaturated Fat: 6g | Trans Fat: 0.02g | Cholesterol: 8mg | Sodium: 28mg | Potassium: 242mg | Fiber: 2g | Sugar: 27g | Vitamin A: 23IU | Vitamin C: 0.1mg | Calcium: 74mg | Iron: 2mg

The Best Weeknight Lasagna

December 12, 2025 by Kris Longwell 3 Comments

An overhead view of a steel lasagna pan filled from end to end with the best weeknight lasagna with a block parmesan cheese and a bottle of red wine nearby.

This Best Weeknight Lasagna is a hearty, comforting meal that’s perfect for busy evenings. With layers of savory ground beef-tomato sauce, creamy ricotta and mozzarella, and classic Italian herbs, it comes together quickly and bakes to bubbly perfection. Serve it with a crisp Italian chopped salad and cheesy garlic bread for a complete, crowd-pleasing dinner.

An overhead view of a steel lasagna pan filled from end to end with the best weeknight lasagna with a block parmesan cheese and a bottle of red wine nearby.
[feast_advanced_jump_to]

🥫 The Ingredients

This recipe combines rich, savory flavors with creamy cheeses and classic Italian seasonings to create a comforting and satisfying lasagna. Find ingredient notes (including substitutions and variations) below.

An arrangement of ingredients for the best weeknight lasagna on a grey wooden background including ground beef, lasagna noodles, mozzarella cheese, an egg, beef stock, crushed tomatoes, tomato sauce, cottage cheese, and seasonings.

📝 Ingredient Notes with Substitutions and Variations

  • Ground Beef: Opt for lean ground beef for a healthier option, or substitute with ground turkey, chicken, or Italian sausage for different flavors.
  • Tomato Sauce & Crushed Tomatoes: You can use canned or homemade versions; for a richer taste, add a splash of red wine or substitute with marinara sauce.
  • Cheeses: You can use all ricotta cheese or all cottage cheese, depending on your preference. Part-skim ricotta and low-fat cottage cheese are great choices to reduce fat and calories. Parmesan adds sharpness but can be omitted or replaced with Pecorino Romano for a saltier bite.
  • Italian Herbs: Dried oregano and parsley work well, but fresh herbs like basil or thyme can add a brighter flavor.
  • Lasagna Noodles: Use no-boil noodles to save time, or substitute with gluten-free noodles if needed.

See the recipe card (with video) below for a full list of ingredients and measurements.

📌 Tips and Tricks for Perfect Lasagna

  • Don’t overcook the noodles: If using traditional lasagna noodles, cook them just until al dente to avoid mushy layers after baking. No-boil noodles are a great time-saver.
  • Drain excess fat: Brown the ground beef thoroughly and drain any excess fat to keep the sauce from becoming greasy.
  • Layer evenly: Spread the sauce and cheese layers evenly to ensure every bite has a balanced flavor.
  • Let it rest: Allow the lasagna to rest for 10-15 minutes after baking to help it set and make slicing easier.
  • Make ahead: Assemble the lasagna a day in advance and refrigerate; it will develop deeper flavors and save time on busy nights.
  • Customize your cheese: Mix ricotta and cottage cheese or use all of one depending on your texture preference.
  • Add extra veggies: Sneak in finely chopped spinach, mushrooms, or zucchini to boost nutrition without compromising flavor.
  • Use fresh herbs: If possible, add fresh parsley or basil right before serving for a bright, fresh finish.

👩🏼‍🍳 How to Make the Best Weeknight Lasagna

A large non-stick skillet filled with cooked ground beef on a portable induction stove.
  1. Step 1: Cook the ground beef over medium heat until no longer pink. Safely discard rendered grease.
A large non-stick skillet filled with two pounds of cooked ground beef with crushed tomatoes, tomato sauce, and tomato paste sitting on top of the meat.
  1. Step 2: Add the crushed tomatoes, tomato sauce, and tomato paste.
A large non-stick skillet filled with cooked ground beef, tomato sauce, beef stock, tomato paste, and seasonings.
  1. Step 3: Next, add the beef broth, onion powder, garlic powder, oregano, salt, and pepper. Stir and simmer for 10 to 15 minutes.
A person using a large wooden spoon to combine ricotta cheese, cottage cheese, an egg, and chopped Italian parsley in a large glass bowl.
  1. Step 4: In a large bowl, use a large wooden spoon to combine the ricotta cheese, cottage cheese, egg, ricotta, and salt.
A person using a small ladle to smooth a tomato-based meat sauce of the top of cooked lasagna noodles that are on top of a ricotta cheese mixture in a metal lasagna pan.
  1. Step 5: In a lasagna pan (or 9×13″ dish), start with a layer of meat sauce, then noodles, half of the ricotta mixture, a sprinkle of parm, another layer of noodles, meat sauce, mozzarella, noodles, remaining ricotta mixture, parm, noodles, meat sauce, mozzarella, and topped with parmesan.
A person placing a freshly baked best weeknight lasagna on a wire rack resting on a wooden cutting board.
  1. Step 6: Cover with foil and bake in a 375°F oven for 30 minutes, remove the foil, and bake for another 15 to 20 minutes. Let rest for at least 15 minutes before slicing.

Expert Tip

Make sure boiled noodles are completely dry before layering to prevent a watery lasagna; alternatively, using no-boil noodles is a convenient way to skip this step and still achieve perfect texture.

🍽️ How to Serve

  • Slice with care: Use a sharp knife or a spatula to cut and lift neat portions without breaking the layers.
  • Pair with a fresh salad: Serve alongside a classic Italian chopped salad or homemade Caesar salad for a restaurant-style meal.
  • Add garlic bread: Cheesy garlic bread or easy skillet dinner rolls make a perfect accompaniment for soaking up extra sauce.
  • Offer grated cheese: Provide extra grated Parmesan or Pecorino Romano at the table for guests to sprinkle on top.
  • Serve warm: Keep the lasagna warm in the oven at low heat if serving buffet-style or over time.
  • Complement with wine: Pair with a medium-bodied red wine like Chianti or Sangiovese to enhance the flavors.

🙋🏽‍♂️ Frequently Asked Questions

How can I make Weeknight Lasagna faster to prepare?

Use no-boil noodles, prepare the sauce ahead of time, and assemble the lasagna in advance to save time on busy evenings.

Can I freeze Weeknight Lasagna?

Yes, you can freeze it either before or after baking; just wrap it tightly and thaw in the refrigerator before reheating.

What’s the best way to reheat Weeknight Lasagna without drying it out?

For easy cleanup, reheat the desired portion in a separate oven-safe dish covered with foil, warming it at 350°F until heated through—this prevents the original pan from becoming harder to clean over time.

Can I make Weeknight Lasagna vegetarian?

Absolutely! Substitute the ground beef with sautéed vegetables like mushrooms, zucchini, or spinach, and use vegetable broth instead of beef broth.

How do I prevent Weeknight Lasagna from becoming watery?

Make sure boiled noodles are completely dry before layering, drain excess fat from the meat, and avoid adding too much liquid to the sauce.

Can I use all ricotta or all cottage cheese in Weeknight Lasagna?

Yes, you can use all ricotta or all cottage cheese, based on your preference; part-skim versions help reduce fat and calories.

A metal spatula being used to raise a slice of the best weeknight lasagna up from a pan of the same.

😋 Other Delicious Weeknight Recipes

  • A large silver skillet filled with easy ravioli with creamy basil-tomato sauce with a wooden spoon stuck in it.
    Easy Ravioli with Creamy Basil-Tomato Sauce
  • A straight-on view of two white bowls filled with Tex-Mex pasta with colorful bell peppers and cilantro sitting nearby.
    Tex-Mex Pasta with Ground Beef
  • An overhead view of an antique platter filled with stuffed zucchini boats that are topped with melty cheese and surrounded by sprigs of parsley.
    Stuffed Zucchini Boats
  • An overhead view of a large straight-edge stainless steel skillet filled with weeknight stroganoff of a creamy ground beef sauce tossed with egg noodles.
    Weeknight Beef Stroganoff

Ready to make an amazing lasagna with not much effort? Go for it!

And when you do, be sure to take a photo of it, post it on Instagram, and tag @HowToFeedaLoon and hashtag #HowToFeedaLoon!

A close-up view of the best weeknight lasagna in a metal lasagna pan with a square piece missing from the corner, revealing the layers of noodles, meat sauce, and melty cheese.
Print Recipe
5 from 2 votes

The Best Weeknight Lasagna

A quick and comforting weeknight lasagna layered with savory beef sauce, creamy cheese, and classic Italian herbs—perfect for an easy family dinner.
Prep Time15 minutes mins
Cook Time1 hour hr
Resting time15 minutes mins
Total Time1 hour hr 30 minutes mins
Course: Entree
Cuisine: American / Italian
Servings: 8
Calories: 778kcal
Author: Kris Longwell

Equipment

  • Lasagna pan or 9×13" dish

Ingredients

  • 2 lbs ground beef 90% lean
  • 1 15 oz can crushed tomatoes or stewed tomatoes
  • 1 15 oz can tomato sauce
  • 1 6 oz tomato paste
  • 1 cup beef broth or stock
  • 1 teaspoon onion powder
  • 1 teaspoon garlic powder
  • 1 tablespoon dried oregano or Italian seasoning
  • 1½ teaspoon salt
  • 1 teaspoon black pepper
  • 16 lasagna noodles dried, or no-boil noodles
  • 15 oz tub whole milk ricotta cheese
  • 16 oz tub cottage cheese
  • 1 large egg
  • 2 tablespoon Italian parsley chopped, or 1 teaspoon dried, optional
  • ½ cup Parmesan cheese grated
  • 16 oz mozzarella shredded

Instructions

  • Preheat oven to 375°F and bring a pot of salted (1 tbsp) water to a boil.
  • In a large skillet, cook the ground beef until no longer pink. Tilt the pan to one side and use a large spoon to remove most of the rendered grease. Discard safely.
    2 lbs ground beef
  • Stir the crushed tomatoes, tomato sauce, tomato paste, and beef broth into the meat.
    1 15 oz can crushed tomatoes, 1 15 oz can tomato sauce, 1 6 oz tomato paste, 1 cup beef broth
  • Add the onion powder, garlic powder, oregano, salt, and pepper. Stir until completely combined. Simmer over medium heat for 10 to 15 minutes. Set aside.
    1 teaspoon onion powder, 1 teaspoon garlic powder, 1 tablespoon dried oregano, 1½ teaspoon salt, 1 teaspoon black pepper
  • Add the noodles to the boiling water and cook according to package instructions, usually about 12 minutes, until al dente. Drain and set aside. Toss with oil if cooking them ahead of time (this keeps them from sticking together). Be sure to dry the noodles with paper towels before assembling the lasagna.
    16 lasagna noodles
  • Meanwhile, in a medium-sized bowl, use a wooden spoon to combine the ricotta cheese, cottage cheese, egg, parsley, and ½ teaspoon salt. Set aside.
    15 oz tub whole milk ricotta cheese, 16 oz tub cottage cheese, 1 large egg, 2 tablespoon Italian parsley
  • Assemble the lasagna: Start with a thin layer of meat sauce in the bottom of the pan. Add a layer of noodles (usually 3 noodles). Spoon on half of the ricotta/cottage cheese mixture. Sprinkle grated Parmesan cheese over the mixture. Add another layer of noodles. Spoon on half of the remaining meat sauce. Top with half of the mozzarella. Add another layer of noodles and top them with the rest of the ricotta/cottage cheese mixture and another sprinkling of grated Parmesan. Top with the rest of the mozzarella and Parmesan cheese. Sprinkle some extra dried oregano, if desired.
    ½ cup Parmesan cheese, 16 oz mozzarella
  • Cover the dish with foil and bake for 30 minutes. Remove the foil and bake for another 15 to 20 minutes, or until bubbly and lightly browned on the top. Remove from the oven and let the lasagna rest for 15 to 30 minutes before slicing.
  • Serve with extra Parmesan on the side.

Video

Notes

NOTE: Watch the video in the recipe card for visual guidance.
  • Use no-boil noodles to save time and skip boiling.
  • Make sure boiled noodles are completely dry before layering to avoid a watery lasagna.
  • Part-skim ricotta or low-fat cottage cheese reduces fat without sacrificing creaminess.
  • Let the lasagna rest 10-15 minutes before slicing for cleaner servings.
  • Leftovers reheat well in a covered dish to retain moisture.
  • Add chopped veggies like spinach or mushrooms for extra nutrition.

Nutrition

Calories: 778kcal | Carbohydrates: 50g | Protein: 50g | Fat: 41g | Saturated Fat: 19g | Polyunsaturated Fat: 2g | Monounsaturated Fat: 15g | Trans Fat: 1g | Cholesterol: 162mg | Sodium: 1440mg | Potassium: 796mg | Fiber: 3g | Sugar: 6g | Vitamin A: 956IU | Vitamin C: 6mg | Calcium: 457mg | Iron: 4mg

Baked Brie with Cranberry-Orange Sauce and Pecans

December 10, 2025 by Kris Longwell Leave a Comment

A circular dish holding Baked Brie with Cranberry-Orange Sauce and Pecans surrounded by two glasses of white wine, pieces of toast, holly, and silverware.

Looking for the perfect appetizer to kick off your holiday feast? This Baked Brie with Cranberry-Orange Sauce and Pecans is creamy, tangy, and delightfully nutty—an elegant starter that pairs beautifully with show-stopping mains like beef tenderloin, roast leg of lamb, or royal crown pork roast. It’s the ideal way to welcome guests and set the tone for a festive and memorable meal.

A circular dish holding Baked Brie with Cranberry-Orange Sauce and Pecans surrounded by two glasses of white wine, pieces of toast, holly, and silverware.
[feast_advanced_jump_to]

🍊 The Ingredients

This recipe combines rich, creamy cheese with bright citrus and warm spices, complemented by toasted nuts and a touch of sweetness for a perfectly balanced holiday appetizer. Find ingredient notes (including substitutions and variations) below.

An arrangement of ingredients for Baked Brie with Cranberry-Orange Sauce and Pecans including brie, cranberries, pecans, orange juice, honey, orange zest, butter, sugar, herbs, and cinnamon.

📝 Ingredients Notes with Substitutions

  • Brie: Choose a good-quality wheel with a soft, creamy interior; Camembert can be used as a similar alternative.
  • Cranberries: Fresh or frozen, both work well; if fresh cranberries aren’t available, frozen are a great substitute and just as flavorful.
  • Orange Juice and Zest: Freshly squeezed juice and zest provide the best bright citrus flavor; bottled juice can be used in a pinch, but may be less vibrant.
  • Pecans: Toasted pecans add a rich crunch; walnuts or almonds can be substituted if preferred.
  • Butter: Unsalted butter lets you control the saltiness; salted butter can be used, but reduce added salt elsewhere.
  • Honey: Adds a natural sweetness and glossy finish; maple syrup or agave nectar are good alternatives.
  • Fresh Rosemary: Adds aromatic herbal notes; thyme or sage can be used as substitutes for a different flavor profile.

See the recipe card (with video) below for a full list of ingredients and measurements.

📌 Tips and Tricks for the Perfect Holiday Appetizer

  • Use a whole wheel of Brie with the rind intact to help the cheese hold its shape while baking and create a beautiful presentation.
  • Toast the pecans lightly in a dry skillet to enhance their flavor and crunch before adding them to the sauce.
  • Simmer the cranberry-orange sauce gently to allow the cranberries to burst and thicken without burning or sticking to the pan.
  • Let the sauce cool slightly before spooning it over the baked Brie to avoid making the cheese too runny.
  • If using puff pastry, wrap the Brie tightly and seal the edges well to prevent leaks during baking.
  • Serve immediately after baking for the best gooey texture and flavor.

👩🏼‍🍳 How to Make Baked Brie with Cranberry-Orange Sauce and Pecans

A person placing a wheel of brie into a circular baking dish on a wooden cutting board.
  1. Step 1: Place the brie in a baking dish. Don’t remove the rind.
A person where oven mitts holding the handles of a circular baking dish that is holding a wheel of brie that has been heated in the oven.
  1. Step 2: Bake for 15 minutes, or until the brie is soft and melty.
A silver saucepan filled with simmering cranberries and in sweet honey sauce on a gas stove.
  1. Step 3: While the brie is baking, cook the cranberries, orange juice, sugar, orange zest, and cinnamon in a saucepan over medium heat until slightly thickened.
A saucepan filled with a cranberry-orange sauce with a pad of butter melting in the center of it.
  1. Step 4: Stir in the butter until heated through.
A person sprinkling chopped pecans over the top of a baked brie in a circular baking dish that is also topped with a cranberry-orange sauce.
  1. Step 5: Pour the cranberry-orange sauce over the warm brie and top with toasted chopped pecans.
A person using a wooden honey spoon to drizzle honey over the top of a baked brie with cranberry-orange sauce and pecans in a circular baking dish.
  1. Step 6: Drizzle with honey and serve at once.

🍽️ How to Serve

  • Serve warm and gooey straight from the oven for the best creamy texture and flavor.
  • Accompany the brie with sliced baguette, assorted crackers, or toasted bread for easy dipping.
  • Add fresh fruit like apple slices, grapes, or figs on the side to balance the richness with natural sweetness.
  • Garnish with extra fresh rosemary or thyme sprigs for a festive touch and aroma.
  • Perfect as an elegant appetizer for holiday gatherings, cocktail parties, or cozy winter evenings.
  • Pair with a crisp white wine, sparkling wine, or a light red like Pinot Noir to complement the flavors.

🙋🏽‍♂️ Frequently Asked Questions

Can I prepare Baked Brie with Cranberry-Orange Sauce and Pecans ahead of time?

Yes, you can make the cranberry-orange sauce and toast the pecans in advance; assemble and bake the Brie just before serving for the best texture.

Should I remove the rind from the Brie before baking?

It’s best to leave the rind on, as it helps the cheese hold its shape and adds flavor when baked.

Can I use frozen cranberries for the sauce?

Absolutely! Frozen cranberries work well and can be used straight from the freezer.

What can I substitute for pecans if I have a nut allergy?

You can omit the nuts or substitute them with toasted seeds like pumpkin or sunflower seeds for a similar crunch.

Can I wrap the Brie in puff pastry?

Yes, wrapping Brie in puff pastry creates a beautiful presentation and adds a flaky crust—just be sure to seal the edges well and bake until golden. Spoon a little of the cranberry-orange sauce over the top of the brie before encasing it in the puff pastry. Then top with the remaining sauce and pecans.

A person using a small knife to spread baked brie with cranberry-orange sauce and pecans onto a small piece of toast.

🎄 More Amazing Holiday Appetizers

  • A wheel of baked brie in a baking dish smothered in pecan praline sauce.
    Baked Brie with Praline Sauce
  • An platter made from a tree stump topped with festive Christmas crostinis next to two glasses filled with red wine.
    Christmas Crostini
  • A charcuterie board that is covered with cubed cheese, a meat flower, hummus, olives, and bread sticks.
    How To Make a Charcuterie Board
  • A small round dark grey plate filled with garlic shrimp sitting next to a stemless glass of white wine.
    Garlic Shrimp (Gambas al Ajillo)

Ready to make the most impressive holiday appetizer in town? Go for it!

And when you do, be sure to take a photo of it, post it on Instagram, and tag @HowToFeedaLoon and hashtag #HowToFeedaLoon!

A circular dish holding Baked Brie with Cranberry-Orange Sauce and Pecans surrounded by two glasses of white wine, pieces of toast, holly, and silverware.
Print Recipe
No ratings yet

Baked Brie with Cranberry-Orange Sauce and Pecans

Warm, creamy baked Brie topped with tangy cranberry-orange sauce and toasted pecans—an easy and elegant appetizer perfect for holiday gatherings and special occasions.
Prep Time15 minutes mins
Cook Time15 minutes mins
Total Time30 minutes mins
Course: Appetizer
Cuisine: American
Servings: 8
Calories: 256kcal
Author: Kris Longwell

Equipment

  • baking dish
  • Medium saucepan

Ingredients

  • 1 8 oz Brie wheel, rind left on
  • 1 cup cranberries fresh or frozen
  • ⅓ cup orange juice preferably freshly squeezed
  • ¼ cup granulated sugar
  • 1 teaspoon orange zest usually from 1 orange
  • ½ teaspoon ground cinnamon
  • 1 tablespoon unsalted butter
  • ½ cup chopped pecans lightly toasted
  • honey for drizzling
  • fresh rosemary for garnish, optional

Instructions

  • Preheat oven to 375°F.
  • Place the Brie (with rind still on) in a baking dish and place in oven. Bake for 15 minutes.
    1 8 oz Brie
  • While the Brie is baking, make the cranberry-orange sauce by adding the cranberries, orange juice, sugar, orange zest, and cinnamon to a saucepan over medium heat. Cook, stirring often, until the cranberries are bursting open and the sauce has thickened.
    1 cup cranberries, ⅓ cup orange juice, ¼ cup granulated sugar, 1 teaspoon orange zest, ½ teaspoon ground cinnamon
  • Remove the sauce from the heat and stir in the butter.
    1 tablespoon unsalted butter
  • Remove the Brie from the oven and spoon the cranberry-orange sauce over the top. Sprinkle with the toasted pecans.
    ½ cup chopped pecans
  • Drizzle honey over the top and garnish with sprigs of rosemary (if desired). Serve immediately with toasted baguette slices, crackers, or fresh fruit.
    honey, fresh rosemary

Video

Notes

NOTE: Watch the video in the recipe card for visual guidance.
  • Store any leftover baked Brie covered in an airtight container in the refrigerator for up to 2 days.
  • Reheat gently in a 350°F (175°C) oven for 10–15 minutes until warmed through and gooey.
  • The cranberry-orange sauce can be made ahead and refrigerated for up to 3 days.
  • Toast the pecans just before serving to keep them crunchy and flavorful.
  • For best results, serve immediately after baking to enjoy the creamy texture.

Nutrition

Calories: 256kcal | Carbohydrates: 10g | Protein: 1g | Fat: 12g | Saturated Fat: 1g | Polyunsaturated Fat: 2g | Monounsaturated Fat: 3g | Trans Fat: 0.1g | Cholesterol: 4mg | Sodium: 1mg | Potassium: 60mg | Fiber: 1g | Sugar: 8g | Vitamin A: 78IU | Vitamin C: 7mg | Calcium: 9mg | Iron: 0.2mg

French Onion au Gratin Potatoes

December 7, 2025 by Kris Longwell 7 Comments

An overhead view of a large cast-iron skillet filled with French onion au gratin potatoes with fresh herbs and a grey napkin near the dish.

Looking for the perfect side to elevate your holiday feast? Our French Onion Au Gratin Potatoes are rich, creamy, and packed with caramelized onion flavor, making them an irresistible addition to any meal. They pair beautifully with holiday roasts like Standing Prime Rib, Roast Leg of Lamb, or Glazed Cornish Hens, adding a comforting, cheesy touch that will have everyone asking for seconds.

An overhead view of a large cast-iron skillet filled with French onion au gratin potatoes with fresh herbs and a grey napkin near the dish.
[feast_advanced_jump_to]

🥔 The Ingredients

This recipe combines savory aromatics, rich cheeses, and tender potatoes to create a deeply flavorful and comforting side dish. Find ingredient notes (including substitutions and variations) below.

An arrangement of ingredients for French onion au gratin potatoes on a grey wooden background including sliced onions, sliced potatoes, minced garlic, cream, beef stock, wine, butter, cheese, flour, and seasonings.

📝 Ingredients Notes and Substitutions

  • Yellow Onions: Sweet and mellow when caramelized; you can substitute with white or Vidalia onions for a slightly different flavor.
  • White Wine: Adds depth and acidity; if you prefer, substitute with extra beef broth or a splash of apple cider vinegar.
  • Beef Broth: Provides rich, savory flavor; chicken broth or vegetable broth can be used as a milder alternative.
  • Gruyère Cheese: Melts beautifully with a nutty flavor; Swiss or Emmental cheeses are great substitutes if needed.
  • Parmesan Cheese: Adds sharpness and umami; Pecorino Romano or Asiago can be used instead.
  • All-Purpose Flour: Used to thicken the sauce; gluten-free flour blends or cornstarch can be substituted for gluten-free versions.
  • Dried Thyme: Adds earthy, herbal notes; fresh thyme can be used (about twice the amount), or substitute with rosemary or savory for a different herbal twist. We highly recommend Maison Gabrielle for dried thyme and a wide selection of herbs and spices—the exceptional quality truly elevates your dishes to a whole new level of culinary excellence. Use code HOWTOFEEDALOON for a 10% discount.

See the recipe card (with video) below for a full list of ingredients and measurements.

🔥 Tips and Tricks for the Perfect Side Dish

  • Caramelize onions slowly: Cook the onions over medium-low heat to develop a deep, sweet flavor without burning.
  • Use thin potato slices: Thin, even slices ensure the potatoes cook through evenly and absorb the sauce well. A mandolin slicer makes this easy.
  • Layer ingredients evenly: Distribute the onions, sauce, and cheese evenly between layers for balanced flavor in every bite.
  • Don’t skip the wine: Even though optional, white wine adds a subtle acidity that brightens the rich sauce.
  • Let the dish rest: Allow the casserole to rest for 10-15 minutes after baking, so it sets and slices cleanly.
  • Use freshly shredded cheese: Freshly shredded Gruyère and Parmesan melt better and provide superior flavor compared to pre-shredded varieties.
  • Adjust seasoning at the end: Taste the sauce before baking and adjust salt and pepper as needed for the best flavor.

👩🏼‍🍳 How to Make French Onion au Gratin Potatoes

A person using a large wooden spatula to transfer thinly sliced onions from a glass bowl into a large oval Dutch oven sitting on an induction stovetop.
  1. Step 1: Melt the butter in a large pot and stir in the sliced onions to coat.
A person getting ready to dump minced garlic from one bowl and dried thyme from another small bowl into a large Dutch oven filled with caramelized onions.
  1. Step 2: Cook the onions, stirring often, until reduced, caramelized, and brown (not burnt). Stir in the garlic and thyme and cook for another minute.
Person pouring white wine from a small carafe into a large Dutch oven that is filled with simmering caramelized onions.
  1. Step 3: Add the wine and cook until mostly evaporated, about 1 minute.
A person dumping all-purpose flour from a small bowl into a large Dutch oven that is filled with simmering caramelized onions.
  1. Step 4: Stir in the flour and cook for another minute, stirring often.
One person pouring heavy cream from a small milk jug and another person pouring beef stock from a measuring cup into a Dutch oven that is filled with flour-coated caramelized onions.
  1. Step 5: Whisk in the cream and stock (or broth) and stir until slightly thickened, about 3 minutes.
A person using a small ladle to transfer a French onion sauce over thinly sliced gold potatoe in a large cast-iron skillet.
  1. Step 6: Add a layer of potatoes to the greased pan. Sprinkle with a little salt and pepper, and then top with a thin layer of the sauce and a sprinkle of Parmesan cheese. Repeat until potatoes are all used.
A person sprinkling shredded Gruyere cheese over the top of layers of sliced gold potatoes and a French onion cream sauce.
  1. Step 7: Top with shredded Gruyere cheese.
A person removing a layer of aluminum foil from the top of a large black cast-iron skillet that is filled with a partially baked French onion au gratin potatoes.
  1. Step 8: Cover with foil and bake for 45 minutes in a 375°F oven. Remove the foil and bake another 15 to 20 minutes. Let it rest for at least 10 to 15 minutes.

🍽️ How to Serve

  • Serve warm and bubbly straight from the oven for the best creamy, cheesy texture. However, remember to let the potatoes rest for at least 10 to 15 minutes before slicing. The dish will stay warm (covered with foil) for up to 30 minutes.
  • Pair beautifully with roast beef tenderloin, herb-stuffed pork loin, or maple-glazed turkey breast for a complete, elegant meal.
  • Garnish with fresh thyme or chopped parsley to add a pop of color and fresh herbal aroma.
  • Offer alongside glazed baby carrots or roasted cauliflower with olives to balance the richness.
  • Serve on individual plates or in a large casserole dish for family-style dining.

🙋🏽‍♂️ Frequently Asked Questions

Can I make French Onion Au Gratin Potatoes ahead of time?

Yes, you can prepare the dish a day in advance and refrigerate it. Just bake it freshly before serving for the best texture and flavor.

What type of potatoes work best for French Onion Au Gratin Potatoes?

Yukon Gold or other waxy potatoes (ie, red, fingerling, or new) are ideal because they hold their shape well and absorb the sauce beautifully.

Can I use a different cheese in French Onion Au Gratin Potatoes?

Absolutely! Swiss, Emmental, or even a sharp white cheddar are great alternatives if you don’t have Gruyère or Parmesan.

Is the white wine necessary in French Onion Au Gratin Potatoes?

The wine adds depth and brightness, but you can omit it and substitute it with extra broth or a splash of vinegar if preferred.

Can French Onion Au Gratin Potatoes be made gluten-free?

Yes, you can substitute the all-purpose flour with a gluten-free flour blend or cornstarch to thicken the sauce.

A person using a large metal spatula to raise up a square piece of French onion au gratin potatoes over a skillet filled with the same.

😋 Other “Special Occasion” Side Dishes

  • A square slice of potatoes dauphinoise on a white plate and is garnished with chopped Italian parsley.
    Potatoes Dauphinoise
  • An overhead view of a large black oval baking dish that is filled with an untouched gourmet green bean casserole that is topped with fried onion strips.
    Gourmet Green Bean Casserole
  • A baked oyster casserole in an oval black baking dish next to a grey napkin and a wooden spoon.
    Oyster Casserole
  • A white bowl holding stewed okra and tomatoes.
    Stewed Okra and Tomatoes

Ready to make a show-stopper side dish for your special feast? Go for it!

And when you do, be sure to take a photo of it, post it on Instagram, and tag @HowToFeedaLoon and hashtag #HowToFeedaLoon!

An overhead view of a large cast-iron skillet filled with French onion au gratin potatoes.
Print Recipe
5 from 3 votes

French Onion au Gratin Potatoes

Rich, creamy, and loaded with caramelized onions and melted cheese, these French Onion Au Gratin Potatoes make a comforting and elegant side dish perfect for any special meal.
Prep Time20 minutes mins
Cook Time1 hour hr 40 minutes mins
Resting Time15 minutes mins
Total Time2 hours hrs 15 minutes mins
Course: Side Dish
Cuisine: French / American
Servings: 8
Calories: 413kcal
Author: Kris Longwell

Equipment

  • Large pot or skillet for caramelizing onions (8-quart Dutch oven is excellent)
  • 9"x13" baking dish or similar size baking dish or 12-inch cast-iron skillet

Ingredients

  • 4 tablespoon unsalted butter
  • 4 large yellow onions or 5 medium, peeled and thinly sliced
  • 4 cloves garlic minced
  • 1 teaspoon dried thyme or 1 tablespoon fresh
  • ¼ cup white wine optional, see NOTES
  • 3 tablespoon all-purpose flour
  • 2 cups beef stock or broth
  • 1 cup heavy cream or half and half
  • salt and pepper
  • 1 tablespoon oil or butter, for greasing dish
  • 2½ lbs gold potatoes peeled and thinly sliced (⅛" inch)
  • ¼ cup Parmesan cheese grated
  • 1 cup Gruyère cheese shredded
  • fresh thyme chopped, for garnish (optional)

Instructions

  • In a large skillet, pot, or Dutch oven, melt the butter over medium heat. Add the onions, and cook, stirring often, until deep golden brown, and caramelized – about 40 to 50 minutes. Stir in the garlic and thyme and cook, stirring often, for another minute.
    4 tablespoon unsalted butter, 4 large yellow onions, 4 cloves garlic, 1 teaspoon dried thyme
  • Add the wine (if using) and stir until mostly evaporated, usually about 1 minute. Stir in the flour to coat the onions and cook, stirring often, for another 1 to 2 minutes.
    ¼ cup white wine, 3 tablespoon all-purpose flour
  • Whisk in the beef stock and cream. Gently stir with a wooden spoon or spatula until slightly thickened, about 3 to 4 minutes. Stir in 1 teaspoon salt and ½ teaspoon black pepper. Remove from the heat.
    2 cups beef stock, 1 cup heavy cream, salt and pepper
  • Preheat oven to 375°F.
  • Grease your dish with softened butter or olive oil. Arrange a double layer of potatoes in the greased dish. Sprinkle salt and pepper over the potatoes. Spoon a thin layer of the sauce over the potatoes (you'll do about a quarter of the sauce). Sprinkle Parmesan cheese over the sauce. Repeat this process 3 to 4 more times (until you run out of potatoes, or sauce, whichever comes first).
    1 tablespoon oil, 2½ lbs gold potatoes, ¼ cup Parmesan cheese
  • Top the dish with the shredded Gruyère. Cover with foil and bake in the preheated oven (375°F) for 45 minutes. Remove the foil and bake for another 20 minutes, or until the cheese has browned in spots.
    1 cup Gruyère cheese
  • Remove the dish from the oven and let rest for 10 to 15 minutes. Or, cover with foil and let rest for up to 30 minutes. Garnish with chopped fresh herbs (ie, thyme), if desired. Serve immediately.
    fresh thyme

Video

Notes

NOTE: Watch the video in the recipe card for visual guidance.
  • For best flavor, use dry white wine, but it can be omitted or replaced with extra broth or a splash of vinegar.
  • Store leftovers in an airtight container in the refrigerator for up to 3 days. Reheat gently in the oven until warmed through.
  • This dish freezes well—cool completely, then freeze in an airtight container for up to 2 months. Thaw overnight in the fridge before reheating. The texture may be a little grainy after thawing, but will still be delicious after reheating. 
  • Use thinly sliced potatoes for even cooking and a creamy texture.
  • Freshly shredded cheese melts better than pre-shredded varieties.

Nutrition

Calories: 413kcal | Carbohydrates: 36g | Protein: 12g | Fat: 25g | Saturated Fat: 14g | Polyunsaturated Fat: 2g | Monounsaturated Fat: 7g | Trans Fat: 0.2g | Cholesterol: 69mg | Sodium: 308mg | Potassium: 879mg | Fiber: 5g | Sugar: 6g | Vitamin A: 802IU | Vitamin C: 34mg | Calcium: 270mg | Iron: 2mg

Ultimate Hot Bacon and Cheddar Dip

December 5, 2025 by Kris Longwell Leave a Comment

An overhead view of an oval baking dish filled with Ultimate Hot Bacon and Cheddar Dip garnished with chopped scallions and crumbled bacon.

If you’re looking for a crowd-pleasing appetizer that’s easy to make and bursting with flavor, this Ultimate Hot Bacon and Cheddar Dip is exactly what you need. Creamy, cheesy, and loaded with smoky bacon, it’s perfect for game days, parties, or any time you want to impress with minimal effort.

An overhead view of an oval baking dish filled with Ultimate Hot Bacon and Cheddar Dip garnished with chopped scallions and crumbled bacon.
[feast_advanced_jump_to]

🥓 The Ingredients

This dip combines creamy, tangy, and savory flavors with a smoky, spicy kick for a perfectly balanced and irresistible appetizer. Find ingredient notes (including substitutions and variations) below.

An arrangement of ingredients for Ultimate Hot Bacon and Cheddar Dip on a grey wooden background including strips of uncooked bacon, cream cheese, mayonnaise, cheddar cheese, sour cream, scallions, and seasonings.

📝 Ingredients Notes with Substitutions and Variations

  • Cream Cheese, Sour Cream & Mayonnaise: These create a rich, creamy base. For a lighter version, try using Greek yogurt instead of sour cream or mayonnaise.
  • Cheddar Cheese: Sharp cheddar adds great flavor, but you can swap in Monterey Jack, Colby, or a smoked cheese for a different twist.
  • Bacon: Use thick-cut bacon for extra crunch and smokiness, or substitute with turkey bacon for a leaner option.
  • Scallions: Fresh scallions add a mild onion flavor and color; you can replace them with chives or finely diced red onion.
  • Spices & Hot Sauce: Garlic and onion powders add depth, while hot sauce introduces a subtle heat—adjust the amount to your taste or swap hot sauce for cayenne pepper or smoked paprika for variation.

See the recipe card (with video) below for a full list of ingredients and measurements.

🔥 Tips and Tricks

  • Use softened cream cheese: Let the cream cheese sit at room temperature for at least 30 minutes to ensure a smooth, creamy dip without lumps.
  • Cook bacon until crispy: Crispy bacon adds the best texture and flavor contrast—don’t rush this step!
  • Mix thoroughly: Beat the base ingredients well to create a uniform, creamy texture before folding in cheese and bacon.
  • Adjust spice level: Start with a small amount of hot sauce and add more gradually to suit your heat preference.
  • Make ahead: This dip tastes even better after chilling for a few hours or overnight, allowing the flavors to meld.
  • Serve warm: Reheat gently before serving to keep the cheese melty and the dip irresistible.
  • Pair with the right dippers: Serve with sturdy crackers, toasted baguette slices, or fresh veggies for the best experience.

🍽️ How to Make the Ultimate Hot Bacon and Cheddar Dip

A person using paper towels to spread softened butter all over the inside of a white oval baking dish.
  1. Step 1: Grease a baking dish (1.5-quart) with softened butter or cooking spray.
A person using a wooden spoon to mix softened cream cheese, sour cream, and mayonnaise in a glass bowl on a wooden cutting board.
  1. Step 2: Stir (or mix) the softened cream cheese, sour cream, and mayonnaise until smooth.
A person transferring shredded cheddar cheese from a white bowl into a large glass bowl filled with a mixture of cream cheese, mayonnaise, sour cream, crispy bacon pieces, chopped scallions, and seasonings.
  1. Step 3: Stir in the 2 cups of cheddar, most of the bacon, most of the scallions, onion powder, garlic powder, salt, pepper, and hot sauce (if using).
A person using a large wooden spoon to transfer uncooked bacon and cheddar dip from a large glass bowl into a greased oval baking dish.
  1. Step 4: Transfer the mixture to the prepared dish.
A person using his fingers to sprinkle shredded cheddar cheese over the top of a bacon and cheddar dip that is in a baking dish that is about to go into the oven.
  1. Step 5: Top with half a cup of shredded cheddar and bake for 25 to 30 minutes.
A person sprinkling crispy, crumbled bacon over the top of a freshly baked ultimate bacon and cheddar dip in a baking dish resting on a baking rack.
  1. Step 6: Garnish with the remaining bacon and scallions. Serve with toasted baguette slices, crackers, veggies, or sturdy chips.

Expert Tip

For an extra hearty and flavorful twist, try adding cooked, crumbled sausage along with the bacon—this boosts the protein and adds a savory depth that pairs perfectly with the creamy cheese base. You can also experiment with mix-ins like jalapeños for heat or sun-dried tomatoes for a tangy kick.

🍽️ How to Serve

  • Serve warm straight from the oven or slow cooker for melty, gooey goodness.
  • Pair with a variety of dippers like crispy crackers, toasted baguette slices, pita chips, or crunchy fresh vegetables such as celery, carrots, and bell peppers.
  • Spoon over baked potatoes or use as a topping for nachos to add extra flavor and richness.
  • Offer alongside a fresh green salad or sliced apples to balance the richness with some crisp freshness.
  • For parties, serve in a bread bowl for a fun, shareable presentation.

🙋🏽‍♂️ Frequently Asked Questions

Can I make the Ultimate Hot Bacon and Cheddar Dip ahead of time?

Yes! It actually tastes better after chilling for a few hours or overnight, allowing the flavors to meld. Just reheat gently before serving.

What can I use to dip with the Ultimate Hot Bacon and Cheddar Dip?

Crackers, toasted baguette slices, pita chips, and fresh veggies like celery, carrots, and bell peppers all work wonderfully.

Can I make the Ultimate Hot Bacon and Cheddar Dip dairy-free or vegetarian?

You can substitute dairy ingredients with plant-based alternatives and replace bacon with vegetarian bacon or smoked mushrooms for a similar flavor.

How do I store leftovers of the Ultimate Hot Bacon and Cheddar Dip?

Store leftovers in an airtight container in the refrigerator for up to 3-4 days. Reheat gently on the stovetop or in the microwave.

Is the Ultimate Hot Bacon and Cheddar Dip spicy?

The recipe has a mild kick from hot sauce, but you can easily adjust the heat level to suit your taste.

A person lifting a toasted baguette slice that is filled a pile freshly baked ultimate hot bacon and cheddar dip.

🎉 More Awesome Party Dips

  • An overhead view of an oval baking dish filled with a partially eaten sausage, bean, and spinach dip with a silver spoon inserted into the side of the dip.
    Sausage, Spinach, and White Bean Dip
  • An oval black baking dish filled with baked clam dip sitting next to slices of toasted bread.
    Incredible Baked Clam Dip
  • Queso Fundido with Chorizo
  • A large white bowl filled with Texas caviar surrounded by tortilla chips and scallions.
    Texas Caviar

Ready to take your party to the next level with dip? Go for it!

And when you do, be sure to take a photo of it, post it on Instagram, and tag @HowTofeedaLoon and hashtag #HowToFeedaLoon!

Print Recipe
No ratings yet

Ultimate Hot Bacon and Cheddar Dip

A creamy, cheesy dip loaded with crispy bacon and sharp cheddar, perfectly balanced with a hint of spice—ideal for parties, game days, or anytime you want a crowd-pleasing appetizer.
Prep Time15 minutes mins
Cook Time35 minutes mins
Total Time50 minutes mins
Course: Appetizer
Cuisine: American
Servings: 8
Calories: 445kcal
Author: Kris Longwell

Equipment

  • 1.5-quart baking dish or similar size (ie, x8" dish)

Ingredients

  • 8 slices bacon cooked and crumbled
  • 1 tablespoon unsalted butter room temperature, or cooking spray
  • 8 oz cream cheese room temperature
  • 1 cup sour cream
  • ½ cup mayonnaise
  • 2½ cups cheddar cheese shredded
  • 3 scallions chopped
  • 1 tablespoon hot sauce (optional)
  • ½ teaspoon garlic powder
  • ½ teaspoon onion powder
  • ½ teaspoon Kosher salt
  • ¼ teaspoon black pepper

Instructions

  • Fry the bacon or bake it in the oven until crispy. Roughly chop and set aside.
    8 slices bacon
  • Preheat oven to 375°F. Grease the dish with the softened butter or cooking spray.
    1 tablespoon unsalted butter
  • In a large bowl, use a hand mixer or a large wooden spoon to mix together the softened cream cheese, sour cream, and mayonnaise until smooth.
    8 oz cream cheese, 1 cup sour cream, ½ cup mayonnaise
  • Stir in 2 cups of the cheddar cheese, most of the bacon, most of the scallions, hot sauce (if using), garlic powder, onion powder, salt, and pepper. Stir until combined.
    2½ cups cheddar cheese, 3 scallions, 1 tablespoon hot sauce, ½ teaspoon garlic powder, ½ teaspoon onion powder, ½ teaspoon Kosher salt, ¼ teaspoon black pepper
  • Transfer the mixture to the prepared dish. Top with the remaining half cup of cheese. Bake until bubbly and lightly browned, 20 to 25 minutes. If desired, turn the broiler on HIGH to brown a little more, but keep an eye on it, don't let it burn!
  • Top with extra bacon and scallions. Serve hot with toasted baguette slices, crackers, veggies, or sturdy chips.

Video

Notes

NOTE: Watch the video in the recipe card for visual guidance.
  • For best results, use softened cream cheese to ensure a smooth, creamy dip.
  • Adjust the amount of hot sauce to control the spice level to your preference.
  • Crispy bacon adds great texture—cook it well before mixing it into the dip.
  • This dip can be made ahead and refrigerated; store leftovers in an airtight container in the fridge for up to 4 days. Reheat gently in the microwave or on the stovetop until warmed through.
  • Feel free to add cooked sausage or jalapeños for extra flavor and heartiness.
  • Serve with sturdy dippers like crackers or toasted bread to hold up to the creamy texture.

Nutrition

Calories: 445kcal | Carbohydrates: 5g | Protein: 14g | Fat: 29g | Saturated Fat: 9g | Polyunsaturated Fat: 7g | Monounsaturated Fat: 5g | Trans Fat: 0.1g | Cholesterol: 105mg | Sodium: 568mg | Potassium: 166mg | Fiber: 0.2g | Sugar: 2g | Vitamin A: 1022IU | Vitamin C: 2mg | Calcium: 313mg | Iron: 0.3mg

Classic Breakfast Casserole (Egg Bake)

December 3, 2025 by Kris Longwell 6 Comments

A yellow rectangular baking dish filled with a classic breakfast casserole with the handles of the dish being held by a person holding two linen napkins.

This Classic Breakfast Casserole is the ultimate crowd‑pleasing morning dish! Fluffy eggs, savory sausage, melty cheese, and soft bread bake together into cozy, golden perfection. It’s easy to make ahead and always a hit for holidays, brunch, or lazy weekend mornings.

A yellow rectangular baking dish filled with a classic breakfast casserole with the handles of the dish being held by a person holding two linen napkins.
[feast_advanced_jump_to]

🥚 The Ingredients

This comforting casserole combines simple breakfast staples into a rich, fluffy, and savory bake that’s satisfying enough to feed a crowd. Find ingredient notes (including substitutions and variations) below.

An arrangement of ingredients for classic breakfast casserole on a grey wooden background including uncooked breakfast sausage, shredded cheddar cheese, milk, two sliced of bread, dry mustard, salt, and pepper.

📝 Ingredients Notes with Substitutions and Variations

  • Eggs: The star of the dish! They create a fluffy, custard‑like texture. For a lighter version, you can replace a few whole eggs with egg whites.
  • Breakfast Sausage: Adds hearty flavor and a touch of spice. Swap with bacon, diced ham, turkey sausage, or even sautéed veggies for a meat‑free version.
  • Cheese: Sharp cheddar gives the best flavor, but you can mix in Monterey Jack, Swiss, or pepper jack for a twist.
  • Bread: Day‑old or slightly dried bread cubes soak up the egg mixture perfectly. Try French bread, sourdough, or even croissants for an extra-rich flavor.
  • Milk: Whole milk gives a creamy texture, but half‑and‑half makes it even more indulgent. For a lighter option, use 2% milk or unsweetened almond milk.
  • Ground Mustard: Adds a subtle tang that balances the richness—if you don’t have it, a small spoonful of Dijon mustard works too.
  • Add‑ins: Customize your casserole with sautéed onions, bell peppers, spinach, or mushrooms for extra flavor and color.
  • Make it spicy: Mix in a pinch of cayenne or top with sliced jalapeños for a little heat.

See the recipe card (with video) below for a full list of ingredients and measurements.

💡 Tips for Success

  • Use day‑old bread: Slightly dried bread absorbs the egg mixture better, giving you a soft, custardy interior without turning soggy.
  • Whisk well: Beat the eggs and milk until fully combined and slightly frothy — this helps the casserole bake up light and fluffy.
  • Layer evenly: Spread the bread, sausage, and cheese evenly in the dish so every bite has a perfect mix of flavor and texture.
  • Let it rest before baking (optional): For the best texture, cover and refrigerate the assembled casserole for at least 30 minutes or overnight to let the bread soak up the custard.
  • Don’t overbake: The casserole is done when the center is just set and the top is lightly golden — overbaking can make it dry.
  • Rest before serving: Let it sit for 10–15 minutes after baking to make slicing easier and to help the flavors meld.
  • Make‑ahead friendly: Assemble the night before, refrigerate, and bake fresh in the morning for a stress‑free breakfast or brunch.

👩🏼‍🍳 How to Make Classic Breakfast Casserole

A close-up view of breakfast sausage that is being browned and stirred with a wooden spatula in a black non-stick skillet.
  1. Step 1: Cook the sausage in a large skillet. Set aside.
A person using a whisk to mix whole eggs, milk, salt, and dry mustard in a large glass bowl on a wooden cutting board.
  1. Step 2: In a large bowl, whisk together the eggs with the milk, mustard, salt, and pepper.
A glass bowl filled with a milk and egg mixture and topped with cooked breakfast sausage, cubed white bread, and shredded cheddar cheese.
  1. Step 3: Add the cubed bread, cheese, and cooked sausage. Gently stir to combine.
A person using a grey plastic spoon to smooth an uncooked mixture of classic breakfast casserole in a 9 by 13 inch yellow casserole dish.
  1. Step 4: Transfer the mixture to a greased 9×13″ baking dish and use a spoon to spread it evenly.
A person using two striped oven mitts to hold a 9 by 13 yellow casserole dish that is filled with classic breakfast casserole that has just come out of the oven.
  1. Step 5: Bake for 45 minutes, until fluffy and lightly browned. Let rest for 10 minutes before slicing.
A person using a metal spatula to lift a slice of classic breakfast casserole from a dish that is filled with the casserole.
  1. Step 6: Cut into slices and serve at once!

Expert Tip

For the fluffiest texture and best flavor, let the casserole rest for at least 20–30 minutes before baking (or overnight if you can). This gives the bread time to fully absorb the egg mixture, so every bite is soft and custardy inside with a perfectly golden top. If baking straight away, lightly press the bread down into the custard to help it soak evenly.

🍽️ How To Serve

  • Pair with Maple Pepper Bacon: The sweet‑savory kick of crispy maple‑glazed bacon with a touch of black pepper perfectly complements the rich, cheesy casserole.
  • Add something fresh: Balance the meal with a bright fruit salad, fresh berries, or orange slices to lighten the plate.
  • Classic breakfast sides: Serve alongside hash browns, buttery toast, or flaky buttermilk biscuits for a hearty, diner‑style spread.
  • Brunch upgrade: Round out the table with a simple green salad, homemade cinnamon rolls, or a pitcher of fresh orange juice or mimosas.
  • For holidays or gatherings: This casserole stays warm beautifully on a brunch buffet — just cover lightly with foil to keep it soft and steamy.

🙋🏽‍♂️ Frequently Asked Questions

Can I make Classic Breakfast Casserole ahead of time?

Yes! You can assemble the casserole the night before, cover it tightly, and refrigerate it overnight. It’s best that way! In the morning, let it sit at room temperature for about 20–30 minutes before baking as directed.

How do I know when the classic breakfast casserole is done?

The casserole is ready when the center is set and no longer jiggly, and the top is lightly golden. A knife inserted in the middle should come out clean.

Can I freeze Classic Breakfast Casserole?

Absolutely. Bake it first, let it cool completely, then wrap tightly and freeze for up to 2 months. Thaw overnight in the fridge and reheat in the oven at 350°F until warmed through.

How can I make this casserole lighter?

Use turkey sausage, reduced‑fat cheese, and 2% milk. You can also replace some of the bread with sautéed vegetables like spinach, mushrooms, or bell peppers.

Can I make Classic Breakfast Casserole gluten‑free?

Yes! Simply use your favorite gluten‑free bread — it absorbs the egg mixture beautifully and bakes up just as fluffy.

Can I use different meats or cheeses?

Definitely! Try diced ham, cooked bacon, or even chorizo. For cheese, swap cheddar for Swiss, pepper jack, or a blend for extra flavor.

A square piece of classic breakfast casserole on a white plate next to a glass of orange juice and a small bowl of freshly cut fruit.

☀️ More Amazing Breakfast Dishes

  • An untouched circular loaf of homemade monkey bread on a circular white plate next to a couple mugs of coffee.
    Homemade Monkey Bread
  • A white bowl filled with easy breakfast potatoes garnished with chopped parsley with a large serving spoon inserted along the side of the dish.
    Easy Breakfast Potatoes
  • An overhead view of two large black plate filled with breakfast tacos that are stuffed with eggs, chorizo, bacon, potatoes, and sitting next to a bowl of pico de gallo.
    Breakfast Tacos (3 Ways)
  • A loaf of best homemade pumpkin bread that has been cut into slices on brown paper next to two glass mugs of coffee and a small bowl of softened butter.
    Best Homemade Pumpkin Bread Recipe

Ready to make a breakfast dish that everyone will love? Go for it!

And when you do, be sure to take a photo of it, post it on Instagram, and tag @HowToFeedaLoon and hashtag #HowToFeedaLoon!

A yellow rectangular baking dish filled with a classic breakfast casserole with the handles of the dish being held by a person holding two linen napkins.
Print Recipe
5 from 2 votes

Classic Breakfast Casserole (Egg Bake)

This Classic Breakfast Casserole is a warm, comforting dish made with fluffy eggs, savory sausage, melty cheese, and soft bread baked to golden perfection. It’s easy to make ahead and perfect for holidays, brunch, or cozy weekend mornings.
Prep Time15 minutes mins
Cook Time45 minutes mins
Chill and Rest Time (Combined)2 hours hrs
Course: Breakfast / Brunch
Cuisine: American
Servings: 8
Calories: 351kcal
Author: Kris Longwell

Equipment

  • 8'x12" baking dish

Ingredients

  • 1 lb breakfast sausage
  • 1 tablespoon unsalted butter room temperature
  • 6 large eggs
  • 2 cups whole milk
  • 1 teaspoon Kosher salt
  • 1 teaspoon dry mustard
  • 2 slices white bread cubed, preferably day old (sitting out)
  • 1 cup cheddar cheese shredded

Instructions

  • Cook the sausage and then set aside to cool. Grease the dish with the softened butter.
    1 lb breakfast sausage, 1 tablespoon unsalted butter
  • In a large bowl, whisk the eggs until lightly beaten. Whisk in the milk, salt, and dry mustard.
    6 large eggs, 2 cups whole milk, 1 teaspoon Kosher salt, 1 teaspoon dry mustard
  • Gently stir in the cubed bread, cheddar cheese, and cooked sausage. Stir until just combined. Transfer to the prepared dish. Cover with plastic wrap and chill in the refrigerator for at least 30 minutes, preferably several hours, or even better, overnight.
    2 slices white bread, 1 cup cheddar cheese
  • Preheat oven to 350°F.
  • Remove the dish from the fridge, remove plastic wrap, and let rest at room temperature for 20 to 30 minutes.
  • Bake the casserole for 45 minutes, or until the center is no longer jiggly and the top is lightly browned. Remove from the oven and let stand for 10 minutes.
  • Slice and serve at once.

Video

Notes

NOTE: Watch the video in the recipe card for visual guidance.
  • Assemble the casserole the night before for an easy, stress‑free morning—just cover and refrigerate overnight.
  • Use day‑old or slightly dried bread for the best texture; it soaks up the egg mixture without getting soggy.
  • Swap the sausage for bacon, ham, or sautéed vegetables to change up the flavor.
  • For a lighter version, use turkey sausage, reduced‑fat cheese, and low‑fat milk.
  • To make it gluten‑free, use your favorite gluten‑free bread.
  • Leftovers reheat beautifully—cover with foil and warm in a 350°F oven until heated through.
  • Serve with Maple Pepper Bacon, fruit salad, or fresh orange juice for a complete breakfast or brunch.

Nutrition

Calories: 351kcal | Carbohydrates: 7g | Protein: 19g | Fat: 24g | Saturated Fat: 11g | Polyunsaturated Fat: 3g | Monounsaturated Fat: 7g | Trans Fat: 0.2g | Cholesterol: 206mg | Sodium: 850mg | Potassium: 304mg | Fiber: 0.2g | Sugar: 3g | Vitamin A: 529IU | Vitamin C: 0.4mg | Calcium: 215mg | Iron: 2mg

The Best Slow Cooker Pot Roast

November 30, 2025 by Kris Longwell 16 Comments

An overhead view of the best slow cooker pot roast on a platter surrounded by slow cooked potatoes and carrots.

There’s nothing quite like a classic Slow Cooker Pot Roast—tender beef, baby potatoes, and sliced carrots simmered together until everything is melt-in-your-mouth delicious. This easy, comforting meal fills your kitchen with an incredible aroma and delivers hearty flavor in every bite. It’s wonderful served with Southern-style green beans and a batch of easy skillet dinner rolls for the ultimate cozy, home-cooked dinner.

An overhead view of the best slow cooker pot roast on a platter surrounded by slow cooked potatoes and carrots.
[feast_advanced_jump_to]

🥩 The Ingredients

Simple, hearty ingredients come together to create a rich, savory pot roast with tender beef, flavorful vegetables, and a perfectly seasoned, silky gravy. Find ingredient notes (including substitutions and variations) below.

An arrangement of ingredients for the best slow cooker pot roast on a grey wooden background including an uncooked chuck roast, carrots, potatoes, onions, garlic, butter, beef stock, tomato paste, oil, Worcestershire sauce, and seasonings.

📝 Ingredient Notes, Substitutions & Variations

  • Chuck Roast: This cut is ideal for slow cooking because it becomes incredibly tender and flavorful. You can also use brisket or bottom round if chuck isn’t available.
  • Potatoes: Baby gold potatoes hold their shape beautifully, but red potatoes or chunks of russet potatoes work too.
  • Carrots: Sliced carrots add sweetness and color—try parsnips or turnips for a fun twist.
  • Beef Broth: Use low-sodium broth to better control salt levels. If you have homemade beef or turkey stock, it adds even more depth.
  • Red Wine: Optional but highly recommended—it enhances the sauce with rich, savory flavor. Substitute with extra broth or a splash of balsamic vinegar for a non-alcoholic version.
  • Worcestershire Sauce: Adds umami depth; soy sauce or a bit of steak sauce can work in a pinch.
  • Herbs: Dried thyme and rosemary bring classic pot roast flavor, but fresh herbs can be used—just double the amount.
  • Cornstarch Slurry: Thickens the gravy at the end. You can also use flour mixed with cold water or skip it for a thinner sauce.

See the recipe card (with video) below for a full list of ingredients and measurements.

🔥 Tips and Tricks for Perfect Pot Roast

  • Sear the roast first: Browning the meat before slow cooking adds rich, caramelized flavor and helps lock in juices.
  • Dredge in flour: Lightly coating the roast in flour helps thicken the gravy as it cooks.
  • Use the right size slow cooker: A 6-quart slow cooker is ideal for a 3–4 pound roast with vegetables.
  • Don’t lift the lid: Each time you open the lid, you lose heat and add about 20 minutes to the cooking time.
  • Cook low and slow: For the most tender results, cook on LOW for 8–9 hours rather than high heat.
  • Rest before serving: Let the roast rest for 10 minutes after cooking so the juices redistribute and the meat slices cleanly.
  • Make it ahead: The pot roast tastes even better the next day—store in the fridge overnight and reheat gently for deeper flavor.

👩🏼‍🍳 How to Make the Best Slow Cooker Pot Roast

A person dredging an uncooked chuck roast through seasoned flour on a large platter.
  1. Step 1: Season the chuck roast all over with salt and pepper, and then dredge it through flour seasoned with salt and pepper.
A person using metal tongs to flip are large chuck roast that is being seared in olive oil in a large black cast-iron skillet.
  1. Step 2: Heat the oil in a large skillet over medium heat, and then sear the roast until browned, about 5 minutes per side.
A person transferring sliced carrots from a white bowl with hand and transferring sliced baby potatoes from a glass bowl with his other hand into a slow cooker containing a seared chuck pot roast.
  1. Step 3: Place the seared roast over the onions and garlic in your slow cooker, then top with sliced carrots and halved baby potatoes.
A person pouring a red wine and beef stock with herbs mixture into a slow cooker filled with a seared pot roast and sliced carrots and potatoes.
  1. Step 4: Whisk together the sauce ingredients and then pour it over the vegetables and roast.
A person using a metal spatula to place a slow cooker pot roast onto a wooden cutting board next to a bowl of slow cooked vegetables.
  1. Step 5: Cook on LOW for 8 hours and then remove the vegetables and roast. Let it rest for at least 10 minutes.
A person straining broth from a slow cooker through a sieve into a large glass measuring cup on a wooden cutting board.
  1. Step 6: Strain the remaining liquid from the slow cooker.
A person pouring a cornstarch slurry into a brown gravy that is being stirred and simmered in a large black non-stick skillet.
  1. Step 7: Skim the excess grease from the surface, then transfer to a large skillet over medium heat. Stir in the cornstarch slurry and continue stirring until the mixture thickens.
Brown gravy being poured over slices of the best slow cooker pot roast on a white dinner plate also holding cooked potatoes and carrots.
  1. Step 8: Slice (or shred) the roast and serve immediately with the potatoes and brown gravy.

Expert Tip

Because the roast will be incredibly tender after slow cooking, slice it against the grain into thick pieces for the best texture—or simply use two forks to gently shred the meat right in the slow cooker for a rustic, melt-in-your-mouth presentation.

🍽️ How To Serve

  • Classic style: Serve the tender beef slices with the carrots, potatoes, and plenty of rich gravy spooned over top.
  • With Southern sides: Pair with Southern-style green beans and easy skillet dinner rolls for a comforting, homestyle meal.
  • Over mashed potatoes: Spoon the shredded pot roast and gravy over buttery mashed potatoes for extra indulgence.
  • As open-faced sandwiches: Pile the shredded beef on toasted bread, drizzle with gravy, and serve with a side of vegetables.
  • In incredible pot roast sliders: Layer the shredded pot roast on soft slider buns with a bit of gravy or melted cheese for an irresistible, crowd-pleasing bite.
  • Next-day leftovers: Use the meat in sandwiches, wraps, or even tacos for a quick and flavorful meal the following day.

🙋🏽‍♂️ Frequently Asked Questions

What cut of meat is best for Slow Cooker Pot Roast?

Chuck roast is the top choice because it becomes fall-apart tender and flavorful when cooked low and slow. Brisket or bottom round can also work well.

Can I skip searing the roast?

You can skip it if you’re short on time—the pot roast will still be tender and delicious—but searing adds a noticeable boost of flavor and color to the finished dish.

Can I cook Slow Cooker Pot Roast on HIGH?

You can, but for the most tender, juicy results, it’s best to cook on LOW for 8–9 hours. Cooking on high tends to make the meat less tender.

Can I make Slow Cooker Pot Roast ahead of time?

Absolutely. Pot roast tastes even better the next day! Store it in the refrigerator and reheat gently on the stovetop or in the slow cooker.

What if I don’t want to use wine?

No problem—just replace the wine with extra beef broth or a splash of balsamic vinegar for a similar depth of flavor.

A white dinner plate filled with a serving of the best slow cooker pot roast with vegetables and brown gravy.

😋 More Amazing Slow Cooker Recipes

  • An overhead view of two side-by-side bowls both filled with a serving of slow cooker lasagna soup.
    Slow Cooker Lasagna Soup
  • A straight-on view of a white bowl filled with a serving of slow-cooker coconut chicken curry with a glass of white wine nearby.
    Slow Cooker Coconut Chicken Curry
  • A white platter holding sliced slow cooker beef braciole with a bowl of marinara next to it.
    Slow Cooker Beef Braciole
  • A large white bowl filled with slow cooker asparagus risotto next to a pepper grinder and a glass of white wine.
    Slow Cooker Asparagus Risotto

Ready to make the best pot roast in town? Go for it!

And when you do, be sure to take a photo of it, post it on Instagram, and tag @HowToFeedaLoon and hashtag #HowToFeedaLoon

A white dinner plate filled with a serving of the best slow cooker pot roast with vegetables and brown gravy.
Print Recipe
4.50 from 8 votes

The Best Slow Cooker Pot Roast

This Slow Cooker Pot Roast is the ultimate comfort meal—tender beef, baby potatoes, and carrots simmered in a rich, savory gravy. It’s easy to prepare, full of flavor, and perfect for cozy family dinners or Sunday suppers.
Prep Time15 minutes mins
Cook Time8 hours hrs 10 minutes mins
Resting Time10 minutes mins
Course: Entree / Slow Cooker
Cuisine: American
Servings: 8
Calories: 532kcal
Author: Kris Longwell

Equipment

  • large (12-inch) skillet
  • 6-quart slow-cooker

Ingredients

  • 3½ lb chuck roast 3 to 4 lbs
  • salt and pepper
  • ⅓ cup all-purpose flour
  • 2 tablespoon olive oil or butter
  • 1 cup onion chopped or thinly sliced
  • 4 cloves garlic
  • 4 medium carrots peeled and sliced
  • 1½ lbs baby potatoes gold or red, halved

For the Sauce

  • 1 cup beef stock or broth
  • ¾ cup red wine optional
  • 2 tablespoon tomato paste
  • 1 tablespoon Worcestershire sauce
  • 1 teaspoon rosemary dried
  • 1 teaspoon thyme
  • 2 bay leaves
  • 1 teaspoon Kosher salt
  • ½ teaspoon black pepper
  • 2 tablespoon cornstarch mixed with 2 tablespoon water

Instructions

  • Pat the roast dry with a paper towel and then liberally salt and pepper it all over.
    3½ lb chuck roast, salt and pepper
  • Place the flour on a platter or plate and gently toss it with 1 teaspoon salt and 1 teaspoon black pepper. Dredge the seasoned roast in the flour and shake off excess.
    ⅓ cup all-purpose flour
  • Heat the oil over medium heat in a large skillet, preferably cast-iron. Once the oil is shimmering, add the roast and sear for about 5 minutes per side. Set aside.
    2 tablespoon olive oil
  • Place the onions and garlic in the bottom of your slow cooker. Place the roast over the onions and garlic. Place the carrots and potatoes on top of the roast.
    1 cup onion, 4 cloves garlic, 4 medium carrots, 1½ lbs baby potatoes
  • In a bowl or large measuring cup, whisk together the beef stock, wine, tomato paste, Worcestershire sauce, rosemary, thyme, bay leaves, salt (1 tsp), and black pepper (½ tsp). Pour the liquid over the meat and vegetables in the slow cooker.
    1 cup beef stock, ¾ cup red wine, 2 tablespoon tomato paste, 1 tablespoon Worcestershire sauce, 1 teaspoon rosemary, 1 teaspoon thyme, 2 bay leaves, 1 teaspoon Kosher salt, ½ teaspoon black pepper
  • Cook on LOW for 8 to 9 hours.
  • Carefully remove the vegetables and the roast and place them in a serving bowl or platter. Transfer the liquid (and any remaining solids) through a sieve over a bowl. Use a spoon (or fat separator) to remove grease from the surface of the liquid.
  • Pour the sauce into a saucepan over medium heat. Combine the cornstarch and water in a small bowl, and slowly whisk the cornstarch slurry into the sauce. Stir with a wooden spoon for a few minutes, until slightly thickened.
    2 tablespoon cornstarch
  • Slice or shred the roast and serve it at once with the gravy and tender vegetables.

Video

Notes

NOTE: Watch the video in the recipe card for visual guidance.
  • No wine? No problem: If you prefer not to cook with wine, simply replace it with an equal amount of beef broth or add a splash of balsamic vinegar for rich flavor.
  • Sear for extra flavor: Browning the roast before slow cooking adds depth and richness to the gravy, but you can skip this step if you’re short on time.
  • Low and slow is best: Cooking on low heat for 8–9 hours yields the most tender, flavorful meat.
  • Taste and adjust seasoning: Different broths vary in saltiness—taste the gravy before serving and adjust salt and pepper as needed.
  • Storage: Store leftovers in an airtight container in the refrigerator for up to 3 days, or freeze for up to 3 months. Reheat gently to keep the meat tender.

Nutrition

Calories: 532kcal | Carbohydrates: 28g | Protein: 42g | Fat: 27g | Saturated Fat: 11g | Polyunsaturated Fat: 2g | Monounsaturated Fat: 14g | Trans Fat: 1g | Cholesterol: 137mg | Sodium: 599mg | Potassium: 1301mg | Fiber: 3g | Sugar: 4g | Vitamin A: 5201IU | Vitamin C: 22mg | Calcium: 72mg | Iron: 6mg

Leftover Turkey Pot Pie with Buttery Puff Pastry

November 26, 2025 by Kris Longwell Leave a Comment

A white plate holding a large ramekin of leftover turkey pot pie with butter puff pastry sitting next to another plate of the same and two glasses of iced tea.

There’s nothing more comforting than a classic pot pie—whether it’s creamy chicken or hearty beef. This Leftover Turkey Pot Pie with Buttery Puff Pastry brings that same cozy flavor to your Thanksgiving leftovers, with tender turkey, savory vegetables, and a golden, flaky crust that’s pure comfort in every bite.

A white plate holding a large ramekin of leftover turkey pot pie with butter puff pastry sitting next to another plate of the same and two glasses of iced tea.
[feast_advanced_jump_to]

🥧 The Ingredients

Simple, wholesome ingredients come together to create a creamy, flavorful filling wrapped in a golden, buttery crust that’s the essence of comfort food. Find ingredient notes (including substitutions and variations) below.

An arrangement of ingredients for Leftover Turkey Pot Pie with Buttery Puff Pastry on a grey wooden background including leftover cubed turkey, celery, onion, carrots, peas, milk, broth, butter, egg, mustard, flour seasonings, and a puff pastry.

📝 Ingredient Notes, Substitutions & Variations

  • Turkey: Leftover roasted turkey works perfectly, but you can also use rotisserie chicken or cooked chicken breasts for a quick swap.
  • Vegetables: Classic carrots, celery, and onions form the flavor base—add mushrooms, corn, or green beans for extra texture and color.
  • Stock: Chicken or turkey stock both work beautifully; for a richer flavor, use homemade stock if you have it on hand.
  • Puff Pastry: Store-bought puff pastry makes this recipe easy and impressive—just be sure it’s fully thawed before baking. You can also use a pie crust for a more traditional pot pie feel.
  • Dijon Mustard: Adds a subtle tang that enhances the creamy filling; feel free to skip or replace with a touch of white wine or a splash of cream for a milder flavor.
  • Herbs: Fresh thyme adds brightness, but rosemary, sage, or a pinch of poultry seasoning make great variations. We highly recommend Maison Gabrielle for dried thyme and a wide selection of herbs and spices—the exceptional quality truly elevates your dishes to a whole new level of culinary excellence. Use code HOWTOFEEDALOON for a 10% discount.

See the recipe card (with video) below for a full list of ingredients and measurements.

🔥 Tips and Tricks

  • Keep the puff pastry cold: Cold pastry puffs up beautifully in the oven, so handle it quickly and chill it again if it gets too soft.
  • Don’t overfill the pie: Leave a little space at the top so the filling doesn’t bubble over while baking.
  • Use leftover gravy: For extra richness, stir a few spoonfuls of leftover Thanksgiving gravy into the filling.
  • Taste before baking: Adjust salt, pepper, and herbs after the filling thickens—seasoning is key to a flavorful pot pie.
  • Vent the top: Cut small slits in the puff pastry to let steam escape and keep the crust crisp.
  • Let it rest: Allow the pot pie to cool for 10–15 minutes before serving so the filling can set slightly and won’t spill out when sliced.
  • Make ahead: Prepare the filling a day in advance and store it in the fridge; assemble and bake when ready for an easy dinner.

👩🏼‍🍳 How to Make Leftover Turkey Pot Pies with Buttery Puff Pastry

A person using a large wooden spatula to sauté chopped onions, celery, and sliced carrots in butter in a large non-stick skillet on a gas stove.
  1. Step 1: Sauté the onions, celery, and carrots in the butter until tender, about 5 to 8 minutes.
A person dumping all-purpose flour from a small glass bowl into a skillet filled with sautéed carrots, celery, and onion.
  1. Step 2: Add the garlic and sauté for 30 seconds, and then stir in the flour and cook for 1 minute.
A person using a wooden spatula to stir a creamy sauce of chicken broth, milk, and sautéd vegetables.
  1. Step 3: Whisk in the milk and broth, and stir until thickened, about 4 minutes.
A person adding a spoonful of Dijon mustard into a skillet filled with a thickened pot pie sauce along with sweet peas, cubed leftover turkey, and seasonings.
  1. Step 4: Stir in the turkey, peas, thyme, salt, pepper, and Dijon. Stir until fully combined.
A person using a large spoon to transfer a leftover turkey pot pie filling from a large skillet into a white ramekin.
  1. Step 5: Spoon the mixture into a large ramekin. Don’t overfill.
A person placing a square puff pastry over the top of a ramekin that is filled with leftover turkey pot pie filling.
  1. Step 6: Brush the edges of the ramekin with egg wash. Cut two slits in a square puff pastry and place over the top of the ramekin.
A person using a pastry brush to apply an egg wash over the the surface of a puff pastry sheet that is resting on top of a ramekin filled with leftover turkey pot pie filling.
  1. Step 7: Brush the surface of the puff pastry with egg wash. Repeat with other pot pies.
Two freshly baked leftover turkey pot pies with puff pastry resting on a small baking sheet on a wooden cutting board.
  1. Step 8: Bake for about 20 minutes, until golden brown. Let rest for 10 minutes before serving.

Expert Tip

Let the filling cool slightly before topping it with puff pastry—if it’s too hot, the butter in the pastry can melt prematurely, preventing that perfect, flaky rise in the oven.

🍽️ How to Serve

  • Straight from the oven: Serve warm with a sprinkle of fresh thyme or parsley and a pinch of coarse sea salt for a touch of color, texture, and a bump of flavor.
  • With a side salad: Pair with a crisp green salad or simple vinaigrette to balance the rich, creamy filling.
  • Alongside roasted vegetables: Complement the pot pie with roasted Mediterranean vegetables, green beans, or glazed baby carrots.
  • For a cozy meal: Serve with the best mashed potatoes or maple orange cranberry sauce for a comforting, Thanksgiving-inspired dinner.
  • As leftovers: Reheat gently in the oven or air fryer to keep the puff pastry crisp and flaky.

🙋🏽‍♂️ Frequently Asked Questions

Can I make Turkey Pot Pie ahead of time?

Yes! You can prepare the filling up to a day in advance and refrigerate it. When ready to bake, add the puff pastry on top and bake as directed.

How do I keep the puff pastry from getting soggy?

Let the filling cool slightly before topping it, and bake the pie on a preheated baking sheet to help crisp the bottom.

Can I freeze Leftover Turkey Pot Pie with Buttery Puff Pastry?

Absolutely. Assemble the pie but don’t bake it, then wrap it tightly and freeze it for up to 2 months. Bake from frozen, adding a few extra minutes to the cooking time.

What can I use instead of puff pastry?

You can use a traditional pie crust or even biscuit dough for a heartier, more rustic topping.

Can I make this with chicken instead of turkey?

Definitely! This recipe works just as well with cooked chicken—perfect for using up leftovers any time of year.

A person using a fork to raise the filling from the inside of an opened up leftover turkey pot pie with buttery puff pastry.

🦃 More Amazing Leftover Turkey Recipes

  • A day after Thanksgiving panini that has been cut in half and stack on a cutting board next to a bowl of gravy.
    Day After Thanksgiving Panini
  • A straight-on view of a white rectangular baking dish filled with leftover turkey enchiladas with a red sauce and topped with chopped lettuce and pico de gallo.
    Leftover Turkey Enchiladas with Red Sauce
  • A large black cast-iron skillet filled with turkey and stuffing dressing with some of the food scooped out.
    Turkey and Stuffing Casserole
  • A large lasagna pan filled with turkey tetrazzini with a portion removed and a wooden spoon in its place.
    Turkey Tetrazzini

Ready to make the best pot pies in the world? Go for it!

And when you do, be sure to take a photo of it, post it on Instagram, and tag @HowToFeedaLoon and hashtag #HowToFeedaLoon!

A close-up view of a leftover turkey pot pie with butter puff pastry in a large ramekin resting on a white dinner plate.
Print Recipe
No ratings yet

Leftover Turkey Pot Pie with Buttery Puff Pastry

This Leftover Turkey Pot Pie with Buttery Puff Pastry is the ultimate comfort food makeover for your Thanksgiving leftovers. Filled with tender turkey, savory vegetables, and a creamy sauce, then topped with golden, flaky puff pastry—it’s cozy, hearty, and irresistibly delicious.
Prep Time20 minutes mins
Cook Time35 minutes mins
Resting time10 minutes mins
Total Time1 hour hr 5 minutes mins
Course: Lunch / Dinner
Cuisine: American / French
Servings: 4
Calories: 856kcal
Author: Kris Longwell

Equipment

  • 4 5-inch ramekins OR one 9-inch pie dish

Ingredients

  • 3 tablespoon unsalted butter
  • 1 medium onion chopped, about 1 cup
  • 3 celery stalks chopped, about 1 cup
  • 2 medium carrots peeled and sliced, about 1 cup
  • 2 cloves garlic minced
  • ⅓ cup all-purpose flour
  • 2 cups turkey stock or chicken broth or stock
  • 1 cup whole milk
  • 2 cups cooked turkey cubed
  • ½ cup frozen sweet peas
  • ½ teaspoon dried thyme
  • 1 tablespoon Dijon mustard
  • 1 teaspoon Kosher salt see NOTES
  • ½ teaspoon black pepper
  • 4 sheets puff pastry
  • 2 large eggs lightly beaten
  • fresh thyme chopped, for garnish (optional)
  • coarse sea salt for garnish (optional)

Instructions

  • Preheat oven to 400°F.
  • In a large saucepan or skillet, melt the butter over medium heat. Add the onion, celery, and carrots, and sauté until softened, about 5 to 8 minutes. Add the garlic and sauté, stirring often, for another 30 seconds.
    3 tablespoon unsalted butter, 1 medium onion, 3 celery stalks, 2 medium carrots, 2 cloves garlic
  • Stir in the flour and cook for 1 minute.
    ⅓ cup all-purpose flour
  • Whisk in the stock (or broth) and milk, stirring until smooth and thickened, about 3 to 5 minutes.
    2 cups turkey stock, 1 cup whole milk
  • Stir in the cooked turkey, peas, thyme, Dijon, salt, and pepper. Taste and add more salt, if needed. See NOTES.
    2 cups cooked turkey, ½ cup frozen sweet peas, ½ teaspoon dried thyme, 1 tablespoon Dijon mustard, 1 teaspoon Kosher salt, ½ teaspoon black pepper
  • Spoon the filling into the ramekins (or 9-inch pie dish). Brush egg wash around the top edges of the ramekins or pie dish.
  • Cut the puff pastries into approximately 6-inch squares (if using ramekins). Cut two slits in each puff pastry. If using a pie dish, just use one puff pastry, or if it's not large enough, arrange two across the top of the dish. Don't forget to cut the slits. Brush egg wash over the top of the puff pastry.
    4 sheets puff pastry, 2 large eggs
  • Place the ramekins (or pie dish) on a large baking pan and bake for 20 minutes, or until the puff pastry is puffed and golden brown.
  • Allow the pot pie(s) to rest for 10 to 15 minutes before serving. If desired, garnish the pastry with chopped fresh thyme and coarse sea salt.
    fresh thyme, coarse sea salt

Video

Notes

NOTE: Watch the video in the recipe card for visual guidance.
  • Taste before baking: Always taste the filling before adding the puff pastry—some store-bought stocks or broths can be saltier than others, so adjust seasoning as needed.
  • Cool the filling slightly: Let the filling cool for a few minutes before topping with puff pastry to prevent the butter in the pastry from melting too soon.
  • Keep the pastry cold: Cold puff pastry bakes up beautifully flaky—if it softens while assembling, pop it back in the fridge for a few minutes.
  • Make-ahead tip: You can prepare the filling up to a day in advance; just refrigerate and assemble when ready to bake.
  • Storage: Store leftovers in the refrigerator for up to 3 days. Reheat in the oven to keep the crust crisp and flaky.

Nutrition

Calories: 856kcal | Carbohydrates: 132g | Protein: 28g | Fat: 32g | Saturated Fat: 12g | Polyunsaturated Fat: 8g | Monounsaturated Fat: 9g | Trans Fat: 0.4g | Cholesterol: 126mg | Sodium: 767mg | Potassium: 575mg | Fiber: 6g | Sugar: 9g | Vitamin A: 5620IU | Vitamin C: 5mg | Calcium: 148mg | Iron: 8mg

Homemade Roasted Turkey Stock

November 25, 2025 by Kris Longwell 4 Comments

An overhead view of a large ladle of homemade roasted turkey stock being held over a large jar filled with more turkey stock.

Rich, aromatic, and deeply flavorful, this homemade roasted turkey stock is the ultimate way to make the most of your holiday leftovers. Roasting the turkey bones first brings out a deep, golden flavor that transforms soups, gravies, and sauces. It’s a simple, satisfying process that turns what might be waste into liquid gold for your kitchen.

An overhead view of a large ladle of homemade roasted turkey stock being held over a large jar filled with more turkey stock.
[feast_advanced_jump_to]

🦃 The Ingredients

A handful of simple, wholesome ingredients come together to create a rich, aromatic stock bursting with deep roasted flavor and comforting warmth. Find ingredient notes (including substitutions and variations) below.

An arrangement of ingredients for homemade roasted turkey stock on a grey wooden background including turkey bone, carrots, celery, onion, olive oil, herbs, and spices.

📝 Ingredient Notes, Substitutions & Variations

  • Turkey Bones: Use the leftover carcass and bones from your roasted turkey—both light and dark meat bones add depth. If you don’t have enough, supplement with chicken bones or wings.
  • Vegetables: Classic aromatics like onions, carrots, and celery build the flavor base. You can add leeks, garlic, or parsnips for extra sweetness or complexity.
  • Herbs: Fresh thyme and parsley add brightness; dried herbs work in a pinch, or try rosemary or sage for a more herbal, earthy note.
  • Peppercorns & Seasoning: Whole black peppercorns add subtle spice—adjust salt and pepper after simmering to taste.
  • Olive Oil: A drizzle helps caramelize the bones and vegetables during roasting; butter or neutral oil can be used instead.
  • Variations: Add a splash of white wine or apple cider vinegar before simmering to help extract flavor from the bones, or toss in a bay leaf for a classic stock aroma.

See the recipe card (with video) below for a full list of ingredients and measurements.

🔥 Tips & Tricks

  • Roast everything well: Don’t rush the roasting step—deeply browned bones and vegetables create the richest, most flavorful stock.
  • Use cold water to start: Starting with cold water helps draw out the collagen and flavor from the bones as the stock slowly heats.
  • Simmer gently: Keep the stock at a gentle simmer, not a rolling boil, to ensure a clear, clean-tasting broth.
  • Skim the foam: Occasionally skim off any foam or impurities that rise to the top for a smoother, more refined stock.
  • Don’t over-salt: Wait to season fully until the end, especially if you plan to reduce the stock later.
  • Strain carefully: Use a fine-mesh strainer or cheesecloth for a clear, golden liquid.
  • Cool and store safely: Let the stock cool completely before refrigerating or freezing—store in smaller containers for easy use later.
  • Freeze smart: Pour cooled stock into ice cube trays or freezer-safe jars for convenient portion sizes in future recipes.

👩🏼‍🍳 How to Make Homemade Roasted Turkey Stock

A person pouring olive oil from a small silver bowl over a large roasting pan filled with a turkey carcass and roughly chopped carrots, celery, and onions.
  1. Step 1: Place the turkey bones and vegetables in a large roasting pan and toss with olive oil, salt, and pepper.
A person using two wooden spoons to toss a turkey carcass and vegetables that have been partially roasted in a hot oven.
  1. Step 2: Roast at 450°F for 40 minutes, tossing everything gently about halfway through.
A person transferring black peppercorns from a small white bowl into a large stock pan filled with roasted turkey bones, vegetables, herbs, and simmering water.
  1. Step 3: Add the roasted turkey bones and veggies to a large stock pot and fill with water, and add the herbs and peppercorns. Simmer for 3 to 4 hours.
A person transferring roasted turkey stock including roasted vegetables and turkey bones from a large stock pan into a colander over a smaller stock pan.
  1. Step 4: Remove the large bones and then strain into a separate pot. Repeat with a fine-mesh sieve, if desired.
A person using a large spoon to scrape congealed fat from the surface of a stock pot filled with homemade roasted turkey stock.
  1. Step 5: Cover and chill overnight in the fridge. Use a spoon to remove any congealed fat on the surface of the stock.
A person twisting on the lid of an oversized jar filled with a gallon of homemade roasted turkey stock on a wooden cutting board.
  1. Step 6: Transfer the stock to a large vessel (or vessels) and store until ready to use. See NOTES about freezing.

Expert Tip

For the smoothest, silkiest stock, strain it twice—first through a regular colander to remove large pieces, then again through a fine-mesh sieve or cheesecloth to catch any tiny bits and achieve a beautifully clear, refined finish.

🍲 How to Use Roasted Turkey Stock

  • Soups & Stews: Use as a rich, flavorful base for turkey noodle soup, vegetable soup, or hearty stews.
  • Gravy: Elevate your Thanksgiving or holiday gravy with the deep, roasted flavor of homemade stock.
  • Risotto or Rice Dishes: Swap out water or store-bought broth for this stock to add incredible depth.
  • Mashed Potatoes: Replace some of the milk or cream with warm stock for lighter, more flavorful potatoes.
  • Sauces & Pan Juices: Deglaze roasting pans or enhance pan sauces for poultry or roasted pork.
  • Casseroles: Add moisture and flavor to stuffing, pot pies, or any baked comfort dish.
  • Freezer Staple: Freeze in portions to have homemade stock ready for quick weeknight meals all winter long.

🙋🏽‍♂️ Frequently Asked Questions

How long does Homemade Roasted Turkey Stock last in the refrigerator?

It will keep for about 4 to 5 days in an airtight container. For longer storage, freeze it for up to 3 months.

Can I make Homemade Roasted Turkey Stock without roasting the bones first?

Yes, but roasting adds a deeper, richer flavor and color. If you skip this step, your stock will be lighter and milder.

Do I need to break down the carcass for Homemade Roasted Turkey Stock?

Yes, breaking the bones into smaller pieces helps them fit in the pot and allows more flavor to extract during simmering.

Can I make Homemade Roasted Turkey Stock in a slow cooker or Instant Pot?

Absolutely! Both methods work well—just adjust the simmering time. Slow cookers develop great flavor over several hours, while pressure cookers reduce the time significantly.

Should I remove the fat from Homemade Roasted Turkey Stock?

It’s up to you! Skimming off the fat gives a cleaner stock, but leaving a bit adds richness and body, especially for soups or gravies.

An extra-large Mason jar filled with homemade roasted turkey stock with a glass of Italian parsley, carrots, an onion, a bowl of peppercorns, and a bowl of salt surrounding it.

🥩 Other Amazing Broth or Stock Recipes

  • Three jars, ranging in size from small to large, filled with homemade chicken broth with loose carrots and herbs nearby.
    Homemade Chicken Broth
  • Homemade beef stock in a jar surrounded by tomatoes, celery, and other vegetables.
    Homemade Beef Stock
  • A large jar holding seafood stock on a wooden table.
    Shellfish Stock
  • A straight-on view of two glass Mason jars that are filled with homemade vegetable stock with lids fastened on the tops of the jars and vegetables surrounding them, too.
    Homemade Vegetable Stock

Ready to take your soups, dressing, casseroles, and more to the next level? Go for it!

And when you do, take a photo of the stock, post it on Instagram, and tag @HowToFeedaLoon and hashtag #HowToFeedaLoon!

An overhead view of a large ladle of homemade roasted turkey stock being held over a large jar filled with more turkey stock.
Print Recipe
No ratings yet

Homemade Roasted Turkey Stock

This Homemade Roasted Turkey Stock is the ultimate way to turn leftover turkey bones into liquid gold. Roasting the bones and vegetables first builds deep, rich flavor, while a slow simmer extracts every bit of goodness for a beautifully golden, aromatic stock. Perfect for soups, gravies, and holiday dishes, it’s a kitchen staple you’ll want to make every year.
Prep Time15 minutes mins
Cook Time4 hours hrs 40 minutes mins
Chill time4 hours hrs
Total Time8 hours hrs 55 minutes mins
Course: Broth or Stock
Cuisine: American
Servings: 12
Calories: 112kcal
Author: Kris Longwell

Equipment

  • 1 Large roasting pan.
  • 1 large stock pan
  • 1 Colander and a fine-mesh sieve

Ingredients

  • 3 to 4 lb turkey bones carcass broken down, if possible (See NOTES)
  • 2 large onions quartered, skins left on
  • 2 large carrots roughly cut, no need to peel the skin
  • 3 stalks celery
  • 2 tablespoon olive oil
  • salt and pepper
  • 4 sprigs thyme fresh
  • 4 sprigs Italian parsley
  • ¼ cup black peppercorns

Instructions

  • Preheat oven to 450°F.
  • Place turkey bones, onions, carrots, and celery in a large roasting pan. Drizzle on some of the oil and liberally sprinkle with salt and pepper. Toss to coat, adding a little more oil, salt, and pepper, if needed.
    3 to 4 lb turkey bones, 2 large onions, 2 large carrots, 3 stalks celery, 2 tablespoon olive oil, salt and pepper
  • Roast for 40 minutes, carefully stirring the bones and veggies after 20 minutes.
  • Transfer the roasted bones and veggies to a large stock pot. Add enough water to cover by about 2 inches, usually about 1 gallon.
  • Add the thyme, parsley, and peppercorns to the pot.
    4 sprigs thyme, 4 sprigs Italian parsley, ¼ cup black peppercorns
  • Gently simmer over medium heat for 4 hours, skimming any impurities that may appear on the surface.
  • Remove most of the bones from the stock before straining. This makes straining easier.
  • Carefully strain the stock into another large pot through a colander. Discard the solid items. If desired, strain again through a fine-mesh sieve or a colander lined with cheesecloth.
  • Cover the stock and place it in the fridge (on a hot pad) for 3 to 4 hours, or even better, overnight. Remove from the fridge and use a spoon to skim congealed fat from the surface of the stock.
  • Use at once, or store in air-tight containers. Store in the refrigerator for up to 1 week, or freeze for up to 3 months.

Video

Notes

NOTE: Watch the video in the recipe card for visual guidance.
  • Break down the carcass: Try to break the turkey carcass into smaller pieces before roasting or simmering—this helps it fit better in the pot and allows more surface area to release flavor and collagen.
  • Don’t skip roasting: Roasting the bones and vegetables first adds incredible depth and a rich, golden color to your stock.
  • Simmer gently: Keep the stock at a low simmer (not a boil) to extract flavor without clouding the broth.
  • Strain twice for clarity: For the smoothest, silkiest stock, strain once through a colander and again through a fine-mesh sieve or cheesecloth.
  • Storage tip: Cool completely before refrigerating or freezing. The stock will keep for up to 7 days in the fridge or 3 months in the freezer.

Nutrition

Calories: 112kcal | Carbohydrates: 7g | Protein: 1g | Fat: 8g | Saturated Fat: 3g | Polyunsaturated Fat: 2g | Monounsaturated Fat: 2g | Sodium: 11mg | Potassium: 144mg | Fiber: 2g | Sugar: 2g | Vitamin A: 2076IU | Vitamin C: 4mg | Calcium: 33mg | Iron: 1mg

Sweet Potato Casserole with Crunchy Pecan Topping

November 23, 2025 by Kris Longwell 6 Comments

An overhead view of a sweet potato casserole with crunchy pecan topping in an oval baking dish with a portion of the casserole missing and a serving spoon inserted into the dish.

Thanksgiving just isn’t complete without a cozy, crowd‑pleasing side like this Sweet Potato Casserole with Crunchy Pecan Topping. Creamy, lightly sweetened sweet potatoes are baked under a golden, buttery pecan crust for the perfect mix of smooth and crunchy. It’s a warm, nostalgic favorite that always earns a spot on the holiday table.

An overhead view of a sweet potato casserole with crunchy pecan topping in an oval baking dish with a portion of the casserole missing and a serving spoon inserted into the dish.
[feast_advanced_jump_to]

🍠 The Ingredients

This classic casserole combines simple, wholesome ingredients that create a rich, creamy base and a perfectly sweet, buttery crunch on top. Find ingredient notes (including substitutions and variations) below.

An arrangement of ingredients for sweet potato casserole with crunchy pecan topping on a grey wooden background including cubed sweet potatoes, chopped pecans, flour, sugar, vanilla, milk, eggs, butter, and salt.

🥄 Ingredient Notes, Substitutions & Variations

  • Sweet Potatoes: Fresh, orange‑fleshed sweet potatoes give the casserole its naturally sweet, creamy base. Canned sweet potatoes work too—just drain them well before mashing.
  • Butter: Unsalted butter adds richness and helps the topping crisp beautifully. For a dairy‑free version, use coconut oil or plant‑based butter.
  • Brown Sugar: Dark brown sugar brings a deep, molasses‑like sweetness. Light brown sugar or maple syrup can be used for a milder flavor.
  • Milk: Whole milk gives a smooth, creamy texture, but half‑and‑half, evaporated milk, or non‑dairy milk are all great substitutes.
  • Cinnamon: A touch of cinnamon adds cozy warmth and enhances the natural sweetness of the potatoes. You can also add a pinch of nutmeg or allspice for extra holiday spice.
  • Pecans: The buttery crunch on top is classic, but chopped walnuts or almonds make great alternatives.
  • Flour: Helps bind the topping—use all‑purpose flour, or swap in oat flour or a gluten‑free 1:1 blend.
  • Add a twist: Stir in a splash of orange juice or maple syrup to the filling for brightness, or top with mini marshmallows for a nostalgic touch.

See the recipe card (with video) below for a full list of ingredients and measurements.

💡 Tips for Success

  • Boil just until tender: Cut the sweet potatoes into chunks and boil until they’re fork‑tender, not mushy. Overcooking can make the filling watery, so drain them well and let them steam dry before mashing.
  • Mash while warm: Warm sweet potatoes blend more smoothly with butter and sugar, giving you a creamy, lump‑free texture.
  • Taste before baking: Sweet potatoes vary in sweetness—taste the filling and adjust the sugar or spice to your liking before adding the topping.
  • Keep the topping crumbly: Mix the pecan topping just until it forms coarse crumbs; overmixing can make it dense instead of crunchy.
  • Watch the bake time: The casserole is ready when the topping is golden and crisp and the filling is just set—don’t overbake or it may dry out.
  • Make ahead: Prepare the filling and topping separately up to one day in advance. Assemble just before baking for the freshest texture.
  • For extra crunch: Sprinkle a few extra pecans on top right before baking or add a pinch of flaky sea salt after it comes out of the oven.

👩🏼‍🍳 How to Make Sweet Potato Casserole with Crunch Pecan Topping

A person stirring cubes of sweet potatoes in a stock pan filled with boiling water on a gas stove.
  1. Step 1: Boil the sweet potato chunks until just tender, about 15 minutes.
A person using an electric hand mixer to mix boiled sweet potatoes in a glass bowl.
  1. Step 2: Mix or mash the sweet potatoes until smooth.
A person stirring mashed sweet potatoes with melted butter, brown sugar, granulated sugar, milk, and eggs.
  1. Step 3: Stir in the melted butter, brown sugar, granulated sugar, milk, eggs, vanilla, salt, and cinnamon. Blend until smooth.
A person transferring a sweet potato casserole mixture with a wooden spoon into a greased baking dish.
  1. Step 4: Transfer the mixture into a greased baking dish (9×13″ or similar size).
A person sprinkling a brown sugar and chopped pecan mixture all over the surface of an uncooked sweet potato casserole in an oval baking dish.
  1. Step 5: Combine the topping ingredients in a bowl and then sprinkle them over the top of the sweet potato mixture.
A person using a pair of oven mitts to place an oval baking dish filled with a freshly baked sweet potato casserole with crunch pecan topping on a baking rack on a cutting board.
  1. Step 6: Bake until the topping is lightly browned, about 35 minutes. Let cool for 10 minutes before serving.

Expert Tip

For a richer flavor and creamier texture, mash the sweet potatoes with warm milk and melted butter instead of adding them cold. The warmth helps everything blend smoothly and evenly, giving the filling a silky consistency. For even more depth, try browning the butter first—it adds a subtle nutty flavor that pairs beautifully with the pecan topping.

🍽️ How to Serve

  • Serve warm: This casserole is best enjoyed fresh from the oven when the filling is creamy and the pecan topping is golden and crisp.
  • As a Thanksgiving side: It pairs beautifully with roast turkey, ham, or beef tenderloin—adding a touch of sweetness to balance savory dishes.
  • For a festive spread: Serve alongside classics like gourmet green bean casserole, mashed potatoes, and cranberry sauce for the ultimate holiday plate.
  • Add a finishing touch: A light sprinkle of flaky sea salt or a drizzle of maple syrup right before serving enhances both flavor and presentation.
  • For leftovers: Reheat individual portions in the oven or air fryer to bring back the topping’s crunch.

🙋🏽‍♂️ Frequently Asked Questions

Can I make Sweet Potato Casserole with Crunchy Pecan Topping ahead of time?

Yes! You can prepare the filling and topping separately up to one day in advance. Store them covered in the refrigerator, then assemble and bake just before serving for the best texture.

How do I keep the pecan topping crunchy?

Make sure the topping mixture is crumbly, not overmixed, and bake the casserole uncovered so the topping crisps up nicely. If reheating leftovers, use the oven instead of the microwave to restore the crunch.

Can I use canned sweet potatoes for Sweet Potato Casserole?

Absolutely. Drain them well before mashing to remove excess liquid, and reduce the sugar slightly since canned sweet potatoes are often packed in syrup.

Can I freeze Sweet Potato Casserole with Crunch Pecan Topping?

Yes! Assemble the casserole (without baking) and wrap it tightly in plastic wrap and foil. Freeze for up to 2 months. Thaw overnight in the refrigerator, then bake as directed.

Can I make Sweet Potato Casserole with Crunchy Pecan Topping gluten‑free?

Yes! Simply swap the all‑purpose flour in the topping for a 1:1 gluten‑free flour blend or use oat flour. The texture stays crisp and buttery, and the casserole will still bake up perfectly golden and delicious.

An overhead view of an freshly baked sweet potato casserole with crunchy pecan topping being place on a baking rack by a person using autumnal cloth linens to grip the handles.

🍁 More Classic Thanksgiving Sides

  • A white serving bowl filled with shaved Brussels sprouts with balsamic, pine nuts, and pancetta with a large spoon inserted into the side of the salt.
    Shaved Brussels Sprouts with Pancetta and Balsamic
  • A baking dish filled with a baked leek gratin that has some of it missing and a spoon inserted into the gratin.
    Baked Leek Gratin
  • An overhead view of a stainless skillet filled with braised green beans with tomatoes with a large wooden spoon inserted into the middle.
    Braised Green Beans with Tomatoes
  • A square white casserole dish filled with strawberry pretzel salad with one piece missing in the corner.
    Strawberry Pretzel Salad

Ready to make a side dish that just might steal the show? Go for it!

And when you do, be sure to take a photo of it, post it on Instagram, and tag @HowToFeedaLoon and hashtag #HowToFeedaLoon!

An overhead view of a sweet potato casserole with crunchy pecan topping in an oval baking dish with a portion of the casserole missing and a serving spoon inserted into the dish.
Print Recipe
5 from 3 votes

Sweet Potato Casserole with Crunchy Pecan Topping

This Sweet Potato Casserole with Crunchy Pecan Topping is a creamy, comforting holiday classic. Smooth, lightly spiced sweet potatoes are topped with a buttery, caramelized pecan crumble for the perfect balance of sweet and savory—an irresistible side dish for Thanksgiving or any festive meal.
Prep Time15 minutes mins
Cook Time1 hour hr
Resting time10 minutes mins
Total Time1 hour hr 25 minutes mins
Course: Side Dish
Cuisine: American
Servings: 8
Calories: 574kcal
Author: Kris Longwell

Equipment

  • 9"x13" baking dish or comparable-sized dish
  • Hand mixer optional, see NOTES

Ingredients

Preparing the Dish

  • 1 tablespoon unsalted butter room temperature, for greasing the dish

For the Sweet Potato Filling

  • 3 lbs sweet potatoes peeled and cut into uniform-sized chunks
  • ½ cup unsalted butter melted, plus extra for greasing the dish
  • ½ cup dark brown sugar
  • ¼ cup granulated sugar
  • ½ cup whole milk
  • 2 large eggs lightly beaten
  • 1 teaspoon vanilla extract
  • 1 teaspoon ground cinnamon
  • ½ teaspoon Kosher salt

For the Crunchy Pecan Topping

  • 1 cup pecans roughly chopped
  • ½ cup dark brown sugar
  • ⅓ cup all-purpose flour
  • ¼ cup unsalted butter melted
  • ½ teaspoon Kosher salt

Instructions

  • Preheat oven to 350°F. Bring a large pot of water to a boil (large enough to cover all of the sweet potato chunks without overflowing). Grease your baking dish with softened butter (or cooking spray).
    1 tablespoon unsalted butter
  • Carefully place the sweet potato chunks in the boiling water. Cook until tender, about 15 minutes, stirring occasionally. Drain.
    3 lbs sweet potatoes
  • In a large bowl, use an electric hand mixer or a potato masher to mash the potatoes until smooth. Stir in the melted butter, brown sugar, granulated sugar, milk, eggs, vanilla, cinnamon, and salt. Mix until creamy and well combined.
    ½ cup unsalted butter, ½ cup dark brown sugar, ¼ cup granulated sugar, ½ cup whole milk, 2 large eggs, 1 teaspoon vanilla extract, 1 teaspoon ground cinnamon, ½ teaspoon Kosher salt
  • Grease the dish with softened butter (or cooking spray).
  • Spread the sweet potato mixture evenly into the prepared dish.
  • In a medium bowl, combine the chopped pecans, brown sugar, flour, melted butter, and salt. Stir until crumbly and evenly coated.
    1 cup pecans, ½ cup dark brown sugar, ⅓ cup all-purpose flour, ¼ cup unsalted butter, ½ teaspoon Kosher salt
  • Sprinkle the pecan mixture evenly over the sweet potatoes.
  • Bake for 30 to 35 minutes, or until the topping is lightly browned and crisp. Cool slightly for about 10 minutes. The topping will firm up a bit as it cools.

Video

Notes

NOTE: Watch the video in the recipe card for visual guidance.
  • Boil sweet potatoes just until tender, then drain well to avoid excess moisture in the filling.
  • To save time, the filling and topping can be prepared a day ahead and assembled just before baking.
  • For a gluten‑free version, use a 1:1 gluten‑free flour blend or oat flour in the topping.
  • Adjust the sweetness to taste—sweet potatoes can vary in natural sugar content.
  • Add a pinch of nutmeg or allspice for extra holiday warmth.
  • Leftovers keep well in the refrigerator for up to 4 days; reheat in the oven to keep the topping crisp.
  • This casserole also freezes beautifully—assemble, freeze unbaked, then thaw overnight before baking.

Nutrition

Calories: 574kcal | Carbohydrates: 74g | Protein: 7g | Fat: 24g | Saturated Fat: 13g | Polyunsaturated Fat: 4g | Monounsaturated Fat: 8g | Trans Fat: 1g | Cholesterol: 98mg | Sodium: 418mg | Potassium: 714mg | Fiber: 7g | Sugar: 41g | Vitamin A: 24807IU | Vitamin C: 4mg | Calcium: 117mg | Iron: 2mg

Roasted Baby Carrots with Herbed Vinaigrette

November 21, 2025 by Kris Longwell Leave a Comment

An overhead view of an oval white platter filled with roasted baby carrots with herbed vinaigrette on an autumnal-style place matt.

These Roasted Baby Carrots with Herbed Vinaigrette are a simple yet elegant side dish that shines on any holiday table. Tender, caramelized carrots are tossed in a bright, herb‑infused vinaigrette for the perfect balance of sweet and savory. They pair beautifully with centerpiece roasts like spatchcocked turkey, holiday ham, or tender beef tenderloin, making them a festive favorite for Thanksgiving, Christmas, or any special occasion.

An overhead view of an oval white platter filled with roasted baby carrots with herbed vinaigrette on an autumnal-style place matt.
[feast_advanced_jump_to]

🥕 The Ingredients

This recipe combines simple, fresh ingredients that create a perfect balance of sweetness, tang, and herbaceous flavor, elevating tender roasted carrots into an exquisite side dish. Find ingredient notes (including substitutions and variations) below.

An arrangement of ingredients for roasted baby carrots with herb vinaigrette on a grey wooden background including yellow, orange, and purple baby carrots, oil, whole grain mustard, vinegar, garlic, herbs, and spices.

🌿 Ingredient Notes, Substitutions & Variations

  • Baby Carrots: Their naturally sweet flavor and tender texture make them perfect for roasting. You can also use regular carrots—just peel and cut them into evenly sized sticks for even cooking.
  • Olive Oil: Helps the carrots caramelize beautifully. Avocado oil or melted butter can be used for a slightly different flavor.
  • White Wine Vinegar: Adds a bright, tangy note to the vinaigrette. Apple cider vinegar or champagne vinegar are great substitutes.
  • Whole Grain Mustard: Brings texture and subtle spice. Dijon mustard works well if you prefer a smoother finish.
  • Fresh Herbs: Rosemary and thyme add earthy depth—feel free to swap in sage or tarragon for a different herbal profile.
  • Garlic: Fresh minced garlic gives the vinaigrette a bold kick; roasted garlic offers a milder, sweeter flavor.
  • Finishing Touch: A sprinkle of coarse sea salt or flaky salt just before serving enhances the flavor and adds a touch of crunch.

💡 Tips for Success

  • Use evenly sized carrots: If using whole carrots, cut them into uniform pieces so they roast evenly and caramelize at the same rate.
  • Don’t overcrowd the pan: Give the carrots space on the baking sheet—overcrowding traps steam and prevents that beautiful golden color.
  • Roast at high heat: A temperature around 400°F (200°C) helps the carrots develop a crisp exterior and tender center.
  • Whisk the vinaigrette well: Emulsify the oil and vinegar thoroughly so the dressing coats the carrots evenly and doesn’t separate.
  • Toss while warm: Add the vinaigrette right after roasting—warm carrots absorb the flavors better.
  • Adjust seasoning before serving: Taste and add a pinch of salt or an extra splash of vinegar if needed to balance the flavors.
  • Add garnish just before serving: A sprinkle of fresh parsley and flaky sea salt at the end adds color, texture, and a touch of freshness.

👩🏼‍🍳 How to Make Roasted Baby Carrots with Herbed Vinaigrette

A person using two wooden spoons to toss colorful baby carrots with olive oil, salt, and pepper in a large glass bowl.
  1. Step 1: Place the carrots in a large bowl and toss with the oil, salt, and pepper.
A person using a wooden spoon to spread lightly seasoned baby carrots in a single row on a metal baking sheet lined with a silicone baking matt.
  1. Step 2: Spread the carrots in an even row on a baking pan lined with parchment paper or a silicone matt.
A person using two wooden spoons to toss baby carrots that are being roasted in a large baking sheet pan inside an oven.
  1. Step 3: Roast in a 475°F oven for 20 minutes, tossing the carrots in the pan halfway through the cooking time.
A person pouring olive oil from a small glass bowl into a jar filled with white wine vinegar, whole grain mustard, minced garlic, and herbs.
  1. Step 4: Add all of the vinaigrette ingredients to a jar with a lid. Shake vigorously to emulsify.
A person using two wooden spatula to toss together roasted baby carrots that are coated with an herbed vinaigrette all in a large glass bowl.
  1. Step 5: Toss the warm, roasted carrots with the vinaigrette.
A person sprinkling chopped Italian parsley over the top of a platter filled with roasted baby carrots with herbed vinaigrette.
  1. Step 6: Transfer to a serving dish, garnish with chopped parsley and coarse sea salt, and serve at once!

Expert Tip

For a perfectly balanced vinaigrette, taste and adjust the acidity before tossing with the carrots. The sweetness of roasted carrots can vary, so add an extra splash of vinegar or a touch more mustard if it needs brightness. This quick adjustment ensures every bite has that ideal sweet‑savory harmony.

🍽️ How to Serve

  • Serve warm or at room temperature: These carrots are delicious straight from the oven or after resting a bit — perfect for busy holiday meals.
  • Drizzle before serving: Give the carrots a final toss or drizzle with any remaining vinaigrette for a glossy, flavorful finish.
  • Add a fresh touch: Sprinkle with chopped Italian parsley or a pinch of flaky sea salt just before serving for color and crunch.
  • Pair with your centerpiece roast: This side shines next to roast turkey, glazed ham, or tender roast leg of lamb, adding brightness and balance to rich main dishes.
  • Make it a colorful spread: Serve alongside other vibrant sides like roasted Brussels sprouts, perfectly mashed potatoes, or a classic cornbread dressing for a beautiful holiday plate.

🙋🏽‍♂️ Frequently Asked Questions

Can I make Roasted Baby Carrots with Herbed Vinaigrette ahead of time?

Yes! You can roast the carrots a few hours in advance, then reheat them just before serving. Add the vinaigrette right before serving to keep the flavors bright and fresh.

Can I use regular carrots instead of baby carrots in Roasted Baby Carrots with Herbed Vinaigrette?

Absolutely. Just peel and cut them into evenly sized sticks or coins so they roast evenly. The flavor will be just as delicious.

How do I keep Roasted Baby Carrots with Herbed Vinaigrette from getting soggy?

Make sure to spread the carrots out on the baking sheet with plenty of space between them. Overcrowding traps steam and prevents caramelization.

Can Roasted Baby Carrots with Herbed Vinaigrette be served cold?

Yes! They’re delicious at room temperature or even chilled, making them a great make‑ahead side for buffets or potlucks.

Can I double the recipe for Roasted Baby Carrots with Herbed Vinaigrette?

Definitely. Just use two baking sheets and rotate them halfway through roasting to ensure even browning.

A person using a silver serving spoon to lift up a serving of roasted baby carrots with herb vinaigrette above a platter of the same.

🔥 Other Amazing Side Dishes

  • An oval baking dish filled with Brussels sprouts gratin with a spoon nestled into the dish.
    Brussels Sprouts Gratin
  • A large silver skillet filled with cooked candied yams and wooden spoon.
    Classic Candied Yams
  • A square white baking dish filled with corn casserole next to a plate filled with the same.
    Corn Casserole
  • The Ultimate Macaroni and Cheese in a large cast iron skillet with a wooden spoon.
    The Ultimate Macaroni and Cheese

Ready to make a beautiful and delicious side dish that everyone will love? Go for it!

And when you do, be sure to take a photo of it, post it on Instagram, and tag @HowToFeedaLoon and hashtag #HowToFeedaLoon!

A close-up view of an oval white platter filled with roasted baby carrots with herb vinaigrette and topped with chopped Italian parsley.
Print Recipe
No ratings yet

Roasted Baby Carrots with Herbed Vinaigrette

These Roasted Baby Carrots with Herbed Vinaigrette are tender, caramelized, and bursting with fresh flavor. A simple herb‑infused vinaigrette adds brightness and elegance, making this an easy yet impressive side dish for any holiday or special meal.
Course: Side Dish
Cuisine: American / French
Servings: 8
Calories: 190kcal
Author: Kris Longwell

Equipment

  • Large baking sheet or two medium-sized
  • Parchment paper or a silicone mat

Ingredients

  • 2 lbs baby carrots
  • 4 tablespoon olive oil
  • 2 teaspoon Kosher salt
  • 2 teaspoon black pepper

For the Vinaigrette and Finishing the Dish

  • ¼ cup white wine vinegar
  • 2 tablespoon whole grain mustard
  • 4 cloves garlic minced
  • 1 tablespoon thyme fresh, chopped, or 1 teaspoon dried
  • 1 teaspoon rosemary fresh, chopped, or ½ teaspoon dried
  • ⅓ cup olive oil
  • 2 tablespoon Italian parsley fresh, chopped, for garnish
  • coarse sea salt for finishing, optional

Instructions

  • Preheat oven to 475°F. Line a baking sheet with parchment paper or a silicone mat.
  • In a large bowl, add the carrots and toss them with 4 tablespoon oil, and two heaping teaspoons of salt and pepper, each.
    2 lbs baby carrots, 4 tablespoon olive oil, 2 teaspoon Kosher salt, 2 teaspoon black pepper
  • Spread the carrots in a single layer on the baking sheet. You don't want any carrots to be piled on each other; if so, use two baking sheets.
  • Bake for 20 minutes, tossing the carrots with a couple of wooden spoons about halfway through. Once the carrots are tender enough to easily pierce with a sharp knife, they are ready.
  • While the carrots are roasting, put together the vinaigrette. In a glass jar (with a tight-fitting lid), add all of the vinaigrette ingredients. Attach the lid and shake the jar vigorously. Or, add all of the ingredients, except the oil, into a glass bowl. Slowly whisk the oil into the bowl until combined and emulsified.
    ¼ cup white wine vinegar, 2 tablespoon whole grain mustard, 4 cloves garlic, 1 tablespoon thyme, 1 teaspoon rosemary, ⅓ cup olive oil
  • Place the warm, roasted carrots in a large bowl and pour the vinaigrette over them. Gently toss to fully coat them.
  • Transfer the carrots with the vinaigrette onto a serving platter and garnish with chopped Italian parsley and a sprinkling of coarse sea salt. Serve at once.
    2 tablespoon Italian parsley, coarse sea salt

Video

Notes

NOTE: Watch the video in the recipe card for visual guidance.
  • If using full‑size carrots, peel and cut them into evenly sized sticks or slices for even roasting.
  • For deeper caramelization, roast the carrots on a preheated baking sheet.
  • The vinaigrette can be made up to 2 days ahead and stored in the fridge—just whisk before using.
  • Toss the carrots with the vinaigrette while they’re still warm so they absorb maximum flavor.
  • Fresh herbs make a big difference, but dried herbs can be used in a pinch (use about one‑third the amount).
  • This dish can be served warm, at room temperature, or even chilled—it’s delicious every way.
  • Leftovers keep well for up to 3 days in the refrigerator; reheat gently or enjoy cold.

Nutrition

Calories: 190kcal | Carbohydrates: 11g | Protein: 1g | Fat: 16g | Saturated Fat: 2g | Polyunsaturated Fat: 2g | Monounsaturated Fat: 12g | Sodium: 713mg | Potassium: 301mg | Fiber: 4g | Sugar: 5g | Vitamin A: 15769IU | Vitamin C: 6mg | Calcium: 50mg | Iron: 1mg

Sautéed Butternut Squash with Pancetta, Maple, and Herbs

November 19, 2025 by Kris Longwell 4 Comments

An overhead view of a white oval serving dish filled with Maple-Glazed Butternut Squash with Pancetta and Herbs sitting next to a small bowl of pecans and another bowl of chopped fresh herbs.

This sautéed butternut squash with pancetta, maple, and herbs strikes the perfect balance of savory and sweet. Crispy pancetta adds richness, while maple and fresh herbs bring warmth and depth. It’s an effortless yet elegant side that pairs beautifully with roasted turkey, holiday ham, or a tender leg of lamb.

An overhead view of a white oval serving dish filled with Maple-Glazed Butternut Squash with Pancetta and Herbs sitting next to a small bowl of pecans and another bowl of chopped fresh herbs.
[feast_advanced_jump_to]

🌿The Ingredients

This dish combines simple, wholesome ingredients that create a rich blend of sweetness, nuttiness, and fresh herbal flavor in every bite. Find ingredient notes (including substitutions and variations) below.

An arrangement of ingredients for maple-glazed butternut squash on a wooden grey background including cubed butternut squash, pancetta, maple syrup, butter, pecans, spices, and herbs.

📝Ingredient Notes, Substitutions & Variations

  • Butternut Squash: Fresh cubed squash gives the best texture and flavor, but pre-cut or frozen squash works for convenience—just adjust cooking time as needed.
  • Fats for Sautéing: A mix of butter and olive oil adds richness and prevents burning; substitute ghee or all-olive oil for a dairy-free option.
  • Maple Syrup: Pure maple syrup adds natural sweetness—swap with honey or brown sugar for a slightly different flavor profile.
  • Herbs: Dried thyme adds earthy depth; try rosemary or sage for a more robust, aromatic twist. We highly recommend Maison Gabrielle for dried thyme and a wide selection of herbs and spices—the exceptional quality truly elevates your dishes to a whole new level of culinary excellence. Use code HOWTOFEEDALOON for a 10% discount.
  • Pancetta: For a different savory note, use diced bacon or prosciutto—or omit entirely for a vegetarian version.
  • Pecans: Toasted pecans add crunch and warmth; walnuts, hazelnuts, or pumpkin seeds make great alternatives.
  • Finishing Touch: A sprinkle of fresh parsley brightens the dish; add a dash of lemon zest or chili flakes for extra flavor contrast.

See the recipe card (with video) below for a full list of ingredients and measurements.

🔥Tips & Tricks

  • Cut evenly: Uniform cubes ensure the squash cooks evenly and caramelizes beautifully.
  • Don’t overcrowd the pan: Give the squash space to brown—too much in the pan will cause it to steam instead of sauté.
  • Use medium heat: Moderate heat allows the squash to soften inside while developing golden, crisp edges.
  • Start with oil, finish with butter: Oil prevents burning early on, while butter added near the end adds flavor and richness.
  • Season in layers: Add salt and pepper as it cooks, then adjust to taste before serving for balanced seasoning.
  • Add maple at the end: Stir in maple syrup during the last minute of cooking to glaze the squash without burning the sugars.
  • Toast nuts separately: Toast pecans or other nuts in a dry skillet or toaster oven for a few minutes before adding—they’ll stay crunchy and flavorful.
  • Use fresh herbs last: Sprinkle herbs just before serving to preserve their bright color and aroma.
  • Test for doneness: The squash should be tender when pierced with a fork but still hold its shape.

👩‍🍳 How to Make Sautéed Butternut Squash with Pancetta, Maple, and Herbs

A person using a slotted metal spatula to transfer crispy, cooked pancetta from a black cast-iron skillet onto a paper towel-lined plate.
  1. Step 1: Cook the cubed pancetta in a cast-iron skillet over medium heat until crispy. Remove with a slotted spoon and leave the rendered grease in the pan.
A person transferring cubed butternut squash from a large glass bowl into a cast-iron skillet with simmering oil in it.
  1. Step 2: Melt the butter in the pan with the grease and stir in the butternut squash. Cook, undisturbed for 5 minutes.
A person holding a metal tin of dried thyme with one hand over a skillet filled with cubed butternut squash and the other hand holding a teaspoon of the dried herb.
  1. Step 3: Add the salt, pepper, and herbs, and cook, stirring occasionally, until the squash is tender a slightly browned, about another 15 minutes.
A person holding a small glass bowl of crispy, cooked pancetta in one hand and the other hand holding a small bowl of maple syrup, all over a skillet filled with sauteed butternut squash.
  1. Step 4: Gently stir in the maple syrup and the cooked pancetta.
A wooden spoon inserted into the center of a skillet filled with Maple-Glazed Butternut Squash with Pancetta and Herbs.
  1. Step 5: Cook for another minute or two, and test to make sure the squash is tender. If not, add a splash of broth and cook for another 5 to 10 minutes.
A person using his fingers to garnish a serving bowl filled with maple-glazed butternut squash with chopped parsley and chopped pecans.
  1. Step 6: Place in serving bowl and garnish with chopped pecans and chopped Italian parsley.

Expert Tip: How to Cube a Butternut Squash

  1. Trim the ends: Cut off both the top and bottom to create a stable, flat surface.
  2. Peel the skin: Use a sharp vegetable peeler to remove the tough outer skin until the bright orange flesh is exposed.
  3. Separate the sections: Slice the squash crosswise where the long neck meets the round bulb.
  4. Cube the neck: Stand the neck upright, cut it into even planks, then into strips, and finally into cubes.
  5. Prepare the bulb: Cut the bulb in half lengthwise, scoop out the seeds, then slice and cube as you did with the neck.
  6. Stay safe: Use a sharp knife, a sturdy cutting board, and take your time—steady cuts make for even cubes and safer prep.

🍽️ How to Serve

  • As a side dish: Serve warm alongside roasted turkey, holiday ham, or leg of lamb for a festive and flavorful pairing.
  • Over grains: Spoon over quinoa, farro, or wild rice for a hearty vegetarian meal.
  • With greens: Toss with arugula or spinach for a warm fall salad topped with goat cheese or feta.
  • On a platter: Arrange in a shallow serving dish and garnish with extra herbs and toasted nuts for a beautiful presentation.
  • For brunch: Pair with eggs and toast for a sweet-and-savory morning option.
  • In a grain bowl: Combine with roasted vegetables, nuts, and a drizzle of vinaigrette for a wholesome lunch.
  • As leftovers: Reheat gently in a skillet or oven—perfect for adding color and flavor to next-day meals.

🙋🏽Frequently Asked Questions

Can I make Sautéed Butternut Squash ahead of time?

Yes, you can cook it a few hours in advance. Reheat gently in a skillet over medium heat or in the oven until warmed through before serving.

How do I keep Sautéed Butternut Squash from getting mushy?

void overcrowding the pan and cook over medium heat so the cubes caramelize instead of steaming. Stir occasionally but not too often.

Can I use frozen squash for Sautéed Butternut Squash?

Yes, but thaw and pat it dry first to remove excess moisture. This helps achieve a nice golden sear

What herbs go best with Sautéed Butternut Squash?

Thyme, sage, or rosemary pair beautifully, but you can mix and match depending on your preference. We love Maison Grabrielle herbs. Use discount code: HOWTOFEEDALOON for 10% off.

Can I make Sautéed Butternut Squash without pancetta?

Absolutely. Simply omit it for a vegetarian version or substitute with chopped bacon or prosciutto for a similar flavor.

Can I roast instead of sauté Sautéed Butternut Squash?

Yes, roasting is a great alternative. Toss the ingredients (except the cooked pancetta and maple syrup) together and bake at 400°F until tender and caramelized, about 25–30 minutes. Then stir in the pancetta and syrup.

A person using a large serving spoon to hold up a mound of Maple-Glazed Butternut Squash with Pancetta and Herbs.

🦃Other Classic Thanksgiving Sides

  • 4 stuffed acorn squash filled with a vegetarian stuffing all in a oval baking dish.
    Stuffed Acorn Squash
  • A white plate of Thanksgiving dressing, turkey, green beans, next to gravy and a black skillet.
    Mom’s Thanksgiving Dressing
  • A baked oyster casserole in an oval black baking dish next to a grey napkin and a wooden spoon.
    Oyster Casserole
  • An overhead view of a large black oval baking dish that is filled with an untouched gourmet green bean casserole that is topped with fried onion strips.
    Gourmet Green Bean Casserole

Ready to make an unforgettable holiday side dish? Go for it!

And when you do, be sure to take a photo of it, post it on Instagram, and tag @HowToFeedaLoon and hashtag #HowToFeedaLoon!

An overhead view of a white oval serving dish filled with Maple-Glazed Butternut Squash with Pancetta and Herbs.
Print Recipe
5 from 1 vote

Sautéed Butternut Squash with Pancetta, Maple, and Herbs

A savory-sweet side dish featuring tender sautéed butternut squash, crispy pancetta, and a touch of maple syrup for warmth and depth. Fresh herbs and toasted pecans add balance and texture, making this an easy yet elegant addition to any fall dinner or holiday feast.
Prep Time15 minutes mins
Cook Time35 minutes mins
Total Time50 minutes mins
Course: Side Dish
Cuisine: American
Servings: 6
Calories: 235kcal
Author: Kris Longwell

Equipment

  • 1 large (12-inch) sturdy skillet cast-iron works well

Ingredients

  • 4 oz pancetta cubed
  • 2 tablespoon unsalted butter
  • 2½ lbs butternut squash cubed, about 4 cups
  • 1 teaspoon Kosher salt
  • ½ teaspoon black pepper
  • 1 teaspoon dried thyme or 2 teaspoon fresh thyme, chopped
  • ¼ cup maple syrup 100% pure
  • ½ cup pecan halves toasted, for garnish
  • 2 tablespoon Italian parsley chopped, for garnish

Instructions

  • In a large skillet over medium heat, cook the pancetta until crispy. Use a slotted spoon to transfer the pancetta to a paper towel-lined plate. Leave the rendered grease in the pan.
    4 oz pancetta
  • Add the butter to the pan over medium heat. Once melted add the cubed squash in a single layer. Let it cook undisturbed for 4 to 5 minutes to begin to develop a lightly golden crust on the bottom.
    2 tablespoon unsalted butter, 2½ lbs butternut squash
  • Stir in the salt, pepper, and thyme. Stir and continue cooking, stirring occasionally, for another 15 to 20 minutes, until the squash is tender and browned in spots.
    1 teaspoon Kosher salt, ½ teaspoon black pepper, 1 teaspoon dried thyme
  • Gently stir in the cooked pancetta and maple syrup and cook for another 1 to 2 minutes.
    ¼ cup maple syrup
  • Transfer to a serving bowl and garnish with chopped, toasted pecans and chopped Italian parsley. Serve at once.
    ½ cup pecan halves, 2 tablespoon Italian parsley

Video

Notes

NOTE: Watch the video near the top of the recipe card for visual guidance. 
  • For best texture, make sure the squash cubes are similar in size so they cook evenly.
  • If using pre-cut squash, pat it dry before cooking to help it caramelize instead of steam.
  • Add the maple syrup near the end of cooking to prevent it from burning.
  • Toast the pecans separately for the best crunch and flavor.
  • This dish can be made ahead and gently reheated before serving — just wait to add the herbs until right before serving for the freshest taste.
  • For a vegetarian version, simply omit the pancetta and use a touch more butter or olive oil.
  • To store: Keep leftovers in an airtight container in the refrigerator for up to 4 days.
  • To reheat: Warm gently in a skillet over medium heat to maintain texture, or reheat in the oven at 350°F until heated through.
 

Nutrition

Calories: 235kcal | Carbohydrates: 32g | Protein: 4g | Fat: 12g | Saturated Fat: 5g | Polyunsaturated Fat: 1g | Monounsaturated Fat: 4g | Trans Fat: 0.2g | Cholesterol: 23mg | Sodium: 523mg | Potassium: 745mg | Fiber: 4g | Sugar: 12g | Vitamin A: 20334IU | Vitamin C: 42mg | Calcium: 113mg | Iron: 2mg

Maple Glazed Turkey Breast – Juicy & Perfect for Holidays

November 16, 2025 by Kris Longwell 2 Comments

A freshly roasted Maple Glazed Turkey Breast resting on a white platter surrounded by fresh herbs, cranberries, and orange slices.

If you’re looking for a holiday main dish that’s simple, stunning, and full of flavor, this Maple Glazed Whole Turkey Breast is it. Juicy and tender on the inside with a beautiful golden glaze on the outside, it’s sweet, savory, and absolutely irresistible. The maple syrup adds a touch of warmth and caramelized richness that pairs perfectly with the roasted turkey, making it a show‑stopping centerpiece for Thanksgiving, Christmas, or any special meal.

A freshly roasted Maple Glazed Turkey Breast resting on a white platter surrounded by fresh herbs, cranberries, and orange slices.
[feast_advanced_jump_to]

🍁 The Ingredients

This recipe uses simple, wholesome ingredients that blend savory herbs and spices with a touch of maple sweetness to create a perfectly seasoned, flavorful turkey with a glossy, golden glaze. Find ingredient notes (including substitutions and variations) below.

An arrangement of ingredients for a maple glazed turkey breast on a grey wooden background including an uncooked turkey breast, apple cider vinegar, butter, maple syrup, garlic, Dijon mustard, oil, herbs, and spices.

📝 Ingredient Notes, Substitutions & Variations

  • Turkey Breast: A bone‑in whole turkey breast gives the juiciest results and crispier skin, but you can use boneless if preferred—just reduce the cooking time slightly.
  • Olive Oil: Helps the seasoning stick and promotes browning. Melted butter or avocado oil can be used for a richer flavor.
  • Smoked Paprika: Adds subtle smokiness and color; regular paprika or a pinch of cayenne can be substituted if you prefer less smoke and more heat.
  • Maple Syrup: Pure maple syrup gives the glaze its signature sweetness and shine. Honey or brown sugar can be used in a pinch, though the flavor will be slightly different.
  • Dijon Mustard: Balances the sweetness of the maple glaze with a little tang. Grainy mustard or yellow mustard works as an alternative.
  • Apple Cider Vinegar: Adds brightness and helps the glaze caramelize. White wine vinegar or a squeeze of lemon juice can be substituted.
  • Fresh Thyme: Brings a fragrant, earthy note—swap with rosemary, sage, or dried thyme if that’s what you have on hand.
  • Garlic: Fresh minced garlic gives the best flavor, but garlic powder works well if you’re short on time.

See the recipe card (with video) below for a full list of ingredients and measurements.

🔥 Tips for Success

  • Pat the turkey dry: Removing excess moisture helps the oil and seasoning stick and ensures the skin roasts up crisp and golden.
  • Use an adjustable roasting rack: It helps hold the turkey breast upright during roasting, allowing the heat to circulate evenly for beautifully browned skin all around.
  • Use a meat thermometer: Turkey breast is perfectly cooked at 165°F (74°C). Checking the temperature ensures juicy, tender results every time.
  • Brush with glaze often: Baste the turkey with the maple glaze during the last 30–40 minutes of roasting to build up that glossy, caramelized finish.
  • Tent with foil if needed: If the skin starts browning too quickly, loosely cover it with foil to prevent burning while the inside finishes cooking.
  • Let it rest before slicing: Rest the turkey for at least 10–15 minutes after roasting so the juices redistribute and the meat stays moist.
  • Save the pan drippings: Whisk them into the remaining glaze or drizzle over slices for extra richness and flavor.

👩🏼‍🍳 How to Make Maple Glazed Turkey Breast

A person using his fingers to sprinkle smoked paprika over an uncooked whole turkey breast on a platter that has already been seasoned with salt and pepper.
  1. Step 1: Pat the turkey breast dry with paper towels, and then season all over with salt, pepper, and smoked paprika.
A person using a small whisk to whisk together a maple glaze that contains maple syrup, herbs, and seasonings.
  1. Step 2: Add the glaze ingredients to a small saucepan and simmer, whisking often, for several minutes over medium heat.
A person using a small black brush to apply a maple glaze to a whole turkey breast that is resting on a baking rack in a roasting pan that is about to go into the oven.
  1. Step 3: Place the turkey breast on a baking rack in a roasting pan and brush on the glaze. Add a little more seasoning if any ran off with the glaze.
A person using a small black brush to baste a partially roasted whole turkey breast with a maple glaze on a baking rack in a roasting pan inside an oven.
  1. Step 4: Place in a 350°F oven and baste with the glaze every 30 minutes.
A person wearing oven mitts to hold a roasting pan that is filled with a maple glazed turkey breast on a baking rack fitted inside a stainless steel roasting pan.
  1. Step 5: Roast for 60 to 90 minutes, or until an internal temperature of 165°F is reached. Let it rest for 15 to 20 minutes.
A person using a carving fork and knife to slice into a freshly roasted maple glazed turkey breast that is resting on a platter surrounded by fresh herbs and sliced oranges.
  1. Step 6: Slice and serve!

🔪 Expert Tip: How to Slice the Turkey

For the juiciest, most tender slices, let the turkey breast rest for at least 15–20 minutes before cutting. Use a sharp carving knife and slice against the grain into even, thin pieces — this shortens the muscle fibers, keeping each bite moist and flavorful. If your turkey breast is bone‑in, carefully remove the breast from the bone first, then slice it on a cutting board for clean, beautiful presentation.

🍽️ How to Serve

  • Let it rest and slice beautifully: After resting, carve the turkey into thin slices against the grain for tender, picture‑perfect servings.
  • Drizzle with glaze: Warm any remaining maple glaze and drizzle it over the sliced turkey for a glossy, flavorful finish.
  • Serve with classic sides: This turkey pairs wonderfully with mashed potatoes, roasted vegetables, gourmet green bean casserole, and classic cornbread dressing to balance the sweetness of the glaze.
  • Add a touch of freshness: Garnish your platter with fresh thyme sprigs, orange slices, or pomegranate seeds for a festive, colorful presentation.
  • Make it a meal to remember: Serve with warm dinner rolls and a crisp salad for a complete, crowd‑pleasing holiday spread.
  • Wine pairing: A light Pinot Noir or a slightly sweet Riesling complements the maple glaze beautifully, while sparkling cider is a great non‑alcoholic option.

🙋🏽‍♂️ Frequently Asked Questions

Can I make Maple Glazed Turkey Breast ahead of time?

Yes! You can roast it a day in advance, then cover and refrigerate. Reheat gently in the oven at 325°F until warmed through, brushing with extra glaze to refresh the flavor and shine.

Can I use boneless meat for Maple Glazed Turkey Breast?

Absolutely. Boneless turkey breast cooks a bit faster and is easier to slice. Just reduce the cooking time slightly and keep an eye on the internal temperature so it doesn’t overcook.

How do I know when the Maple Glazed Turkey Breast is fully cooked?

Use a meat thermometer — the thickest part should reach 165°F (74°C). Once it hits that temperature, remove it from the oven and let it rest before slicing.

What’s the best way to keep Maple Glazed Turkey Breast moist?

Don’t skip the resting time — it allows the juices to redistribute. Also, basting with the glaze during roasting helps lock in moisture and adds extra flavor.

Can I use chicken instead of turkey for Maple Glazed Turkey Breast?

You can! The glaze works wonderfully on chicken breasts or even a whole roasted chicken — just adjust the cooking time based on the size of the meat.

A white dinner plate filled with three slices of maple glazed turkey breast next to cornbread dressing, green bans, and mashed potatoes, all topped with turkey gravy.

😋 More Amazing Turkey Centerpiece Recipes

  • A roasted turkey sitting in a steel roasting pan surrounded by lemons, onions, and herbs.
    The Perfect Roast Turkey
  • A large white platter of cooked and carved spatchcocked turkey with cranberries next to it.
    Spatchcocked Turkey
  • An overhead view of a deep-fried turkey sitting on a platter surrounds by other holiday side dishes.
    Best Deep-Fried Turkey
  • An overhead view of a whole smoked turkey that is resting on a platter of parsley and orange slices and a carving knife nearby.
    Smoked Turkey with Orange Honey Brine

Ready to impress with the best-tasting turkey in town? Go for it!

And when you do, be sure to take a photo of it, post it on Instagram, and tag @HowToFeedaLoon and hashtag #HowToFeedaLoon!

A person pouring turkey gravy from a white gravy boat over a plate filled with three slices of maple glazed whole turkey breast next to cornbread dressing, green beans, and mashed potatoes with gravy.
Print Recipe
No ratings yet

Maple Glazed Roast Turkey

This Maple Glazed Turkey Breast is juicy, tender, and bursting with sweet‑savory flavor. The rich maple glaze caramelizes beautifully as it roasts, creating a golden, glossy finish that’s perfect for any holiday or special occasion.
Prep Time15 minutes mins
Cook Time1 hour hr 30 minutes mins
Resting time15 minutes mins
Total Time2 hours hrs
Course: Entree
Cuisine: American, Thanksgiving
Servings: 4
Calories: 236kcal
Author: Kris Longwell

Equipment

  • 1 Roasting pan preferably with a roasting rack

Ingredients

For the Turkey

  • 1 4 to 5 lb turkey breast whole, bone-in
  • 2 tablespoon olive oil
  • 1 teaspoon Kosher salt
  • 1 teaspoon black pepper
  • 1 teaspoon smoked paprika
  • 1 cup chicken broth or water (optional)

For the Maple Glaze and Serving

  • ½ cup maple syrup
  • 2 tablespoon Dijon mustard
  • 2 tablespoon unsalted butter melted
  • 2 teaspoon garlic minced
  • 1 tablespoon apple cider vinegar
  • 1 teaspoon thyme fresh, chopped (or ½ teaspoon dried)
  • ½ teaspoon black pepper
  • Fresh herbs, cranberries, and sliced fruit for garnish (optional)

Instructions

  • Preheat your oven to 350°F.
  • Pat the turkey dry with paper towels. Rub the olive oil all over the turkey. Next, sprinkle the salt, pepper, and paprika all over the turkey.
    1 4 to 5 lb turkey breast, 2 tablespoon olive oil, 1 teaspoon Kosher salt, 1 teaspoon black pepper, 1 teaspoon smoked paprika
  • Place the turkey on a rack in a large roasting pan. If desired, pour about 1 cup of broth (or water) into the pan.
    1 cup chicken broth
  • In a small saucepan, whisk together the maple syrup, Dijon mustard, melted butter, garlic, apple cider vinegar, thyme, and pepper. Bring to a gentle simmer over medium heat for 2 to 3 minutes, until slightly thickened. Remove from the heat.
    ½ cup maple syrup, 2 tablespoon Dijon mustard, 2 tablespoon unsalted butter, 2 teaspoon garlic, 1 tablespoon apple cider vinegar, 1 teaspoon thyme, ½ teaspoon black pepper
  • Brush the turkey breast generously with the maple glaze. The glaze will thicken as it sits (for when you start basting). If the first application of the glaze to the turkey causes some of the seasoning to run off, sprinkle a little more onto the skin. Roast the turkey uncovered for 1½ to 2 hours, brushing with more glaze every 30 minutes.
  • The turkey is done when the internal temperature reaches 165°F at the thickest part. If the skin browns too quickly, tent loosely with foil.
  • Let the turkey rest for 15 to 20 minutes before slicing. The juice will redistribute, keeping the meat tender and moist. Serve the turkey with fresh herbs, cranberries, and sliced fruit, if desired.
    Fresh herbs, cranberries, and sliced fruit
  • If desired, pour the remaining glaze into the roasting pan and simmer for 2 to 3 minutes to create a quick maple pan sauce.

Video

Notes

NOTE: Watch the video in the recipe card for visual guidance.
  • A bone‑in whole turkey breast gives the best flavor and juiciest results, but boneless works too—just reduce the cooking time slightly.
  • Pure maple syrup is key for the best glaze flavor; avoid pancake syrup, which is too sweet and artificial.
  • If the skin starts to brown too quickly, loosely tent the turkey with foil to prevent over‑browning.
  • Use a meat thermometer and remove the turkey when it reaches 165°F (74°C) for perfectly cooked, juicy meat.
  • Let the turkey rest for at least 15–20 minutes before slicing to lock in the juices.
  • Save extra glaze or pan drippings to drizzle over the sliced turkey before serving.
  • Leftovers reheat beautifully—cover with foil and warm in a 325°F oven until heated through.

Nutrition

Calories: 236kcal | Carbohydrates: 29g | Protein: 1g | Fat: 13g | Saturated Fat: 5g | Polyunsaturated Fat: 1g | Monounsaturated Fat: 7g | Trans Fat: 0.2g | Cholesterol: 16mg | Sodium: 723mg | Potassium: 148mg | Fiber: 1g | Sugar: 25g | Vitamin A: 456IU | Vitamin C: 1mg | Calcium: 63mg | Iron: 1mg

The Best Chocolate Bourbon Pecan Pie (Rich, Gooey & Easy)

November 12, 2025 by Kris Longwell Leave a Comment

A slice of the best chocolate bourbon pecan pie on a white dessert plate with a fork off to the side.

If you’re craving a dessert that’s rich, gooey, and unforgettable, this Chocolate Bourbon Pecan Pie is the one. It’s a decadent twist on the Southern classic, blending toasted pecans, silky chocolate, and a splash of bourbon for just the right kick. And with a flaky, buttery homemade pie crust holding it all together, this indulgent treat is truly over the top — perfect for holidays or any special occasion.

A slice of the best chocolate bourbon pecan pie on a white dessert plate with a fork off to the side.
[feast_advanced_jump_to]

🍫 The Ingredients

This pie is made with simple, classic pantry staples that come together to create a rich, buttery filling with just the right balance of sweetness, warmth, and nutty, chocolatey goodness. Find ingredient notes (including substitutions and variations) below.

An arrangement of ingredients for the best chocolate bourbon pecan pie on a wooden background including pecans, pie dough, eggs, bourbon, chocolate, sugar, butter, corn syrup, and vanilla extract.

📝 Ingredient Notes, Substitutions & Variations

  • Pie Crust: A homemade crust gives the best flaky, buttery texture, but a quality store‑bought crust works in a pinch. For extra flavor, try adding a pinch of cinnamon or brown sugar to the dough.
  • Corn Syrup: Light corn syrup yields a milder sweetness, while dark corn syrup adds a deeper, caramel-like flavor. You can also substitute with maple syrup or golden syrup for a different twist.
  • Sugar: Granulated sugar keeps the filling smooth, but you can replace part of it with brown sugar for a richer, molasses note.
  • Eggs: Use large eggs at room temperature for the best texture and even baking.
  • Butter: Unsalted butter lets you control the salt level, but salted butter can be used—just reduce the added salt slightly.
  • Bourbon: Adds depth and warmth; swap with dark rum, whiskey, or omit entirely for a non-alcoholic version (add a splash of extra vanilla instead).
  • Vanilla Extract: Enhances the overall flavor; for a gourmet touch, use vanilla bean paste.
  • Salt: A small pinch balances the sweetness—don’t skip it!
  • Pecans: Toasting them first intensifies their flavor and crunch. Walnuts or hazelnuts can be used for variation.
  • Chocolate: Semi-sweet chocolate creates the perfect balance, but milk chocolate makes it sweeter, and darker chocolate adds a bolder, less sweet flavor.

See the recipe card (with video) below for a full list of ingredients and measurements.

🔥 Tips for Success

  • Toast the pecans: A quick toast in the oven or skillet brings out their rich, buttery flavor and adds irresistible crunch.
  • Don’t overmix the filling: Stir just until combined — overmixing can introduce air bubbles and affect the pie’s texture.
  • Use room‑temperature ingredients: Eggs and butter blend more smoothly, giving you a silky, even filling.
  • Watch the bake time closely: The center should be just set with a slight jiggle — it will continue to firm up as it cools.
  • Cool completely before slicing: This allows the filling to set perfectly and makes for clean, beautiful slices.
  • Add a finishing touch: Serve with a dollop of whipped cream or a scoop of vanilla ice cream for an extra‑indulgent dessert.
  • Make ahead: This pie tastes even better the next day — store it covered at room temperature or refrigerate for up to 3 days.

👩🏼‍🍳 How to Make the Best Chocolate Bourbon Pecan Pie

A person using his two index fingers to flute the top of an uncooked pie dough that has been fitted into a pie dish.
  1. Step 1: Fit the pie dough into a 9-inch pie dish and use your fingers to flute and crimp the edges (if desired).
A person holding a small golden baking sheet pan with toasted pecans in the middle of the pan.
  1. Step 2: Toast the pecans until fragrant, about 10 to 15 minutes.
A person pouring lightly beaten eggs from a small glass bowl into another larger glass bowl filled with sugar, corn syrup, and melted butter.
  1. Step 3: In a large bowl, whisk together the corn syrup, sugar, eggs, melted butter, bourbon, vanilla, and salt until smooth.
A person sprinkling toasted pecan halves over chunks of chocolate in the bottom of an uncooked pie dough that has been fitted into a white pie dish.
  1. Step 4: Place the chocolate over the pie dough and sprinkle the toasted pecans over the chocolate.
A person pouring pecan pie filling over pecan halves and chunks of chocolate in an the bottom of an uncooked pie dough that has been fitted into a white pie dish.
  1. Step 5: Pour the filling evenly over the pecans and chocolate.
An overhead view of the best chocolate bourbon pecan pie in a white pie dish resting on a baking rack on an autumnal linen underneath.
  1. Step 6: Bake until slightly jiggly and then let cool on a rack until completely cooled.

🍽️ How to Serve

  • Let it cool completely: Allow the pie to cool to room temperature before slicing so the filling sets perfectly and each piece holds its shape.
  • Serve at room temperature or slightly warmed: You can gently warm slices in the microwave for 10–15 seconds to bring out that gooey, chocolatey texture.
  • Top with homemade whipped cream:
    • In a chilled bowl, beat 1 cup heavy cream, 2 tablespoons powdered sugar, and ½ teaspoon vanilla extract until soft peaks form.
    • Spoon or pipe over each slice for a light, creamy contrast to the rich filling.
  • Add a finishing flourish: Sprinkle a few chopped toasted pecans or chocolate shavings over the whipped cream for extra texture and presentation.
  • Pair it perfectly: This pie goes beautifully with a cup of coffee, a glass of milk, or even a small pour of bourbon for the adults.
  • For special occasions: Serve it as the grand finale to a holiday meal or dinner party — it’s guaranteed to impress!

🙋🏽‍♂️ Frequently Asked Questions

Can I make Chocolate Bourbon Pecan Pie without alcohol?

Yes! Simply leave out the bourbon and add an extra splash of vanilla extract for flavor. The pie will still be rich, gooey, and delicious.

What type of chocolate works best in Chocolate Bourbon Pecan Pie?

Semi-sweet chocolate strikes the perfect balance of sweetness and depth, but you can use milk chocolate for a sweeter result or dark chocolate for a bolder, less sweet flavor.

Can I use store-bought pie crust for Chocolate Bourbon Pecan Pie?

Absolutely. While a homemade crust gives the best texture and flavor, a good-quality store-bought crust works just fine and saves time.

How far in advance can I make Chocolate Bourbon Pecan Pie?

You can make it up to one day ahead. It actually tastes even better the next day once the flavors have melded together.

How should I store leftover Chocolate Bourbon Pecan Pie?

Cover the pie loosely with foil or plastic wrap and store it at room temperature for up to 2 days, or refrigerate for up to 4 days.

Can Chocolate Bourbon Pecan Pie be frozen?

Yes! Wrap it tightly in plastic wrap and foil, then freeze for up to 2 months. Thaw overnight in the refrigerator before serving.

How do I know when Chocolate Bourbon Pecan Pie is done baking?

The edges should be set, and the center should have a slight jiggle. It will continue to firm up as it cools.

Why did my Chocolate Bourbon Pecan Pie filling turn out runny?

It may have been underbaked. Make sure the center is almost set before removing from the oven, and allow it to cool completely before slicing.

An overhead view of the best chocolate bourbon pecan pie in a white pie dish resting on a baking rack on an autumnal linen underneath.

🥧 Other Classic Holiday Pies

  • Classic Pecan Pie on a plate with whipped cream on top
    Classic Pecan Pie
  • A slice of pumpkin pie on a white plate next to a whole pumpkin pie.
    Classic Pumpkin Pie
  • A sweet potato pie with pecan topping in a white pie dish with a large slice missing on one side of the dish.
    Sweet Potato Pie with Pecan Topping
  • A person using a metal spatula to raise a slice of pecan pie cheesecake from the entire cake resting on a cake stand.
    Pecan Pie Cheesecake

Ready to make a pie that everyone will want seconds of? Go for it!

And when you do, be sure to take a photo of it, post it on Instagram, and tag @HowToFeedaLoon and hashtag #HowToFeedaLoon!

An overhead view of the best chocolate bourbon pecan pie in a white pie dish resting on a baking rack on an autumnal linen underneath.
Print Recipe
No ratings yet

Chocolate Bourbon Pecan Pie

This Chocolate Bourbon Pecan Pie is a rich, gooey twist on a Southern classic! Toasted pecans, smooth chocolate, and a splash of bourbon come together in a buttery homemade crust for a dessert that’s pure indulgence — perfect for holidays or any special occasion.
Prep Time15 minutes mins
Cook Time1 hour hr
Cooling time2 hours hrs
Total Time3 hours hrs 15 minutes mins
Course: Dessert
Cuisine: American
Servings: 8
Calories: 508kcal
Author: Kris Longwell

Equipment

  • 1 9-inch pie dish

Ingredients

  • 1 9-inch pie dough
  • 1½ cups pecan halves
  • 1 cup corn syrup light, dark, or combination
  • 1 cup granulated sugar
  • 3 large eggs
  • ¼ cup unsalted butter melted and slightly cooled
  • 3 tablespoon bourbon
  • 1 teaspoon vanilla extract
  • ½ teaspoon Kosher salt
  • ¾ cup chocolate chips semi-sweet, dark chocolate, or milk chocolate

Instructions

  • Preheat oven to 350°F.
  • Fit the pie dough into a 9-inch pie dish, crimp or flute the edges, and refrigerate while you make the filling.
    1 9-inch pie dough
  • Spread the pecans on a baking sheet and toast for 6 to 10 minutes, until fragrant.
    1½ cups pecan halves
  • In a large bowl, whisk together the corn syrup, sugar, eggs, melted butter, bourbon, vanilla, and salt until smooth.
    1 cup corn syrup, 1 cup granulated sugar, 3 large eggs, ¼ cup unsalted butter, 3 tablespoon bourbon, 1 teaspoon vanilla extract, ½ teaspoon Kosher salt
  • Sprinkle the chocolate chips (or chopped chocolate bar) over the bottom of the pie dough. Add the toasted pecans, then pour the filling evenly over the top.
    ¾ cup chocolate chips
  • Bake for 55 to 60 minutes, or until the center is just (but still a little jiggly), and slightly puffed. If the pecans brown too quickly, tent loosely with foil during the final 15 minutes of baking.
  • Allow the pie to cool at room temperature for at least 2 hours. This allows the filling to set completely.

Video

Notes

NOTE: Watch the video in the recipe card for visual guidance.
  • Toasting the pecans before baking enhances their flavor and adds extra crunch.
  • You can use either light or dark corn syrup — light gives a milder sweetness, while dark adds a deeper, caramel flavor.
  • For a non‑alcoholic version, simply omit the bourbon and add an extra splash of vanilla extract.
  • Homemade pie crust gives the best buttery texture, but a quality store‑bought crust works well, too.
  • The pie is done when the edges are set and the center still has a slight jiggle — it will firm up as it cools.
  • IMPORTANT: Let the pie cool completely before slicing for clean, even pieces.
  • Store covered at room temperature for up to 2 days or refrigerate for up to 4 days.
  • This pie tastes even better the next day as the flavors meld together!

Nutrition

Calories: 508kcal | Carbohydrates: 81g | Protein: 4g | Fat: 19g | Saturated Fat: 9g | Polyunsaturated Fat: 1g | Monounsaturated Fat: 5g | Trans Fat: 0.2g | Cholesterol: 85mg | Sodium: 302mg | Potassium: 102mg | Fiber: 1g | Sugar: 67g | Vitamin A: 279IU | Calcium: 35mg | Iron: 1mg

Creamy Garlic Parmesan Chicken | Easy, Cheesy, and Irristable

November 9, 2025 by Kris Longwell 7 Comments

A white dinner plate filled with a serving of creamy garlic parmesan chicken with sauce drizzled over the tops of the filets resting next to a pile of mashed potatoes and steamed string beans.

There’s nothing quite like Creamy Garlic Parmesan Chicken for a cozy, satisfying dinner that feels restaurant-worthy but comes together in just one pan. Tender, juicy chicken breasts are simmered in a rich, velvety sauce made with garlic, Parmesan cheese, and a touch of cream — simple ingredients that create big, comforting flavor. It’s quick enough for busy weeknights yet elegant enough to serve to guests, making it a true family favorite you’ll want to make again and again.

A white dinner plate filled with a serving of creamy garlic parmesan chicken with sauce drizzled over the tops of the filets resting next to a pile of mashed potatoes and steamed string beans.
[feast_advanced_jump_to]

🧄 The Ingredients

This dish comes together with simple, everyday ingredients that blend savory spices, creamy richness, and a touch of brightness to create a perfectly seasoned, restaurant-quality chicken dinner. Find ingredient notes (including substitutions and variations) below.

An arrangement of ingredients for creamy garlic Parmesan chicken on a grey wooden background including uncooked boneless chicken breasts, garlic, wine, heavy cream, chicken broth, flour, lemon juice, and seasonings.

📝 Ingredient Notes & Substitutions

  • Chicken: Boneless, skinless chicken breasts work beautifully, but boneless thighs are a great option if you prefer extra juiciness. You can also use thinly sliced cutlets for quicker cooking.
  • Seasoning: Smoked paprika adds subtle depth, but regular paprika or a pinch of cayenne can be used for a different flavor profile.
  • Garlic: Fresh garlic gives the best flavor — but if you’re short on time, ½ teaspoon of garlic powder per clove works in a pinch.
  • White Wine: Adds brightness and depth to the sauce, but you can substitute with extra chicken broth if you prefer to skip the alcohol.
  • Lemon Juice (optional): A squeeze of fresh lemon juice at the end lifts and brightens the creamy sauce, balancing the richness beautifully.
  • Cream Sauce: Heavy cream makes the sauce rich and silky. For a lighter version, use half-and-half or evaporated milk (just note the sauce will be slightly thinner).
  • Cheese: Freshly grated Parmesan melts smoothly and gives the best flavor. Pre-shredded cheese can work, but it won’t melt as evenly.
  • Herbs: Dried oregano and basil give classic Italian flavor, but you can swap in Italian seasoning or add fresh herbs like thyme or parsley for a brighter finish.

See the recipe card (with video) below for a full list of ingredients and measurements.

🔥 Recipe Tips for Success

  • Pound chicken evenly: If your chicken breasts are thick, pound them to an even thickness before cooking. This helps them cook quickly and evenly without drying out.
  • Don’t overcrowd the pan: Sear the chicken in batches if needed. Overcrowding traps steam and prevents that beautiful golden crust.
  • Use medium heat for the sauce: After adding the cream and Parmesan, lower the heat to medium or medium-low. A gentle simmer keeps the sauce smooth and prevents curdling.
  • Scrape up the brown bits: When you deglaze the pan with white wine or broth, stir up those flavorful browned bits — they add incredible depth to the sauce.
  • Add lemon at the end: Stir in the fresh lemon juice right before serving for a bright, fresh finish that balances the creamy richness.
  • Adjust thickness: If the sauce gets too thick, whisk in a splash of warm broth or cream until it reaches your desired consistency.
  • Serve immediately: This dish is best enjoyed right after cooking, while the sauce is silky and the chicken is tender.

👩🏼‍🍳 How to Make Creamy Garlic Parmesan Chicken

A person using his fingers to sprinkle smoked paprika over uncooked boneless chicken breasts that have already been seasoned with salt and pepper.
  1. Step 1: Liberally season the chicken breasts all over with salt, pepper, and smoked paprika.
A person dredging a seasoned boneless chicken breast through all-purpose flour on a white platter.
  1. Step 2: Dredge the seasoned cutlets through the flour. Set aside.
A person using a pair of metal tongs to flip a seared seasoned chicken breast in a non-stick skillet with a second seared breast simmering in a thin layer of vegetable oil.
  1. Step 3: Sear the breasts (in batches, if necessary) in the oil over medium heat for about 5 minutes per side. Set aside.
A person pouring white wine from a small carafe into a skillet filled with simmering oil with minced, sautéed garlic in it.
  1. Step 4: Sauté the garlic in melted butter for 30 seconds, then add the wine and simmer until reduced by about half.
A person pouring chicken broth from a measuring cup into a skillet that has a roux and sautéed garlic in while using is other hand to whisk the mixture.
  1. Step 1: Whisk in the flour and cook, stirring often, for 1 minute, then whisk in the broth. Simmer until silky, about 2 minutes.
A person holding a small bowl of grated parmesan cheese in one hand and a small bowl of dried herbs in his other hand, both over a skillet filled with a silky cream sauce.
  1. Step 2: Stir in the cream, dried herbs, and Parmesan cheese over low heat.
A close-up view of seared boneless chicken breasts resting in a creamy garlic parmesan sauce in a large non-stick skillet.
  1. Step 3: Return the cutlets to the pan and simmer for a few minutes until they are heated through.
A person using a spoon to drizzle a garlic Parmesan sauce over the top of a seared boneless chicken breast on a white dinner plate.
  1. Step 4: Serve at once, garnished with chopped parsley and extra sauce.

Expert Tip

For the smoothest, silkiest sauce, turn the heat to low or remove the skillet from the heat before stirring in the Parmesan cheese. Adding it off the heat prevents the cheese from clumping or turning grainy, ensuring a perfectly creamy, restaurant-quality finish every time.

🍽️ Serving Suggestions

  • Over Pasta: Spoon the creamy garlic Parmesan sauce over fettuccine, linguine, or penne for an easy, restaurant-style dinner.
  • With Mashed Potatoes: The rich, velvety sauce pairs beautifully with buttery mashed potatoes — perfect for soaking up every drop.
  • Alongside Rice or Risotto: Serve with fluffy white rice or creamy risotto for a cozy, satisfying meal.
  • With Vegetables: Balance the richness with a side of roasted broccoli, asparagus, or green beans for color and freshness.
  • With Bread: Sliced, warm country white bread or garlic bread is ideal for mopping up that luscious sauce.
  • Low-Carb Option: Serve the chicken over cauliflower mash or zucchini noodles for a lighter, keto-friendly version.

🙋🏽‍♂️ Frequently Asked Questions

Can I use chicken thighs instead of chicken breasts for Creamy Garlic Parmesan Chicken?

Yes, chicken thighs work wonderfully and tend to stay juicier. Just adjust the cooking time slightly since thighs may take a bit longer to cook through.

Can I make Creamy Garlic Parmesan Chicken ahead of time?

Yes, you can prepare it in advance and store it in the refrigerator for up to 3 days. Reheat gently on the stove over low heat, adding a splash of cream or milk to loosen the sauce.

Can I make Creamy Garlic Parmesan Chicken without heavy cream?

Yes, you can substitute half-and-half, cream cheese mixed with milk, or even evaporated milk for a lighter version. The texture and richness may vary slightly.

How do I store leftovers of Creamy Garlic Parmesan Chicken?

Store leftovers in an airtight container in the refrigerator for up to 3 days. Reheat gently to preserve the creamy texture.

Can I freeze Creamy Garlic Parmesan Chicken?

Freezing is possible, but the sauce may separate slightly when thawed. To fix this, stir the sauce well while reheating and add a bit of cream if needed.

A large grey non-stick skillet filled with four seared chicken breasts in a garlic Parmesan sauce with a large spoon resting in the skillet.

😋 More Amazing Chicken Recipes

  • A white dinner plate filled with roasted asparagus topped with Parmesan crusted chicken with a small bowl of vodka sauce next to it.
    Parmesan Crusted Chicken
  • A black dinner plate filled with a serving of chicken Parmesan (Parmigiana) resting on a bed of cooked linguine and marinara sauce.
    Chicken Parmesan (Parmigiana)
  • An overhead view of a large silver skillet filled with creamy Tuscan chicken with slices of toasted bread and a bowl of grated cheese nearby.
    Best Creamy Tuscan Chicken
  • A white dinner plate filled with a caprese-stuffed chicken breast and topped with a balsamic glaze.
    Caprese Stuffed Chicken with Balsamic Glaze

Ready to make the best chicken dinner in town? Go for it!

And when you do, be sure to take a photo of it, post it on Instagram, and tg @HowToFeedaLoon and hashtag #HowToFeedaLoon!

A close-up view of two filets of creamy garlic parmesan chicken on a white dinner plate next a pile of mashed potatoes next to a serving of steamed string beans.
Print Recipe
5 from 3 votes

Creamy Garlic Parmesan Chicken

Indulge in the rich, comforting flavors of this Creamy Garlic Parmesan Chicken — a restaurant-worthy dish made right at home! Tender, juicy chicken breasts are seared to golden perfection, then simmered in a luscious garlic-Parmesan cream sauce that’s bursting with flavor. This quick and easy recipe comes together in about 30 to 45 minutes, making it perfect for busy weeknights or cozy weekend dinners. Serve it over pasta, rice, or mashed potatoes for a meal that’s sure to impress the whole family.
Prep Time15 minutes mins
Cook Time20 minutes mins
Total Time35 minutes mins
Course: Entree
Cuisine: American / Italian
Servings: 4
Calories: 414kcal
Author: Kris Longwell

Equipment

  • 1 large (12-inch) skillet

Ingredients

For the Chicken Cutlets

  • 6 6 oz chicken breasts skinless, boneless, pounded thin
  • Salt and pepper
  • 1 teaspoon smoked paprika
  • ½ cup all-purpose flour
  • 2 tablespoon olive oil

For the Sauce and Serving the Dish

  • 2 tablespoon unsalted butter
  • 4 teaspoon garlic minced
  • ½ cup white wine optional
  • 1 tablespoon all-purpose flour
  • ¾ cup chicken broth
  • ¾ cup heavy cream or half and half
  • ½ teaspoon dried oregano
  • ½ teaspoon dries basil
  • ½ teaspoon Kosher salt
  • ½ teaspoon black pepper
  • ½ cup Parmesan cheese grated
  • 1 tablespoon lemon juice optional
  • 2 tablespoon parsley chopped, for garnish

Instructions

  • Season both sides of the chicken cutlets with salt, pepper, and paprika. Dredge each cutlet in flour, shaking off any excess.
    6 6 oz chicken breasts, Salt and pepper, 1 teaspoon smoked paprika, ½ cup all-purpose flour
  • Heat the oil in a large skillet over medium heat. Working in batches, sear the cutlets until golden brown all over, about 5 minutes per side. Set aside.
    2 tablespoon olive oil
  • In the same skillet, melt the butter over medium heat. Add the garlic and sauté for about 30 seconds. Pour in the wine, and use a wooden spatula to scrape up any bits stuck to the skillet. Simmer until reduced by about half, usually about 3 minutes.
    2 tablespoon unsalted butter, 4 teaspoon garlic, ½ cup white wine
  • Stir in the flour (1 tbsp) and cooke, stirring often, for 1 minute. Whisk in the chicken broth and stir until smooth, silky, and slightly thickened, about 1 to 2 minutes.
    1 tablespoon all-purpose flour, ¾ cup chicken broth
  • Turn the heat to low and stir in the heavy cream, oregano, basil, salt, and pepper. Stir in the Parmesan cheese and lemon juice (if using) and stir until smooth. Return the chicken cutlets to the sauce and let simmer until heated through, just a few minutes.
    ¾ cup heavy cream, ½ teaspoon dried oregano, ½ teaspoon dries basil, ½ teaspoon Kosher salt, ½ teaspoon black pepper, ½ cup Parmesan cheese, 1 tablespoon lemon juice
  • Serve at once, garnished with the parsley. The dish pairs wonderfully with mashed potatoes, cooked pasta, or steamed rice.
    2 tablespoon parsley

Video

Notes

NOTE: Watch the video in the recipe card for visual guidance.
  • For the juiciest results, pound chicken breasts to an even thickness before cooking.
  • Freshly grated Parmesan melts more smoothly than pre-shredded varieties and gives the sauce a richer flavor.
  • If the sauce becomes too thick, stir in a splash of chicken broth or cream to loosen it.
  • Add-ins like spinach, mushrooms, or sun-dried tomatoes make delicious variations.
  • To lighten the dish, substitute half-and-half or evaporated milk for the heavy cream.
  • This recipe pairs beautifully with pasta, mashed potatoes, or steamed vegetables.
  • Leftovers can be stored in the refrigerator for up to 3 days; reheat gently over low heat to keep the sauce creamy.

Nutrition

Calories: 414kcal | Carbohydrates: 18g | Protein: 9g | Fat: 24g | Saturated Fat: 8g | Polyunsaturated Fat: 2g | Monounsaturated Fat: 7g | Trans Fat: 0.2g | Cholesterol: 76mg | Sodium: 673mg | Potassium: 151mg | Fiber: 1g | Sugar: 2g | Vitamin A: 1346IU | Vitamin C: 5mg | Calcium: 197mg | Iron: 1mg

Chicken Enchiladas with Sour Cream Sauce

November 6, 2025 by Kris Longwell 16 Comments

A nine by thirteen inch white casserole dish filled a row of chicken enchiladas with sour cream sauce.

These Chicken Enchiladas with Sour Cream Sauce are unbelievably creamy, cheesy, and full of flavor — pure comfort food baked to perfection. Tender shredded chicken is wrapped in soft tortillas, smothered in a rich sour cream sauce, and topped with melted cheese, making it a dish that’s always a crowd favorite. They’re every bit as delicious as our Beef Enchiladas with Red Sauce, but with a lighter, tangy twist that keeps you coming back for seconds.

A nine by thirteen inch white casserole dish filled a row of chicken enchiladas with sour cream sauce.
[feast_advanced_jump_to]

🧀 The Ingredients.

A few simple, flavorful ingredients come together to create tender, cheesy chicken enchiladas wrapped in soft tortillas and covered with a rich, creamy sour cream sauce. Find ingredient notes (including substitutions and variations) below.

An arrangement of ingredients for chicken enchiladas with sour cream sauce on a grey wooden background including cooked shredded chicken, shredded cheese, chiles, onions, garlic, chicken stock, tortillas, sour cream, and seasonings.

🌶️ Ingredient Notes (with Substitutions & Variations)

  • Chicken: Rotisserie chicken makes this recipe extra quick and flavorful, but any cooked, shredded chicken works beautifully. You can also use leftover grilled or baked chicken for a slightly smokier flavor.
  • Cheese: Colby Jack gives the perfect blend of creaminess and mild spice, but Monterey Jack, Pepper Jack, or even a Mexican blend are great alternatives.
  • Green Chiles: These add a mild heat and tangy depth to both the filling and the sauce. For more spice, swap in diced jalapeños or use hot green chiles.
  • Tortillas: Soft flour tortillas make these enchiladas creamy and tender, but if you prefer a more traditional texture, corn tortillas work too — just warm them first so they don’t tear.
  • Sour Cream Sauce: The homemade sauce is rich and velvety, but you can lighten it up with Greek yogurt or a mix of sour cream and plain yogurt for a tangier twist.
  • Seasonings: Classic Tex-Mex spices like cumin and chili powder bring warmth and depth. Feel free to adjust the heat level to your taste or add smoked paprika for a subtle smoky note.
  • Add-Ins: Stir in black beans, corn, or sautéed bell peppers to stretch the filling and add extra texture and color.

See the recipe card (with video) below for a full list of ingredients and measurements.

🔥 Tips for Perfect Chicken Enchiladas

  • Warm the tortillas first: Briefly heat your flour tortillas in a dry skillet or microwave before filling — this makes them soft, pliable, and less likely to tear when rolled.
  • Don’t overfill: A few tablespoons of filling per tortilla is plenty. Overstuffing makes them harder to roll and can cause the sauce to soak unevenly.
  • Use freshly shredded cheese: Pre-shredded cheese often contains anti-caking agents that prevent smooth melting. Shred your own for a creamier, more velvety texture.
  • Make a smooth roux: When starting your sour cream sauce, whisk the flour into the melted butter until golden and smooth before adding the broth. This prevents lumps and gives you a silky, thick sauce.
  • Add sour cream off the heat: Stir in the sour cream after removing the sauce from the heat to keep it from curdling and ensure a rich, creamy finish.
  • Sauce generously: Spread a thin layer of sauce on the bottom of your baking dish before adding the enchiladas — it keeps them from sticking and adds flavor to every bite.
  • Bake uncovered until bubbly: Let the enchiladas bake until the sauce is bubbling and the cheese is melted and golden around the edges for that irresistible finish.
  • Garnish for freshness: A sprinkle of chopped cilantro or sliced green onions adds a fresh pop of color and flavor to balance the creamy sauce.

👩🏼‍🍳 How to Make the Filling and Sauce

A person using a wooden spoon to stir and sauté chopped onions in melted butter in a large non-stick pan on a gas stove.
  1. Step 1: Heat the butter in a large skillet over medium heat and then sauté the onions until tender.
A person transferring small piles of ground chili powder and ground cumin from a small bowl into a skillet filled with sautéed onions, green chiles, chopped garlic, and other seasonings.
  1. Step 2: Stir in the garlic and sauté another 30 seconds. Add the green chiles, cumin, chili powder, salt, and powder. Stir and sauté for another couple of minutes.
A person transferring shredded Colby Jack cheese from a small glass bowl into a skillet that is filled with chicken enchilada meat.
  1. Step 3: Stir in the chicken until coated with the seasonings. Turn off the heat and stir in the cheese until melted. Set aside.
A person using a wooden spatula to stir flour into melted butter to create a roux in a large black non-stick skillet on a gas stove.
  1. Step 4: In another skillet, melt the butter and stir in the flour to create a roux. Cook for about 1 minute.
A person using a small whisk to incorporate chicken broth being poured from a glass measuring cup into a skillet filled with a roux all on a gas stove.
  1. Step 5: Whisk in the chicken broth and stir continuously until silky and smooth.
A person transferring sour cream from a glass bowl into a skillet filled with a thicken chicken broth along with green chiles, onion and garlic powder, and ground black pepper.
  1. Step 6: Stir in the sour cream, chiles, onion powder, garlic powder, salt, and pepper. Stir until smooth.

👨‍🍳 How to Make Chicken Enchiladas with Sour Cream Sauce

A person using a small ladle to spread a thin layer of a sour cream sauce over the bottom of a white casserole dish.
  1. Step 1: Spread a thin layer of the sauce over the bottom of a 9×13″ casserole dish.
A person using a spoon to transfer chicken enchilada meat into the center of a flour tortilla the is placed in casserole dish with a thin layer of a sour cream sauce in the bottom of the dish.
  1. Step 2: Spread about ½ cup of the chicken mixture into the center of 8 to 10 tortillas in the dish. Roll each enchilada to seal, seam-side down.
A person using a small ladle to pour a sour cream sauce over the tops of roll chicken enchiladas in a white casserole dish.
  1. Step 3: Ladle the rest of the sauce over the tops of the rolled enchiladas.
A person adding handfuls of shredded Colby Jack cheese over the tops of uncooked chicken enchiladas with sour cream sauce in a white casserole dish.
  1. Step 4: Liberally sprinkle cheese down the center of the row of enchiladas.
A casserole dish filled with freshly baked chicken enchiladas with a sour cream sauce resting on a cutting board with a person holding the sides with oven mitts.
  1. Step 5: Bake in a 375°F oven until bubbly and lightly browned on top, about 20 to 25 minutes.
A person sprinkling chopped cilantro over the tops of a row of freshly baked chicken enchiladas with sour cream sauce in a white casserole dish.
  1. Step 6: Let it rest for a few minutes. Garnish with chopped cilantro and serve at once.

Expert Tip

For the creamiest, lump-free sour cream sauce, take your time with the roux. Whisk the flour into the melted butter until smooth and lightly golden before slowly adding the warm chicken broth. This step builds flavor and ensures a perfectly silky texture. Once the sauce thickens, remove it from the heat before stirring in the sour cream — that keeps it from curdling and gives you a rich, velvety sauce that coats every enchilada beautifully.

🍽️ How to Serve

Serve these Chicken Enchiladas with Sour Cream Sauce hot and bubbly straight from the oven with your favorite Tex-Mex sides and toppings:

  • Fresh Garnishes: Sprinkle with chopped cilantro, sliced green onions, or a squeeze of lime juice for a bright, fresh finish.
  • Rice & Beans: Pair with Mexican rice, cilantro-lime rice, or authentic refried beans for a classic, satisfying meal.
  • Crunchy Sides: Add a side of tortilla chips with homemade salsa, pico de gallo, or guacamole for extra texture and flavor.
  • Salad Pairings: A crisp green salad or Mexican street corn salad balances the creamy sauce perfectly.
  • Toppings: Offer extra sour cream, diced tomatoes, or jalapeño slices for those who like a little extra kick.
  • Drinks: Serve with iced tea, margaritas, or a cold Mexican beer for the ultimate restaurant-style experience.

🙋🏽‍♂️ Frequently Asked Questions

Can I make Chicken Enchiladas with Sour Cream Sauce ahead of time?

Yes! You can assemble the enchiladas up to a day in advance, cover tightly, and refrigerate. When ready to bake, let them sit at room temperature for about 20 minutes, then bake as directed.

Can I freeze Chicken Enchiladas with Sour Cream Sauce?

Absolutely. Assemble the enchiladas but hold off on baking. Wrap the dish tightly in plastic wrap and foil, then freeze for up to 2 months. Thaw overnight in the refrigerator and bake covered until heated through.

Can I use corn tortillas instead of flour for Chicken Enchiladas with Sour Cream Sauce?

Yes — corn tortillas give a more traditional texture and flavor. Warm them first in the microwave or a skillet to make them pliable and prevent tearing.

How can I make Chicken Enchiladas with Sour Cream Sauce spicier?

Add diced jalapeños, hot green chiles, or a pinch of cayenne pepper to the filling or sauce. You can also drizzle with hot sauce before serving for an extra kick.

What’s the best cheese for Chicken Enchiladas with Sour Cream Sauce?

Colby Jack melts beautifully and adds mild flavor, but Monterey Jack, Pepper Jack, or a Mexican blend also works great. For a sharper taste, try a mix of cheddar and Monterey Jack.

How do I keep the tortillas from getting soggy in Chicken Enchiladas with Sour Cream Sauce?

Spread a thin layer of sauce on the bottom of your baking dish, but don’t oversaturate the tortillas. Baking uncovered until bubbly helps the edges stay slightly crisp while the centers stay soft.

How long do leftovers of Chicken Enchiladas with Sour Cream Sauce last?

Store leftovers in an airtight container in the refrigerator for up to 3 days. Reheat gently in the oven or microwave until warmed through.

Can I use Greek yogurt instead of sour cream in Chicken Enchiladas with Sour Cream Sauce?

Yes — Greek yogurt makes a great lighter substitute. Use full-fat yogurt for the best texture and stir it in off the heat to prevent curdling.

🌮 More Family-Favorite Tex-Mex Recipes

  • A square slice of a green enchilada casserole with layers of roasted chicken, sauce, roasted peppers, and melted cheddar cheese.
    Green Enchilada Casserole with Chicken
  • A straight-on view of an untouched beef chimichanga on a green platter flanked by a serving of Mexican rice and refried beans on the other side.
    Beef Chimichanga
  • An overhead view of a large fajita skillet filled with a serving of shrimp fajitas with bowls of all the fixings nearby including pice de gallo, lime wedges, and crumbled Cotija cheese.
    Best-Ever Shrimp Fajitas
  • Two rows of crispy beef tacos resting on two taco holders with chopped tomatoes and shredded cheese scattered around them.
    Authentic Tex-Mex Beef Tacos

Ready to make the best enchiladas in town? Go for it!

And when you do, be sure to take a photo of them, post it on Instagram, and tag@HowToFeedaLoon and hashtag #HowToFeedaLoon!

A close-up view of two chicken enchiladas with sour cream sauce on a white dinner plate and garnished with chopped cilantro.
Print Recipe
5 from 6 votes

Chicken Enchiladas with Sour Cream Sauce

These Chicken Enchiladas with Sour Cream Sauce are creamy, cheesy, and full of flavor — made with tender shredded chicken, melty Colby Jack cheese, and a rich, homemade sour cream sauce. Baked until golden and bubbly, they’re comforting, delicious, and just as irresistible as classic beef enchiladas!
Prep Time20 minutes mins
Cook Time40 minutes mins
Resting Time5 minutes mins
Total Time1 hour hr 5 minutes mins
Course: Entree
Cuisine: Tex-Mex
Servings: 4
Calories: 742kcal
Author: Kris Longwell

Equipment

  • 9"x13" casserole dish or a baking sheet pan

Ingredients

For the Chicken Filling

  • 2 tablespoon unsalted butter
  • 1 medium onion chopped
  • 2 teaspoon garlic minced
  • 1 4 oz can green chiles not drained
  • 1 teaspoon ground cumin
  • 1 teaspoon chili powder
  • 1 teaspoon Kosher salt
  • ½ teaspoon black pepper
  • 2 cups cooked chicken shredded or chopped, rotisserie works well
  • 1 cup Colby Jack cheese grated, see NOTES

For the Sour Cream Sauce

  • 3 tablespoon unsalted butter
  • 3 tablespoon all-purpose flour
  • 2 cups chicken broth warmed in the microwave or on the stove
  • 1 cup sour cream
  • 1 4 oz can green chiles not drained
  • 1 teaspoon onion powder
  • 1 teaspoon garlic powder
  • ½ teaspoon Kosher salt
  • ½ teaspoon black pepper

For Assembly

  • 8 – 10 flour tortillas fajita size (not the big ones)
  • 1½ cups Colby Jack cheese shredded, see NOTES
  • 2 tablespoon cilantro fresh, chopped, for garnish

Instructions

  • Preheat oven to 375°F.

Prepare the Chicken Filling

  • In a large skillet, melt the butter over medium heat. Add the onions, and sauté until they are soft, about 4 to 5 minutes.
    2 tablespoon unsalted butter, 1 medium onion
  • Stir in the minced garlic, and sauté for 30 seconds. Stir in the green chiles, cumin, chili powder, salt, and pepper. Stir and sauté for about 1 to 2 minutes. Stir in the chicken until fully coated. Remove heat and stir in the cheese until melted. Set aside.
    2 teaspoon garlic, 1 4 oz can green chiles, 1 teaspoon ground cumin, 1 teaspoon chili powder, 1 teaspoon Kosher salt, ½ teaspoon black pepper, 2 cups cooked chicken, 1 cup Colby Jack cheese

Prepare the Sour Cream Sauce

  • In a separate skillet (or clean out the skillet you prepared the chicken in), melt the butter over medium heat. Stir in the flour, and cook for 1 minute.
    3 tablespoon unsalted butter, 3 tablespoon all-purpose flour
  • Slowly whisk in the warmed chicken broth. Continue stirring until lumps are gone and it becomes slightly thickened and silky.
    2 cups chicken broth
  • Turn the heat to low and stir in the sour cream, green chiles, onion powder, garlic powder, salt, and pepper. Stir until smooth and any lumps are gone. Set aside.
    1 cup sour cream, 1 4 oz can green chiles, 1 teaspoon onion powder, 1 teaspoon garlic powder, ½ teaspoon Kosher salt, ½ teaspoon black pepper

Assemble and Bake the Enchiladas

  • Wrap the tortillas in a napkin (or paper towels) and microwave on HIGH for 30 seconds to 1 minute, until the tortillas are warmed and very pliable.
    8 – 10 flour tortillas
  • Spoon or ladle a thin layer of the sauce over the bottom of a 9×13" baking dish.
  • Place a tortilla at the end of the dish. Spoon about ¼ cup of the chicken filling down the center of the tortilla. Roll tightly and place seam-side down. Repeat with the remaining tortillas.
  • Spoon or ladle the remaining sauce over the top of the row of enchiladas. Sprinkle the cheese down the middle of the enchiladas.
    1½ cups Colby Jack cheese
  • Bake in the preheated oven (375°F) for 20 to 25 minutes, or until bubbly and the cheese is lightly browned in spots. Remove from the oven and let rest for 5 to 10 minutes. Garnish with cilantro and serve at once.
    2 tablespoon cilantro

Video

Notes

NOTE: Watch the video in the recipe card for visual guidance.
  • Cheese Options: Colby Jack gives these enchiladas a creamy, mild flavor, but Monterey Jack, Pepper Jack, or a Mexican blend all work great too. For the smoothest melt, shred your cheese from a block — pre-shredded cheese contains anti-caking agents that can affect texture.
  • Storage: Store leftover enchiladas in an airtight container in the refrigerator for up to 3 days.
  • Reheating: Reheat in the oven at 325°F for 15–20 minutes or in the microwave until warmed through. Add a splash of chicken broth or extra sauce before reheating to keep them moist.
  • Freezing: You can freeze unbaked enchiladas (without the sour cream sauce) for up to 2 months. Thaw overnight in the fridge, add the sauce, and bake as directed.

Nutrition

Calories: 742kcal | Carbohydrates: 44g | Protein: 46g | Fat: 28g | Saturated Fat: 18g | Polyunsaturated Fat: 4g | Monounsaturated Fat: 6g | Trans Fat: 1g | Cholesterol: 205mg | Sodium: 764mg | Potassium: 530mg | Fiber: 3g | Sugar: 6g | Vitamin A: 1818IU | Vitamin C: 3mg | Calcium: 750mg | Iron: 5mg

Homemade Philly Cheesesteak (Juicy, Cheesy, and Easy to Make)

November 2, 2025 by Kris Longwell Leave a Comment

Two homemade Philly cheesesteaks sitting next to each other on wrinkled brown paper with kettle chips, pickle spears, and two beers resting near the sandwiches.

This Homemade Philly Cheesesteak is everything you love about the classic — tender, thinly sliced ribeye, sautéed onions, and melty white American cheese griddled together to perfection. It’s all tucked into a soft hoagie roll for that authentic, cheesy, juicy bite every time. With just a few simple steps and easy techniques, we’ll show you exactly how to recreate that iconic Philly flavor and texture right in your own kitchen.

Two homemade Philly cheesesteaks sitting next to each other on wrinkled brown paper with kettle chips, pickle spears, and two beers resting near the sandwhiches.
[feast_advanced_jump_to]

🥩 The Ingredients

A handful of simple, high-quality ingredients come together to create the ultimate balance of savory, melty, and perfectly seasoned flavor in every bite of this classic cheesesteak. Find ingredient notes (including substitutions and variations) below.

An arrangement of ingredients for homemade Philly cheesesteak on a grey, wooden background inlcuding shave ribey, salt, peper, oil, chopped onions, and rolls.

🥖 Ingredient Notes (with Substitutions & Variations)

  • Ribeye Steak: The marbling in ribeye gives your cheesesteak that signature juicy, tender bite. If you can’t find ribeye, try thinly sliced sirloin, flank steak, or even shaved deli roast beef for a quick version.
  • Onions: Classic Philly flavor starts with sautéed yellow onions. Want a little sweetness? Use Vidalia onions or add a few sliced bell peppers for a “Philly-style with peppers” twist.
  • Cheese: We love Cooper Sharp White American for its creamy melt and nostalgic flavor. You can also use provolone for a milder, gooier sandwich or Cheez Whiz for the authentic South Philly vibe.
  • Hoagie Rolls: Soft, slightly chewy rolls like Amaroso’s are the gold standard. If you can’t find them, use any soft sub or sandwich roll that can hold up to the juicy filling.
  • Oil: A little vegetable oil helps the onions caramelize beautifully. Feel free to use canola or avocado oil — or even a touch of butter for extra richness.
  • Seasoning: Keep it simple with salt and pepper — the meat and cheese do the heavy lifting. For a little kick, add a pinch of garlic powder or crushed red pepper flakes.

See the recipe card (with video) below for a full list of ingredients and measurements.

🔥 Pro Tips for the Best Homemade Cheesesteak

  • Freeze the steak slightly before slicing: Pop your ribeye in the freezer for about 30 minutes — it firms up just enough to make paper-thin slicing easy, which is key to that authentic Philly texture.
  • Use a hot griddle or cast-iron skillet: High heat gives the beef a quick sear and locks in the juices while melting the cheese perfectly into the meat.
  • Don’t overcrowd the pan: Cook the steak in batches if needed — too much at once will steam the meat instead of browning it.
  • Add the cheese right on the meat: Let the cheese melt directly into the hot beef and onions before loading it into the roll — this ensures every bite is gooey and flavorful.
  • Wrap it like they do in Philly: Once assembled, wrap your cheesesteak tightly in butcher paper or sandwich paper and let it sit for a minute or two. The trapped steam softens the roll just enough to create that classic Philly taste and texture — warm, tender bread hugging the melty, cheesy filling.
  • Keep it simple: The best cheesesteaks rely on balance — tender beef, melted cheese, and perfectly cooked onions. No fancy sauces needed.
  • Serve immediately: Cheesesteaks are meant to be eaten hot off the griddle, when the cheese is still molten and the bread is perfectly steamed.

👨‍🍳 How to Make Homemade Philly Cheesesteaks

A pile of chopped yellow onions being sautéed in a little oil on a large outdoor griddle.
  1. Step 1: Heat your griddle (or skillet) with a little oil over medium-high heat and sauté the onions until lightly browned and soft.
A person using a large silver spatula and a bench scraper to gently shred thinly sliced ribeye that is being cooked on an outdoor griddle.
  1. Step 2: Push the onions over (off the heat), add a splash more oil, and then add the thinly sliced steak. Use two spatulas to lightly shred the meat. Cook until just no longer pink.
A person sprinkling ground pepper over chopped cooked ribeye and sautéed onions on a large outdoor griddle.
  1. Step 3: Mix the onions into the beef and lightly sprinkle with salt and pepper.
A person placing squares of white American cheese over two mounds of chopped ribeye and onions on a large outdoor griddle.
  1. Step 4: Divide the meat into two rectangular piles (the length of the buns) and place two slices of cheese over each mound. Let steam for 30 seconds.
A person using a metal spatula and bench scraper to incorporate melty American white cheese into a pile of cooked thin strips of ribeye and sautéed onions on an outdoor griddle.
  1. Step 1: Quickly cut the melty cheese into the meat. Form into a rectangular pile again.
A person that has just placed two large hoagie buns over a mound of Philly cheesesteak piles on a sizzling outdoor griddle.
  1. Step 2: Place the opened buns over the meat.
A person holding a homemade Philly cheesesteak in his right hand while holding the spatula that he used to transfer the meat into the bun with his other hand.
  1. Step 3: Use a long spatula to flip the sandwich over into your hand with the meat/cheese mixture staying inside the bun (it’s okay if a little falls out of the bun).
A person placing two homemade Philly cheesesteaks that are wrapped in white butcher paper on a wooden cutting board.
  1. Step 4: Place the sandwich on a 12″x12″ square of sandwich/butcher paper and roll it up. Let the sandwich steam in the paper for 1 to 10 minutes. Serve at once!

Expert Tip

For the most authentic flavor and texture, cook your cheesesteak on an outdoor flat-top griddle, indoor griddle, or large cast-iron skillet. The even surface lets you sear the beef, sauté the onions, and melt the cheese all in one place — just like the pros do in Philly.

A griddle gives you plenty of room to chop and mix everything together while it cooks, helping the flavors meld and the cheese coat every bite. If you don’t have a griddle, a heavy stainless steel or cast-iron pan works great — just make sure it’s screaming hot before the meat hits the surface for that perfect sizzle.

🍟 Serving Suggestions

Serve your Homemade Philly Cheesesteak hot off the griddle with any of these delicious sides and pairings:

  • Crispy French Fries – The classic cheesesteak companion.
  • Onion Rings or Potato Wedges – Add crunch and a little indulgence.
  • Green Salad or Coleslaw – A fresh, tangy contrast to the rich, cheesy filling.
  • Pickle Spears or Hot Cherry Peppers – For that authentic Philly touch.
  • Cheese Fries or Sweet Potato Fries – Perfect for turning it into a hearty meal.
  • Tomato Soup or Beer Cheese Two homemade Philly cheesesteaks sitting next to each other on wrinkled brown paper with kettle chips, pickle spears, and two beers resting near the sandwiches.Dipping Sauce – Great for dunking your sandwich.
  • Cold Soda or Root Beer – A refreshing way to balance the savory flavors.

🙋🏽‍♂️ Frequently Asked Questions

What kind of meat is best for a Homemade Philly Cheesesteak?

Ribeye is the classic choice because it’s well-marbled and stays juicy when cooked quickly. You can also use thinly sliced sirloin or flank steak if you’re looking for a leaner option.

How do I get the steak sliced so thin for a Homemade Philly Cheesesteak?

Place the ribeye in the freezer for about 30 minutes before slicing — this firms up the meat, making it easier to cut into paper-thin slices with a sharp knife. You can also ask your butcher to shave it for you, which is the easiest and most authentic option. If slicing yourself, go with a top-notch slicer like a Beswood Slicer.

Can I make Homemade Philly Cheesesteaks ahead of time?

You can prep the ingredients in advance — slice the beef, sauté the onions, and store everything separately. When ready to serve, reheat the meat and onions on a hot griddle, melt the cheese, and assemble the sandwiches fresh for the best texture.

What cheese works best for Homemade Philly Cheesesteak?

White American cheese melts beautifully and gives that classic creamy texture. Provolone is a great mild option, while Cheez Whiz adds that nostalgic, authentic Philly flavor.

How do I get the authentic texture for Homemade Philly Cheesesteaks?

Wrap the finished sandwich tightly in butcher or sandwich paper and let it rest for a minute or two. The steam softens the roll slightly, giving it that signature Philly cheesesteak taste and texture.

Can I make a Homemade Philly Cheesesteak without a griddle?

Yes! A large cast-iron or stainless-steel skillet works perfectly. The key is using high heat so the meat sears quickly and stays tender.

What kind of bread should I use for a Homemade Philly Cheesesteak?

Soft, slightly chewy hoagie rolls are ideal — Amaroso’s brand is traditional, but any sturdy sub roll that can hold the juicy filling without falling apart will work.

How should I reheat leftover Homemade Philly Cheesesteak?

Wrap the sandwich in foil and warm it in a 325°F oven for 10–15 minutes. This keeps the bread soft and the cheese melty without drying out the meat.

Can I customize Homemade Philly Cheesesteaks with other toppings?

Absolutely! Add sautéed bell peppers, mushrooms, or even a drizzle of hot sauce for a spicy twist. Just keep the balance of meat, cheese, and bread at the heart of the sandwich.

A person holding an uneaten, freshly prepared homemade Philly cheesesteak in his hand.

🥪 Other Amazing Beef Sandwiches

  • A Marinated Grilled Steak Sandwich on a wood cutting board
    Grilled Steak Sandwich
  • A person holding two halves of a Wagyu pastrami sandwich on rye bread.
    Wagyu Pastrami Sandwich
  • A close-up view of a slow cooker chopped brisket sandwich with barbecue sauce drizzled over the top of the meat with a couple of pickle slices and a thinly slice of onion on top, too.
    Slow Cooker Chopped Brisket Sandwiches
  • A pot roast slider topped with melty Swiss cheese, caramelized onions, and a toasted slider bun resting on the side of the pot roast.
    Pot Roast Sliders

Ready to make the best cheesesteak this side of the City of Brotherly Love? Go for it!

And when you do, be sure to take a photo of it, post it on Instagram, and tag @HowToFeedaLoon and hashtag #HowToFeedaLoon!

A close-up view of a homemade Philly cheesesteak with another cheesesteak sitting next to it, both on a wrinkled brown piece of sandwich paper.
Print Recipe
No ratings yet

Homemade Philly Cheesesteak

This Homemade Philly Cheesesteak is loaded with thinly sliced ribeye, sautéed onions, and melty white American cheese, all griddled to perfection and tucked into a soft hoagie roll. With just a few simple steps, you’ll master that classic Philly flavor and texture — juicy, cheesy, and absolutely irresistible.
Prep Time15 minutes mins
Cook Time15 minutes mins
Resting time3 minutes mins
Total Time33 minutes mins
Course: Lunch / Sandwich
Cuisine: American
Servings: 2
Calories: 502kcal
Author: Kris Longwell

Equipment

  • Flat-iron griddle or large cast-iron skillet
  • 2 spatulas 1 large one to help scoop up the sandwich off the griddle.

Ingredients

  • 16 oz ribeye steak thinly sliced (see NOTES)
  • 2 tablespoon vegetable oil divided
  • 1 large onion chopped
  • salt and pepper
  • 4 slices American white cheese see NOTES
  • 2 soft hoagie buns

Instructions

  • If your steak is not already sliced, place the ribeye in the freezer for 30 to 45 minutes. It should become partially frozen. This makes slicing much easier. Use a sharp knife or a sturdy slicer to cut the meat into very thin slices. Set aside.
    16 oz ribeye steak
  • Heat your griddle (or cast-iron skillet) to medium-high heat. Add a splash of oil and spread it around with a large spatula. Add the onions and sauté them until they are golden brown, about 5 to 7 minutes.
    2 tablespoon vegetable oil, 1 large onion
  • Push the onions to the side of the griddle (not over heat), or remove them from the skillet. Add another splash of oil over the heated griddle and spread it around with the spatula. Add the thinly sliced meat and let it cook (unmoved) for about 30 seconds. Then, use two spatulas (or a spatula and a bench scraper) to gently shred the meat into bite-sized pieces. Continue cooking, spreading around, shredding, and flipping occasionally, until the meat is just no longer pink.
  • Sprinkle the meat with a couple of pinches of salt and pepper. Use your spatula to form two rows of the meat/onion mixture (about the length of your rolls).
    salt and pepper
  • Place two slices of cheese over each mound of the meat. Let the cheese rest on the simmering meat for about 30 seconds. Now, use your spatula to cut the melty cheese into the meat mixture. Continue this for a short bit, until the cheese and meat are fully combined and the cheese has completely melted.
    4 slices American white cheese
  • Place the opened roll directly over each pile of the cheesesteak mixture. Now, use your spatula to scoop the entire sandwich off the griddle, then flip it over onto your hand. Repeat with the other cheesesteak.
    2 soft hoagie buns
  • For authentic texture, wrap the cheesesteaks in sandwich or butcher paper and let then let them rest/steam for 1 to 10 minutes. Then, serve at once!

Video

Notes

NOTE: Watch the video in the recipe card for visual guidance.
  • Steak – This recipe calls for 16 oz of thinly sliced ribeye. That will make two Philly-style sandwiches loaded with steak. One cheesesteak could be split in half and serve two people. Or, just get smaller rolls and make four smaller cheesesteaks. 
  • Cheese Options: Traditional Philly cheesesteaks are made with white American cheese, provolone, or Cheez Whiz — and each gives a slightly different flavor and texture.
    • White American cheese melts smoothly and gives that classic creamy, savory bite.
    • Provolone adds a mild, slightly nutty flavor and a beautiful stretch when melted.
    • Cheez Whiz delivers the most authentic South Philly experience — rich, salty, and extra gooey.
  • When to Add the Cheese:
    • For American or provolone, place the cheese directly on top of the hot beef and onions while still on the griddle. Cover briefly with a lid or inverted pan to help it melt before loading it into the roll.
    • For Cheez Whiz, warm it separately and spoon or drizzle it over the sandwich after assembling — that’s how they do it in Philly!
  • Pro Tip: If you want the bread to have that signature soft, steamy texture, wrap the finished sandwich tightly in butcher or sandwich paper for a minute before serving.

Nutrition

Calories: 502kcal | Carbohydrates: 7g | Protein: 46g | Fat: 32g | Saturated Fat: 14g | Polyunsaturated Fat: 2g | Monounsaturated Fat: 15g | Cholesterol: 138mg | Sodium: 121mg | Potassium: 717mg | Fiber: 1g | Sugar: 3g | Vitamin A: 36IU | Vitamin C: 6mg | Calcium: 33mg | Iron: 4mg

Best Homemade Pumpkin Bread Recipe

October 29, 2025 by Kris Longwell 2 Comments

A loaf of best homemade pumpkin bread that has been cut into slices on brown paper next to two glass mugs of coffee and a small bowl of softened butter.

There’s nothing that says fall baking quite like a loaf of homemade pumpkin bread fresh from the oven. This recipe delivers everything you love — a soft, moist crumb, cozy spices like cinnamon and nutmeg, and that unmistakable pumpkin flavor — but it’s the brown sugar streusel topping that truly puts it over the top. Sweet, buttery, and just a little crunchy, it adds the perfect finishing touch to every slice.

A loaf of best homemade pumpkin bread that has been cut into slices on brown paper next to two glass mugs of coffee and a small bowl of softened butter.
[feast_advanced_jump_to]

🎃 The Ingredients

This pumpkin bread comes together with simple pantry staples and warm fall spices that create a perfectly moist, flavorful loaf with a hint of sweetness in every bite. Find ingredient notes (including substitutions and variations) below.

An arrangement of ingredients for best homemade pumpkin bread on a grey wooden background including pumpkin purée, eggs, flour oil, sugar, milk, vanilla, and spices.

📝 Notes & Variations

  • Pumpkin Purée: Be sure to use 100% pure pumpkin, not pumpkin pie filling. The texture and flavor are completely different.
  • Oil vs. Butter: Vegetable oil keeps the bread extra moist for days, but you can swap half for melted butter if you prefer a richer flavor.
  • Spices: The blend of cinnamon, nutmeg, cloves, and ginger gives that classic pumpkin spice warmth — adjust to taste or use 2–3 teaspoons of pumpkin pie spice for convenience.
  • Sugar: A mix of granulated and brown sugar adds both sweetness and depth. For a more caramel-like flavor, use all brown sugar.
  • Milk: Whole milk gives a tender crumb, but you can substitute buttermilk or even a bit of sour cream for extra moisture.
  • Topping: Don’t skip the brown sugar streusel — it adds a buttery crunch that takes this pumpkin bread from simple to bakery-worthy.
  • Add-ins: Stir in a handful of chopped pecans, walnuts, or chocolate chips for extra texture and flavor.
  • Mini Loaves or Muffins: This batter works beautifully for smaller portions — just reduce the baking time (mini loaves take about 25–30 minutes; muffins, 18–22 minutes).

Refer to the recipe card (with video) below for a complete list of ingredients and measurements.

💡 Tips & Tricks for Perfect Pumpkin Bread

  • Don’t overmix the batter: Stir just until the dry ingredients disappear — overmixing can make the bread dense instead of tender.
  • Measure flour correctly: Spoon it into your measuring cup and level it off; scooping directly from the bag packs in too much flour.
  • Use room temperature ingredients: Eggs, milk, and pumpkin mix more smoothly and help the bread rise evenly.
  • Check for doneness early: Every oven is different — start checking around 50 minutes. A toothpick should come out clean or with just a few moist crumbs.
  • Cool before slicing: Let the bread rest in the pan for 10–15 minutes, then transfer to a rack. Cutting too soon can make it gummy inside.
  • Line your pan: A strip of parchment paper makes it easy to lift the loaf out cleanly — no sticking or crumbling.

👩🏼‍🍳 How to Make Homemade Pumpkin Bread

A person holding a small white bowl in one hand that contains small mounds of salt, baking soda, and baking powder and another white bowl in his other hand containing pumpkin bread spices over a bowl of flour and sugar.
  1. Step 1: In a medium bowl, whisk together the dry ingredients until fully combined.
A person using a wooden spoon to transfer pumpkin purée from a small glass bowl into a large bowl filled beaten eggs, milk, and oil.
  1. Step 2: In another large bowl, stir together the eggs, pumpkin purée, oil, milk, and vanilla extract until smooth.
A person using a wooden spoon to stir a dry flour mixture from one bowl into another bowl that contains a wet mixture for pumpkin bread.
  1. Step 3: Gradually add the dry mixture to the wet mixture, stirring until just combined. Avoid overmix.
A person transferring pumpkin bread batter from a large glass bowl into a loaf pan that is lined with brown parchment paper.
  1. Step 4: Spray a loaf pan with cooking spray and then line it with parchment paper. Pour the batter over the paper.
A person using his fingers to sprinkle uncooked brown sugar streusel over pumpkin bread batter that is in a loaf pan lined with parchment paper.
  1. Step 5: Put together the streusel ingredients and then sprinkle over the top of the bread batter.
A person pulling brown parchment paper away from a freshly baked best homemade pumpkin bread loaf that is resting on a wire rack.
  1. Step 6: Bake at 350°F for 65 minutes, or until an inserted toothpick comes out clean. Let rest 10 minutes in the pan and then let cool on a baking rack.

Expert Tip

For the best texture, keep your streusel cold before sprinkling it over the batter. Chilling the mixture for 10–15 minutes helps the butter stay solid, so it melts slowly in the oven and creates those irresistible, crisp golden clusters instead of melting flat.

🙋🏽‍♂️ Frequently Asked Questions

Why is my Homemade Pumpkin Bread dense or heavy?

This usually happens when the batter is overmixed or if too much flour is added. Stir just until the dry ingredients are combined, and measure flour by spooning it into the cup and leveling it off.

Can I make Homemade Pumpkin Bread ahead of time?

Yes! It actually tastes even better the next day as the spices deepen. Once cooled, wrap it tightly in plastic wrap or foil and store at room temperature for up to 3 days.

Can I freeze Homemade Pumpkin Bread?

Absolutely. Wrap the cooled loaf (or individual slices) tightly in plastic wrap, then in foil, and freeze for up to 3 months. Thaw overnight at room temperature before serving.

How do I keep Homemade Pumpkin Bread moist?

Use oil instead of butter and don’t overbake it. Also, store it tightly wrapped once cooled — a little trapped moisture keeps the crumb soft and tender.

Can I add nuts or chocolate chips to Homemade Pumpkin Bread?

Yes! Stir in up to 1 cup of chopped pecans, walnuts, or chocolate chips just before baking. They add great texture and flavor.

Why did my Homemade Pumpkin Bread crack on top?

That’s actually a good sign! The crack forms as the bread rises and sets — it means the interior is moist and expanding properly.

Can I use fresh pumpkin purée in Homemade Pumpkin Bread?

You can, but make sure it’s well-drained and thick. Fresh purée can be more watery than canned, which may affect texture and baking time.

A half eaten slice of best homemade pumpkin bread with softened butter smeared on the top and is resting on a small white plate.

🍁 More Classic Pumpkin Recipes

  • A straight-on view of a stack of three pumpkin waffles that are topped with a dollop of whipped cinnamon honey butter, maple syrup, and chopped pecans.
    Pumpkin Waffles with Whipped Cinnamon Honey Butter
  • A white dessert plate holding two pumpkin whoopie pies in front of a cake platter holding more whoopie pies.
    Pumpkin Whoopie Pies
  • A slice of pumpkin pie on a white plate next to a whole pumpkin pie.
    Classic Pumpkin Pie
  • Two slices of pumpkin butterscotch bread on a white plate next to a cup of coffee and two loaves of bread.
    Pumpkin Butterscotch Bread

Ready to make the best pumpkin bread in town? Go for it!

And when you do, be sure to take a photo of it, post it on Instagram, and tag @HowToFeedaLoon and hashtag #HowToFeedaLoon!

An overhead view of a loaf of best homemade pumpkin bread that has three slices cut from it and resting on brown paper with two glass mugs of creamed coffee nearby.
Print Recipe
5 from 1 vote

Best Homemade Pumpkin Bread Recipe

This Homemade Pumpkin Bread is soft, moist, and perfectly spiced with cinnamon, nutmeg, and cloves — but it’s the buttery brown sugar streusel on top that makes it truly irresistible. Easy to make, full of cozy fall flavor, and even better the next day!
Prep Time15 minutes mins
Cook Time1 hour hr 5 minutes mins
Total Time1 hour hr 20 minutes mins
Course: Breakfast / Brunch
Cuisine: American
Servings: 8
Calories: 424kcal
Author: Kris Longwell

Equipment

  • 1 loaf pan 9"x5"
  • Parchment paper

Ingredients

For the Brown Sugar Streusel

  • ⅓ cup all-purpose
  • ½ cup dark brown sugar
  • ½ teaspoon ground cinnamon
  • ¼ teaspoon salt
  • 2 tablespoon unsalted butter chilled and cut into small cubes
  • ½ cup pecans chopped (optional)

For the Pumpkin Bread

  • Cooking spray or oil or softened butter
  • 1¾ cups all-purpose flour
  • 1 teaspoon baking soda
  • ½ teaspoon baking powder
  • ½ teaspoon salt
  • 1½ teaspoon ground cinnamon
  • ½ teaspoon ground nutmeg
  • ¼ teaspoon ground cloves
  • ¼ teaspoon ground ginger
  • 1 cup granulated sugar
  • ½ cup dark brown sugar
  • 2 large eggs lightly beaten
  • 1 cup pumpkin purée not pumpkin pie filling
  • ½ cup vegetable oil
  • ¼ cup whole milk
  • 1 teaspoon vanilla extract
  • brown sugar streusel

Instructions

Make the Brown Sugar Streusel

  • In a small bowl, whisk together the flour, brown sugar, cinnamon, and salt.
    ⅓ cup all-purpose, ½ cup dark brown sugar, ½ teaspoon ground cinnamon, ¼ teaspoon salt
  • Add the cold, cubed butter and use a fork, pastry cutter, or your fingers to work it into the mixture.
    2 tablespoon unsalted butter
  • Mix in the chopped nuts (if using). Chill until ready to use.
    ½ cup pecans

Make the Pumpkin Bread

  • Preheat oven to 350°F. Spray the loaf pan with cooking spray (or grease with oil or softened butter). Line the pan with parchment paper.
    Cooking spray
  • In a medium bowl, whisk together the flour, baking soda, baking powder, salt, cinnamon, nutmeg, cloves, ginger, granulated sugar, and brown sugar.
    1¾ cups all-purpose flour, 1 teaspoon baking soda, ½ teaspoon baking powder, ½ teaspoon salt, 1½ teaspoon ground cinnamon, ½ teaspoon ground nutmeg, ¼ teaspoon ground cloves, ¼ teaspoon ground ginger, 1 cup granulated sugar, ½ cup dark brown sugar
  • In a large bowl, mix together the lightly beaten eggs, pumpkin purée, oil, milk, and vanilla. Stir until smooth and completely blended.
    2 large eggs, 1 cup pumpkin purée, ½ cup vegetable oil, ¼ cup whole milk, 1 teaspoon vanilla extract
  • Gently fold the dry ingredients into the wet mixture until just combined. Avoid overmixing.
  • Pour the batter into the prepared loaf pan. Generously top with the streusel mixture. Bake for 55 to 65 minutes, or until a toothpick inserted into the center of the loaf comes out clean.
    brown sugar streusel
  • Let the bread cool in the pan for 10 to 15 minutes. Transfer to a wire rack to cool completely.

Video

Notes

NOTE: Watch the video in the recipe card for visual guidance.
  • Pumpkin: Use 100% pure pumpkin purée, not pumpkin pie filling. The texture and flavor are completely different.
  • Oil: Using oil instead of butter keeps the bread extra moist and tender for days.
  • Spices: Adjust the spice blend to your taste — or substitute 2–3 teaspoons of pumpkin pie spice for convenience.
  • Toppings: The brown sugar streusel adds a delicious crunch, but you can skip it for a classic smooth loaf or swap it for a sprinkle of raw sugar, chopped nuts, or chocolate chips.
  • Storage: Wrap tightly and store at room temperature for up to 3 days, or refrigerate for up to a week. The flavor deepens as it rests.
  • Freezer-Friendly: Freeze whole or sliced for up to 3 months. Thaw overnight at room temperature before serving.
 

Nutrition

Calories: 424kcal | Carbohydrates: 81g | Protein: 6g | Fat: 9g | Saturated Fat: 3g | Polyunsaturated Fat: 2g | Monounsaturated Fat: 4g | Trans Fat: 0.1g | Cholesterol: 55mg | Sodium: 387mg | Potassium: 220mg | Fiber: 3g | Sugar: 53g | Vitamin A: 4939IU | Vitamin C: 1mg | Calcium: 74mg | Iron: 3mg

Homemade Chinese Hot and Sour Soup

October 26, 2025 by Kris Longwell 6 Comments

An overhead view of two bowls on a wicker placemat and that are filled with servings of homemade Chinese sweet and sour soup with wooden spoons flanking each bowl.

Bring the flavors of your favorite Chinese restaurant home with this Homemade Chinese Sweet and Sour Soup—a perfect balance of tangy, savory, and comforting goodness. This vibrant soup makes the ideal start to a Chinese feast at home, pairing beautifully with easy General Tso’s Chicken, Crispy Sesame Beef, or Kung Pao Shrimp. Whether you’re hosting a cozy dinner or craving takeout-style comfort, this simple recipe delivers all the bold, authentic flavors you love in every spoonful.

An overhead view of two bowls on a wicker placemat and that are filled with servings of homemade Chinese sweet and sour soup with wooden spoons flanking each bowl.
[feast_advanced_jump_to]

🍄 The Ingredients

This flavorful soup comes together with a mix of savory, tangy, and spicy elements that create the perfect balance of warmth, depth, and authentic Chinese taste. Find ingredient notes (including substitutions and variations) below.

An arrangement of ingredients for homemade Chinese sweet and sour soup on wooden background including chicken stock, mushrooms, bamboo soots, tofu, seasonings, soy sauce, vinegar, chili paste, egg, and scallions.

📝 Ingredients Notes and Variations

  • Broth: Use chicken broth for a rich, savory base, or swap in vegetable broth for a vegetarian version without losing depth of flavor.
  • Soy Sauce: Light soy sauce adds saltiness and umami; if you prefer a deeper color and stronger flavor, add a splash of dark soy sauce. Regular soy sauce, including low-sodium soy sauce, can used in place of light.
  • Vinegar: Traditional black vinegar gives the soup its signature tang—rice vinegar or apple cider vinegar can be used in a pinch.
  • Chili Paste: Adjust the amount to control the heat. For a milder version, use a touch of chili oil or omit it entirely.
  • Mushrooms: Shiitake mushrooms bring an earthy flavor; feel free to use wood ear mushrooms or button mushrooms if that’s what you have.
  • Tofu: Firm tofu holds its shape best, but soft tofu creates a silkier texture if you prefer a smoother mouthfeel.
  • Cornstarch Slurry: This thickens the soup to that classic glossy consistency—add gradually until it reaches your desired thickness.
  • Egg: The beaten egg creates delicate ribbons when stirred in; you can skip it for a vegan version.
  • Optional Add-ins: Try adding julienned carrots, baby corn, or even shredded chicken for extra flavor and texture.

👨‍🍳 How to Make Homemade Chinese Sweet and Sour Soup

A person holding a small bowl filled with chili paste in one hand and the other hand holding a small bowl of black vinegar both over a pot filled with chicken broth and a sprinkling of white pepper.
  1. Step 1: In a large pot, add the chicken broth, water, soy sauce, vinegar, chili paste, sesame oil, sugar, and white pepper. Bring to a strong simmer.
A person holding a small glass bowl filled with strips of bamboo shoots in one hand and the other hand holding a small glass bowl filled with strips of firm tofu both over a pot filled with a simmering broth with sliced mushrooms floating at the surface.
  1. Step 2: Stir in the mushrooms, bamboo shoots, and tofu. Simmer for about 7 minutes.
A person pouring a cornstarch slurry from a small glass bowl into a pot of simmering homemade Chinese hot and sour soup.
  1. Step 3: Slowly stir in the cornstarch slurry. Cook, stirring often, for about 2 minutes until glossy.
A person stirring in two lightly beaten eggs from a glass bowl into a large pot filled with simmering homemade Chinese hot and sour soup.
  1. Step 4: Slowly stir the beaten egg into the soup. Cook, stirring often, until ribbons of cooked egg appear, about 1 minute.
A person using a large wooden ladle to transfer homemade Chinese hot and sour soup from a large pot into a festive Asian soup bowl.
  1. Step 5: Ladle the soup into large soup bowls.
A person sprinkling chopped scallions over the top of a bowl filled with steaming homemade Chinese hot and sour soup.
  1. Step 6: Garnish with chopped scallions and serve at once!

Expert Tip

For the perfect silky texture, stir the soup in one direction to create a gentle whirlpool before slowly drizzling in the beaten egg—this helps form delicate, ribbon-like strands instead of clumps.

🍜 How to Serve

  • As a Starter: Serve this soup as the first course of a homemade Chinese feast—it sets the tone perfectly before mains like Homemade Sesame Chicken or Crispy Chili Beef.
  • With Rice or Noodles: Pair it with a bowl of steamed jasmine rice or simple stir-fried noodles to make it a more filling meal.
  • Add Garnishes: Top with sliced green onions, a drizzle of sesame oil, or a sprinkle of white pepper for extra aroma and flavor.
  • Family-Style Meal: Serve it in a large soup tureen or pot at the center of the table so everyone can ladle their own bowl.
  • Meal Prep Option: Store leftovers in the fridge and reheat gently—this soup tastes even better the next day as the flavors deepen.

Expert Tip – How to Make Crispy Wonton Strips

For a crunchy finishing touch, make easy fried wonton strips to serve with your soup! Simply cut store-bought wonton wrappers into thin strips, then fry them in hot oil (about 350°F / 175°C) for 30–45 seconds until golden and crisp. Drain on paper towels, sprinkle lightly with salt, and serve on top of or alongside your soup for that irresistible restaurant-style crunch.

🙋🏽‍♂️ Frequently Asked Questions

What makes Homemade Chinese Hot and Sour Soup both “hot” and “sour”?

The “hot” comes from chili paste or white pepper, while the “sour” flavor comes from vinegar—together they create the soup’s signature balance.

Can I make Homemade Chinese Hot and Sour Soup vegetarian or vegan?

Yes! Simply use vegetable broth instead of chicken broth and skip the egg. You can also add more tofu or vegetables for extra protein and texture.

Can I make Homemade Chinese Hot and Sour Soup ahead of time?

Absolutely. It reheats well—just store it in an airtight container in the fridge and reheat gently on the stove before serving.

Can I freeze Homemade Chinese Hot and Sour Soup?

Yes, but it’s best enjoyed fresh. The tofu and cornstarch can change texture once frozen. If you plan to freeze it, leave out the cornstarch and egg, then add them when reheating.

Why did my Homemade Chinese Hot and Sour Soup turn cloudy?

Cloudiness can happen if the cornstarch slurry isn’t fully dissolved or if the soup is stirred too vigorously after adding the egg. Stir gently for a clear, silky finish.

A large wooden ladle being used to raise a serving of homemade Chinese sweet and sour soup from a large white pot filled with the soup.

🥡 Other Classic Chinese “Starter” Recipes

  • A homemade egg roll that has been split in half revealing the pork and cabbage inside with one of the halves resting on the other half with a bowl of homemade duck sauce in the background.
    Homemade Egg Rolls with Easy Duck Sauce
  • Scallion pancakes that have been quartered and placed on a plate with a bowl filled with a dipping sauce off to the side.
    Easy Scallion Pancakes
  • A potsticker being dunked into a bowl with chop sticks into a bowl of soy dipping sauce
    Potstickers
  • crab rangoon on a plate with chop sticks
    Crab Rangoon

Ready to make the best soup this side of China Town? Go for it!

And when you do, be sure to take a photo of it, post it on Instagram, and tag @HowToFeedaLoon and hashtag #HowToFeedaLoon!

An overhead view of a festive soup bowl filled with homemade Chinese sweet and sour soup with a wooden spoon nearby and is garnished with chopped scallions.
Print Recipe
5 from 3 votes

Homemade Chinese Hot and Sour Soup

This Homemade Chinese Hot and Sour Soup is a quick, easy, and flavorful dish that brings together tangy, spicy, and savory flavors in every spoonful. With tender tofu, mushrooms, and a rich, balanced broth, it’s a comforting classic that tastes just like your favorite takeout. Perfect as a starter for a Chinese-inspired dinner or a cozy meal on its own!
Prep Time15 minutes mins
Cook Time20 minutes mins
Total Time35 minutes mins
Course: Appetizer or Soup
Cuisine: Chinese / American
Servings: 8
Calories: 142kcal
Author: Kris Longwell

Equipment

  • 1 Large pot

Ingredients

  • 8 cups chicken broth
  • 2 cups water
  • ¼ cup + 2 tbsp light soy sauce
  • ¼ cup black vinegar
  • 2 tablespoon chili paste
  • 2 teaspoon sesame seed oil
  • 2 teaspoon sugar
  • 1 teaspoon white pepper
  • 1 cup bamboo shoots cut into thin strips
  • 8 oz shiitake mushrooms stems removed and cut into strips
  • 1 cup firm tofu cut into strips or cubes
  • ¼ cup cornstarch mixed with 6 tablespoon water
  • 1 large egg slightly beaten
  • 3 scallions chopped, for garnish
  • fried wonton strips for garnish (optional), see NOTES

Instructions

  • Add the chicken broth, water, soy sauce, vinegar, chili paste, sesame oil, sugar, and white pepper to a large pot over medium-high heat. Stir to combine and bring to a strong simmer.
    8 cups chicken broth, 2 cups water, ¼ cup + 2 tablespoon light soy sauce, ¼ cup black vinegar, 2 tablespoon chili paste, 2 teaspoon sesame seed oil, 2 teaspoon sugar, 1 teaspoon white pepper
  • Add the bamboo shoots, mushrooms, and tofu. Turn the heat to medium and simmer for about 7 minutes, or until the mushrooms are tender.
    1 cup bamboo shoots, 8 oz shiitake mushrooms, 1 cup firm tofu
  • In a small bowl, mix together the cornstarch (¼ cup) with the water (6 tbsp) until combined and the cornstarch has dissolved. Slowly stir the cornstarch slurry into the soup, stirring constantly. Continue stirring and simmering until the soup is silky and slightly thickened, about 1 to 2 minutes.
    ¼ cup cornstarch
  • Reduce the heat to low and slowly stir the egg into the soup, stirring constantly until silky ribbons of cooked egg appear.
    1 large egg
  • Taste and add more sauce for salt and/or more vinegar for tang, if desired.
  • Serve garnished with chopped scallions and fried wonton strips, if desired.
    3 scallions, fried wonton strips

Video

Notes

NOTE: Watch the video in the recipe card for visual guidance.
  • Adjust the spice: Add more chili paste or white pepper for extra heat, or reduce it for a milder soup.
  • Vegetarian option: Use vegetable broth and omit the egg for a plant-based version.
  • Thickening tip: Stir in the cornstarch slurry gradually to reach your preferred consistency.
  • Egg ribbons: Create silky strands by stirring the soup gently in one direction while drizzling in the beaten egg.
  • Fried wonton strips: Cut wonton wrappers into thin strips and fry in hot oil (350°F / 175°C) for 30–45 seconds until golden and crisp. Drain and sprinkle lightly with salt.
  • Storage: Refrigerate leftovers for up to 3 days and reheat gently over low heat before serving.

Nutrition

Calories: 142kcal | Carbohydrates: 11g | Protein: 6g | Fat: 8g | Saturated Fat: 1g | Polyunsaturated Fat: 1g | Monounsaturated Fat: 1g | Trans Fat: 0.003g | Cholesterol: 28mg | Sodium: 907mg | Potassium: 181mg | Fiber: 1g | Sugar: 4g | Vitamin A: 94IU | Vitamin C: 2mg | Calcium: 61mg | Iron: 1mg

Best-Ever Smash Burger | Crispy, Juicy, and Easy to Make

October 22, 2025 by Kris Longwell 4 Comments

Two best-ever smash burgers with toasted brioche buns sitting on crumpled brown paper with two glasses of dark beer in the background.

There’s nothing quite like a perfectly made smash burger — crispy, golden edges, a juicy center, and that irresistible sizzle as it hits the hot griddle. This Best-Ever Smash Burger Recipe brings all the flavor of your favorite diner right to your kitchen. With simple ingredients, quick cooking time, and a few pro tips, you’ll learn how to create restaurant-quality burgers at home that are bursting with flavor and impossible to resist.

Two best-ever smash burgers with toasted brioche buns sitting on crumpled brown paper with two glasses of dark beer in the background.
[feast_advanced_jump_to]

🧀 The Ingredients

The secret to an unforgettable smash burger starts with simple, high-quality ingredients — but the most important of all is the ground beef, since the right fat content and freshness are what create those crispy edges and juicy, flavorful patties. Find ingredient notes (including substitutions and variations) below.

An arrangement of ingredients for best-ever smash burger on a grey wooden background including ground beef, buns, oil, cheese slices, burger sauce, pickles, lettuce, onion, butter, tomato slices, salt, and pepper.

🥩 Choosing the Right Beef

  • Go for 80/20 beef:
    The ideal ratio is 80% lean meat and 20% fat. This blend gives you crispy, caramelized edges and a juicy, flavorful center.
  • Avoid lean blends:
    Leaner beef (like 90/10 or 93/7) doesn’t have enough fat to create that signature sizzle and crust.
  • Buy fresh, not pre-packaged:
    Freshly ground beef from the butcher holds together better and delivers a cleaner, beefier flavor.
  • Ask for a custom grind (optional):
    A mix of chuck, brisket, and short rib is a popular choice for an extra-rich, restaurant-quality burger.
  • Keep it cold until cooking:
    Cold beef sears better, helping you achieve that perfect smash and crust without overcooking the inside.

Expert Tip: Perfect Beef Blend (80/20 Ratio)

For the ultimate smash burger, skip the pre-packaged ground beef and either ask your butcher to grind a custom blend or grind it yourself at home. To achieve the ideal 80/20 lean-to-fat ratio, use about 60% chuck roast, 30% brisket, and 10% short ribs. This combination delivers the perfect balance of rich beef flavor, buttery fat, and meaty depth — exactly what you need for crispy edges and a juicy, flavorful bite in every smash burger.

👩🏼‍🍳 How to Make the Best-Ever Smash Burgers

A person holding a round ball of ground beef in his hand over a piece of brown paper that is holding three other balls of beef.
  1. Step 1: Form the ground meat into loose balls, 3 to 4 ounces each.
Four hamburger buns, two tops and two bottoms, being toasted cut-side down on a large outdoor griddle.
  1. Step 2: Butter the buns and toast them until golden. Set aside.
A person using a hamburger smasher and a large spatula to flatten ground hamburger on a hot griddle.
  1. Step 3: Oil your griddle and then flatten the beef with a spatula and a heavy object, or with a burger smasher.
A person sprinkling salt and pepper onto a smash burger that is being cooked on an outdoor griddle.
  1. Step 4: Season with salt and pepper.
A person using a large spatula to push together a crispy smash burger patty that was just recently flipped on an outdoor griddle.
  1. Step 5: After about 2 minutes, flip the patties. Push any stray pieces of beef into the patty.
A person placing a square slice of yellow American cheese onto the top of a crispy smash burger that is sizzling on a large outdoor griddle.
  1. Step 6: Top with a layer of American cheese.
A person using a large metal spatula to place two smash burgers with American cheese onto a hamburger bun with burger sauce, lettuce, and tomato on it.
  1. Step 7: Stack one patty on top of another. Place them on the bottom bun with burger sauce, lettuce, and tomato.
A person placing the top half of a toasted brioche hamburger on top of a double-stacked smash burger with American cheese, pickles, onion, tomato, lettuce, and burger sauce.
  1. Step 8: Top the burgers with sliced onion, pickles, and the top bun. Serve at once!

Expert Tip

If you’re cooking multiple rounds of burgers, wipe away excess grease between batches and reapply a light film of oil. This keeps the surface clean and prevents burnt bits from sticking to the next patties.

🍟 What to Serve with Best-Ever Smash Burgers

🥫 Condiments & Sauces

  • Smash Burger Sauce: The star condiment — creamy, tangy, and perfectly balanced. Spread it on both buns or serve on the side for dipping. See Recipe Card for how to make.
  • Ketchup & Mustard: Classic burger must-haves. Keep them simple and high-quality. Homemade Ketchup is easy and so good!
  • Pickles: Dill or bread-and-butter pickles add that sharp, vinegary bite that cuts through the richness.
  • Hot Sauce or Sriracha: For a little heat, drizzle or mix into your Smash Burger Sauce.
  • BBQ Sauce: Adds a smoky-sweet contrast that pairs beautifully with the crispy edges of the patties. Easy Homemade BBQ Sauce is the best!

🍟 Sides

  • Crispy French Fries: Go classic with bistro-style fries, or make it fun with waffle or sweet potato fries.
  • Onion Rings: Crunchy, golden, and perfect for dipping in that Smash Burger Sauce.
  • Coleslaw: A creamy diner-style slaw adds freshness and crunch to balance the burger’s richness.
  • Tater Tots: Another diner favorite — crispy outside, fluffy inside, and great with any dipping sauce.
  • Side Salad: A light green salad with a tangy vinaigrette helps cut through the fat and keeps the meal balanced.

🙋🏽‍♂️ Frequently Asked Questions

What kind of ground beef works best for the Best-Ever Smash Burger Recipe?

Use 80/20 ground beef — that’s 80% lean and 20% fat. The higher fat content helps create those crispy, caramelized edges and keeps the burger juicy. Ideally, go with 60% ground chuck, 30% ground brisket, and 10% beef short ribs (meat only).

How do I keep my patties from falling apart when making the Best-Ever Smash Burger Recipe?

Make sure your beef is loosely packed, your griddle is very hot, and you only flip once — after a crust has fully formed. A sturdy metal spatula also helps you flip cleanly without breaking the patty.

How much oil should I use when cooking the Best-Ever Smash Burger Recipe?

You only need a light coating — about ½ to 1 teaspoon of high-heat oil (like canola or avocado) to prevent sticking. If your griddle is well-seasoned, you can skip the oil altogether.

Can I make the Best-Ever Smash Burger Recipe on a regular skillet instead of a griddle?

Yes! A cast-iron skillet works great. Just make sure it’s large enough to give each patty room to sear without steaming.

What kind of cheese is best for the Best-Ever Smash Burger Recipe?

American cheese is the classic choice for its perfect melt, but cheddar, Swiss, or pepper jack also work well depending on your flavor preference.

Can I prepare the Best-Ever Smash Burger Recipe ahead of time?

It’s best made fresh, but you can portion and chill the beef balls in advance. Smash and cook them right before serving for the crispiest results.

A person holding a double-stacked best-ever smash burger in his hand.

🍔 More Amazing Burger Recipes

  • A person holding a best-ever cheeseburger consisting of a juicy beef burger topped with melting cheddar cheese, lettuce, tomato, red onion, and pickles all sandwiched between a toasted homemade hamburger bun.
    Best-Ever Cheeseburger
  • A bulgogi hamburger on a brioche bun with a layer of chili sauce mayo on the bottom and kimchi on top.
    Bulgogi Burgers with Easy Kimchi
  • A mushroom Swiss burger on a white plate next to a small bowl of ketchup and and a beer.
    Mushroom Swiss Burger
  • A black and bleu burger with two pickle slices stuck in the top of the bun with a tooth pick all on a white plate next to crosshatch fried and two spears of pickles and two glasses of dark beer in the background.
    Black and Bleu Burger

Ready to make the best burger in town? Go for it!

And when you do, be sure to take a photo of it, post it on Instagram, and tag @HowToFeedaLoon and hashtag #HowToFeedaLooon!

A close-up view of a double-stacked smash burger with melty cheese on each patty and garnished with pickles, red onion, shredded lettuce, and burger sauce.
Print Recipe
5 from 2 votes

Best-Ever Smash Burger

This Best-Ever Smash Burger Recipe delivers crispy, caramelized edges, juicy beef, and melty cheese — all made in minutes on a hot griddle or skillet. With simple ingredients and big flavor, these diner-style burgers are the ultimate at-home classic.
Prep Time15 minutes mins
Cook Time15 minutes mins
Chill time30 minutes mins
Total Time1 hour hr
Course: Lunch / Dinner / Cookout
Cuisine: American
Servings: 4
Calories: 756kcal
Author: Kris Longwell

Equipment

  • Griddle indoor or outdoor, or a large cast-iron skillet
  • Large spatula
  • Parchment paper Cut into eight 5"x5" squares.

Ingredients

For the Smash Burger Sauce

  • ¼ cup mayonnaise
  • 1 tablespoon ketchup
  • 1 tablespoon yellow mustard
  • 1 tablespoon pickle brine
  • Several dashes hot sauce (optional)

For the Smash Burgers

  • 1½ lb ground beef 80/20 (80% lean, 20% fat) – See NOTES
  • 8 burger buns Brioche or potato buns are great
  • 3 tablespoon unsalted butter softened, or olive oil (for toasting buns)
  • 1 teaspoon vegetable oil
  • salt and pepper
  • 8 American cheese slices
  • lettuce chopped or shredded, iceberg or romaine, for serving
  • 2 medium tomatoes sliced, for serving
  • 1 medium red onion thinly sliced, for serving
  • pickle slices dill or bread and butter, for serving

Instructions

Do Ahead – Make the Smash Burger Sauce

  • In a medium bowl, mix together the sauce ingredients until smooth. Cover and chill until ready to use.
    ¼ cup mayonnaise, 1 tablespoon ketchup, 1 tablespoon yellow mustard, 1 tablespoon pickle brine, Several dashes hot sauce

Make the Smash Burgers

  • Divide the ground beef into 8 loose balls (about 3 ounces each). Don't pack them tightly. Chill for at least 30 minutes. (If longer, keep covered in the fridge).
    1½ lb ground beef
  • Butter the cut sides of the buns and toast them on the hot griddle (or skillet) until golden brown. Set aside.
    8 burger buns, 3 tablespoon unsalted butter
  • Heat your griddle or skillet over medium-high heat until it's very hot. Add about ½ to 1 teaspoon vegetable oil and spread it around with your large spatula. See NOTES.
    1 teaspoon vegetable oil
  • Place 1 beef ball on the hot surface. Immediately cover it with parchment paper (if using) and use your spatula and a heavy object to smash the burger. Press down on the burger for about 5 to 7 seconds. Carefully remove the spatula and parchment paper from the burger. Lightly sprinkle with salt and pepper. Continue this same process with the remaining balls of beef. (Don't flatten the patties anymore once you remove the parchment, and don't move them around on the griddle.)
    salt and pepper
  • After 2 to 3 minutes, the edges should be browned and crispy. The center of the burgers should barely be pink and juicy. Carefully use your spatula to pry the burger from the griddle gently, then quickly flip the burger over. Repeat with the remaining burgers.
  • Once the burgers have all been flipped, immediately add the cheese slices to each patty. Slather the sauce on the buns and then stack the burgers, two at a time, and place them on the buns. Add your favorite toppings and serve immediately!
    8 American cheese slices, lettuce, 2 medium tomatoes, 1 medium red onion, pickle slices

Video

Notes

NOTE: Watch the video in the recipe card for visual guidance.
  • Ground Beef: For the juiciest, most flavorful smash burgers, use 80/20 ground beef — that’s 80% lean meat and 20% fat. The fat is what creates those crispy, caramelized edges and keeps the burger tender.
  • Custom Blend: For a next-level flavor, ask your butcher to grind a custom mix or grind it yourself using 60% chuck, 30% brisket, and 10% short ribs. This blend gives you the perfect balance of rich beefiness, buttery fat, and meaty depth.
  • Oil for the Griddle: You only need a light coating of oil — about ½ to 1 teaspoon of a high smoke point oil (like canola, avocado, or vegetable oil). Wipe it evenly across the surface before cooking. If your griddle or skillet is well-seasoned, you can skip the oil entirely.

Nutrition

Calories: 756kcal | Carbohydrates: 49g | Protein: 39g | Fat: 32g | Saturated Fat: 14g | Polyunsaturated Fat: 6g | Monounsaturated Fat: 14g | Trans Fat: 2g | Cholesterol: 149mg | Sodium: 708mg | Potassium: 772mg | Fiber: 3g | Sugar: 10g | Vitamin A: 807IU | Vitamin C: 12mg | Calcium: 173mg | Iron: 7mg

Homemade Corn Dog – Classic State Fair Recipe

October 19, 2025 by Kris Longwell 1 Comment

Two baskets lined with red and white checkered wax paper and filled each with two homemade corn dogs and a small container of yellow mustard.

Bring the taste of the fair right to your kitchen with these Easy Homemade Corn Dogs! Crispy on the outside, tender on the inside, and perfectly golden, they’re made with simple ingredients and a quick, flavorful batter that fries up beautifully. Serve with mustard or even easy homemade ketchup for the perfect State Fair classic!

Two baskets lined with red and white checkered wax paper and filled each with two homemade corn dogs and a small container of yellow mustard.
[feast_advanced_jump_to]

🌭 The Ingredients

This simple batter comes together with everyday pantry staples to create a crisp, golden coating that perfectly complements the juicy hot dogs inside. Find ingredient notes (including substitutions and variations) below.

An arrangement of ingredients for homemade corn dogs on a grey wooden background including a pile of hot dogs, buttermilk, oil, eggs, flour, cornmeat, baking powder, salt, and sugar.

📝 Ingredients Notes and Substitutions

  • Hot Dogs – Use your favorite brand of beef, pork, or turkey hot dogs. Substitute: Try cocktail franks for mini corn dogs or plant-based hot dogs for a vegetarian version.
  • Cornmeal – Gives the batter its signature flavor and texture. Substitute: Use finely ground cornmeal for a smoother coating or coarse cornmeal for extra crunch.
  • All-Purpose Flour – Helps bind the batter and creates a light, fluffy texture. Substitute: A 1:1 gluten-free flour blend works if needed.
  • Sugar – Adds a touch of sweetness to balance the savory flavor. Variation: Increase slightly for a more fair-style taste or reduce for a less sweet version.
  • Baking Powder – Provides lift and keeps the coating light and airy. Make sure yours is fresh for the best results.
  • Salt – Enhances flavor and balances the sweetness of the batter.
  • Buttermilk – Adds tangy flavor and helps create a tender, fluffy coating. Substitute: If you don’t have buttermilk, make your own by mixing 1 cup of milk with 1 tablespoon of lemon juice or vinegar and letting it sit for 5 minutes.
  • Egg – Helps the batter cling to the hot dogs and adds richness. Substitute: Use a flax egg (1 tablespoon ground flaxseed + 3 tablespoons water) for an egg-free version.
  • Vegetable Oil – Used for frying; it gives a crisp, golden crust. Substitute: Canola or peanut oil is a great alternative with high smoke points.

See the recipe card (with video) below for a full list of ingredients and measurements.

🎠 Tips for Perfect Homemade Corn Dogs

  • Keep the oil hot and steady. Maintain a temperature around 350°F (175°C) for even cooking and a crisp, golden coating. If the oil is too cool, the batter will absorb grease; too hot, and it’ll brown before the inside cooks.
  • Dry the hot dogs first. Pat them dry with paper towels before dipping — this helps the batter stick evenly.
  • Use skewers or sticks. Insert wooden skewers or chopsticks into the hot dogs before coating for easy dipping and frying.
  • Dip and twist. Pour the batter into a tall glass or jar, then dip and twist each hot dog to coat it evenly without air pockets.
  • Fry in small batches. Overcrowding the pot lowers the oil temperature and can lead to soggy corn dogs.
  • Drain properly. Place cooked corn dogs on a wire rack or paper towels to remove excess oil and keep them crisp.
  • Serve immediately. Corn dogs are best enjoyed hot and fresh — crisp on the outside and soft inside!

👩🏼‍🍳 How to Make a Homemade Corn Dog

A person inserting a wooden skewer into the end of an uncooked beef hot dog over a wooden cutting board.
  1. Step 1: Insert a wooden skewer into the end of each hot dog, leaving enough at the end for a handle.
A person pouring cornmeal from a glass bowl into another glass bowl filled with flour, sugar, and baking powder.
  1. Step 2: Combine the cornmeal, flour, sugar, baking powder, and salt.
A person pouring buttermilk from a measuring cup into a glass bowl filled with two lightly beaten eggs.
  1. Step 3: In another bowl, mix the buttermilk with the lightly beaten eggs and 1 tablespoon of oil.
A person transferring a dry flour and cornmeal mixture from one bowl into another glass bowl filled with an egg and buttermilk wet mixture.
  1. Step 4: Stir the dry ingredients into the wet mixture until smooth.
A person pulling a hot dog on a stick out of a glass that is filled with corn dog batter.
  1. Step 5: Fill a tall glass with the batter and submerge the hot dog, then slowly remove it.
A person using a metal spider to lift a freshly deep-fried corn dog from a white pot filled with hot oil.
  1. Step 6: Fry in 350°F oil until golden brown. Serve at once!

🍽️ How to Serve

Homemade corn dogs are best served hot and crispy, straight from the fryer! Here are some tasty ways to enjoy them:

  • Classic Style: Serve with ketchup and yellow mustard for that nostalgic fairground flavor.
  • Sweet & Savory: Drizzle with honey or maple syrup for a fun twist on the classic.
  • Spicy Kick: Pair with spicy mustard, sriracha mayo, or Cajun remoulade.
  • Cheesy Dip: Try dipping in warm nacho cheese sauce for an indulgent treat.
  • Mini Corn Dogs: Make bite-sized versions for parties, game day, or kids’ lunches.
  • Complete the Meal: Serve alongside homemade fries, creamy coleslaw, or Southern baked beans for a hearty, fair-style dinner.

No matter how you serve them, these golden, crispy corn dogs bring all the fun and flavor of the fair right to your kitchen!

Expert Tip

For the perfect corn dog experience, order corn dog sticks online — they’re sturdy, heat-safe, and the ideal length for dipping and frying. If you don’t have any on hand, wooden skewers or popsicle sticks work just as well!

🙋🏽‍♂️ Frequently Asked Questions

Can I make Homemade Corn Dog batter ahead of time?

Yes! You can prepare the batter a few hours in advance and keep it covered in the refrigerator. Just give it a quick stir before dipping the hot dogs.

What kind of oil is best for frying a Homemade Corn Dog?

Use a neutral oil with a high smoke point, such as vegetable, canola, or peanut oil. These oils fry evenly and give the corn dogs a crisp, golden coating.

Can I make Homemade Corn Dogs without buttermilk?

Absolutely! You can make a quick substitute by mixing 1 cup of milk with 1 tablespoon of lemon juice or vinegar and letting it sit for 5 minutes before using.

Why did my Homemade Corn Dog batter slide off the hot dogs?

This usually happens if the hot dogs are wet. Pat them completely dry before dipping to help the batter stick evenly.

How do I store leftover Homemade Corn Dogs?

Let them cool completely, then store in an airtight container in the refrigerator for up to 3 days. Reheat in the oven or air fryer to restore crispness.

Can I freeze Homemade Corn Dogs?

Yes! Freeze cooked corn dogs on a baking sheet, then transfer to a freezer bag. Reheat straight from frozen in the oven or air fryer until hot and crispy.

A person plunging a homemade corn dog into a small plastic container filled with yellow mustard.

🎡 More State Fair Classic Recipes

  • Two homemade funnel cakes that have been heavily dusted with powdered sugar sitting side by side, both resting on brown pieces of paper.
    Homemade Funnel Cake Recipe
  • A spoon being used to drizzle easy homemade nacho cheese sauce onto rows of tortilla chips that are sitting side by side in a paper basket.
    Easy Homemade Nacho Cheese Sauce
  • A straight-on view of a black platter filled with a stack of homemade soft pretzels next to two glasses of beer and a bowl of melted cheese.
    Easy Homemade Soft Pretzels
  • Sausage and Peppers Hero

Ready to make corn dogs better than the state fair? Go for it!

And when you do, be sure to take a photo of it, post it on Instagram, and tag @HowToFeedaLoon and hashtag #HowToFeedaLoon!

Two homemade corn dogs next to each other with a small container of yellow mustard nearby all on a red and white checkered wax paper in a basket.
Print Recipe
No ratings yet

Homemade Corn Dog – Classic State Fair Recipe

Bring the fair home with this Homemade Corn Dog recipe! Crispy, golden, and perfectly sweet and savory, these corn dogs are easy to make, fun to eat, and a hit with both kids and adults.
Prep Time10 minutes mins
Cook Time10 minutes mins
Total Time20 minutes mins
Course: Lunch / Hot Dogs
Cuisine: American
Servings: 4
Calories: 685kcal
Author: Kris Longwell

Equipment

  • 1 deep sturdy pot for frying, or a deep-fryer
  • 8 corn dog sticks or skewers or popsicle sticks

Ingredients

  • vegetable oil for frying
  • 8 beef hot dogs
  • 1 cup cornmeal
  • 1 cup all-purpose flour
  • ¼ cup sugar
  • 1 tablespoon baking powder
  • ½ teaspoon salt
  • 1 cup buttermilk
  • 2 large eggs
  • 1 tablespoon vegetable oil

Instructions

  • Heat about 2 inches of oil in a deep pot to 350 to 360°F.
    vegetable oil
  • Pat the hot dogs dry with paper towels (this helps the batter stick to them). Insert wooden sticks (or skewers) into each hot dog, leaving enough at the end for a handle. Set aside.
    8 beef hot dogs
  • In a large bowl, whisk together the cornmeal, flour, sugar, baking powder, and salt until the mixture is well combined.
    1 cup cornmeal, 1 cup all-purpose flour, ¼ cup sugar, 1 tablespoon baking powder, ½ teaspoon salt
  • In another bowl, whisk the buttermilk, eggs, and 1 tablespoon vegetable oil.
    1 cup buttermilk, 2 large eggs, 1 tablespoon vegetable oil
  • Combine the wet and dry ingredients, stirring until smooth and thick.
  • Transfer the batter into a tall glass or jar (this makes dipping easier).
  • Dip a dog into the batter, twisting to fully coat. Carefully place in the oil (1 or 2 at a time) and fry until golden brown, 2 to 3 minutes, turning occasionally.
  • Remove the corn dogs with metal tongs or a spider and drain on paper towels.
  • Repeat with the remaining dogs. Serve at once with yellow mustard and ketchup.

Video

Notes

NOTE: Watch the video in the recipe card for visual guidance.
  • Oil temperature matters: Keep the oil around 350°F (175°C) for a perfectly crisp, golden coating. If the oil is too cool, the batter will absorb grease; too hot, and it will brown too quickly.
  • Dry the hot dogs first: Pat them completely dry before dipping so the batter sticks evenly.
  • Batter thickness: The batter should be thick enough to coat the hot dog evenly — if it’s too thin, add a little more flour; if too thick, whisk in a splash of buttermilk.
  • Storage: Store cooled corn dogs in an airtight container in the fridge for up to 3 days or freeze for up to 2 months.
  • Reheating: Warm in a 350°F oven or air fryer for 5–8 minutes to restore crispness — avoid microwaving, which can make the coating soggy.

Nutrition

Calories: 685kcal | Carbohydrates: 72g | Protein: 22g | Fat: 28g | Saturated Fat: 9g | Polyunsaturated Fat: 3g | Monounsaturated Fat: 8g | Trans Fat: 0.01g | Cholesterol: 150mg | Sodium: 1317mg | Potassium: 697mg | Fiber: 5g | Sugar: 18g | Vitamin A: 234IU | Calcium: 229mg | Iron: 5mg

Homemade Funnel Cake Recipe

October 18, 2025 by Kris Longwell Leave a Comment

Two homemade funnel cakes that have been heavily dusted with powdered sugar sitting side by side, both resting on brown pieces of paper.

Bring the magic of the fair right to your kitchen with this Easy Homemade Funnel Cake Recipe! Crispy, golden, and lightly dusted with powdered sugar, these funnel cakes taste just like the ones you’d get at your favorite carnival or state fair. The best part? They’re simple to make with basic pantry ingredients and come together in minutes.

Two homemade funnel cakes that have been heavily dusted with powdered sugar sitting side by side, both resting on brown pieces of paper.
[feast_advanced_jump_to]

🥚 The Ingredients

This simple batter comes together with everyday kitchen staples to create a light, crisp, and perfectly sweet funnel cake that tastes just like the fair. Find ingredient notes (including substitutions and variations) below.

An arrangement of ingredients for homemade funnel cake on a grey wooden background including flour, baking powder, salt, water, eggs, vanilla, milk, sugar, oil, and powdered sugar.

🥛 Ingredients Notes and Substitutions

  • Egg – Helps bind the batter and adds richness. Substitute: Use a flax egg (1 tablespoon ground flaxseed + 3 tablespoons water) for an egg-free version.
  • Whole Milk – Creates a smooth, creamy batter and helps achieve that tender inside. Substitute: 2% milk, half-and-half, or a dairy-free milk alternative, such as almond or oat milk, will also work.
  • Vanilla Extract – Adds a warm, sweet flavor that enhances the classic fair aroma. Substitute: Almond extract or maple extract for a fun flavor twist.
  • All-Purpose Flour – The base of the batter, giving structure and crispness. Substitute: A 1:1 gluten-free all-purpose blend if you need a gluten-free option.
  • Sugar – Gives the funnel cakes a touch of sweetness and helps them brown beautifully. Substitute: You can reduce the sugar slightly for a less sweet version, or use cane sugar.
  • Baking Powder – Provides lift and that light, airy texture. Substitute: If you’re out, mix ¼ teaspoon baking soda with ½ teaspoon cream of tartar for each teaspoon of baking powder.
  • Vegetable Oil – Used for frying; it ensures crisp, golden results. Substitute: Canola or peanut oil is a great alternative with high smoke points.
  • Powdered Sugar – The classic finishing touch for that signature fairground look and taste. Substitute: Try cinnamon sugar, chocolate drizzle, or fruit toppings for variety.

See the recipe card (with video) below for a full list of ingredients and measurements.

⭐️ Tips for Perfect Homemade Funnel Cakes

  • Use the right oil temperature. Keep your oil around 350°F (175°C) — too cool and the batter will absorb oil and turn greasy; too hot and it’ll brown before cooking through.
  • Test with a small drizzle first. Before frying a full cake, drizzle a bit of batter into the oil to make sure it sizzles and floats right away.
  • Pour in a steady swirl. Use a squeeze bottle, funnel, or measuring cup with a spout to create that signature lacy pattern.
  • Don’t overcrowd the pan. Fry one or two funnel cakes at a time so the oil temperature stays consistent.
  • Flip carefully. Use tongs or a slotted spatula to turn the funnel cake once the edges are golden — usually after about 1–2 minutes.
  • Drain and dust. Let each cake rest on paper towels briefly, then dust generously with powdered sugar while still warm.
  • Serve immediately. Funnel cakes are best enjoyed fresh and hot when they’re crisp on the outside and soft inside.

👩🏼‍🍳 How to Make a Homemade Funnel Cake

A person using a whisk to mix milk, water, eggs, and vanilla extract in a glass bowl on a wooden cutting board.
  1. Step 1: In a large bowl, whisk together the eggs, milk, water, and vanilla.
A person using a small whisk to combine flour with sugar, salt, and baking powder in a glass bowl on a wooden cutting board.
  1. Step 2: In another bowl, whisk together the flour, sugar, baking powder, and salt.
A person using a whisk to stir a homemade funnel cake batter in a large glass bowl on a wooden cutting board.
  1. Step 3: Combine the wet and the dry mixtures and stir and whisk until smooth.
A person using a metal funnel batter dispenser to add circular rows of funnel cake batter into hot oil that is in a large cast-iron skillet on a gas stove.
  1. Step 4: Bring the oil to 350°F. Pour the batter into a funnel, piping bag, squeeze bottle, or measuring cup. Drizzle the batter in a swirling, crisscrossing pattern.
A person using a metal spatula to carefully flipped a partially cooked homemade funnel cake that is being fried in hot oil in a large cast-iron skillet on a gas stove.
  1. Step 5: Fry for about 1 to 2 minutes, then very carefully flip the cake over and cook for another minute.
A person sifting powdered sugar from a sieve onto a freshly made homemade funnel cake that is resting on a brown piece paper.
  1. Step 6: Remove from the oil and drain on paper towels. Sift the funnel cakes liberally with powdered sugar. Serve immediately.

Expert Tip

For perfectly crisp, golden funnel cakes, maintain a steady oil temperature throughout frying. Use a kitchen thermometer and adjust the heat as needed — consistent temperature is the secret to that light, airy texture and fairground-quality crunch every time.

🎠 How to Serve

Funnel cakes are best served warm and fresh from the fryer — crisp on the outside, soft on the inside, and ready for your favorite toppings! Try these delicious ideas:

  • Classic Style: Dust generously with powdered sugar for that nostalgic state fair flavor.
  • Chocolate Lovers: Drizzle with chocolate syrup or melted Nutella and top with whipped cream.
  • Fruity & Fresh: Add sliced strawberries, blueberries, or bananas with a dollop of whipped cream.
  • Caramel Delight: Drizzle with caramel sauce and sprinkle with chopped nuts or sea salt.
  • Ice Cream Sundae: Top with a scoop of homemade vanilla ice cream and your favorite sundae toppings.
  • Cinnamon Sugar Twist: Toss the warm funnel cake in cinnamon sugar for a sweet, spiced variation.
  • Mini Party Cakes: Make smaller versions and serve them as a fun dessert at parties or brunches.

No matter how you serve them, homemade funnel cakes are a guaranteed crowd-pleaser!

🙋🏽‍♂️ Frequently Asked Questions

Can I make Homemade Funnel Cake ahead of time?

Funnel cakes are best served fresh, but you can make the batter a few hours in advance and keep it covered in the refrigerator until ready to fry.

What kind of oil is best for frying Homemade Funnel Cake?

Use a neutral oil with a high smoke point, such as vegetable, canola, or peanut oil. These give you that crisp, golden finish without adding extra flavor.

Can I make Homemade Funnel Cake without a funnel?

Absolutely! You can use a squeeze bottle, piping bag, or even a measuring cup with a spout to pour the batter into the oil in a swirling motion. But a kitchen funnel is inexpensive and fun to have on hand.

Why is my Homemade Funnel Cake soggy instead of crispy?

If your funnel cake turned out soggy, your oil was likely too cool. Make sure the temperature stays around 350°F (175°C) for the best texture.

Can I make Homemade Funnel Cake without eggs or dairy?

Yes! Substitute the egg with a flax egg and use a dairy-free milk alternative like almond or oat milk for a vegan-friendly version.

How do I store leftover Homemade Funnel Cake?

Let them cool completely, then store in an airtight container at room temperature for up to 2 days. Reheat in the oven or air fryer to bring back the crispness.

A person holding a portion of a homemade funnel cake in his hand over the rest of the funnel cakes below.

🎡 More Classic State Fair Recipes

  • A spoon being used to drizzle easy homemade nacho cheese sauce onto rows of tortilla chips that are sitting side by side in a paper basket.
    Easy Homemade Nacho Cheese Sauce
  • A straight-on view of a black platter filled with a stack of homemade soft pretzels next to two glasses of beer and a bowl of melted cheese.
    Easy Homemade Soft Pretzels
  • A straight-on view of a basket that is lined with a red-checkered piece of wax paper and is filled with a pile of crispy chicken tenders and a small container of honey mustard dipping sauce.
    Crispy Chicken Tenders
  • Sausage and Peppers Hero

Ready to make the best funnel cake in the state? Go for it!

And when you do, be sure to take a photo of it, post it on Instagram, and tag @HowToFeedaLoon and hashtag #HowToFeedaLoon!

A close-up view of a homemade funnel cake topped with a dusting of powdered sugar and is resting on a brown piece of paper.
Print Recipe
No ratings yet

Homemade Funnel Cake Recipe

Bring the fair to your kitchen with this Homemade Funnel Cake recipe! Light, crispy, and golden, it’s an easy, fun treat topped with powdered sugar or your favorite sweet toppings.
Prep Time10 minutes mins
Cook Time10 minutes mins
Total Time20 minutes mins
Course: Dessert / Snack
Cuisine: American
Servings: 8
Calories: 292kcal
Author: Kris Longwell

Equipment

  • 1 skillet or pot for frying or deep-fryer
  • candy/deep fry thermometer
  • funnel batter dispenser or pastry bag, squeeze bottle, or measuring cup with spout

Ingredients

  • vegetable oil for frying
  • 2 large eggs
  • 1 cup whole milk
  • 1 cup water
  • 1 teaspoon vanilla extract
  • 3 cups all-purpose flour
  • ¼ cup sugar
  • 1 tablespoon baking powder
  • ½ teaspoon Kosher salt
  • 1 cup powdered sugar

Instructions

  • Add about 2 inches of oil into a deep skillet or pot. Heat to 350 to 360°F.
    vegetable oil
  • In a large bowl, whisk together the eggs, milk, water, and vanilla extract
    2 large eggs, 1 cup whole milk, 1 cup water, 1 teaspoon vanilla extract
  • In another bowl, mix the flour, sugar, baking powder, and salt.
    3 cups all-purpose flour, ¼ cup sugar, 1 tablespoon baking powder, ½ teaspoon Kosher salt
  • Use a large wooden spoon the gradually add the dry ingredients into the wet, stirring until the batter is smooth.
  • Carefully transfer the batter into a large funnel, piping bag, squeeze bottle, or measuring cup with a spout.
  • Over the hot oil, drizzle the batter in a swirling, crisscross pattern to form a lacy round cake. Fry for 1 to 2 minutes, until the underside is golden brown. Use tongs or metal spatulas to very carefully flip the cake over. Fry for another minute or two.
  • Use a spatula or metal spider to carefully transfer the cake to a plate lined with paper towels. Repeat with the remaining batter.
  • Dust the funnel cakes generously with powdered sugar. Serve immediately.
    1 cup powdered sugar

Video

Notes

NOTE: Watch the video in the recipe card for visual guidance.
  • For a lighter version, you can use 2% milk instead of whole milk — the texture will still be fluffy and crisp.
  • Oil temperature is key: keep it around 350°F (175°C) for perfectly golden, non-greasy funnel cakes.
  • If you don’t have a funnel, try a squeeze bottle, piping bag, or measuring cup with a spout to pour the batter.
  • Toppings: Classic powdered sugar is a must, but chocolate sauce, caramel, berries, or ice cream make it extra special.
  • To reheat, warm leftover funnel cakes in a 350°F oven or air fryer for a few minutes to restore crispness.
  • Storage: Store cooled funnel cakes in an airtight container at room temperature for up to 2 days, or freeze for longer storage.

Nutrition

Calories: 292kcal | Carbohydrates: 59g | Protein: 7g | Fat: 18g | Saturated Fat: 4g | Polyunsaturated Fat: 2g | Monounsaturated Fat: 1g | Trans Fat: 0.01g | Cholesterol: 50mg | Sodium: 179mg | Potassium: 266mg | Fiber: 1g | Sugar: 23g | Vitamin A: 117IU | Calcium: 118mg | Iron: 3mg

Easy Homemade Nacho Cheese Sauce

October 17, 2025 by Kris Longwell Leave a Comment

A spoon being used to drizzle easy homemade nacho cheese sauce onto rows of tortilla chips that are sitting side by side in a paper basket.

Get ready to level up your snack game with this Easy Homemade Nacho Cheese Sauce — smooth, creamy, and packed with bold, cheesy flavor! This quick recipe comes together in just minutes using simple ingredients you probably already have on hand. Perfect for dipping tortilla chips, drizzling over homemade fries, or topping your favorite game-day snacks, it delivers that irresistible, movie-theater-style taste right from your own kitchen. Once you try it, you’ll never go back to the store-bought stuff!

A spoon being used to drizzle easy homemade nacho cheese sauce onto rows of tortilla chips that are sitting side by side in a paper basket.
[feast_advanced_jump_to]

🧀 The Ingredients

This simple recipe uses everyday kitchen staples to create a rich, velvety cheese sauce with just the right balance of creaminess, flavor, and a subtle kick of heat. Find ingredient notes (including substitutions and variations) below.

An arrangement of ingredients for easy homemade nacho sauce on grey wooden background including shredded yellow American cheese, butter, seasonings, cream, milk, flour, a jalapeño pickling brine.

📝 Ingredients Notes and Substitutions

  • Butter – Adds richness and helps form the base of the roux.
    Substitute: Margarine or neutral oil in a pinch, though butter gives the best flavor.
  • All-Purpose Flour – Thickens the sauce and gives it that smooth, creamy texture.
    Substitute: Cornstarch (use half as much) for a gluten-free option.
  • Whole Milk – Provides creaminess and helps balance the cheese flavor.
    Substitute: 2% milk works fine; for extra richness, use evaporated milk.
  • Heavy Cream – Makes the sauce silky and decadent.
    Substitute: Half-and-half or additional milk for a lighter version.
  • Shredded American Cheese – Melts perfectly for that classic nacho cheese texture and flavor.
    Substitute: Processed cheese (like Velveeta) or a blend of mild cheddar and Monterey Jack for a slightly different flavor.
  • Salt – Enhances all the other flavors; adjust to taste.
  • Garlic Powder & Onion Powder – Add subtle savory depth without overpowering the cheese.
    Substitute: A small amount of finely minced fresh garlic or onion sautéed in the butter before adding flour.
  • Pickled Jalapeño Brine – Gives the sauce a tangy, slightly spicy kick reminiscent of concession stand nacho cheese.
    Substitute: A splash of pickle juice, hot sauce, or vinegar if you don’t have jalapeño brine.

🔥 Tips for Perfect Easy Homemade Nacho Sauce

  • Use low heat once the cheese goes in. High heat can cause the cheese to separate or turn grainy. Keep the sauce gently warm and stir constantly as it melts.
  • Shred your own cheese if possible. Pre-shredded cheese often contains anti-caking agents that can make the sauce less smooth.
  • Add liquid gradually. When making the roux, slowly whisk in the milk and cream to prevent lumps and ensure a silky texture.
  • Don’t skip the roux. The butter-and-flour base is what gives the sauce body and keeps it from breaking as it cools.
  • Adjust the thickness to your liking. If the sauce is too thick, whisk in a splash of warm milk; if it’s too thin, simmer a bit longer to reduce.
  • Serve immediately or keep warm. Nacho cheese sauce thickens as it sits, so keep it over very low heat or in a small slow cooker for serving.
  • Reheat gently. Warm leftovers slowly on the stove or in short microwave bursts, adding a bit of milk to bring back the creamy consistency.

👩🏼‍🍳 How to Make Easy Homemade Nacho Sauce

A person using a wooden spatula to stir a butter and flour roux in a black cast-iron skillet on a gas stove.
  1. Step 1: Melt the butter in a skillet over low-medium heat and then stir in the flour to create a roux.
A person pouring cream into a cast-iron skillet that has a roux in it on a gas stove.
  1. Step 2: Slowly whisk in the milk and cream and stir until slightly thickened.
A person using his hand to sprinkle shredded yellow American cheese into a bechamel sauce in a black cast-iron skillet on a gas stove.
  1. Step 3: Stir in the cheese by handfuls over low heat, stirring often.
A person getting ready to transfer small amounts of garlic power, salt, and onion powder from a small bowl into a skillet filled with a simmering cheese sauce.
  1. Step 4: Gently stir in the onion powder, garlic powder, and salt.
A person getting ready to transfer a small bowl of pickled Jalapeño brine into a skillet that is filled with a simmering nacho cheese sauce.
  1. Step 5: Stir in the pickled jalapeño brine.
A spoon being used to drizzle easy homemade nacho sauce over a basket-full of corn tortilla chips.
  1. Step 6: Serve at once, or keep warm over low heat or in a slow-cooker on the WARM setting.

👉 Expert Tip

If your nacho cheese sauce turns out too thick, whisk in a little warm milk — just a tablespoon at a time — until it reaches your desired consistency.

If it becomes grainy or separates, don’t panic! Remove it from the heat and whisk in a splash of cream or milk to help it come back together. Gentle heat and constant stirring are key to keeping your sauce smooth and luscious.

🌶️ How to Serve

  • Classic Nachos: Drizzle generously over warm tortilla chips and top with jalapeños, sour cream, and salsa for the ultimate snack.
  • Soft Pretzels: Serve as a dip alongside homemade soft pretzels or store-bought pretzels for that true state fair vibe.
  • Loaded Fries or Tater Tots: Pour over crispy fries or tots, then sprinkle with bacon bits, scallions, or Texas chili for a hearty treat.
  • Hot Dogs or Corn Dogs: Use as a rich, cheesy topping for a fun twist on classic fair food like Coney Island hot dogs or homemade corny dogs.
  • Vegetables: Add flavor to roasted broccoli with a kick, cauliflower, or roasted veggies for an easy side dish kids will love.
  • Game Day or Party Dip: Keep it warm in a small slow cooker and serve with chips, pretzels, or even chicken taquitos for dipping.

🙋🏽‍♂️ Frequently Asked Questions

Can I make Easy Homemade Nacho Cheese Sauce ahead of time?

Yes! You can make it up to 3 days in advance. Let it cool completely, then store it in an airtight container in the refrigerator. Reheat gently on the stove or in the microwave, adding a splash of milk to bring back the creamy texture.

How do I keep Easy Homemade Nacho Cheese Sauce warm for a party?

Keep it warm in a small slow cooker set to low or warm. Stir occasionally to prevent a skin from forming and add a bit of milk if it thickens over time.

Can I freeze Easy Homemade Nacho Cheese Sauce?

It’s best enjoyed fresh, but you can freeze it for up to 2 months. Let it cool, then store it in a freezer-safe container. Thaw overnight in the fridge and reheat slowly with extra milk or cream to restore smoothness.

What kind of cheese melts best for Easy Homemade Nacho Cheese Sauce?

Processed cheeses like American or Velveeta melt smoothly and give that classic movie-theater texture. For a more natural option, use mild cheddar or Monterey Jack combined with a bit of cream cheese to help it stay creamy.

Why did my Easy Homemade Nacho Cheese Sauce turn grainy or separate?

This usually happens if the heat is too high when adding the cheese. Always remove the pan from the burner before stirring in the cheese, and let residual heat do the melting.

Can I make Easy Homemade Nacho Cheese Sauce spicier?

Definitely! Add a few diced pickled jalapeños, a dash of hot sauce, or a pinch of cayenne pepper for extra heat.

A person holding a corn tortilla chip that is partially coated with easy homemade nacho cheese sauce and topped with a single pickled jalapeño slice.

😋 Other Delicious Cheesy Recipes

  • Queso Fundido with Chorizo
  • This classic fried cheese is so gooey and delicious
    Amazing Fried Mozzarella
  • A hand dipping a piece of pretzel into a white bowl of beer cheese sauce.
    Beer Cheese Sauce
  • Classic Tex-Mex Queso in a cast iron dish with pico de gallo on top.
    Classic Tex-Mex Queso

Ready to make a cheese sauce that’s even better than the movie theater? Go for it!

And when you do, be sure to take a photo of it, post it on Instagram, and tag @HowToFeedaLoon and hashtag #HowToFeedaLoon!

A spoon being used to drizzle easy homemade nacho cheese sauce onto rows of tortilla chips that are sitting side by side in a paper basket.
Print Recipe
No ratings yet

Easy Homemade Nacho Cheese Sauce

This Easy Homemade Nacho Cheese Sauce is rich, creamy, and full of bold, cheesy flavor — ready in just minutes! Perfect for dipping chips, drizzling over fries, or serving with soft pretzels, it’s a quick and crowd-pleasing recipe that tastes just like classic movie-theater nachos.
Prep Time10 minutes mins
Cook Time5 minutes mins
Total Time15 minutes mins
Course: Appetizer
Cuisine: American / TexMex
Servings: 8
Calories: 282kcal
Author: Kris Longwell

Equipment

  • 1 medium skillet

Ingredients

  • 2 tablespoon unsalted butter
  • 2 tablespoon all-purpose flour
  • 1 cup whole milk
  • 1 cup heavy cream
  • 2 cup American cheese yellow, shredded from a block, see NOTES
  • 1 teaspoon Kosher salt
  • ¼ teaspoon garlic powder
  • ¼ teaspoon onion powder
  • 3 tablespoon jalapeño brine

Instructions

  • In a medium skillet, heat the butter over medium heat. Stir in the flour and cook for 1 minute.
    2 tablespoon unsalted butter, 2 tablespoon all-purpose flour
  • Slowly whisk in the milk and cream. Stir until any lumps are gone and has slightly thickened.
    1 cup whole milk, 1 cup heavy cream
  • Turn off the heat (or turn to low) and add the shredded cheese a handful at a time, stirring until melted and smooth.
    2 cup American cheese
  • Stir in the salt, onion powder, garlic powder, and jalapeño brine.
    1 teaspoon Kosher salt, ¼ teaspoon garlic powder, ¼ teaspoon onion powder, 3 tablespoon jalapeño brine
  • Serve at once or keep warm over very low heat in a small slow cooker on WARM or LOW. If too thick, add a splash or two of milk until the desired consistency.

Video

Notes

NOTE: Watch the video in the recipe card for visual guidance.
  • For a slightly lighter version, you can substitute half-and-half for the heavy cream — the sauce will still be creamy, just a bit less rich.
  • Cheese matters! American cheese gives you that ultra-smooth, classic nacho texture, while mild cheddar or Monterey Jack adds a sharper flavor. You can even mix a few types for the best of both worlds.
  • To reheat, warm the sauce slowly over low heat or in short microwave bursts, stirring often. Add a splash of milk or cream to bring back the silky consistency.

Nutrition

Calories: 282kcal | Carbohydrates: 5g | Protein: 8g | Fat: 24g | Saturated Fat: 16g | Polyunsaturated Fat: 1g | Monounsaturated Fat: 7g | Trans Fat: 1g | Cholesterol: 80mg | Sodium: 742mg | Potassium: 125mg | Fiber: 0.1g | Sugar: 3g | Vitamin A: 905IU | Vitamin C: 0.2mg | Calcium: 425mg | Iron: 0.3mg

Texas-Style Smoked Brisket

October 15, 2025 by Kris Longwell 4 Comments

A person holding on a fully cooked Texas-Style Beef Brisket with one hand and using a large knife to slice it into juicy strips with the other hand.

Nothing says authentic barbecue like a perfectly smoked Texas-Style Brisket—tender, juicy, and packed with rich, smoky flavor. This recipe captures the true spirit of Texas BBQ with its simple seasoning, slow smoking, and melt-in-your-mouth texture. It’s the ultimate centerpiece for any cookout or weekend feast, especially when served with a side of Easy Homemade BBQ Sauce for that perfect finishing touch.

A person holding on a fully cooked Texas-Style Beef Brisket with one hand and using a large knife to slice it into juicy strips with the other hand.
[feast_advanced_jump_to]

😋 The Ingredients

This classic recipe combines a well-marbled brisket, a flavorful beef rub, and slow cooking over wood chips to create tender, smoky perfection every time. Find ingredient notes (including substitutions and variations) below.

An arrangement of ingredients for Texas-Style Smoked Brisket on a grey wooden background including an uncooked brisket flat on a baking rack in a baking sheet, Hickory wood chips, salt, beef run, and barbecue sauce.

🥩 Understanding Brisket Cuts

Brisket comes from the lower chest of the cow—a hardworking muscle that becomes tender, juicy, and full of flavor when cooked low and slow. There are a few different ways brisket is sold, and knowing the difference helps you choose the right cut for your smoker:

  • Whole Packer Brisket:
    This is the entire brisket, including both the point and the flat, still attached. It’s the cut most pitmasters prefer for authentic Texas-style BBQ because it offers a perfect balance of lean and fatty meat. You’ll usually need to ask your butcher for a whole packer, as it’s less common in standard grocery stores.
  • The Point (Deckle):
    The point is the thicker, fattier end of the brisket, known for its rich flavor and juicy texture. It’s ideal for burnt ends or those who love a more marbled bite. Like the whole packer, you’ll typically need to get the point from your butcher.
  • The Flat (First Cut):
    The flat is leaner, more uniform in shape, and slices beautifully—great for presentation and sandwiches. It’s also the most widely available cut and can usually be found right in the meat section of your supermarket. Because it’s lean, it benefits from the Texas Crutch method—wrapping it partway through the cook to keep it moist and tender.

For this recipe, we’re using the flat cut, which delivers clean slices, a beautiful bark, and that signature Texas BBQ flavor when smoked low and slow

🔥 Types of Smokers

There are several types of smokers you can use to make incredible Texas-Style Smoked Brisket, and each has its own advantages. Whether you prefer the convenience of electric or the hands-on feel of wood or charcoal, the key is consistent low heat and clean smoke.

  • Electric Smokers:
    We love our electric smoker for its ease of use and reliability—no need to constantly monitor temperatures or feed wood. Our go-to is the Smokin’ Tex Electric Smoker, which delivers consistent heat, rich smoke flavor, and effortless results every time. It’s perfect for both beginners and seasoned pitmasters.
    👉 Use Discount Code: LOON10 for 10% off your entire order at Smokin’ Tex. They offer a wide variety of top-of-the-line smokers and all the essential accessories to elevate your BBQ game.
  • Pellet Smokers:
    Pellet smokers automatically feed wood pellets to maintain a steady temperature, making them a great mix of flavor and convenience. They’re ideal for set-it-and-forget-it cooking while still delivering authentic smoke flavor.
  • Charcoal Smokers:
    For traditionalists, charcoal smokers offer that classic BBQ experience and deep, smoky flavor. They require a bit more hands-on attention but reward you with a beautiful smoke ring and rich, layered taste.
  • Offset Smokers:
    The choice of many Texas pitmasters, offset smokers use a firebox to burn wood logs, sending heat and smoke through the cooking chamber. They produce unbeatable flavor but require consistent fire management.

No matter which smoker you use, the key is patience, steady heat, and quality wood smoke. But if you’re looking for a dependable, easy-to-use option, you can’t go wrong with a Smokin’ Tex Electric Smoker—it’s what we trust for perfect brisket every time.

👩🏼‍🍳 How to Make Texas-Style Smoked Brisket

A person using his fingers to sprinkle coarse Kosher salt all over the surface of an uncooked brisket flat that is resting on baking rack inside a baking sheet.
  1. Step 1: Sprinkle the brisket all over with Kosher salt. Chill for at least 1 hour, but preferably 12 to 24 hours.
A person who is wearing latex black gloves is pressing a beef run all over the surface of an uncooked brisket flat on the grate of a smoker that is sitting on a wooding cutting board.
  1. Step 2: Spritz a little water over the chilled brisket and then liberally season with the beef rub.
A person holding a grate of an electric smoker that has an uncooked, seasoned beef brisket flat on and with a digital thermometer probe stuck into the thickest part of the meat.
  1. Step 3: Insert a digital thermometer in the thickest part of the meat and place it in your smoker (with wood chips) until you hit the stall, between 150 and 160°F, usually within 2 to 4 hours.
A person pulling a grate from an electric smoker that is holding a beef brisket flat that has been tightly wrapped in foil with a digital thermometer piercing through the foil into the meat.
  1. Step 4: Once you are in the stall, remove the brisket and tightly wrap it in foil, and re-insert the thermometer probe. Smoke until the internal temperature of 195 to 203°F is reached, usually another 6 to 8 hours.
A person placing a fully cooked brisket that is still wrapped in foil into an Igloo cooler that is lined with a white towel.
  1. Step 5: Line a cooler with a towel and place the brisket (still wrapped in foil) in it. Wrap with the towel and let it rest for 1 to 3 hours.
A person using a large brisket knife to slice into a partially sliced, fully cooked beef brisket flat on a cutting board.
  1. Step 6: Remove the brisket from the foil and slice against the grain.

💡 Pit‑Master Expert Tip

While pink butcher paper is a favorite among pitmasters for wrapping smoked meats—it allows the brisket to breathe and maintain its bark—for a brisket flat, we recommend wrapping it tightly in two layers of heavy-duty foil. The foil traps steam and juices, helping the leaner flat cut stay moist, tender, and flavorful all the way through the cook.

🍽️ How to Serve

  • Slice It Right: Always slice against the grain into ¼-inch thick slices for maximum tenderness. A long, sharp slicing knife or carving knife works best for clean, even cuts.
  • Serve with Sauce (Optional): True Texas BBQ often lets the brisket shine on its own, but a side of Easy Homemade BBQ Sauce adds a sweet and tangy complement for those who like a little extra flavor.
  • Pair with Classic Sides: Round out your plate with traditional favorites like creamy coleslaw, Southern baked beans, classic potato salad, the ultimate mac and cheese, homemade cornbread, or traditional Country white bread.
  • Make It a Meal: Pile slices onto a toasted bun for a brisket sandwich, or serve with pickles, onions, and white bread for an authentic Texas BBQ experience.
  • Presentation Tip: Arrange slices on a large cutting board or platter, drizzle lightly with pan juices, and garnish with a few pickle slices for a rustic, crowd-pleasing presentation.

🙋🏽‍♂️ Frequently Asked Questions

What type of wood is best for Texas-Style Smoked Brisket?

Traditional Texas BBQ relies on oak or hickory wood for its clean, balanced smoke flavor that complements the beef without overpowering it. Post oak is a favorite among pitmasters, but you can also mix in or pecan for a slightly sweeter finish.

How long does it take to cook Texas-Style Smoked Brisket?

Cooking time depends on the size of your brisket and smoker temperature, but generally plan for 1 to 1½ hours per pound at 225°F–250°F. Always cook to temperature, not time—the brisket is ready when it reaches 195°F–203°F and feels tender when probed.

What does cutting against the grain mean for Texas-Style Smoked Brisket?

Cutting against the grain means slicing perpendicular to the direction of the muscle fibers. This shortens the fibers, making each bite more tender and easier to chew. You can identify the grain before cooking and mark it to ensure proper slicing later.

How do I keep Texas-Style Smoked Brisket from drying out?

Use the Texas Crutch method—wrapping the brisket in foil or butcher paper once it hits about 160°F—to trap moisture during the stall. Also, be sure to rest the brisket for at least 30–60 minutes after cooking so the juices redistribute.

Can I make Texas-Style Smoked Brisket in an electric smoker?

Yes! Electric smokers are great for maintaining a consistent temperature and smoke level. We love using our Smokin’ Tex Electric Smoker for perfectly tender results every time.

How should I store and reheat leftover Texas-Style Smoked Brisket?

Store leftovers in an airtight container with a little of the cooking juices or broth to keep it moist. Reheat gently in the oven at 250°F, covered, until warmed through.

A person drizzling barbecue sauce across the center of three strips of Texas-Style Smoked Brisket that is on a trey lined with brown paper and is surrounded by white bread slices, a bowl of coleslaw, a small bowl of BBQ sauce, and two pickle spears.

👉 More Classic BBQ Recipes

  • Grilled BBQ Chicken with visible grill marks resting on a metal sheet pan with a small white bowl of homemade BBQ sauce with a spoon in it nearby.
    Best-Ever Grilled BBQ Chicken
  • A sliced smoked brisket that is resting on cutting board with a large butcher's knife just underneath the meat.
    Smoked Pork Brisket
  • An overhead view of a pile of BBQ shrimp sitting on a cutting board with a small white bowl filled with homemade BBQ sauce nearby.
    Best-Ever BBQ Shrimp
  • A straight-on view of a slow cooker pulled pork sandwich sitting on a red checkered sandwich wrapper with kettle chips scattered around it.
    Slow Cooker Pulled Pork

Ready to make the best BBQ this side of Austin, Texas? Go for it!

And when you do, be sure to take a photo of it, post it on Instagram, and tag @HowToFeedaLoon and hashtag #HowToFeedaLoon!

A person using a large brisket knife to slice into a partially sliced, fully cooked beef brisket flat on a cutting board.
Print Recipe
5 from 2 votes

Texas-Style Smoked Brisket

This Texas-Style Smoked Brisket is slow-cooked to tender perfection with rich, smoky flavor and a beautiful bark. It’s authentic Texas BBQ at its best—perfect for weekend cookouts and even better served with Easy Homemade BBQ Sauce on the side.
Prep Time20 minutes mins
Cook Time9 hours hrs
Chill and Rest (after smoking)12 hours hrs
Total Time21 hours hrs 20 minutes mins
Course: Main Dish
Cuisine: BBQ / Southern
Servings: 6
Calories: 633kcal
Author: Kris Longwell

Equipment

  • Smoker electric (see NOTES), pellet, or charcoal
  • Digital thermometer
  • water pan optional
  • wood chips

Ingredients

  • 4 lb brisket flat
  • Kosher salt
  • water for spritzing
  • 1 cup beef rub
  • 2 cups BBQ sauce

Instructions

  • Sprinkle the salt all over the brisket. Place on a rack on a baking sheet and chill in the fridge for at least one hour, preferably 12 to 24.
    4 lb brisket, Kosher salt
  • Mist the beef with a little water and liberally sprinkle the beef rub all over the brisket (you may not use an entire cup of rub).
    water, 1 cup beef rub
  • Prepare your smoker and heat it to 225°F, preferably with a water pan on the bottom grate. Add about 4 ounces of wood chips. Place the brisket in the smoker with a digital thermometer inserted in the thickest part of the meat. Smoke until you hit the stall, which is usually between 150 and 160°F. Once you're at a consistent temperature for at least 30 minutes, you'll know you've hit the stall. It usually takes a few hours to reach the stall.
  • Carefully remove the brisket from the smoker, close the door, and quickly wrap it tightly in two large pieces of heavy-duty aluminum foil. Place back in the smoker (with digital thermometer in the same location as before), and cook until 195 to 203°F is reached. This usually will take another 8 to 10 hours.
  • Place a towel in a cooler and carefully transfer the brisket, still wrapped in foil, into the cooler. Gently wrap the towel over the top of the brisket and close the lid of the cooler. Let it rest for 1 to 4 hours. It will stay plenty warm during this time.
  • Remove the brisket from the foil and cut slices against the grain. Serve at once, with BBQ on the side, if desired.
    2 cups BBQ sauce

Video

Notes

NOTE: Watch the video in the recipe card for visual guidance.
  • Keep your smoker steady at 225°F–250°F for tender, smoky brisket. Oak wood delivers that classic Texas BBQ flavor.
  • We rely on our Smokin’ Tex Electric Smoker for consistent results—use Discount Code LOON10 for 10% off your entire order at Smokin’ Tex.
  • Always rest the brisket 30–60 minutes before slicing to let the juices redistribute.
  • Storage: Refrigerate leftovers in an airtight container with a little broth or cooking juices for up to 4 days, or freeze for up to 3 months.
  • Reheating: Warm gently in the oven at 250°F, covered, until heated through to keep the meat moist and tender.

Nutrition

Calories: 633kcal | Carbohydrates: 39g | Protein: 63g | Fat: 23g | Saturated Fat: 8g | Polyunsaturated Fat: 1g | Monounsaturated Fat: 11g | Cholesterol: 187mg | Sodium: 1221mg | Potassium: 1219mg | Fiber: 1g | Sugar: 32g | Vitamin A: 214IU | Vitamin C: 1mg | Calcium: 47mg | Iron: 6mg

Best Beef Rub

October 15, 2025 by Kris Longwell Leave a Comment

A small white bowl filled with Best Beef Rub with a spoon in the middle of it while the bowl is resting on a wooden cutting board.

Looking for the perfect seasoning to elevate your BBQ? This Best Beef Rub is bold, balanced, and packed with flavor — ideal for Texas-style smoked brisket, beef ribs, and any cut that deserves a rich, savory crust. It brings out the natural depth of beef while adding just the right kick. Whether you’re firing up the smoker or the grill, this rub guarantees mouthwatering results every time.

A person holding on a fully cooked Texas-Style Beef Brisket with one hand and using a large knife to slice it into juicy strips with the other hand.
[feast_advanced_jump_to]

👉 The Ingredients

These simple yet powerful ingredients—black pepper, sugar, onion and garlic powder, dry mustard, and chili mustard—combine to create a bold, balanced rub that enhances the natural flavor of beef. Find ingredient notes (including substitutions and variations) below.

An arrangement of ingredients for Best Beef Rub on a grey wooden background including pepper, garlic powder, cayenne pepper, chili powder, sugar, onion powder, and dry mustard.

☑️ Ingredient Notes and Variations

  • Black Pepper: Adds a sharp, smoky heat. Use coarse-ground pepper for more texture, or swap for white pepper if you prefer a milder bite.
  • Sugar: Balances the spice and helps create a caramelized crust. Brown sugar adds depth, while turbinado sugar resists burning on high heat.
  • Onion Powder: Provides subtle sweetness and savory flavor. You can substitute dried minced onion for a chunkier rub.
  • Garlic Powder: A must for rich, umami depth. Granulated garlic works just as well if that’s what you have.
  • Dry Mustard: Adds tang and brightness that cuts through the fat of beef. If unavailable, mix 1 teaspoon of yellow mustard into the rub before applying.
  • Chili Powder: Brings gentle heat and color. Adjust to taste or replace with smoked paprika for a milder, smoky flavor.

See the recipe card (with video) below for a full list of ingredients and measurements.

👩🏼‍🍳 How to Make the Best Beef Rub

A person dumping onion powder, sugar, and ground mustard into a glass bowl that has ground pepper in it.
  1. Step 1: In a medium bowl, combine the sugar, onion powder, and dry mustard with the black pepper.
A person dumping small piles of cayenne pepper, garlic powder, and chili powder from a small white bowl that is filled with piles of black pepper, sugar, onion powder, and ground mustard.
  1. Step 2: Add the garlic powder, cayenne pepper, and chili powder.
A person mixing a best beef rub in a small glass bowl on a wooden cutting board.
  1. Step 3: Mix until thoroughly combined.
A person using a silver spoon to transfer Best Beef Rub from a glass bowl into a small glass jar.
  1. Step 4: Transfer to a jar with a tight-fitting lid and store in a cool place for up to 2 months.

🔥 How To Use

  1. Prep the Meat: Pat your brisket or beef ribs dry with paper towels to help the rub stick and promote a better crust.
  2. Apply a Binder (Optional): Lightly coat the meat with a thin layer of yellow mustard or olive oil—this helps the rub adhere and adds flavor depth.
  3. Season Generously: Sprinkle the Best Beef Rub evenly over all sides of the meat, pressing it in gently to form a uniform coating.
  4. Rest Before Cooking: Let the seasoned meat rest at room temperature for 30–45 minutes, or refrigerate for several hours for deeper flavor penetration.
  5. Cook Low and Slow: Ideal for smoked brisket or beef ribs—maintain a steady temperature around 225°F–250°F until tender and juicy.
  6. Let It Rest: After cooking, rest the meat for at least 30 minutes before slicing to lock in moisture and flavor.

🙋🏽‍♂️ Frequently Asked Questions

How long should I let the Best Beef Rub sit on the meat before cooking?

For the best flavor, let the rub sit for at least 30–45 minutes before cooking. For deeper seasoning, refrigerate the meat with the rub for up to 12 hours (covered). Or, salt-brined (dry-brine) overnight and then apply the 30 minutes before smoking or grilling.

Can I use the Best Beef Rub on other meats besides beef?

Absolutely! While it’s perfect for smoked brisket and beef ribs, it also tastes great on steaks, steakhouse burgers, pork tenderloin, or even beer-can chicken.

How should I store leftover Best Beef Rub?

Keep your rub in an airtight container in a cool, dark place for up to 6 months. Avoid moisture to preserve freshness and flavor.

Is the Best Beef Rub spicy?

It has a mild to medium heat from the chili powder and cayenne pepper. For more kick, add extra cayenne pepper; for less heat, reduce or omit the cayenne and chili component.

Can I make the Best Beef Rub without sugar?

Yes — simply omit the sugar or replace it with a sugar-free sweetener like monk fruit or erythritol. The rub will still deliver bold, savory flavor.

Should I apply the Best Beef Rub before or after smoking?

Always apply before smoking to allow the spices to form a flavorful bark as the meat cooks low and slow.

A person holding a spoon of Best Beef Rub over a small bowl filled with the same while resting on a wooden cutting board.

😋 Other Classic BBQ Rubs and Condiments

  • A small white bowl filled with best pork rub with a spoon inserted into the midle of it.
    Best Pork Rub
  • A spoon filled with Carolina mustard sauce being raised from a jar filled with the sauce with a sliced brisket nearby.
    Carolina Mustard Sauce
  • A straight-on view of a small glass jar filled with Alabama white sauce next to grilled chicken on metal skewers.
    Alabama White Sauce
  • Homemade BBQ sauce being poured on to incredible slow-cooker baby back ribs.
    Easy Homemade BBQ Sauce

Ready to take your BBQ to the next level? Go for it!

And when you do, be sure to take a photo, post it on Instagram, and tag @HowToFeedaLoon and hashtag #HowToFeedaLoon!

A small white bowl filled with Beef Rub with a spoon in the middle of it while the bowl is resting on a wooden cutting board.
Print Recipe
No ratings yet

Best Beef Rub

This Best Beef Rub delivers bold, smoky flavor and a perfect crust on smoked brisket, beef ribs, and any cut of beef—ideal for BBQ lovers who want rich, authentic taste every time.
Prep Time10 minutes mins
Total Time10 minutes mins
Course: Rub
Cuisine: BBQ / Southern
Servings: 2
Calories: 87kcal
Author: Kris Longwell

Ingredients

  • 3 tablespoon ground black pepper
  • 1 tablespoon sugar
  • 1 tablespoon onion powder
  • 2 teaspoon dry mustard
  • 2 teaspoon garlic powder
  • 2 teaspoon chili powder
  • 1 teaspoon cayenne pepper optional

Instructions

  • Mix all of the ingredients together in a small bowl.
    3 tablespoon ground black pepper, 1 tablespoon sugar, 1 tablespoon onion powder, 2 teaspoon dry mustard, 2 teaspoon garlic powder, 2 teaspoon chili powder, 1 teaspoon cayenne pepper
  • Transfer to a jar with a tight-fitting lid. Store in a cool place for up to 2 to 3 months.

Video

Notes

NOTE: Watch the video in the recipe card for visual guidance.
  • For the best flavor, apply the rub several hours before cooking or let it rest overnight in the fridge. If using a dry-brining method (salt-brining), don’t add the beef rub until about 30 minutes before smoking, roasting, or grilling. 
  • Store leftover rub in an airtight container for up to 6 months in a cool, dry place.
  • Adjust the spice level by adding more chili powder for heat or reducing it for a milder flavor.

Nutrition

Calories: 87kcal | Carbohydrates: 19g | Protein: 3g | Fat: 2g | Saturated Fat: 0.3g | Polyunsaturated Fat: 1g | Monounsaturated Fat: 1g | Sodium: 40mg | Potassium: 264mg | Fiber: 4g | Sugar: 7g | Vitamin A: 1059IU | Vitamin C: 2mg | Calcium: 69mg | Iron: 2mg

Mediterranean Roasted Vegetables

October 12, 2025 by Kris Longwell 3 Comments

A large white platter filled with Mediterranean Roasted Vegetables topped with crumbled feta cheese and chopped Italian parsley.

These Mediterranean Roasted Vegetables are a vibrant, flavor-packed side dish that celebrates the beauty of simple ingredients. Tossed in olive oil and seasoned with aromatic thyme, rosemary, and tangy sumac, the vegetables roast to golden perfection—crisp on the edges and tender inside.

A large white platter filled with Mediterranean Roasted Vegetables topped with crumbled feta cheese and chopped Italian parsley.
[feast_advanced_jump_to]

🥕 The Ingredients

A colorful mix of roasted vegetables—tossed with olive oil, thyme, rosemary, and sumac—gets a bright Mediterranean finish with lemon, parsley, feta, and a sprinkle of sea salt. Find ingredient notes (including substitutions and variations) below.

An arrangement of ingredients for Mediterranean roasted vegetables on a grey wooden background including potatoes, zucchini, bell peppers, tomatoes, onion, olives, herbs, olive oil, and feta cheese.

Expert Tip

Using high-quality herbs and spices makes all the difference in flavor and aroma! We love the exceptional freshness of herbs from Maison Gabrielle—they elevate these Mediterranean Roasted Vegetables to a whole new level. Use Discount Code HowToFeedaLoon at checkout for 10% off your order!

📝 Notes and Substitutions

  • Baby Red Potatoes: Their creamy texture and thin skins make them perfect for roasting. Cut them into even pieces for consistent crisping.
  • Substitute: Yukon Gold or fingerling potatoes work just as well. For a lower-carb option, try chunks of cauliflower or parsnips.
  • Zucchini: Adds moisture and a tender bite. Roast it with the other veggies but avoid overcooking to keep it from getting too soft.
  • Substitute: Yellow squash or eggplant slices for a similar texture.
  • Bell Peppers: Red and yellow peppers bring sweetness and color.
  • Variation: Add green bell pepper for a slightly bitter balance or roasted poblano for a smoky twist.
  • Red Onion: Caramelizes beautifully and adds a mild, sweet flavor when roasted.
  • Substitute: Shallots or sweet onions for a gentler flavor, or white onions for a sharper bite.
  • Carrots: Their natural sweetness deepens as they roast, balancing the savory herbs.
  • Variation: Try rainbow carrots for extra color or sweet potatoes for a heartier version.
  • Cherry Tomatoes: They burst with juicy flavor and add brightness to the dish.
  • Variation: Use grape tomatoes or sun-dried tomatoes for a more concentrated flavor.
  • Olive Oil: Use a good-quality extra virgin olive oil for the best flavor and crisp texture.
  • Pro Tip: Don’t skimp—olive oil helps the herbs adhere and promotes even roasting.
  • Herbs & Spices (Thyme, Rosemary, and Sumac): These classic Mediterranean seasonings add earthy, citrusy, and aromatic depth.
  • Substitute: Use Italian seasoning or Herbes de Provence if you don’t have thyme and rosemary. For a different finish, try smoked paprika or za’atar in place of sumac.
  • Garnishes (Parsley, Feta, Lemon, Sea Salt): Fresh parsley and lemon brighten the roasted flavors, while feta adds a creamy, tangy contrast.
  • Variation: Swap feta with goat cheese or shaved Parmesan; add a drizzle of balsamic glaze for an extra-rich finish.

Expert Tip

For perfectly crispy potatoes, par-boil them before roasting! Boil the cut potatoes in water for about 5–7 minutes, just until the edges start to soften. Drain well and let them steam-dry for a few minutes—this removes excess moisture and roughens the surface, helping them crisp beautifully in the oven. Steam-drying means letting the hot, drained potatoes sit for a few minutes after boiling—without covering them—so the remaining surface moisture evaporates naturally.

👩🏼‍🍳 How to Make Mediterranean Roasted Vegetables

A person holding a teaspoon filled with sumac over a small glass bowl filled with olive oil, thyme, and rosemary.
  1. Step 1: Combine the thyme, rosemary, sumac, salt, and pepper with the olive oil. Set aside. Preheat oven to 425°F.
A person transferring oiled and seasoned halved baby red potatoes on a large baking sheet that is lined with parchment paper.
  1. Step 2: Toss the par-boiled potatoes with about half of the herbed oil and place them on a large parchment paper-lined baking sheet. Roast for 15 minutes.
A person transferring slices of oiled and seasoned carrots onto a baking sheet that is lined with parchment paper and has lightly toasted baby red potatoes on it.
  1. Step 3: Toss the carrots with 2 teaspoons of the herb oil and add them to the pan. Spread ingredients out evenly and bake another 10 minutes.
A person transferring sliced zucchin, red onion wedges, and strips of bell peppers onto a baking sheet that is filled with toasted baby red potatoes and carrot slices.
  1. Step 4: Toss the zucchini, bell peppers, and onion with the remaining herb oil. Spread out on the pan and bake for another 10 minutes.
A person transferring a bowl filled with cherry tomatoes in one hand and a bowl of olives in the other hand onto a baking sheet filled with Mediterranean roasted vegetables on it.
  1. Step 5: Add the tomatoes and olives and bake for a final 10 minutes.
A close-up view of a large white platter filled with Mediterranean roasted vegetables garnished with crumbled feta cheese and chopped Italian parsley.
  1. Step 6: Transfer to a large platter and garnish with freshly squeezed lemon, chopped Italian parsley, and crumbled feta.

🙋🏽‍♂️ Frequently Asked Questions

Can I make Mediterranean Roasted Vegetables ahead of time?

Yes! You can roast the vegetables a few hours in advance and reheat them in a hot oven before serving. They also taste great at room temperature.

How should I store leftover Mediterranean Roasted Vegetables?

Store leftovers in an airtight container in the refrigerator for up to 4–5 days. Reheat in the oven or air fryer to bring back their crisp texture.

Are Mediterranean Roasted Vegetables healthy?

Absolutely! They’re packed with fiber, vitamins, and antioxidants from a variety of colorful vegetables, plus heart-healthy olive oil and herbs.

Can I use different vegetables in Mediterranean Roasted Vegetables?

Definitely, swap or add veggies like eggplant, asparagus, or broccoli—just adjust roasting times so everything cooks evenly.

An overhead view of a large baking pan filled with a colorful medley of Mediterranean roasted vegetables.

☀️ Other Amazing Mediterranean Recipes

  • A stack of three squares of spanakopita on a white plate.
    Spanakopita (Greek Spinach Pie)
  • An oval white platter filled with several filets of Mediterranean-style baked red snapper all next to a glass and bottle of white wine.
    Mediterranean-Style Baked Red Snapper
  • A large white platter filled with and Italian chopped salad with homemade vinaigrette with two serving utensils inserted into the side of the salad.
    Italian Chopped Salad with Homemade Vinaigrette
  • A large silver saucepan filled with Mediterranean pasta with shrimp.
    Mediterranean Pasta with Shrimp

Ready to make the best dish this side of the Mediterranean Sea? Go for it!

And when you do, be sure to take a photo of it, post it on Instagram, and tag @HowToFeedaLoon and hashtag #HowToFeedaLoon!

A close-up view of a large white platter filled with Mediterranean roasted vegetables garnished with crumbled feta cheese and chopped Italian parsley.
Print Recipe
5 from 1 vote

Mediterranean Roasted Vegetables

These Mediterranean Roasted Vegetables are bursting with color and flavor! A mix of tender zucchini, sweet bell peppers, red onion, and baby red potatoes is roasted with olive oil, thyme, rosemary, and sumac, then finished with lemon, parsley, and feta. Simple, wholesome, and irresistibly delicious—this dish is the perfect side for any meal.
Prep Time15 minutes mins
Cook Time45 minutes mins
Total Time1 hour hr
Course: Side Dish or Entree
Cuisine: Mediterranean
Servings: 8
Calories: 137kcal
Author: Kris Longwell

Equipment

  • 1 Large baking sheet or 2 regular-sized baking sheets
  • Parchment paper

Ingredients

  • ¼ cup olive oil plus a little more, if needed
  • 1 teaspoon dried rosemary
  • 1 teaspoon dried thyme
  • 1½ teaspoon sumac powder
  • 1 teaspoon salt
  • ½ teaspoon black pepper plus extra for garnish
  • 1½ lb baby red potatoes halved
  • 2 medium carrots peeled and sliced diagonly
  • 1 medium zucchini sliced into half moons
  • 1 red bell pepper seeded and cut into bite-sized pieces
  • 1 yellow bell pepper seeded and cut into bite-sized pieces
  • 1 medium red onion cut into wedges
  • 1 cup cherry tomatoes
  • 1 cup olives pitted, Kalamata, green, black, or medley
  • lemon juice freshly squeezed from 1 lemon, for finishing
  • 2 tablespoon Italian parsley fresh, chopped, for garnish (optional)
  • ½ cup feta cheese crumbled, for garnish (optional)

Instructions

  • Preheat oven to 425°F and bring a pot of water to a boil. Line a large baking pan (or 2 regular-sized ones) with parchment paper.
  • In a small bowl, mix the oil with the rosemary, thyme, sumac, salt, and pepper.
    ¼ cup olive oil, 1 teaspoon dried rosemary, 1 teaspoon dried thyme, 1½ teaspoon sumac powder, 1 teaspoon salt, ½ teaspoon black pepper
  • Add the potatoes to the water and bring back to a boil. Boil for 6 minutes and then drain. Transfer to a baking sheet lined with paper towels and let them air dry (steam dry).
    1½ lb baby red potatoes
  • Place the par-boiled potatoes in a medium-sized bowl and add about half of the herbed oil, and toss to cover. Spread the potatoes across the parchment paper in a single row. (Don't pile them; they crisp better when they are not touching each other). Place them in the oven and roast for 15 minutes.
  • Meanwhile, add the carrots to the same bowl, and toss them with a couple of teaspoons of the herbed oil. Remove the potatoes from the oven and add the carrots, spreading them out evenly. Return the pan to the oven and roast for another 10 minutes.
    2 medium carrots
  • Add the zucchini, bell peppers, and onion to the bowl. Add most of the remaining herbed oil and gently toss to coat. Remove the pan from the oven and add the vegetables, spreading them out evenly. Place back in the oven and roast for 10 minutes.
    1 medium zucchini, 1 red bell pepper, 1 yellow bell pepper, 1 medium red onion
  • Remove the pan from the oven and gently stir in the tomatoes and olives. Drizzle a little more olive oil over the top. Roast for another 10 minutes.
    1 cup cherry tomatoes, 1 cup olives
  • Remove the pan from the oven and gently transfer the veggies to a large serving platter.
  • For extra flavor, squeeze fresh lemon juice (from 1 lemon) over the veggies, and garnish with chopped Italian parsley, crumbled feta, a few pinches of coarse sea salt, and freshly ground black pepper. Serve at once (can also be served at room temperature).
    lemon juice, 2 tablespoon Italian parsley, ½ cup feta cheese

Video

Notes

NOTE: Watch the video near the top of the recipe for visual guidance.
  • Use high-quality herbs: Fresh, top-notch dried herbs like thyme, rosemary, and sumac make all the difference. We love using herbs from Maison Gabrielle—use Discount Code HowToFeedaLoon for 10% off your order!
  • Cut evenly: Keep all vegetables roughly the same size so they roast evenly and finish at the same time.
  • Par-boil potatoes: Boil baby red potatoes for 5–7 minutes, then let them steam-dry before roasting for extra crispiness.
  • Don’t overcrowd the pan: Give the vegetables space to roast—use two baking sheets if needed to ensure beautiful caramelization.
  • Finish fresh: A squeeze of lemon, chopped parsley, and crumbled feta just before serving adds the perfect Mediterranean brightness.

Nutrition

Calories: 137kcal | Carbohydrates: 7g | Protein: 3g | Fat: 12g | Saturated Fat: 3g | Polyunsaturated Fat: 1g | Monounsaturated Fat: 7g | Cholesterol: 8mg | Sodium: 678mg | Potassium: 258mg | Fiber: 2g | Sugar: 3g | Vitamin A: 3379IU | Vitamin C: 58mg | Calcium: 77mg | Iron: 1mg

Chorizo and Bean Soup

October 8, 2025 by Kris Longwell 4 Comments

An overhead view of a large white pot filled with chorizo and bean soup with a wooden spoon in the middle of the soup.

Chorizo and Bean Soup is rich, smoky, and full of hearty flavor. Tender beans, spicy chorizo, and savory vegetables simmer together in a comforting broth that pairs perfectly with easy homemade cornbread.

An overhead view of a large white pot filled with chorizo and bean soup with a wooden spoon in the middle of the soup.
[feast_advanced_jump_to]

🫘 The Ingredients

Made with simple, pantry-friendly ingredients like beans, chorizo, and spices, this soup is budget-friendly, hearty, and easy to pull together anytime. Find ingredient notes (including substitutions and variations) below.

An arrangement of ingredients for chorizo and bean soup including Mexican chorizo, pinto beans, salt pork, chicken stock, a bottle of beer, chopped onions and jalapeños, garlic, and seasonings.

👉 Substitutions and Variations

  • Beans: Dried pinto beans are classic, but you can use black beans, kidney beans, or canned beans if you’re short on time (just reduce the cooking time).
  • Chorizo: Mexican chorizo adds rich, spicy flavor—swap with Spanish chorizo for a smokier taste, or use ground pork or turkey seasoned with paprika, cumin, and chili powder.
  • Beer: Adds depth and slight bitterness; replace with additional chicken stock or a splash of apple cider vinegar for a non-alcoholic option.
  • Salt Pork: Substitute with bacon or pancetta for similar richness, or omit for a lighter soup.
  • Pork Lard: Optional for extra flavor—olive oil or vegetable oil works just as well.
  • Jalapeños: Adjust the heat level by using fewer peppers, or swap with milder green chilies or spicier serranos.
  • Cilantro: If you’re not a fan, replace it with parsley or green onions for a fresh finish.
  • Spices: Add smoked paprika for a deeper flavor, or a pinch of cayenne for extra heat.

See the recipe card (with video) below for a full list of ingredients and measurements.

⭐️ Tips and Tricks for Perfect Chorizo and Bean Soup

  • Soak the beans: For even cooking and a creamier texture, soak dried pinto beans overnight or use the quick-soak method (boil for 3 minutes, then let sit for 1 hour).
  • Simmer gently: Keep the soup at a low simmer—boiling too hard can cause beans to split or turn mushy.
  • Don’t add salt too early: Wait until the beans are nearly tender before salting; adding salt too soon can toughen their skins.
  • Brown the chorizo well: Let it cook until slightly crisp—this deepens the smoky flavor base of the soup.
  • Deglaze with beer: Pouring in the beer after browning helps lift all the flavorful bits from the bottom of the pot.
  • Layer your flavors: Add spices like cumin and oregano early so they bloom in the fat, then adjust seasoning near the end for balance.
  • Make ahead: The flavors deepen overnight, so it’s even better the next day.
  • Adjust thickness: For a thicker soup, mash a few beans against the pot’s side or simmer uncovered for the last 15 minutes.

Expert Tip

After browning the chorizo, pour it through a fine sieve into a heatproof bowl to separate the rendered grease. Use 1 to 2 tablespoons of that flavorful fat to sauté your onions, jalapeños, and garlic—the smoky, spiced drippings add incredible depth and richness to the base of the soup.

👩🏼‍🍳 How to Make Chorizo and Bean Soup

A person pouring water into a white pot that is filled with dried pinto beans.
  1. Step 1: Cover the dried beans with water in a pot by a couple of inches. Let them soak overnight.
A person pouring beer from a bottle into a pot that is filled with dried pinto beans, water, chicken stock, and a salt pork.
  1. Step 2: Drain the beans and place them back in the pot with the chicken stock, water, salt pork, and beer. Let simmer for 1 hour.
A person dumping cooked crumbled chorizo sauce from a sieve into a pot filled with simmering broth, a salt pork, and pinto beans.
  1. Step 3: Cook the chorizo in a skillet, transfer to a sieve over a heatproof bowl (to catch the rendered grease), and add the chorizo to the pot of simmering beans.
A person transferring sautéed chopped onions, jalapeños, and garlic from a skillet into a pot of simmering chorizo and bean soup.
  1. Step 4: Sauté the onions, jalapeños, and garlic in 1 to 2 tablespoon of the rendered grease and then transfer to the soup.
A person holding a small white bowl that is filled with a teaspoon each of dried cumin and dried oregano over a pot on a stove that is filled with a simmering chorizo and bean soup with chopped tomatoes and cilantro resting on the surface of the soup.
  1. Step 5: Add the pork lard (if using), cilantro, tomatoes, cumin, oregano, salt, and pepper to the soup.
A person using a wooden spoon to stir a white pot of simmering chorizo and bean soup.
  1. Step 6: Simmer for another 30 minutes to one hour, or until the beans are very tender. The soup is now ready to eat!

🥣 How to Serve and Reheat

  • With cornbread: Pair with warm, buttery homemade cornbread to soak up the rich, smoky broth.
  • With rice: Serve over a scoop of white steamed rice or brown rice for a heartier, stew-like meal.
  • With toppings: Garnish with fresh cilantro, diced onions, sliced jalapeños, or a squeeze of lime for brightness.
  • With cheese: Add a sprinkle of shredded cheddar, Monterey Jack, or crumbled queso fresco for extra richness.
  • With a side salad: Balance the hearty flavors with a crisp green or avocado salad.
  • As leftovers: Reheat the next day—the flavors deepen beautifully, making it even more delicious.

🙋🏽‍♂️ Frequently Asked Questions

Can I make Chorizo and Bean Soup ahead of time?

Yes! The flavors deepen overnight, so it’s even better the next day. Just store it in the refrigerator and reheat gently before serving.

What type of chorizo should I use for Chorizo and Bean Soup?

Mexican chorizo works best—it’s soft, spicy, and blends beautifully into the broth. Spanish chorizo can be used for a smokier, firmer texture.

Can I make Chorizo and Bean Soup with canned beans instead of dried?

Absolutely. Use about three cans of drained beans and reduce the cooking time to an hour since canned beans are already tender.

How spicy is Chorizo and Bean Soup?

It has a mild to medium heat from the chorizo and jalapeños, but you can easily adjust the spice level by adding more or fewer peppers.

😋 More Heart-Warming Soup Recipes

  • A close-up view of a blue soup bowl filled with creamy tortellini soup topped with grated parmesan cheese with two chunks of Italian bread sitting nearby.
    Creamy Tortellini Soup with Spinach and Sausage
  • Two white bowls filled with French onion soup with sliced toasted pieces of a baguette and spoons nearby.
    French Onion Soup
  • A small crock of roasted butternut squash on a small white plate with croutons on it.
    Roasted Butternut Squash Soup
  • A large white soup bowl filled with New England Clam Chowder on a plate with oyster crackers and spoon next to it.
    Classic New England Clam Chowder

Ready to make the most heart-warming soup in town? Go for it!

And when you do, be sure to take a photo of it, post it on Instagram, and tag @HowToFeedaLoon and hashtag #HowToFeedaLoon

A dark blue soup bowl filled with a serving of chorizo and bean soup with a spoon resting in the middle of the soup bowl.
Print Recipe
5 from 2 votes

Chorizo and Bean Soup

Hearty and full of smoky flavor, this Chorizo and Bean Soup combines spicy Mexican chorizo, tender beans, and aromatic vegetables simmered in a rich, savory broth—perfect for cozy nights and even better with homemade cornbread.
Prep Time20 minutes mins
Cook Time1 hour hr 30 minutes mins
Soaking (See NOTES)8 hours hrs
Total Time9 hours hrs 50 minutes mins
Course: Appetizer or Soup
Cuisine: Mexican-American
Servings: 8
Calories: 426kcal
Author: Kris Longwell

Equipment

  • 1 Large pot
  • 1 large skillet (12")

Ingredients

  • 1 lb pinto beans dried
  • 4 cups chicken broth or stock
  • 1 bottle beer preferably Mexican
  • 2 cups water
  • 1 lb salt pork
  • 12 oz chorizo uncooked (not cured)
  • 1 medium onion chopped
  • 2 medium jalapeños seeded and finely chopped
  • 3 cloves garlic minced
  • 2 tablespoon pork lard (optional)
  • ½ cup cilantro fresh, chopped
  • 2 medium tomatoes roughly chopped
  • 1 teaspoon ground cumin
  • 1 teaspoon dried oregano
  • 1 teaspoon Kosher salt see NOTES
  • 1 teaspoon black pepper

Instructions

  • Place the beans in a large pot and cover with water by about 1 to 2 inches. Let them soak overnight. (See NOTES for Quick Soak Method).
    1 lb pinto beans
  • Drain the beans. Place the beans back in the pot and add the chicken broth, beef, water, and salt pork. Bring to a boil, then lower the heat to medium-low and simmer, stirring occasionally, for 1 hour.
    4 cups chicken broth, 1 bottle beer, 2 cups water, 1 lb salt pork
  • Meanwhile, cook the chorizo over medium heat in a large skillet. Drain the chorizo through a sieve into a heatproof bowl that will catch the rendered grease. Add the cooked chorizo to the simmering beans.
    12 oz chorizo
  • Heat 1 tablespoon of the rendered grease (or use olive oil) in the same skillet over medium heat. Add the onion and peppers and sauté until soft, about 4 minutes. Stir in the garlic and sauté for an additional 30 seconds, stirring often.
    1 medium onion, 2 medium jalapeños, 3 cloves garlic
  • Add the sautéed vegetables to the soup.
  • Stir in the pork lard (if using), cilantro, tomatoes, cumin, oregano, salt (to taste), and pepper. Simmer for another 30 minutes to 1 hour. Remove the salt pork and discard it. The beans should be very tender. Taste and add more salt, if needed (it will depend on how salty your pork salt is).
    2 tablespoon pork lard, ½ cup cilantro, 2 medium tomatoes, 1 teaspoon ground cumin, 1 teaspoon dried oregano, 1 teaspoon Kosher salt, 1 teaspoon black pepper

Video

Notes

NOTE: Watch the video near the top of the recipe for visual guidance.
  • Salt to taste: The amount of salt needed will depend on how salty your salt pork (or bacon) is—taste before adding extra.
  • Rendered chorizo grease: After browning the chorizo, strain it and use 1–2 tablespoons of the rendered grease to sauté your vegetables for deeper flavor.
  • Beans: If using canned beans instead of dried, reduce the cooking time since they’re already tender.
  • Beer substitute: Replace the beer with extra chicken stock or a splash of apple cider vinegar for a non-alcoholic option.
  • Make-ahead: The soup tastes even better the next day as the flavors meld. Store covered in the refrigerator for up to 3 days.
  • Freezing: Cool completely before freezing in airtight containers for up to 3 months. Reheat gently on the stove

Nutrition

Calories: 426kcal | Carbohydrates: 20g | Protein: 16g | Fat: 16g | Saturated Fat: 7g | Polyunsaturated Fat: 5g | Monounsaturated Fat: 8g | Cholesterol: 28mg | Sodium: 727mg | Potassium: 436mg | Fiber: 6g | Sugar: 2g | Vitamin A: 520IU | Vitamin C: 10mg | Calcium: 51mg | Iron: 3mg

Crispy Chili Beef

October 5, 2025 by Kris Longwell 1 Comment

An overhead view of a colorful serving bowl filled with crispy chili beef garnished with slivers of red peppers, chopped scallions, and toasted sesame seeds.

Crispy Chili Beef is a beloved takeout classic that’s surprisingly easy to make at home. Tender strips of beef are fried until perfectly golden and crunchy, then tossed in a bold, sweet-and-spicy chili sauce that’s bursting with flavor. If you love Crispy Sesame Beef or Mongolian Beef, you’ll fall for this dish—it’s quick, satisfying, and sure to impress on busy weeknights or at dinner parties.

An overhead view of a colorful serving bowl filled with crispy chili beef garnished with slivers of red peppers, chopped scallions, and toasted sesame seeds.
[feast_advanced_jump_to]

🥩 The Ingredients

You can keep it simple with regular or low-sodium soy sauce, or make it more authentic with a quick trip to your Asian market for light and dark soy sauce to deepen the flavor—either way, the ingredients come together to deliver a better-than-takeout taste. Find ingredient notes (including substitutions and variations) below.

An arrangement of ingredients for crispy chili beef on a grey wooden background including a raw ribeye steak, ginger, carrot, onion, garlic, eggs, soy sauce, flour, oil, scallions, and seasonings.

👉 Substitutions and Variations

  • Beef: Swap with chicken, pork, shrimp, or even tofu for a lighter or vegetarian-friendly version.
  • Soy Sauce: Use regular or low-sodium soy sauce, or upgrade with light and dark soy sauce for authentic flavor.
  • Chili Heat: Adjust spice by using fresh red chilies, chili flakes, or a milder sweet chili sauce.
  • Vegetables: Add bell peppers, broccoli, or snap peas for extra crunch and nutrition.
  • Sweetness: Replace sugar with honey or brown sugar for a different depth of sweetness.
  • Gluten-Free: Use tamari or coconut aminos instead of soy sauce, and cornstarch or arrowroot for coating.
  • Crispness Level: For extra crunch, double-fry the beef strips before tossing them in the sauce.

Expert Tip

For perfectly thin, even strips, place the beef in the freezer for about 20–30 minutes before slicing—this firms up the meat just enough to make cutting against the grain much easier.

☑️ Tips and Tricks for Making Perfect Crispy Chili. Beef

  • Slice thinly: Cut the beef into very thin strips against the grain for tenderness and quick cooking.
  • Cornstarch coating: Toss the beef in cornstarch just before frying to achieve that signature crisp texture.
  • High heat is key: Fry in hot oil so the beef crisps quickly without becoming greasy.
  • Batch fry: Cook the beef in small batches to keep the oil hot and the coating crunchy.
  • Sauce timing: Add the beef to the sauce just before serving so it stays crisp on the outside while coated in flavor.
  • Soy sauce upgrade: Use light and dark soy sauce from your Asian market for authentic depth, or stick with regular/low-sodium if that’s what you have.

👩🏼‍🍳 How to Make Crispy Chili Beef Extra Crispy

A person using a large Japanese knife to slice an uncooked and partially frozen ribeye steak into strips on a cutting board.
  1. Step 1: Freeze the steak for 20 to 30 minutes, then cut against the grain and make strips of beef.
A person using a small whisk to combine a sauce for crispy chili beef.
  1. Step 2: Whisk together the sauce ingredients in a small bowl. Set aside.
A person transferring ground black pepper from a small gold spoon into a glass bowl filled with cornstarch with a whisk resting in the middle of the bowl.
  1. Step 3: Whisk the salt and pepper into the cornstarch in a bowl.
Strips of uncooked ribeye steak resting in a bowl that has two beaten eggs in it.
  1. Step 4: Working in batches, add the beef to the eggs and stir until fully coated.
A person using his hands to coat egg-soaked beef strips with seasoned cornstarch in a glass bowl.
  1. Step 5: Allow the eggs to drip from the beef strips and then coat them with the cornstarch mixture.
A person holding up a metal spider filled with crispy strips of breaded beef over a wok that also has crispy beef strips being deep-fried.
  1. Step 6: Deep-fry until golden and very crispy. Set aside.

Expert Tip

For a smoother cooking flow, fry the beef in a separate heatproof pan, then quickly bring everything together in the wok for that final toss in sauce—just be sure to handle the hot oil with care to keep things safe and stress-free.

🔥 How To Stir-Fry Crispy Chili Beef

A large black wok sitting on a gas stove and is filled with thin strips of onion, julienned carrots, and slivers of a Fresno chili pepper.
  1. Step 1: Heat the oil over high heat in the wok and stir-fry the onions, carrots, and peppers for 1 minute.
A person transferring mince garlic and minced ginger from a small bowl into a wok that has stir-fried onions, carrots, and peppers in it.
  1. Step 2: Add the garlic and ginger and stir-fry for another 30 seconds.
A person pouring an Asian sweet and spicy sauce from a glass bowl into a wok that has simmering vegetables that are being stir-fried with the sauce.
  1. Step 3: Pour in the prepared sauce and bring to a boil.
A person transferring a bowl-full of crispy strips of breaded steak into a wok that has a chili sauce and sautéed vegetables simmering in it.
  1. Step 4: Add the crispy beef and stir until fully coated. Serve at once with sesame seeds and scallions.

🍽️ How to Serve

  • With rice: Serve over perfectly steamed rice to soak up the sweet and spicy sauce.
  • With noodles: Toss with lo mein, rice noodles, or even soba for a heartier meal.
  • With vegetables: Pair with stir-fried broccoli, bell peppers, or bok choy for balance and crunch.
  • As an appetizer: Serve in smaller portions with toothpicks for a crowd-pleasing starter.
  • In lettuce wraps: Spoon into crisp lettuce cups for a lighter, fresher twist.
  • With sides: Add homemade egg rolls, savory scallion pancakes, or authentic crab rangoon for a full takeout-style spread at home.

🙋🏽‍♂️ Frequently Asked Questions

Can I make Crispy Chili Beef ahead of time?

It’s best enjoyed fresh, but you can prep the beef and sauce separately, then combine just before serving.

What cut of beef works best for Crispy Chili Beef?

Ribery, flank steak, and sirloin are great options because they’re tender and slice easily into thin strips.

Can I make Crispy Chili Beef without deep frying?

Yes—you can shallow fry the beef, which means cooking it in a smaller amount of oil (just enough to cover the bottom of the pan) instead of fully submerging it. You can also try air frying, though the texture may be slightly less crunchy.

Can I make Crispy Chili Beef gluten-free?

Yes, simply use tamari or coconut aminos in place of soy sauce and ensure your cornstarch is gluten-free.

How spicy is Crispy Chili Beef?

The heat level is adjustable—add more or fewer chilies or use a milder chili sauce to suit your taste.

A light grey dinner plate filled with a serving of crispy chili beef on a bed or steamed rice with chop sticks sitting on the edge of the plate.

🥡 Other Classic Chinese Take-Out Recipes

  • A white bowl of General Tso's Chicken with a pair of chop sticks next to it.
    Authentic General Tso’s Chicken
  • A bowl full of beef and broccoli stir-fry with chop sticks.
    Beef and Broccoli Stir-Fry
  • A wok filled with fully cooked Kung Pao Shrimp and a wooden spoon inserted in the middle of it all.
    Kung Pao Shrimp
  • A white bowl of steamed pork dumplings with a spicy peanut sauce over the top.
    Pork Dumplings with Peanut Sauce

Ready to make the best take-out fake-out in town? Go for it!

And when you do, be sure to take a photo of it, post it on Instagram, and tag @HowToFeedaLoon and hashtag #HowToFeedaLoon!

An overhead view of a colorful serving bowl filled with crispy chili beef garnished with slivers of red peppers, chopped scallions, and toasted sesame seeds.
Print Recipe
5 from 1 vote

Crispy Chili Beef

Crispy Chili Beef is a takeout favorite made easy at home—thin strips of tender beef are fried until golden and crunchy, then tossed in a sweet, spicy chili sauce for a bold, better-than-restaurant dish.
Prep Time15 minutes mins
Cook Time15 minutes mins
Freezing the steak20 minutes mins
Total Time50 minutes mins
Course: Entree
Cuisine: Chinese / American
Servings: 4
Calories: 299kcal
Author: Kris Longwell

Equipment

  • Sturdy pot for deep-frying Or just use your wok
  • Wok or large skillet

Ingredients

  • 1 lb beef filet ie, ribeye, flank, or sirloin
  • Peanut oil or vegetable oil, for frying
  • salt and pepper for seasoning the beef
  • ¼ cup rice vinegar
  • 2 tablespoon light soy sauce see NOTES
  • 2 tablespoon dark soy sauce see NOTES
  • 1 tablespoon sugar
  • 2 tablespoon honey
  • ¼ cup sweet chili sauce
  • ½ teaspoon red pepper flakes more for extra heat
  • 1 cup cornstarch
  • ½ teaspoon Kosher salt
  • ½ teaspoon black pepper
  • 2 eggs
  • 1 tablespoon peanut oil or vegetable oil, for stir-frying.
  • 1 medium onion thinly sliced
  • 1 medium carrot julieened, or cut into strips
  • 1 red chili pepper ie, Fresno chili pepper
  • 4 cloves garlic minced
  • 2 teaspoon ginger fresh, minced
  • toasted sesame seeds for garnish
  • 1 bunch scallions sliced, for garnish

Instructions

  • Wrap the steak in plastic wrap and place it in the freezer for 20 to 30 minutes.
    1 lb beef filet
  • Heat the oil in a pot over medium-high heat to 350 to 365°F.
    Peanut oil
  • Remove the steak from the freezer, and cut against the grain into thin strips. Season the steak with salt and pepper.
    salt and pepper
  • In a small bowl, whisk together the vinegar, soy sauce, sugar, honey, chili sauce, and red pepper flakes. Set aside.
    ¼ cup rice vinegar, 2 tablespoon light soy sauce, 2 tablespoon dark soy sauce, 1 tablespoon sugar, 2 tablespoon honey, ¼ cup sweet chili sauce, ½ teaspoon red pepper flakes
  • In a medium-sized bowl, whisk together the cornstarch with the salt and pepper.
    1 cup cornstarch, ½ teaspoon Kosher salt, ½ teaspoon black pepper
  • In another bowl, add the eggs and lightly beat them. Add the beef and toss until fully coated.
    2 eggs
  • Working in batches, lift the beef from the eggs, allowing excess egg to drip off, and add to the seasoned cornstarch. Toss until fully coated.
  • Carefully add the beef to the hot oil, and use a metal spider or tongs to move the beef around, to help them not stick to each other. Fry until lightly golden and very crispy, about 4 to 5 minutes. Remove from the oil onto a plate lined with paper towels. Repeat this process with the remaining beef. Set aside. Let the oil cool down and safely discard it.
  • Heat 1 tablespoon of peanut oil in your wok over high heat. Once the oil is shimmering, add the onion, carrots, and chili pepper, and stir-fry for 1 to 2 minutes.
    1 tablespoon peanut oil, 1 medium onion, 1 medium carrot, 1 red chili pepper
  • Add the garlic and ginger and stir-fry for another 30 seconds to 1 minute.
    4 cloves garlic, 2 teaspoon ginger
  • Stir in the reserved sauce and bring to a boil. Carefully add the crispy beef and use two large wooden spoons to toss until fully coated.
  • Remove from heat and serve immediately, garnished with sesame seeds and chopped scallions. Serve over steamed rice or cooked noodles.
    toasted sesame seeds, 1 bunch scallions

Video

Notes

NOTE: Watch the video near the top of the recipe for visual guidance.
  • For the most authentic flavor, use a combination of light and dark soy sauce from your Asian market. If unavailable, regular or low-sodium soy sauce works just fine.
  • Fry the beef in small batches to keep the oil hot and the coating crisp.
  • For extra crunch, double-fry the beef before tossing it in the sauce.
  • Adjust the spice level by adding more chilies and/or red pepper flakes. 
  • Serve immediately after tossing in the sauce to preserve the crispy coating.
  • Store leftovers in an airtight container in the refrigerator for up to 2 days. Reheat in a hot skillet or air fryer to help restore crispness—avoid the microwave, which can make the beef soggy.

Nutrition

Calories: 299kcal | Carbohydrates: 56g | Protein: 5g | Fat: 18g | Saturated Fat: 1g | Polyunsaturated Fat: 2g | Monounsaturated Fat: 2g | Trans Fat: 0.01g | Cholesterol: 82mg | Sodium: 1006mg | Potassium: 222mg | Fiber: 2g | Sugar: 22g | Vitamin A: 2910IU | Vitamin C: 21mg | Calcium: 41mg | Iron: 1mg

Pan-Fried Cod with Lemon-Butter Sauce

October 1, 2025 by Kris Longwell 7 Comments

An overhead view of four pan-fried filets of cod topped with a lemon butter sauce all on a beaded oval platter with lemon slices scattered around the fish.

Delicate, flaky cod meets a bright and buttery finish in this quick and elegant homemade seafood dish. Pan-frying gives the fish a golden crust while keeping it tender inside, and a simple lemon butter sauce adds just the right balance of richness and freshness. Perfect for a weeknight dinner yet impressive enough for guests, this Pan-Fried Cod with Lemon Butter Sauce is a versatile recipe you’ll come back to again and again.

An overhead view of four pan-fried filets of cod topped with a lemon butter sauce all on a beaded oval platter with lemon slices scattered around the fish.
[feast_advanced_jump_to]

🐟 The Ingredients

With simple, budget-friendly ingredients you likely already have on hand, this recipe is both easy to prepare and mild enough to please even the pickiest eaters. Find ingredient notes (including substitutions and variations) below.

An arrangement of ingredient for pan-fried cod with lemon butter sauce on a wooden grey background including cod filets, butter, lemon, white wine, garlic, flour, Italian parsley, and seasonings.

👉 Substitutions and Variations

  • Cod Fillets → Swap with haddock, tilapia, halibut, pollock, salmon, or trout.
  • Flour → Use gluten-free flour, cornstarch, or almond flour; season with paprika, garlic powder, or herbs for extra flavor.
  • Olive Oil → Replace with canola, avocado, or sunflower oil; or mix oil with butter for added richness.
  • Butter → Substitute with ghee or plant-based butter; brown the butter for a nutty twist.
  • Garlic → Use garlic powder or shallots; roast garlic for a sweeter, mellow flavor.
  • Lemon Juice + Zest → Swap with lime or add capers for a piccata-style variation.
  • Parsley → Replace with dill, chives, or basil; or use a mix of fresh herbs for more complexity.

See the recipe card (with video) below for a full list of ingredients and measurements.

☑️ Tips and Tricks for Perfect Pan-Fried Cod with Lemon-Butter Sauce

  • Pat the fish dry before dredging in flour to help the coating stick and ensure a crisp crust.
  • Season in layers—lightly season the fish, the flour, and the sauce for balanced flavor.
  • Don’t overcrowd the pan; cook the fillets in batches if needed to get a golden sear.
  • Use medium-high heat so the fish browns quickly without overcooking inside.
  • Flip gently using a thin spatula to prevent the delicate fillets from breaking apart.
  • Deglaze the pan with a splash of white wine or broth before adding butter for extra depth in the sauce.
  • Add lemon juice and wine at the end to keep the flavor bright and prevent bitterness.
  • Serve immediately—cod is best hot and fresh, as it can dry out if reheated.

👩🏼‍🍳 How to Make Pan-Fried Cod with Lemon-Butter Sauce

A person using his fingers to sprinkle salt and pepper over four uncooked filets of cod resting on brown paper on a small wooden cutting board.
  1. Step 1: Liberally season the filets with salt and pepper on both sides.
A person dredging a seasoned filet of cod in seasoned flour on a white and blue oval platter.
  1. Step 2: Combine the flour with the salt, pepper, onion powder, and oregano, then dredge the filet until completely coated.
Four filets of cod being pan fried in olive oil and melted butter in a black non-stick skillet on a gas stove.
  1. Step 3: Heat the oil and butter in a non-stick skillet over medium heat, and then pan-fry the fillets until golden on both sides, about 4 minutes per side.
A person adding diced garlic from a small silver bowl into a large black skillet filled with simmering butter and olive oil on a gas stove.
  1. Step 4: Remove the filets and then melt the remaining butter, and then sauté the garlic for 1 minute.
A person pouring white wine from a small white bowl into a black skillet filled with a simmering white wine, butter, and garlic sauce.
  1. Step 5: Add the wine, lemon juice, and lemon zest, and simmer over medium-high heat for 2 minutes.
A person using his fingers to sprinkle chopped Italian parsley over the top of a white dinner plate filled with a serving of pan-fried cod with lemon butter sauce.
  1. Step 6: Serve over pasta or steamed rice with extra sauce and garnished with chopped parsley.

Expert Tip

Use a good-quality non-stick pan for pan-frying cod—its delicate, flaky texture is prone to sticking, and a non-stick surface helps the fillets release easily while still developing a beautiful golden crust.

🍽️ Serving Suggestions

  • Starches: Pair with best-ever mashed potatoes, herbed rice, or buttery orzo for a comforting base.
  • Vegetables: Serve alongside roasted asparagus, sautéed green beans, or steamed broccolini for a light balance.
  • Salads: A crisp green salad with a homemade Italian vinaigrette or a cucumber-dill salad adds freshness.
  • Grains: Try quinoa, farro, or couscous for a wholesome, nutty contrast.
  • Bread: Easy skillet dinner rolls or cheesy garlic bread are perfect for soaking up the lemon butter sauce.
  • Wine Pairing: A chilled Sauvignon Blanc, Pinot Grigio, or Chardonnay complements the bright citrus notes.

🙋🏽‍♂️ Frequently Asked Questions

Can I use frozen fish for Pan-Fried Cod with Lemon Butter Sauce?

Yes, just thaw it completely and pat it dry before cooking.

Can I make Pan-Fried Cod with Lemon Butter Sauce ahead of time?

It’s best enjoyed fresh, but you can prep the sauce ingredients in advance.

How do I keep the fish from falling apart in Pan-Fried Cod with Lemon Butter Sauce?

Handle it gently, use medium-high heat, and flip only once.

Is Pan-Fried Cod with Lemon Butter Sauce kid-friendly?

Yes—the mild flavor of cod and buttery sauce make it appealing to picky eaters.

Is Pan-Fried Cod with Lemon Butter Sauce a healthy meal option?

Yes—cod is a lean source of protein, and the lemon butter sauce can be adjusted for lighter or richer versions depending on your preference.

A person using a serving spoon to drizzle a lemon butter sauce over two pan-fried filets of cod on a bed of orzo on a white dinner plate.

😋 Other Amazing (But Easy) Seafood Recipes

  • An oval white platter filled with several filets of Mediterranean-style baked red snapper all next to a glass and bottle of white wine.
    Mediterranean-Style Baked Red Snapper
  • An overhead view of a two shallow pasta bowls each filled with a bed of bucatini pasta topped with salmon and a puttanesca sauce.
    Salmon Puttanesca
  • A straight-on view of two dinner plates that are holding servings of fish en papillote with a lemon wedge off to the side.
    Fish en Papillote (Cod in Parchment)
  • A side-view of a white pasta bowl filled sautéd vegetables and white bean in a broth and a fillet of halibut nestled on top.
    Pan-Seared Halibut with Vegetables

Ready to make the best (and easiest) seafood dish on the block? Go for it!

And when you do, be sure to take a photo of it, post it on Instagram, and tag @HowToFeedaLoon and hashtag #HowToFeedaLoon!

A plate filled with a serving of pan-fried cod with lemon butter sauce resting on cooked orzo pasta and two lemon wedges off to the side of the dish.
Print Recipe
5 from 2 votes

Pan-Fried Cod with Lemon Butter Sauce

Light, flaky cod is pan-fried to golden perfection and topped with a bright, buttery lemon sauce—an easy, flavorful dish that’s perfect for both weeknights and special occasions.
Prep Time10 minutes mins
Cook Time10 minutes mins
Total Time20 minutes mins
Course: Entree
Cuisine: American
Servings: 4
Calories: 260kcal
Author: Kris Longwell

Equipment

  • 1 Large skillet preferably non-stick

Ingredients

For the Fish

  • 4 6 oz cod filets
  • salt and pepper
  • ¼ cup all-purpose flour
  • 1 teaspoon onion powder
  • 1 teaspoon dried oregano
  • 2 tablespoon olive oil
  • 2 tablespoon unsalted butter

For the Lemon-Butter Sauce and Serving

  • 4 tablespoon unsalted butter
  • 2 teaspoon garlic minced
  • ¼ cup white wine see NOTES
  • 1 tablespoon lemon juice usually from 1 lemon
  • 1 teaspoon lemon zest usually from 1 lemon
  • 2 tablespoon Italian parsley fresh, chopped, for garnish

Instructions

Prepare the Cod Filets

  • Liberally salt the cod filets all over with salt and pepper.
    4 6 oz cod filets, salt and pepper
  • Combine the flour, onion powder, and oregano on a plate or pan. Dredge the cod filets through the flour mixture until completely coated.
    ¼ cup all-purpose flour, 1 teaspoon onion powder, 1 teaspoon dried oregano
  • Meanwhile, heat the oil in a large skillet (preferably non-stick) over medium heat. Once shimmering, add the butter and stir until melted.
    2 tablespoon olive oil, 2 tablespoon unsalted butter
  • Carefully add the filets to the skillet and pan-fry until lightly browned on the bottom side. Don't move the filets around in the skillet too much. Move them just enough to ensure they are not sticking to the skillet.
  • Use a spatula and a steady hand to flip the filets over gently. Pan-fry for another 4 minutes, or until lightly browned on both sides. Don't overcook the filets!
  • Gently remove the filets to a plate.

Make the Sauce and Serve

  • Add the butter (4 tbsp) to the skillet (no need to clean the skillet out) and cook over medium heat until melted.
    4 tablespoon unsalted butter
  • Add the garlic and sauté, stirring often, until aromatic, about 1 minute.
    2 teaspoon garlic
  • Stir in the wine, lemon juice, and lemon zest. Simmer over medium-high for about 2 minutes. Taste, and add a pinch of salt, if needed.
    ¼ cup white wine, 1 tablespoon lemon juice, 1 teaspoon lemon zest
  • Serve the filets immediately, spooning the sauce over the tops. Garnish with chopped Italian parsley.
    2 tablespoon Italian parsley

Video

Notes

NOTE: Watch the video near the top of the recipe for visual guidance.
  • If you don’t want to cook with wine, you can easily replace it with chicken broth or seafood stock.
  • Pat the fish fillets very dry before dredging to help the coating stick and achieve a crisp, golden crust.
  • A non-stick skillet makes flipping delicate cod fillets much easier and helps prevent sticking.
  • For extra flavor, try adding capers or fresh herbs like dill or chives to the lemon butter sauce.
  • This dish is best served immediately, as cod can dry out if reheated.
  • Store any leftovers in an airtight container in the refrigerator for up to 2 days.
  • Reheat gently in a non-stick skillet over low heat with a splash of broth or water to keep the fish moist—avoid the microwave, as it can make the cod dry and rubbery.
  • For the best flavor and texture, enjoy the fish fresh when possible.

Nutrition

Calories: 260kcal | Carbohydrates: 8g | Protein: 1g | Fat: 17g | Saturated Fat: 8g | Polyunsaturated Fat: 1g | Monounsaturated Fat: 6g | Trans Fat: 1g | Cholesterol: 46mg | Sodium: 6mg | Potassium: 55mg | Fiber: 0.4g | Sugar: 0.4g | Vitamin A: 694IU | Vitamin C: 5mg | Calcium: 16mg | Iron: 1mg

Creamy Beef and Shells

September 28, 2025 by Kris Longwell 8 Comments

Two white pasta bowls filled with servings of creamy beef and shells with a glass of ice tea and lemon nearby.

This Creamy Beef and Shells recipe is the ultimate weeknight comfort food—hearty, flavorful, and ready in a snap. Tender pasta shells are tossed with juicy ground beef and coated in a rich, cheesy tomato sauce that’s both satisfying and family‑friendly. It’s a simple, one‑pot style dish that delivers big flavor with minimal effort, perfect for busy nights when you need dinner on the table quickly.

Two white pasta bowls filled with servings of creamy beef and shells with a glass of ice tea and lemon nearby.
[feast_advanced_jump_to]

🥫 The Ingredients

Made with pantry‑friendly staples like dried oregano, dried basil, ground mustard, Worcestershire sauce, flour, and canned Ro‑Tel tomatoes, this dish comes together easily without a special trip to the store. Find ingredient notes (including substitutions and variations) below.

An arrangement of ingredients for creamy beef and shells on a grey wooden background including ground beef, seasonings, flour, chopped tomatoes, pasta shells, onion, cheddar cheese, onion, and beef stock.

👉 Substitutions and Variations

  • Olive Oil: Used for sautéing the onion and beef. Substitute with vegetable oil, canola oil, or even butter for a richer flavor.
  • Ground Beef: Lean ground beef works best, but ground turkey, chicken, or even Italian sausage can be swapped in for variety.
  • Onion: Yellow onion is classic, but white or red onion works too. Onion powder can be used in a pinch.
  • Dried Oregano & Dried Basil: Pantry staples that add Italian‑inspired flavor. Fresh herbs can be substituted—use about 3x the amount.
  • Ground Mustard: Adds a subtle tang. If you don’t have it, Dijon mustard or yellow mustard can be used (start with ½ teaspoon).
  • Worcestershire Sauce: Deepens the savory flavor. Soy sauce or tamari makes a good alternative.
  • Flour: Helps thicken the sauce. Cornstarch or arrowroot powder can be used as a gluten‑free option.
  • Ro‑Tel Tomatoes: Adds a little spice and tang. Substitute with regular canned diced tomatoes or diced tomatoes with green chilies for a similar kick.
  • Heavy Cream: Makes the sauce rich and silky. Half‑and‑half or whole milk can be used for a lighter version, though the sauce will be thinner.
  • Shredded Cheddar: Sharp cheddar adds bold flavor, but mozzarella, Monterey Jack, or even a blend of cheeses can be used.

See the recipe card (with video) below for a full list of ingredients and measurements.

☑️ Tips and Tricks for Perfect Creamy Beef and Shells

  • Brown the beef well: Let the ground beef develop a nice sear before breaking it up—this adds depth and flavor to the sauce.
  • Don’t skip the roux: Cooking the flour with the beef and onion for a minute removes any raw flour taste and ensures a smooth, thick sauce.
  • Add cream off the heat: Stir in the heavy cream after lowering the heat to prevent curdling and keep the sauce silky.
  • Shred your own cheese: Pre‑shredded cheese often contains anti‑caking agents that can make sauces grainy. Freshly shredded cheese melts smoothly.
  • Reserve pasta water: A splash of starchy pasta water can loosen the sauce if it gets too thick.
  • Taste and adjust: Before serving, taste the sauce and adjust salt, pepper, or spices to your liking.

Expert Tip

For the creamiest, smoothest sauce, remove the skillet from direct heat before stirring in the cream and cheese—this prevents curdling and ensures the cheese melts evenly into a velvety finish.

👩🏼‍🍳 How to Make Creamy Beef and Shells

A large skillet filled with cooked ground beef and sautéed onions with a wooden spatula in the meat mixture.
  1. Step 1: Cook the beef and onions in the oil until no longer pink and the onions are tender, about 8 minutes. Discard rendered grease safely.
A person pouring Worcestershire sauce from a small white bowl into a skillet that is filled with cooked ground beef, onions, and small piles of flour, dried herbs, and dry mustard.
  1. Step 2: Stir in the dried herbs, mustard, flour, and Worcestershire sauce. Cook, stirring often, for about 1 minute.
Beef stock being poured from a glass measuring cup into a skillet that is filled with seasoned cooked ground beef and a pile of chopped tomatoes.
  1. Step 3: Stir in the tomatoes and beef stock. Simmer until slightly thickened. Cook the pasta during this time.
A person transferring cooked pasta shells from a pot into a skillet that is filled with a simmering meat and tomato sauce.
  1. Step 4: Drain the pasta and stir it into the meat and tomato sauce.
A person pouring heavy cream from a small glass milk jug into a skillet filled with pasta shells in meat sauce and topped with a pile of shredded cheddar cheese.
  1. Step 5: Stir in the cheese and cream.
A person using a wooden spatula to stir a skillet filled with creamy beef and shells with shredded cheddar cheese beginning to melt as it is being stirred.
  1. Step 6: Remove from the heat and stir until the cheese has melted.

🍽️ Serving Suggestions

  • Garlic Bread: A warm, crusty loaf or easy homemade skillet rolls are perfect for soaking up the rich, cheesy sauce.
  • Green Salad: A crisp side salad with homemade Italian dressing balances the hearty pasta with freshness.
  • Roasted Vegetables: Try broccoli, zucchini, or bell peppers for a colorful, healthy complement.
  • Stewed Green Beans: Lightly seasoned green beans add a simple, classic side.
  • Wine Pairing: A medium‑bodied red like Merlot or Chianti pairs beautifully with the savory beef and creamy sauce.

🙋🏽‍♂️Frequently Asked Questions

Can I make Creamy Beef and Shells ahead of time?

Yes, you can prepare it a day in advance. Store in an airtight container in the fridge and reheat gently on the stovetop with a splash of milk or cream to loosen the sauce.

What type of pasta works best for Creamy Beef and Shells?

Medium pasta shapes like shells, penne, or rotini work well because they hold onto the rich sauce.

Can I freeze Creamy Beef and Shells?

It can be frozen, but the cream sauce may separate slightly when reheated. For best results, freeze without the cream and cheese, then add them fresh when reheating.

How can I make Creamy Beef and Shells lighter?

Swap heavy cream for half‑and‑half or whole milk, use lean ground beef or ground turkey, and reduce the cheese slightly for a lighter dish.

How long will Creamy Beef and Shells last in the fridge?

Stored properly in an airtight container, it will keep for 3–4 days.

An overhead view of a large skillet filled with creamy beef and shells with melty shredded cheddar cheese in the center of the pasta.

😋 More Amazing Weeknight Winner Recipes

  • A skillet filled with one-pot chili mac with a layer of melted cheddar cheese over the the surface with colorful checkered napkins near the pan and two glasses of iced tea nearby.
    One-Pot Chili Mac
  • An overhead view of a large straight-edge stainless steel skillet filled with weeknight stroganoff of a creamy ground beef sauce tossed with egg noodles.
    Weeknight Beef Stroganoff
  • A white bowl filled with a serving of creamy mac and cheese with chicken and broccoli sitting next to a large skillet filled with the same.
    Creamy Mac and Cheese with Chicken and Broccoli
  • A straight-on view of two white bowls filled with Tex-Mex pasta with colorful bell peppers and cilantro sitting nearby.
    Tex-Mex Pasta with Ground Beef

Ready to make the best weeknight dinner in town? Go for it!

And when you do, be sure to take a photo of it, post it on Instagram, and tag @HowToFeedaLoon and hashtag #HowToFeedaLoon!

A close-up view of a white pasta filled with a serving of creamy beef and shells with a red-checkered napkin nearby.
Print Recipe
5 from 3 votes

Creamy Beef and Shells

Creamy Beef and Shells is a hearty pasta dish with tender shells, savory ground beef, and a rich, cheesy tomato cream sauce—comfort food made easy. An instant family favorite!
Prep Time10 minutes mins
Cook Time20 minutes mins
Total Time30 minutes mins
Course: Entree
Cuisine: American
Servings: 4
Calories: 693kcal
Author: Kris Longwell

Equipment

  • 1 Large skillet

Ingredients

  • 1 tablespoon olive oil
  • 1 lb ground beef 85% lean
  • 1 cup onion chopped
  • 1 teaspoon dried oregano
  • 1 teaspoon dried basil
  • 1 teaspoon dry mustard
  • 1 tablespoon Worcestershire sauce
  • 1½ teaspoon Kosher salt
  • 1 teaspoon black pepper
  • 2 tablespoon all-purpose flour
  • 8 oz dried pasta shells about 3 cups
  • 1 15 oz can Ro-tel tomatoes see NOTES
  • 1½ cups beef stock or broth
  • ¾ cup heavy cream
  • 1½ cups cheddar cheese shredded
  • 2 tablespoon Italian parsley chopped, for garnish (optional)

Instructions

  • Bring a pot of salted (1 tbsp) water to a boil.
  • Meanwhile, heat the oil in a large skillet over medium heat. Add the hamburger and onions. Use a wooden spoon or spatula to break up the meat. Cook, stirring often, until the beef is no longer pink and the onions are tender, about 8 minutes. Safely discard most of the rendered grease.
    1 tablespoon olive oil, 1 lb ground beef, 1 cup onion
  • Stir in the oregano, basil, mustard, Worcestershire sauce, salt, pepper, and flour. Cook, stirring often, for 1 to 2 minutes.
    1 teaspoon dried oregano, 1 teaspoon dried basil, 1 teaspoon dry mustard, 1 tablespoon Worcestershire sauce, 1½ teaspoon Kosher salt, 1 teaspoon black pepper, 2 tablespoon all-purpose flour
  • Add the pasta to the boiling water. Stir now and then.
    8 oz dried pasta shells
  • Stir in the tomatoes and beef stock into the meat mixture. Bring to a boil and then lower the heat and simmer until slightly thickened, about 10 minutes (long enough for the pasta to become tender).
    1 15 oz can Ro-tel tomatoes, 1½ cups beef stock
  • Drain the pasta and then stir it into the meat sauce. Taste the sauce and add more salt, if needed.
  • Stir in the heavy cream and cheese. Turn off the heat and stir until the cheese is melted.
    ¾ cup heavy cream, 1½ cups cheddar cheese
  • Serve at once, garnished with chopped parsley, if using.
    2 tablespoon Italian parsley

Video

Notes

NOTE: Watch the video near the top of the recipe for visual guidance.
  • Ro‑Tel Tomatoes: These add a little spice and tang to the sauce. If you can’t find them, use canned tomatoes with green chiles, or substitute with fire‑roasted or plain diced tomatoes.
  • Cheese Tip: Freshly shredded cheddar melts more smoothly than pre‑shredded cheese, which can make sauces grainy.
  • Cream Swap: Heavy cream gives the richest texture, but you can use half‑and‑half or whole milk for a lighter version.
  • Storage & Freezing: Store leftovers in an airtight container in the fridge for up to 3–4 days. To freeze, place cooled pasta in a freezer‑safe container for up to 2 months. For best results, freeze without the cream and cheese, then stir those in fresh when reheating.

Nutrition

Calories: 693kcal | Carbohydrates: 12g | Protein: 34g | Fat: 28g | Saturated Fat: 12g | Polyunsaturated Fat: 2g | Monounsaturated Fat: 8g | Trans Fat: 1g | Cholesterol: 173mg | Sodium: 756mg | Potassium: 672mg | Fiber: 1g | Sugar: 4g | Vitamin A: 1258IU | Vitamin C: 6mg | Calcium: 383mg | Iron: 4mg

Crispy Chicken and Waffles

September 24, 2025 by Kris Longwell 2 Comments

A serving of crispy chicken and waffles resting on a black plated with a fork and a glass mug of coffee nearby.

This Crispy Chicken and Waffles recipe brings together the best of both worlds—juicy, golden fried chicken served over light, fluffy waffles. With its perfect balance of sweet and savory, it’s a comfort food classic that works just as well for brunch as it does for dinner.

A serving of crispy chicken and waffles resting on a black plated with a fork and a glass mug of coffee nearby.
[feast_advanced_jump_to]

🍶 The Ingredients

Made with pantry staples and a touch of Southern charm, this dish uses tangy buttermilk in both the crispy fried chicken and the fluffy waffles for extra flavor and tenderness. Find ingredient notes (including substitutions and variations) below.

An arrangement of ingredients for crispy chicken and waffles on a wooden grey background including chicken, buttermilk, seasonings, flour, eggs, butte, sugar, and vanilla extract.

👉 Substitutions and Variations

Substitutions

  • Chicken: Use bone‑in pieces for extra juiciness, or boneless tenders for quicker cooking.
  • Buttermilk: Make your own by mixing 1 cup milk with 1 tablespoon lemon juice or vinegar.
  • Flour coating: Swap part of the flour with cornstarch or panko for extra crunch.
  • Waffles: Frozen waffles work in a pinch, or use pancake batter if you don’t have a waffle iron.
  • Oil for frying: Peanut oil is classic, but canola or vegetable oil works well, too.

Variations

  • Spicy kick: Add cayenne or hot sauce to the chicken marinade or batter.
  • Savory waffles: Mix in cheddar cheese, chives, or crumbled bacon for a fun twist.
  • Sweet touch: Drizzle with warm maple syrup, honey butter, or even hot honey for extra flavor.
  • Brunch style: Top with a fried egg or a side of perfect scrambled eggs for a hearty meal.
  • Southern flair: Serve with collard greens, mac and cheese, or pickles on the side.

See the recipe card (with video) below for a full list of ingredients and measurements.

Expert Tip

For extra crunch, drizzle a few spoonfuls of the buttermilk marinade into your seasoned flour and toss with a fork to create little clumps—these bits stick to the chicken and fry up into an ultra‑crispy, craggy coating.

👩🏼‍🍳 How to Make Crispy Fried Chicken

A person pouring seasoned buttermilk from a glass measuring cup into a glass bowl filled with pieces of skinless, boneless chicken thighs.
  1. Step 1: Stir together the buttermilk, hot sauce, garlic powder, and salt in a large measuring cup, then pour over the chicken in a bowl.
A person dredging chicken thighs that have been coated with seasoned buttermilk in a square pan filled with seasoned flour.
  1. Step 2: Shake excess buttermilk from the chicken pieces and dredge them in the seasoned flour.
A person using a pair of metal tongs to grip onto a strip of a breaded chicken thigh that is being fried in hot oil in a black cast-iron skillet.
  1. Step 3: Working in batches, fry the chicken pieces in hot peanut oil (or vegetable oil) until golden and crispy.
Several rows of crispy fried chicken thighs resting on a baking rack nestled into a baking pan.
  1. Step 4: Place the fried chicken on a baking rack on a baking sheet while you continue frying. If desired, keep them warm in a low-temp (225°F oven).

🧇 How to Make the Waffles and How to Assemble

A person using a large sieve to sift flour, sugar, and cornmeal into a large glass bowl resting on a wooden cutting board.
  1. Step 1: Sift together the flour, cornmeal, sugar, baking powder, baking soda, and salt.
A person pouring buttermilk from a glass measuring cup into a large glass bowl that is filled with dry waffle ingredients.
  1. Step 2: Combine the buttermilk, melted butter, egg yolks, and vanilla. Mix and then stir into the flour mixture.
A person transferring soft peak egg whites from a metal bowl into a large glass bowl that is filled with buttermilk waffles batter.
  1. Step 3: Beat the egg whites until soft peaks form and then fold them into the batter.
Four freshly prepared waffles resting in a square waffle maker.
  1. Step 4: Cook the waffles according to the manufacturer’s instructions.
A person using a pair of metal tongs to place a crispy fried chicken piece on the top of two buttermilk waffles on a black dinner plate.
  1. Step 5: Plate two waffles and then place two crispy chicken pieces on them.
Maple syrup being poured over the top of a plate filled with crispy chicken and waffles.
  1. Step 6: Drizzle with warm maple syrup and serve at once, with more syrup on the side.

Expert Tip

Keep fried chicken warm and crispy while you make the waffles by placing the pieces on a wire rack set over a baking sheet in a 250°F (120°C) oven. This allows air to circulate, preventing sogginess and keeping the coating crunchy until everything is ready to serve.

🍽️ How To Serve

  • Drizzle generously with warm maple syrup for the classic sweet‑meets‑savory combo.
  • For an autumnal feast, serve the chicken with pumpkin spice waffles.
  • Add a pat of honey butter or hot honey for extra indulgence.
  • Serve with a fried egg on top for a hearty brunch twist.
  • Pair with fresh fruit or a simple green salad to balance the richness.
  • Offer hot sauce on the side for those who like a spicy kick.

🙋🏽‍♂️ Frequently Asked Questions

Can I make Crispy Chicken and Waffles ahead of time?

Yes, you can prepare the waffles in advance and reheat them in the oven, while the chicken is best fried fresh for maximum crunch.

What’s the best oil for frying Crispy Chicken and Waffles?

Neutral oils with a high smoke point, like peanut, canola, or vegetable oil, work best for frying.

Can I make Crispy Chicken and Waffles without a waffle maker?

Yes, you can use pancake batter cooked on a griddle as a substitute, though the texture will differ from waffles.

How do I store leftovers from Crispy Chicken and Waffles?

Keep chicken and waffles in separate airtight containers in the fridge for up to 3 days, and reheat in the oven or air fryer to keep them crisp.

A person pouring maple syrup from a syrup bottle over a serving of crispy chicken and waffles on a black dinner plate.

🌞 More Classic Brunch Recipes

  • A Croque Madame sandwich with a sunny side egg resting on top of it on a black plate.
    Croque Madame
  • A close-up view of an untouched crab cakes egg Benedict with hollandaise flowing over the top of the poached egg and pooling on a white plate.
    Crab Cake Benedict
  • An overhead view of two large black plate filled with breakfast tacos that are stuffed with eggs, chorizo, bacon, potatoes, and sitting next to a bowl of pico de gallo.
    Breakfast Tacos (3 Ways)
  • A serving of huevos rancheros on a black plate garnished with crumbled Cotija cheese and chopped fresh cilantro.
    Authentic Huevos Rancheros

Ready to make the best brunch dish in town? Go for it!

And when you do, be sure to take a photo of it, post it on Instagram, and tag @HowToFeedaLoon and hashtag #HowToFeedaLoon!

A serving of crispy chicken and waffles resting on a black plated with a fork and a glass mug of coffee nearby.
Print Recipe
5 from 1 vote

Crispy Chicken and Waffles

Crispy Chicken and Waffles – A Southern classic that pairs golden, crunchy fried chicken with fluffy buttermilk waffles for the ultimate sweet‑and‑savory comfort food.
Prep Time20 minutes mins
Cook Time30 minutes mins
Marinating time4 hours hrs
Total Time4 hours hrs 50 minutes mins
Course: Breakfast / Brunch
Cuisine: American Southern
Servings: 4
Calories: 1100kcal
Author: Kris Longwell

Equipment

  • Large skillet for frying Preferably 12-inches
  • 1 waffle iron

Ingredients

For the Crispy Chicken Marinade

  • 2½ lbs chicken thighs boneless, skinless
  • 2 cups buttermilk
  • 2 tablespoon hot sauce
  • 2 teaspoon garlic powder
  • 2 teaspoon Kosher salt

For the Breading and Frying

  • vegetable oil for frying, or peanut oil
  • 1½ cups all-purpose flour
  • 1 tablespoon cornstarch
  • 1 teaspoon garlic powder
  • 2 teaspoon chili powder
  • 1½ teaspoon Kosher salt
  • 1 teaspoon black pepper

For the Buttermilk Waffles and Serving

  • 2 cups all-purpose flour
  • 1 tablespoon yellow cornmeal
  • 4 tablespoon sugar
  • 1 tablespoon baking powder
  • 1 teaspoon baking soda
  • ½ teaspoon salt regular table salt
  • 2½ cups buttermilk
  • 6 tablespoon unsalted butter melted
  • 3 eggs yolks save the whites
  • 1 teaspoon vanilla extract
  • 3 egg whites
  • Cooking spray
  • Maple syrup 100% pure, warmed

Instructions

Prepare the Crispy Chicken

  • Trim excess fat from the chicken thighs. If desired, cut the thighs in half (this makes them the ideal size for serving on top of the waffles). Place in a large bowl.
    2½ lbs chicken thighs
  • In a medium bowl or measuring cup, mix the buttermilk, hot sauce, garlic powder, and salt. Pour over the chicken and make sure all pieces of chicken are coated with the marinade. Cover with plastic wrap and refrigerate for 1 hour, or even better, overnight.
    2 cups buttermilk, 2 tablespoon hot sauce, 2 teaspoon garlic powder, 2 teaspoon Kosher salt
  • Add enough oil to a large sturdy skillet to fill it just over halfway. Heat the oil to 340°F. Preheat oven to 225°F.
    vegetable oil
  • In a medium-sized bowl or platter, stir together the flour, cornstarch, garlic powder, chili powder, salt, and pepper. Add 5 tablespoons of the chicken marinade to the flour mixture and gently stir until incorporated. There should be clumps that have formed from the marinade in the flour.
    1½ cups all-purpose flour, 1 tablespoon cornstarch, 1 teaspoon garlic powder, 2 teaspoon chili powder, 1½ teaspoon Kosher salt, 1 teaspoon black pepper
  • Working one chicken thigh at a time, remove the chicken from the marinade, and shake the excess off. Place the thigh in the flour mixture, and turn it several times to fully coat the chicken. Place on a baking rack on a baking sheet and continue with the remaining chicken thighs.
  • Working in batches, carefully place the breaded cutlets into the hot oil. Do not overcrowd the pan! Fry until golden brown and very crispy, using metal tongs to carefully flip the cutlets occasionally until the internal temperature is 165°F. Remove from the oil and place on a clean baking rack over a baking pan.
  • Continue with the remaining chicken thighs. Keep the fried chicken thighs in the oven until ready to serve.

Prepare the Waffles and Assemble the Dish

  • Heat your waffle maker to the desired setting.
  • In a bowl, sift together the flour, cornmeal, sugar, baking powder, baking soda, and salt.
    2 cups all-purpose flour, 1 tablespoon yellow cornmeal, 4 tablespoon sugar, 1 tablespoon baking powder, 1 teaspoon baking soda, ½ teaspoon salt
  • In a separate bowl, combine the buttermilk, melted butter, egg yolks, and vanilla extract and whisk to combine.
    2½ cups buttermilk, 6 tablespoon unsalted butter, 3 eggs yolks, 1 teaspoon vanilla extract
  • Add the liquid ingredients to the dry and whisk or stir with a spoon until combined. The batter will be somewhat lumpy.
  • Place the egg whites in a bowl and use a hand mixer at high speed to beat the egg whites until soft peaks form.
    3 egg whites
  • Gently fold the egg whites into the batter. Continue working them into the batter until large chunks of white are no longer visible.
  • Spray your waffle maker with cooking spray and follow the manufacturer's instructions for cooking waffles. Carefully transfer the cooked waffles to a platter and cover with foil to keep them warm. Continue this process with the remaining batter.
    Cooking spray
  • Place two waffles on each plate and then top with one or two pieces of chicken. Drizzle warm maple syrup over the top and serve at once with additional syrup passed at the table.
    Maple syrup

Video

Notes

NOTE: Watch the video near the top of the recipe for visual guidance.
  • Make Ahead: Waffles can be made in advance and kept warm in a 200°F oven, while chicken is best fried fresh for maximum crunch.
  • Substitutions: No buttermilk? Mix milk with a splash of lemon juice or vinegar. Frozen waffles or pancake batter can work in a pinch.
  • Storage & Reheating: Store chicken and waffles separately in the fridge for up to 3 days. Reheat chicken in the oven or air fryer to keep it crispy, and waffles in the toaster or oven.

Nutrition

Calories: 1100kcal | Carbohydrates: 118g | Protein: 72g | Fat: 36g | Saturated Fat: 11g | Polyunsaturated Fat: 8g | Monounsaturated Fat: 6g | Trans Fat: 1g | Cholesterol: 498mg | Sodium: 892mg | Potassium: 1495mg | Fiber: 4g | Sugar: 26g | Vitamin A: 1696IU | Vitamin C: 5mg | Calcium: 513mg | Iron: 8mg

Classic Steak Diane

September 21, 2025 by Kris Longwell 2 Comments

A serving of Classic Steak Diane on a white dinner plate with sautéed mushrooms on top of the filet as well as a brown sauce surrounding the steak and next to roasted asparagus.

This Classic Steak Diane is a retro favorite that brings old‑school restaurant elegance right to your table. Traditionally prepared tableside in the mid‑20th century, it features tender seared steak topped with a luxurious pan sauce made with brandy, mustard, cream, and fresh herbs.

A serving of Classic Steak Diane on a white dinner plate with sautéed mushrooms on top of the filet as well as a brown sauce surrounding the steak and next to roasted asparagus.
[feast_advanced_jump_to]

🥩 The Ingredients

Tender steak, rich cream, sharp mustard, and a splash of brandy come together with fresh herbs to create the bold, savory flavors of Classic Steak Diane. Find ingredient notes (including substitutions and variations) below.

An arrangement of ingredients for Classic Steak Diane on a grey wooden background including filet mignon steaks, mushrooms, Dijon mustard, cream, beef stock, butter, brandy, garlic, a shallot, and parsley.

👉 Substitutions and Variations

  • Steak: Traditionally made with beef tenderloin or filet mignon for tenderness. Ribeye, strip steak, or even sirloin can be used for a more budget‑friendly option.
  • Butter: Adds richness and depth to the sauce. Olive oil or ghee can be used as lighter alternatives.
  • Shallots/Onion: Provide a sweet, aromatic base. Substitute with finely minced onion or even green onions in a pinch.
  • Mushrooms: Often included for earthy depth and texture. Cremini or button mushrooms are classic; shiitake or portobello add bolder flavor.
  • Brandy/Cognac: Essential for the classic flambé effect and deep flavor. Substitute with sherry, Marsala, or even bourbon if brandy isn’t available.
  • Dijon Mustard: Adds tangy sharpness. Spicy brown mustard or whole‑grain mustard can be used for a slightly different flavor.
  • Worcestershire Sauce: Brings umami depth. Soy sauce or tamari can be used as substitutes.
  • Heavy Cream: Creates a silky, rich sauce. Half‑and‑half or crème fraîche are good alternatives.
  • Beef Stock: Rounds out the sauce—chicken stock can be used as a substitute in a pinch.

✨ Variations:

  • Make it lighter by swapping cream with Greek yogurt (stirred in off heat to prevent curdling).
  • Try a peppercorn variation by adding crushed black peppercorns for a “Steak au Poivre” style sauce.
  • For a modern twist, serve the sauce over chicken, pork chops, or even roasted vegetables.

☑️ Tips and Tricks for Perfect Classic Steak Diane

  • Flambé safely: Always remove the pan from direct heat before adding brandy or cognac, then carefully ignite with a long lighter. Keep a lid nearby to smother the flame if needed.
  • Don’t overcook the steak: Sear quickly over high heat for a golden crust while keeping the center tender. Medium‑rare to medium is traditional for Steak Diane.
  • Use room‑temperature steak: Let the meat sit out for 20–30 minutes before cooking—this ensures even cooking and better browning.
  • Slice mushrooms evenly: Uniform slices help them cook at the same rate and develop a rich, golden flavor.
  • Deglaze properly: Scrape up the browned bits after adding brandy or stock—those caramelized bits are key to the sauce’s depth.
  • Finish with fresh herbs: Add parsley, chives, or thyme at the end for brightness and a restaurant‑quality finish.

Expert Tip

When working with extra‑thick steaks, use a meat thermometer to ensure the perfect doneness. After searing, let the steaks gently simmer—or even braise—in the sauce until they reach the correct internal temperature. If the sauce reduces too quickly, add a splash of beef broth to maintain the right consistency while the steak finishes cooking.

👩🏼‍🍳 How to Make Classic Steak Diane

A person using his fingers to sprinkle ground black pepper over the tops of two uncooked filet mignon steaks on brown paper.
  1. Step 1: Allow the steaks to rest at room temperature for 15 minutes, and then season them with salt and pepper.
Two large filet mignon steaks being seared in a large black cast-iron skillet filled with shimmering melted lard.
  1. Step 2: Melt lard or butter in a large skillet over medium heat, and cook the steaks until an internal temperature of 120°F is reached (you’ll finish cooking them in the sauce).
A person using a wooden spatula to stir boiling beef stock in a black cast-iron skillet on a gas stove.
  1. Step 3: Remove the steaks and add the beef stock to the hot skillet. Simmer for 10 minutes, until reduced in half.
A person using a wooden spatula to stir sliced mushrooms and chopped garlic that are being sautéed in butter in a large black cast-iron skillet.
  1. Step 4: Pour the reduced stock into a heatproof bowl, then melt the butter and sauté the shallots, garlic, and mushrooms.
A large cast-iron skillet on a gas stove with a large flame filling much of the skillet as the mushrooms in the skillet are being flambéed.
  1. Step 5: Carefully add the Cognac (or brandy), stand back, and use a long match (or lighter) to flambé.
An overhead view of two filets of Classic Steak Diane in a cast-iron skillet that consists of seared filet mignon and sautéed mushrooms in a brown sauce.
  1. Step 6: Return the steak and stock to the pan and simmer until an internal temperature of 135°F (medium-rare) to 145°F (medium) is reached.

🥗 What to Serve with Classic Steak Diane

  • Potatoes: Creamy mashed potatoes, roasted baby potatoes, or crispy fries soak up the rich sauce beautifully.
  • Vegetables: Steamed asparagus, Southern-style green beans, or roasted Brussels sprouts add freshness and balance.
  • Rice or Pasta: Buttered noodles or fluffy rice make a simple, neutral base for the flavorful sauce.
  • Salads: A crisp green salad with a light vinaigrette helps cut through the richness.
  • Bread: Warm crusty bread or skillet dinner rolls are perfect for mopping up every drop of sauce.
  • Wine Pairing: A bold red wine like Cabernet Sauvignon or a silky Pinot Noir complements the dish’s depth.

🙋🏽‍♂️ Frequently Asked Questions

Why is it called Classic Steak Diane?

The dish is believed to be named after Diana, the Roman goddess of the hunt, with the rich, game‑inspired sauce originally paired with venison before becoming a classic accompaniment to steak.

Can I make Classic Steak Diane without flambéing?

Yes, you can simply let the alcohol cook down in the pan until reduced; the sauce will still be flavorful without igniting it.

Can Classic Steak Diane be made without alcohol?

Yes, simply replace the brandy or cognac with extra beef broth or a splash of Worcestershire sauce—the sauce will still be rich and flavorful without the alcohol.

Can I prepare Classic Steak Diane ahead of time?

It’s best served fresh, but you can prep the sauce ingredients in advance and quickly cook the steak and sauce just before serving.

A serving spoon pouring a mushroom brown gravy sauce of a fully cooked filet mignon in a cast-iron skillet that is filled with classic steak Diane.

😋 More Classic Steak Recipes

  • Steak au Poivre on a white plate with a fork nearby.
    Steak au Poivre
  • A white plate holding a filet mignon with classic Bordelaise sauce and a side of roasted asparagus.
    Filet Mignon with Classic Bordelaise Sauce
  • A straight-on view of a ribeye steak that has about half of it cut into sliced and is topped with a creamy gorgonzola sauce and served with roasted potatoes and green beans.
    Reverse-Sear Ribeye with Gorgonzola Sauce
  • An overhead view of bistecca alla fiorentina that has been cut into slices, topped with sautéed herbs and surrounded by roasted balsamic potatoes.
    Bistecca alla Fiorentina (Italian Porterhouse)

Ready to make the best steakhouse dinner in town? Go for it!

And when you do, be sure to take a photo of it, post it on Instagram, and tag @HowToFeedaLoon and hashtag #HowToFeedaLoon!

A serving of Classic Steak Diane on a white dinner plate with sautéed mushrooms on top of the filet as well as a brown sauce surrounding the steak and next to roasted asparagus.
Print Recipe
5 from 1 vote

Classic Steak Diane

Classic Steak Diane – Tender steak topped with a rich, creamy brandy‑mustard sauce, a timeless dish that’s elegant yet easy to make at home.
Prep Time15 minutes mins
Cook Time30 minutes mins
Total Time45 minutes mins
Course: Entree
Cuisine: American
Servings: 4
Calories: 325kcal
Author: Kris Longwell

Equipment

  • 1 large skillet (12") cast-iron works well
  • long stick match or a long flame lighter

Ingredients

  • 4 6 oz filet mignons
  • salt and pepper
  • 2 tablespoon lard or vegetable oil
  • 1¾ cups beef stock
  • 3 tablespoon unsalted butter
  • 1 shallot finely chopped
  • 2 teaspoon garlic minced
  • 8 oz mushrooms sliced
  • ⅓ cup brandy or Cognac
  • ¼ cup heavy cream
  • 1 tablespoon Dijon mustard
  • 1 tablespoon Worcestershire sauce
  • 2 tablespoon Italian parsley fresh, finely chopped

Instructions

  • Season steaks with salt and pepper. If you have time, let them rest for 15 minutes at room temperature.
    4 6 oz filet mignons, salt and pepper
  • Melt the lard (or oil) over medium-high heat in a large skillet, preferably cast-iron.
    2 tablespoon lard
  • Add the steaks, and cook, turning often, until browned on the exterior and an internal temperature of 125°F is reached (it will continue cooking in the sauce).
  • Remove the steaks. Add the beef stock to the skillet and turn the heat to high. Simmer until reduced by about half, usually around 10 minutes. Transfer the reduced stock to a heatproof bowl.
    1¾ cups beef stock
  • In the same skillet, over medium heat, melt the butter. Add the shallots and sauté until soft, about 3 minutes. Add the garlic and sauté another 30 seconds. Add the mushrooms and sauté, stirring often, until they are soft and beginning to release their liquid, about 4 to 5 minutes.
    3 tablespoon unsalted butter, 1 shallot, 2 teaspoon garlic, 8 oz mushrooms
  • Stand back, and carefully pour in the brandy (or Cognac). Use a long match or a long flame lighter to flambé the mushrooms (stand back!). Once the flames die down, stir in the reduced stock, heavy cream, Dijon, and Worcestershire sauce. Bring to a slight simmer and nestle the steaks into the sauce.
    ⅓ cup brandy, ¼ cup heavy cream, 1 tablespoon Dijon mustard, 1 tablespoon Worcestershire sauce
  • Allow the steaks to simmer in the sauce, flipping from time to time, until the desired internal temperature is reached (130°F to 135°F for medium-rare and 140°F to 145°F for medium).
  • Plate the steaks and pour the mushroom sauce over them. Garnish with chopped parsley and serve at once with extra sauce passed at the table.
    2 tablespoon Italian parsley

Video

Notes

NOTE: Watch the video near the top of the recipe for visual guidance.
  • Steak Options: Filet mignon is traditional, but ribeye, strip steak, or sirloin can also be used with excellent results.
  • Alcohol-Free Version: Skip the flambé and replace the brandy with extra beef broth or a splash of Worcestershire sauce.
  • Make Ahead: Prep the sauce ingredients in advance, but cook the steak and finish the sauce just before serving for the best flavor and texture.
  • Storage & Reheating: Store leftovers in an airtight container in the fridge for up to 3 days. Reheat gently in a skillet over low heat with a splash of broth or cream to keep the sauce silky and prevent the steak from drying out.

Nutrition

Calories: 325kcal | Carbohydrates: 7g | Protein: 5g | Fat: 18g | Saturated Fat: 9g | Polyunsaturated Fat: 1g | Monounsaturated Fat: 4g | Trans Fat: 0.3g | Cholesterol: 39mg | Sodium: 316mg | Potassium: 485mg | Fiber: 1g | Sugar: 3g | Vitamin A: 1027IU | Vitamin C: 8mg | Calcium: 54mg | Iron: 1mg

Gooey Butter Cake

September 17, 2025 by Kris Longwell 2 Comments

A person holding a square piece of a Gooey Butter Cake that has been dusted with powdered sugar and is near other cut squares of the cake.

Get ready to fall in love with Gooey Butter Cake—a St. Louis favorite that’s sweet, buttery, and deliciously ooey‑gooey in the center. With its golden crust and melt‑in‑your‑mouth texture, this nostalgic treat is guaranteed to disappear fast at any gathering. Serve it with homemade vanilla ice cream for the ultimate sweet treat!

A person holding a square piece of a Gooey Butter Cake that has been dusted with powdered sugar and is near other cut squares of the cake.
[feast_advanced_jump_to]

🧈 The Ingredients

Made with simple, pantry‑friendly staples like butter, sugar, eggs, and flour, Gooey Butter Cake comes together easily without any special trips to the store. Find ingredient notes (including substitutions and variations) below.

An arrangement of ingredients for Gooey Butter Cake on a grey wooden background including flour, eggs, sugar, butter, vanilla, baking powder, salt, and cream cheese.

👉 Substitutions and Variations

  • Butter: The star of the recipe—use unsalted for better control of flavor. Salted butter works too; reduce the added salt.
  • Sugar: Granulated sugar is classic; swap with light brown sugar for a deeper, caramel‑like sweetness.
  • Eggs: Provide structure and richness—large eggs are standard. For an egg‑free version, try a flax egg or commercial egg replacer.
  • Flour: All‑purpose flour is traditional; substitute with a 1:1 gluten‑free flour blend if needed.
  • Cream cheese: Adds tang and creaminess to the gooey layer. Neufchâtel cheese works as a lighter option.
  • Vanilla extract: Enhances flavor—almond extract or a splash of bourbon can be used for a fun twist.
  • Powdered sugar: Sweetens the topping and creates that signature gooey texture. For less sweetness, reduce slightly or mix with cocoa powder for a chocolate variation.

✨ Variations:

  • Add a swirl of fruit preserves (raspberry, strawberry, or apricot) before baking for a fruity twist.
  • Mix in chocolate chips or chopped nuts for extra texture.
  • Dust with powdered sugar after baking for a simple finish, or drizzle with caramel for added indulgence.

See the recipe card (with video) below for a full list of ingredients and measurements.

⭐️ Tips and Tricks for Perfect Gooey Butter Cake

  • Don’t overbake: The center should still look slightly soft and jiggly when you pull it from the oven—it firms up as it cools while staying gooey.
  • Room‑temperature ingredients: Soften butter and cream cheese before mixing for a smooth, lump‑free batter.
  • Grease the dish: Use parchment paper or lightly grease the pan to make removing and slicing the cake easier.
  • Cool before cutting: Let the cake cool at least 30 minutes so it sets properly and slices cleanly.
  • Flavor boost: A pinch of salt or a splash of almond extract can enhance the sweetness and add depth.

Expert Tip

For the perfect gooey texture, bake until the edges are set and the top is a light golden color while the center still has a slight jiggle—any longer and the filling will turn more cakey than creamy.

👩🏼‍🍳 How to Prep a Gooey Butter Cake

A person using a whisk to mix flour, salt, and baking powder in a glass bowl on a wooden cutting board.
  1. Step 1: Whisk together the flour, baking powder, and salt.
A person using a white spatula to scrape down creamed butter and sugar from the inside of a mixer bowl.
  1. Step 2: In a stand mixer, or with a hand-mixer, cream (beat) the butter with the sugar until fluffy.
A person holding a small white bowl that is filled with a whole egg over a stand mixer filled with creamed butter and sugar.
  1. Step 3: Beat in the eggs, one at a time.
A person holding a small silver bowl filled with a teaspoon of vanilla extract over the bowl of a stand mixer that is filled with creamed butter and sugar.
  1. Step 4: Next, beat in the vanilla extract.
A person transferring all-purpose flour from a glass bowl into the bowl of a stand mixer that is mixing creamed butter and sugar.
  1. Step 5: Slowly beat in the flour mixture until fully combined and the dough is formed.
A person using a paper towel to spread softened butter all over the inside of a white 9 by 13 inch baking dish.
  1. Step 6: Liberally grease the baking dish with softened butter and a paper towel.

👨‍🍳 How to Bake a Gooey Butter Cake

A person using his hand to press dough into the base of a white 9 by 13 inch baking dish.
  1. Step 1: Transfer the crust dough into the dish and press with your fingers until it is smooth and compact.
A white spatula resting in a stand-mixer bowl that is filled with softened cream cheese, eggs, and vanilla extract.
  1. Step 2: Clean the mixer bowl, and then beat together the cream cheese, eggs, and vanilla extract.
A person transferring powdered sugar from a glass bowl into a mixer that is beating a cream cheese mixture in the mixer bowl.
  1. Step 3: Slowly beat in the powdered sugar until smooth.
A person pouring a cream cheese mixture over an uncooked crust in a white 9 by 13 inch baking dish.
  1. Step 4: Pour the topping over the crust dough and spread evenly with a spatula.
An overhead view of a fully baked Gooey Butter Cake in a white 9 by 13 inch baking dish resting on a baking rack.
  1. Step 5: Bake at 350°F until browned and jiggly in the center. Cool on a baking rack.
A person using a small sifter to dust powdered sugar over squares of Gooey Butter Cake resting on brown paper.
  1. Step 6: Cut into squares and dust with powdered sugar.

🍽️ How To Serve

  • Dust with powdered sugar for a simple, classic finish.
  • Serve warm with a scoop of vanilla ice cream.
  • Pair with fresh berries for a sweet‑tart contrast.
  • Cut into small squares for potlucks, parties, or holiday trays.

🙋🏽‍♂️ Frequently Asked Questions

Can I make Gooey Butter Cake ahead of time?

Yes, it keeps well at room temperature for a day or two, or you can refrigerate it and reheat gently before serving.

How long does Gooey Butter Cake last?

Stored in an airtight container, it will keep for up to 4–5 days in the fridge, or up to 2 months in the freezer.

Can I add flavors to Gooey Butter Cake?

Absolutely—try adding chocolate chips, nuts, or fruit preserves to the filling, or use a flavored cake mix for a fun twist.

How do I make Gooey Butter Cake gluten-free?

Simply swap the all‑purpose flour or cake mix with a 1:1 gluten‑free baking blend. The texture stays soft and gooey, and no one will miss the gluten.

A person using a small sifter to dust powdered sugar over squares of Gooey Butter Cake resting on brown paper.

😋 Other Awesome Sweet Treat Recipes

  • Four blondies with vanilla chips and toffee stacked on top of each other on a piece of white parchment paper.
    Best-Ever Blondies
  • Four stacked fudge brownies on parchment paper with crumbs scattered nearby.
    Ultimate Fudge Brownies
  • Two rows of square raspberry Linzer bars sitting on parchment paper with a vanilla glazed drizzled over the top.
    Raspberry Linzer Bars
  • A small white plate holding 2 homemade blueberry pop tarts, one that is split open on top, sitting next to a glass of milk.
    Homemade Blueberry Pop Tarts

Ready to make the best sweet treat in town? Go for it!

And when you do, be sure to take a photo of it, post it on Instagram, and tag @HowToFeedaLoon and hashtag #HowToFeedaLoon!

A person holding a square piece of a Gooey Butter Cake that has been dusted with powdered sugar and is near other cut squares of the cake.
Print Recipe
5 from 1 vote

Gooey Butter Cake

Gooey Butter Cake – A rich St. Louis classic with a golden crust and irresistibly gooey, buttery center that melts in your mouth.
Prep Time15 minutes mins
Cook Time40 minutes mins
Resting time1 hour hr
Total Time1 hour hr 55 minutes mins
Course: Dessert / Snack
Cuisine: American / St. Louis
Servings: 8
Calories: 725kcal
Author: Kris Longwell

Equipment

  • Stand mixer or hand mixer
  • 1 9×13-inch baking dish

Ingredients

For the Crust (Bottom Layer)

  • 2½ cups all-purpose flour
  • 1 tablespoon baking powder
  • ½ teaspoon salt
  • 8 tablespoon unsalted butter room temperature, plus extra for greasing the dish
  • 1¾ cup sugar
  • 2 large eggs room temperature
  • 1 teaspoon vanilla extract

For the Cream Cheese Topping

  • 8 oz cream cheese room temperature
  • 2 large eggs room temperature
  • 1 teaspoon vanilla extract
  • 3 cups powdered sugar plus extra for dusting

Instructions

  • Preheat oven to 350°F.
  • In a medium bowl, mix the flour, baking powder, and salt. Set aside.
    2½ cups all-purpose flour, 1 tablespoon baking powder, ½ teaspoon salt
  • Use a stand mixer (or hand mixer) to beat (on medium) the butter with the sugar until pale and light, about 4 minutes.
    8 tablespoon unsalted butter, 1¾ cup sugar
  • Beat in the eggs, one at a time, until just combined. Beat in the vanilla.
    2 large eggs, 1 teaspoon vanilla extract
  • Slowly beat in the flour mixture until fully incorporated.
  • Grease a 9×13-inch baking dish with softened butter or cooking spray. Transfer the crust dough to the dish and press it down with your fingers (or the bottom of a measuring cup), until compact and smooth.
  • Clean out the bowl of the mixer and the beat together the softened cream cheese, eggs, and vanilla until smooth.
    8 oz cream cheese, 2 large eggs, 1 teaspoon vanilla extract
  • Slowly beat in the powdered sugar until fully incorporated. Scraping down the sides as necessary.
    3 cups powdered sugar
  • Pour the cream cheese mixture of the crust dough and use a spatula to evenly spread it to the sides of the dish.
  • Bake until golden on top and the sides are lightly browned. The center should be slightly "jiggly," usually 35 to 40 minutes. Let cool for at least 1 hour.
  • Use a sieve to dust the top of the cake with powdered sugar. Cut into squares and serve at once, or store in an air-tight container for up to 2 days on the counter or 4 to 5 days in the refrigerator.

Video

Notes

NOTE: Watch the video near the top of the recipe for visual guidance.
  • Make Ahead: This cake tastes even better the next day—bake, cool, and cover tightly at room temperature or refrigerate overnight.
  • Substitutions: Use a gluten‑free flour blend or cake mix for a gluten‑free version, or swap cream cheese with Neufchâtel for a lighter option.
  • Storage: Keep in an airtight container at room temperature for 1–2 days, refrigerate up to 5 days, or freeze for up to 2 months.
 

Nutrition

Calories: 725kcal | Carbohydrates: 121g | Protein: 9g | Fat: 24g | Saturated Fat: 14g | Polyunsaturated Fat: 1g | Monounsaturated Fat: 6g | Trans Fat: 0.5g | Cholesterol: 152mg | Sodium: 275mg | Potassium: 272mg | Fiber: 1g | Sugar: 89g | Vitamin A: 866IU | Calcium: 117mg | Iron: 2mg

Chicken and Biscuits Casserole

September 14, 2025 by Kris Longwell 5 Comments

A white casserole dish filled with a freshly baked chicken and biscuits casserole.

This Chicken and Biscuits Casserole is comfort food at its finest, combining two timeless classics in one cozy dish. The filling is rich and creamy, just like a traditional chicken pot pie, loaded with tender chicken and hearty vegetables. On top, golden Southern buttermilk biscuits bake up light, fluffy, and buttery, creating the perfect balance of savory, creamy, and comforting in every bite.

A white casserole dish filled with a freshly baked chicken and biscuits casserole.
[feast_advanced_jump_to]

🥕 The Ingredients

Juicy chicken, garden veggies, and a creamy pot pie filling get crowned with golden buttermilk biscuits for the ultimate homestyle comfort dish. Find ingredient notes (including substitutions and variations) below.

An arrangement of ingredients for chicken and biscuits casseroles on a wooden grey background including chicken breast, broth, flour, buttermilk, butter, butter, and seasonings.

👉 Substitutions and Variations

Substitutions

  • Chicken: Use leftover rotisserie chicken, turkey, or even cooked ham.
  • Vegetables: Swap the classic peas and carrots with green beans, corn, or mushrooms.
  • Biscuits: Use store‑bought biscuits for a shortcut, or puff pastry for a flaky twist.
  • Cream base: Replace with cream of mushroom or cream of celery soup if preferred. But, only in a pinch.
  • Buttermilk: Make a quick substitute by mixing milk with a splash of lemon juice or vinegar.

Variations

  • Cheesy topping: Sprinkle shredded cheddar or Parmesan over the biscuits before baking.
  • Herb lovers: Add fresh thyme, rosemary, or parsley to the filling for an extra burst of flavor.
  • Spicy kick: Stir in a pinch of cayenne or red pepper flakes.
  • Vegetarian version: Skip the chicken and use extra veggies or white beans for protein.
  • Individual servings: Bake in ramekins for personal pot pie–style portions.

See the recipe card (with video) below for a full list of ingredients and measurements.

Expert Tip

For the perfect balance of creamy filling and fluffy biscuits, make sure the filling is hot before adding the biscuit dough—this jump‑starts the baking process, ensuring the bottoms cook through without getting soggy.

☑️ Tips and Tricks for Perfect Chicken and Biscuits Casserole

  • Don’t overbake: Keep an eye on the biscuits—cover loosely with foil if they brown too quickly while the filling finishes bubbling.
  • Keep biscuits fluffy: Handle biscuit dough gently and avoid over‑mixing to ensure a tender, light texture.
  • Use warm filling: Add the biscuits on top of hot filling so they start baking immediately and cook through evenly.
  • Shortcut option: Store‑bought rotisserie chicken and frozen veggies make this casserole quick and easy without sacrificing flavor.
  • Make ahead: Assemble the filling a day in advance, then top with biscuits and bake just before serving.

🍽️ How To Serve

  • Serve hot straight from the oven with a sprinkle of fresh parsley for color.
  • Pair with a crisp green salad to balance the rich, creamy filling.
  • Add roasted or steamed vegetables, like green beans or broccoli, for extra freshness.
  • Offer cranberry sauce or chutney on the side for a sweet‑tangy contrast.
  • Enjoy leftovers for lunch the next day—just reheat gently to keep the biscuits tender.

👩🏼‍🍳 How to Make the Filling

A person using his fingers to sprinkle black pepper over the top of an uncooked chicken breast that is resting on a baking rack in a baking sheet.
  1. Step 1: Rub the chicken breasts with oil and then season with salt and pepper on a baking rack in a baking sheet.
A person using a chef's knife to cube a cooked piece of chicken breast on a large cutting board.
  1. Step 2: Roast the chicken at 350°F until an internal temp of 165°F is reached. When cool enough to handle, cut the meat into bite-sized pieces.
A person dumping all-purpose flour from a small white bowl into a pot that is filled with sautéed onions, carrot slices, and chopped onions.
  1. Step 3: In a large pot, sauté the onions, carrots, and mushrooms until soft. Sprinkle on the flour and cook, stirring often, for 1 minute.
A person using a ladle to transfer chicken broth into a pot filled with sautéd vegetables that have been cooked with flour to create a roux.
  1. Step 4: Whisk in the warm chicken broth.
A person pouring heavy cream from glass measuring cup into a white pot that is filled with a brown gravy with sautéd mushrooms and vegetables.
  1. Step 5: Season with salt and pepper and then stir in the heavy cream.
A person transferring cooked pieces of chicken from a bowl in one hand and another hand transferring peas into a pot filled with a simmering chicken pot pie filling.
  1. Step 6: Stir in the chicken, parsley, and peas. Simmer until slightly thickened.

Expert Tip

Using homemade chicken stock instead of store‑bought elevates the casserole’s flavor, adding a rich, savory depth that makes the creamy filling taste more comforting and wholesome.

👨‍🍳 How to Make Chicken and Biscuits Casserole

A person using a metal bench scraper to transfer grated butter into a glass bowl filled with self-rising flour.
  1. Step 1: Add the grated butter into a bowl filled with the self-rising flour.
A person pouring buttermilk from a glass measuring cup into a glass bowl filled with self-rising flour that has been mixed with chilled shredded butter.
  1. Step 2: Mix in the buttermilk and stir until cohesive.
A person using a metal cookie cutter to cut into a rectangle square of biscuit dough on a black marble counter that has been lightly floured.
  1. Step 3: Use a cookie/biscuit cutter to cut the biscuits.
A person pouring chicken pot pie filling into a 9 by 13 white baking dish.
  1. Step 4: Spread the warm filling into a 9×13″ baking dish.
A person placing uncooked buttermilk biscuits over the top of chicken pot pie filling in a 9 by 13 white baking dish.
  1. Step 5: Place the biscuits over the filling.
A person using a blue pastry brush to apply melted butter over the top of a biscuit that in a freshly baked chicken and biscuits casserole.
  1. Step 6: Brush the biscuits with melted butter and then bake until golden. Brush once again with melted butter.

🙋🏽‍♂️ Frequently Asked Questions

Can I make Chicken and Biscuits Casserole ahead of time?

Yes, you can prepare the filling a day in advance, then add the biscuits and bake just before serving for the freshest results.

How do I store leftovers from Chicken and Biscuits Casserole?

Store leftovers in an airtight container in the refrigerator for up to 3 days. Reheat gently in the oven to keep the biscuits tender.

Can I freeze Chicken and Biscuits Casserole?

Yes, assemble the filling and freeze it without the biscuits. When ready to serve, thaw and reheat the filling, then top with fresh biscuit dough and bake.

What can I serve with Chicken and Biscuits Casserole?

It pairs beautifully with a crisp chopped salad, roasted veggies, or something light and fresh to balance the rich, creamy filling.

A half-eaten biscuit from a white bowl filled with a serving of chicken and biscuits casserole with a fork resting in the bowl.

😋 Other Comforting Casseroles

  • King Ranch casserole in a large cast iron skillet with a spoon in it all next to festive napkins.
    King Ranch Chicken Casserole
  • An overhead view of an oval baking dish filled with Sloppy Joe Casserole that is topped with a golden brown puff pastry and part of the casserole is gone and a spoon in the dish.
    Sloppy Joe Casserole
  • An overhead view of a person using two grey napkins to hold an oval baking dish that is filled with a freshly baked cheesy ham and potato casserole.
    Cheesy Ham and Potato Casserole
  • A straight-on view of a 9-inch by 13-inch white casserole dish that is filled with the best breakfast casserole with a portion of it missing and revealing the filling of the dish.
    Best Breakfast Casserole

Ready to make the most comforting casserole in town? Go for it!

And when you do, be sure to take a photo of it, post it on Instagram, and tag @HowToFeedaLoon and hashtag #HowToFeedaLoon!

A white bowl filled with an untouched serving of chicken and biscuits with a glass of iced tea just behind the bowl.
Print Recipe
5 from 3 votes

Chicken and Biscuits Casserole

Chicken and Biscuits Casserole is a cozy classic with creamy chicken pot pie filling topped with fluffy Southern buttermilk biscuits for the ultimate comfort food.
Prep Time30 minutes mins
Cook Time1 hour hr
Resting time10 minutes mins
Total Time1 hour hr 40 minutes mins
Course: Entree
Cuisine: American Southern
Servings: 6
Calories: 672kcal
Author: Kris Longwell

Equipment

  • biscuit cutter 3¼-inch
  • 9×13-inch baking dish

Ingredients

For the Filling

  • 5 cups chicken broth See NOTES
  • 2 chicken bouillon cubes
  • 3 cups chicken roasted, cut into bite-sized pieces
  • 6 tablespoon unsalted butter
  • 1 cup onion chopped
  • 1 cup carrots thinly sliced
  • 8 oz mushrooms sliced
  • ½ cup all-purpose flour
  • ½ cup heavy cream
  • ½ cup sweet peas frozen
  • ¼ cup Italian parsley fresh, chopped, plus extra for garnish
  • 1½ teaspoon Kosher salt
  • 1 teaspoon black pepper

For the Biscuits

  • ½ cup unsalted butter 1 stick
  • 2¼ cups self-rising flour preferably Lily's
  • 1 cup buttermilk cold
  • 2 tablespoon unsalted butter melted

Instructions

Do Ahead

  • Put two sticks of butter in the freezer (you'll only use half of each stick). You'll need to remove them from the freezer about 15 minutes before you start preparing the biscuits.
    ½ cup unsalted butter
  • Brush oil over two skin-on, bone-in chicken breasts and season with salt and pepper. Roast at 350°F until the internal temperature reaches 165°F. Once cool enough to handle, remove the skin and then cut out the meat. Cut into bite-sized pieces. Set aside. Or, use rotisserie chicken.
    3 cups chicken

Make the Filling

  • Add the broth to a pan and crumble in the bouillon cubes. Heat the broth over medium-low heat.
    5 cups chicken broth, 2 chicken bouillon cubes
  • Melt the butter in a large pot over medium heat. Add the onions and carrots and sauté, stirring often, until soft, about 5 minutes. Add the sliced mushrooms and sauté until they are soft and beginning to release liquid, about another 4 to 6 minutes.
    6 tablespoon unsalted butter, 1 cup onion, 1 cup carrots, 8 oz mushrooms
  • Stir in the flour and cook, stirring often, for another 1 to 2 minutes.
    ½ cup all-purpose flour
  • Gradually and carefully add the warm stock to the pot, whisking constantly. Continue stirring until all lumps are gone. Simmer for a few minutes.
  • Stir in the cream and cook for another couple of minutes.
    ½ cup heavy cream
  • Stir in the chicken (3 cups), peas, parsley, salt, and pepper. Simmer, stirring often, for about 15 minutes. Taste and add a pinch more salt, if needed. The filling should thicken to the point that it coats the back of your spatula. Set aside.
    See NOTES to make filling thicker if too thin.
    ½ cup sweet peas, ¼ cup Italian parsley, 1½ teaspoon Kosher salt, 1 teaspoon black pepper

Make the Biscuits

  • Grate the cold butter with a box grater onto a cutting board. To make this easier, grate just half of each partially frozen stick of butter.
  • Place the flour in a large bowl and quickly toss it with the grated butter. Place in the freezer for 15 minutes.
    2¼ cups self-rising flour
  • Use a wooden spoon to work the cold buttermilk into the flour/butter mixture. It will be a shaggy (loose) dough.
    1 cup buttermilk
  • Turn the dough out onto a floured surface. Use your hands to quickly knead the dough until mostly cohesive (it will still be a bit shaggy).
  • Roll the dough into an 8×10-inch rectangle. Use a bench scraper or a large knife to cut the rectangle into fourths. Stack the quarters on top of each other and again roll the dough into an 8×10-inch square. Repeat one more time.
  • Use a biscuit/cookie cutter to cut the dough into three biscuits. Roll the scraps into another square and cut out two more biscuits. Use the remaining dough to create one last biscuit; you should have 6 biscuits. Place the biscuits in a cake pan and place them in the freezer for 15 minutes.

Assemble and Bake the Casserole

  • Preheat the oven to 450°F.
  • If the filling has cooled off, reheat over medium heat until heated through. Transfer the warm filling into a 9×13-inch baking dish.
  • Remove the biscuits from the freezer and space them evenly over the filling. Brush melted butter over the tops of each biscuit.
    2 tablespoon unsalted butter
  • Bake for 15 to 20 minutes, or until the tops are golden brown, turning the dish around halfway through baking.
  • Remove from the oven and brush more melted butter over the tops of each biscuit. Let the casserole rest for 10 minutes before serving. Serve hot, garnish with chopped parsley, if desired.

Video

Notes

NOTE: Watch the video near the top of the recipe for visual guidance.
If you want a thick filling, reduce the broth quantity to 4 cups. You can also thicken the filling by adding a cornstarch slurry, which is 2 tablespoon of cornstarch mixed with 2 tablespoon of water. NOTE: The filling will thicken after it rests for 10 minutes after baking. 
  • Make Ahead: Prepare the filling up to a day in advance, then top with biscuits and bake just before serving.
  • Substitutions: Swap chicken with turkey, add your favorite veggies, or use store‑bought biscuits for a quick shortcut.
  • Storage: Store leftovers in the fridge for up to 3 days and reheat gently in the oven to keep the biscuits tender.

Nutrition

Calories: 672kcal | Carbohydrates: 52g | Protein: 17g | Fat: 34g | Saturated Fat: 12g | Polyunsaturated Fat: 3g | Monounsaturated Fat: 7g | Trans Fat: 1g | Cholesterol: 132mg | Sodium: 856mg | Potassium: 476mg | Fiber: 3g | Sugar: 7g | Vitamin A: 5117IU | Vitamin C: 8mg | Calcium: 110mg | Iron: 2mg

Italian Chopped Salad with Homemade Vinaigrette

September 10, 2025 by Kris Longwell 2 Comments

A large white platter filled with and Italian chopped salad with homemade vinaigrette with two serving utensils inserted into the side of the salad.

Italian Chopped Salad with Homemade Vinaigrette is fresh, zesty, and the perfect starter for an Italian feast of homemade chicken piccata, smothered pork chops, or classic steak bistecca—and the components can be easily adapted to suit your tastes.

A large white platter filled with and Italian chopped salad with homemade vinaigrette with two serving utensils inserted into the side of the salad.
[feast_advanced_jump_to]

🥬 The Ingredients

This Italian Chopped Salad may have a long list of ingredients, but every element adds to an explosion of flavor in each bite. The easy homemade Italian dressing ties it all together and takes the salad to the next level. Find ingredient notes (including substitutions and variations) below.

An arrangement of ingredients on a grey wooden background for Italian chopped salad with homemade vinaigrette including chopped lettuce, vegetables, Italian cured meats, Mozzarella cubes, olives, Italian dressing, and seasonings.

👉 Substitutions and Variations

Substitutions

  • Romaine & iceberg lettuce: Swap with butter lettuce, spinach, arugula, or a spring mix.
  • Olives (three types): Use any mix you like—Kalamata, Castelvetrano, or green olives—or skip if you prefer a milder flavor.
  • Cherry tomatoes: Substitute grape tomatoes or chopped heirloom tomatoes.
  • Cucumbers: Use English cucumber, Persian cucumber, or zucchini for a similar crunch.
  • Red onion: Try shallots, green onions, or pickled onions for a softer bite.
  • Garbanzo beans: Swap with cannellini beans, kidney beans, or omit for a lower-carb option.
  • Mozzarella balls: Replace with provolone, feta, or shaved Parmesan.
  • Italian meats (salami, mortadella, smoked ham): Use prosciutto, pepperoni, turkey, or even grilled chicken for a lighter protein.

Variations

  • Vegetarian: Skip the meat and add extra beans or roasted vegetables.
  • Spicy twist: Add hot pepperoncini, banana peppers, or a sprinkle of red pepper flakes.
  • Mediterranean style: Use feta, kalamata olives, and add roasted red peppers.
  • Light & fresh: Go heavier on the veggies and use a lemony vinaigrette for a brighter flavor.
  • Make it a meal: Serve with garlic bread or top with grilled shrimp or chicken for extra protein.

🇮🇹 Tips & Tricks for the Best Italian Chopped Salad

  • Balance the flavors: Taste as you go—add more olives for brininess, extra cheese for richness, or a squeeze of lemon for brightness.
  • Chop evenly: Cut all ingredients into bite‑sized pieces so every forkful has a little of everything.
  • Keep it crisp: Chill the lettuce and veggies before assembling for maximum crunch.
  • Dry the greens well: Use a salad spinner or pat dry with paper towels—excess water will dilute the dressing.
  • Dress lightly: Toss the salad with just enough vinaigrette to coat, then serve extra on the side.
  • Make ahead: Prep the meats, cheese, and veggies in advance, but wait to chop the lettuce and add dressing until just before serving.

Expert Tip

For the best flavor and texture, chop all the ingredients into uniform, bite‑sized pieces—this ensures every forkful delivers the perfect mix of crunchy veggies, savory meats, creamy cheese, and zesty dressing.

🍽️ How to Serve

  • Serve as a starter to an Italian feast with classic spaghetti and meatballs, homemade chicken marsala, or succulent shrimp scampi.
  • Enjoy as a light main dish with crusty bread or garlic knots on the side.
  • Pair with New York-style pizza or easy pasta pomodoro for a balanced, restaurant‑style meal.
  • Pack into lunch containers for a fresh, make‑ahead option.
  • Top with grilled chicken, shrimp, or salmon to turn it into a hearty entrée salad.

👩🏼‍🍳 How to Make Italian Chopped Salad with Homemade Vinaigrette

A person holding a jar of homemade Italian dressing with a lid screwed on and has just been vigorously shaken.
  1. Step 1: Put together the vinaigrette (Italian dressing) and chill for at least 1 hour.
A person using a chef's knife to chop Romaine lettuce on a wooden cutting board.
  1. Step 2: Wash and dry the Romaine and iceberg lettuce. Chop and chill for at least an hour.
A person slicing a peeled cucumber on a cutting board with small glass bowls filled with various types of olives, garbanzo beans, onions, and tomatoes nearby.
  1. Step 3: Peel and chop the cucumber into small pieces. Cut and slice the cherry tomatoes, olives, and radishes.
An overhead view of a large platter filled with piles of vegetables, cured meats, olives, mozzarella balls, garbanzo beans, and onions.
  1. Step 4: Place the chilled chopped lettuce on a large platter and top with all the components of the salad.
A person pouring Italian dressing from a small glass pitcher over a platter filled with the components for Italian chopped salad.
  1. Step 5: Drizzle ¼ to ½ cup of the dressing over the salad.
An overhead view of an Italian chopped salad with homemade vinaigrette on a large platter being served family-style.
  1. Step 6: Toss until everything is combined. Serve immediately.

🙋🏽‍♂️ Frequently Asked Questions

Can I make Italian Chopped Salad ahead of time?

Yes, you can prep the meats, cheese, and veggies a day in advance, but wait to chop the lettuce and add the dressing until just before serving.

How long will Italian Chopped Salad last in the fridge?

Once dressed, it’s best enjoyed the same day, but leftovers can be stored in an airtight container for up to 2 days.

Can I make Italian Chopped Salad vegetarian?

Absolutely—just leave out the meats and add extra beans, cheese, or roasted vegetables for protein and flavor.

What kind of dressing goes best with Italian Chopped Salad?

A zesty homemade Italian vinaigrette is classic, but you can also use balsamic vinaigrette or even creamy Ranch dressing if you prefer.

Two salad plates filled with individual servings of Italian chopped salad with homemade vinaigrette next to a large platter filled with the same salad.

🥗 More Amazing Salad Recipes

  • A straight-on view of a large serving pasta bowl filled with panzanella that has been topped with shaved Parmesan cheese.
    Panzanella (Tuscan Tomato and Bread Salad)
  • A classic Caesar salad served family-style on a large white platter topped with homemade croutons and grated Parmesan cheese.
    Classic Caesar Salad
  • An oval white platter filled with a large serving of green bean and tomato salad topped with a scallion buttermilk dressing, scallions, and chopped fresh herbs.
    Green Bean and Tomato Salad with Scallion Buttermilk Dressing
  • A dark circular plate filled with roasted beet and burrata salad.
    Roasted Beet and Burrata Salad

Ready to make the best chopped salad this side of Tuscany? Go for it!

And when you do, be sure to take a photo of it, post it on Instagram, and tag @HowToFeedaLoon and hashtag #HowToFeedaLoon!

A close-up view of a large white platter filled with an Italian chopped salad with homemade vinaigrette with two serving utensils inserted into the side of the salad.
Print Recipe
5 from 1 vote

Italian Chopped Salad with Homemade Vinaigrette

Italian Chopped Salad with Homemade Vinaigrette is a crisp, colorful mix of fresh veggies, savory meats, and cheese tossed in a zesty homemade dressing for the perfect start to any Italian meal.
Prep Time20 minutes mins
Chill time for lettuce and vinaigrette1 hour hr
Total Time1 hour hr 20 minutes mins
Course: Appetizer or Salad
Cuisine: Italian / American
Servings: 8
Calories: 212kcal
Author: Kris Longwell

Ingredients

  • 1 cup Italian dressing click the link for the recipe
  • ½ head iceberg lettuce
  • 1 romaine heart
  • ½ cup Genoa salami chopped
  • ½ cup Mortadella chopped
  • ½ cup smoked ham chopped
  • ½ cup Mozzarella balls fresh, halved
  • ¼ cup red onion finely chopped
  • ½ cup cucumber seeded and chopped
  • ½ cup black olives pitted and halved
  • ½ cup green olives pitted and halved
  • ½ cup Kalamata olives pitted and halved
  • ½ cup garbanzo beans drained
  • ½ cup radishes thinly sliced and roughly chopped
  • ¾ cup cherry tomatoes halved
  • salt and pepper
  • ½ teaspoon dried oregano
  • ½ cup pepperoncini peppers

Instructions

Do Ahead – Make the Vinaigrette (Italian Dressing) and Prep the Lettuce

  • Put all of the ingredients in a jar and shake vigorously. Chill for at least one hour.
    1 cup Italian dressing
  • Cut the iceberg (half of the head) into two quarters. Rinse under cool water. Drain, cut-side down on paper towels. Rinse the Romaine leaves under cool water and pat dry. Chill in the fridge for 1 hour.
    ½ head iceberg lettuce, 1 romaine heart

Assemble the Salad

  • Chop the chilled lettuce and then place it on a large platter. Arrange all of the salad components over the lettuce. Shake the jar of dressing and then drizzle about ¼ to ½ cup of it over the salad. Add a pinch of salt, pepper, and dried oregano over the salad. Save a few of the pepperoncini peppers to garnish the salad.
    ½ cup Genoa salami, ½ cup Mortadella, ½ cup smoked ham, ½ cup Mozzarella balls, ¼ cup red onion, ½ cup cucumber, ½ cup black olives, ½ cup green olives, ½ cup Kalamata olives, ½ cup garbanzo beans, ½ cup radishes, ¾ cup cherry tomatoes, salt and pepper, ½ teaspoon dried oregano
  • Use a pair of salad utensils (or tongs) to gently toss the salad until fully combined. Top with a few pepperoncini peppers.
    ½ cup pepperoncini peppers
  • Serve immediately, preferably with chilled salad plates.

Video

Notes

NOTE: Watch the video near the top of the recipe for visual guidance.
  • Make Ahead: Chop meats, cheese, and veggies in advance, but wait to dress the salad until just before serving to keep it crisp.
  • Ingredient Swaps: Use your favorite mix of olives, cheeses, or Italian meats to customize the flavors.
  • Storage: Leftovers will keep in the fridge for up to 2 days, though the lettuce may soften once dressed.

Nutrition

Calories: 212kcal | Carbohydrates: 11g | Protein: 7g | Fat: 16g | Saturated Fat: 3g | Polyunsaturated Fat: 4g | Monounsaturated Fat: 6g | Trans Fat: 0.02g | Cholesterol: 16mg | Sodium: 678mg | Potassium: 286mg | Fiber: 3g | Sugar: 6g | Vitamin A: 1613IU | Vitamin C: 13mg | Calcium: 66mg | Iron: 1mg

Creamy Mac and Cheese with Chicken and Broccoli

September 7, 2025 by Kris Longwell Leave a Comment

A white bowl filled with a serving of creamy mac and cheese with chicken and broccoli sitting next to a large skillet filled with the same.

There’s nothing more comforting than a bowl of creamy mac and cheese, and this version takes it to the next level with tender chicken and fresh broccoli. It’s rich, cheesy, and satisfying, yet balanced with a pop of color and freshness from the veggies. Perfect for busy weeknights or when you’re craving a cozy family dinner, this dish is sure to become a new favorite.

A white bowl filled with a serving of creamy mac and cheese with chicken and broccoli sitting next to a large skillet filled with the same.
[feast_advanced_jump_to]

🧀 The Ingredients

Just a handful of simple ingredients—juicy chicken, crisp broccoli, pasta, and plenty of melty cheese—come together for the ultimate cozy meal. Find ingredient notes (including substitutions and variations) below.

An arrangement of ingredients for creamy mac and cheese with chicken and broccoli on a wooden grey background including shredded cheese, chicken broth, pasta, milk, half and half, broccoli, chicken, butter, and seasonings.

👉 Substitutions and Variations

Substitutions:

  • Butter: Use olive oil or margarine if preferred.
  • Flour: Swap with cornstarch or gluten-free flour for a gluten-free option.
  • Whole milk & half and half: Use all whole milk, heavy cream, or a dairy-free alternative like oat or almond milk.
  • Chicken broth: Vegetable broth works well, or just use water with a bouillon cube.
  • Dijon mustard: Yellow mustard or a pinch of dry mustard powder can stand in.
  • Garlic powder & onion powder: Fresh garlic and onion can be sautéed in the butter for added depth.
  • Elbow pasta: Any short pasta like shells, rotini, or penne works great.
  • Fresh broccoli: Substitute with frozen broccoli, cauliflower, peas, or spinach.
  • Rotisserie chicken: Use leftover grilled, baked, or even canned chicken.
  • Cheddar cheese: Swap with Gruyère, Colby Jack, or Monterey Jack.
  • Yellow American cheese: Use Velveeta, provolone, or more cheddar for a different flavor.

Variations:

  • Spicy Kick: Add red pepper flakes, hot sauce, or jalapeños.
  • Extra Veggies: Stir in mushrooms, bell peppers, or zucchini.
  • Crunchy Topping: Top with breadcrumbs or crushed crackers before baking.
  • Lighter Version: Use whole wheat pasta and reduced-fat cheese.
  • Indulgent Bake: Transfer to a casserole dish, sprinkle with extra cheese, and bake until bubbly and golden.

😋 Tips & Tricks for the Best Creamy Mac and Cheese with Chicken and Broccoli

  • Shred your own cheese: Pre-shredded cheese often has anti-caking agents that prevent smooth melting—freshly grated melts creamier.
  • Cook pasta al dente: Slightly undercook the pasta so it holds its shape once mixed with the sauce.
  • Steam broccoli lightly: Keep broccoli bright green and slightly crisp—it will finish cooking in the hot sauce.
  • Add broth gradually: Pour in broth slowly while whisking to prevent a thin or watery sauce.
  • Season in layers: Taste the sauce before adding pasta and adjust salt, pepper, or mustard for balance.
  • Serve right away: Creamy mac and cheese is best fresh; if reheating, add a splash of milk to loosen the sauce.

Expert Tip

For the creamiest sauce, whisk the milk and half-and-half slowly into the roux, then stir in cheese off the heat—this keeps it from separating and ensures a smooth, velvety finish.

👩🏼‍🍳 How to Make Creamy Mac and Cheese with Chicken and Broccoli

A person lifting a clear lid from a metal pot on a stove that contains a steamer basket with freshly steamed broccoli florets resting on the basket.
  1. Step 1: Steam the broccoli florets until tender.
A person using a wooden spatula to stir a roux in a large skillet on a gas stove.
  1. Step 2: Melt the butter and then stir in the flour and cook, stirring often, to create a roux.
A person pouring milk with one hand into a skillet filled with a bechamel sauce with his other hand whisking the mixture.
  1. Step 3: Slowly whisk in the broth, half and half, and milk.
A person holding a small bowl filled with a teaspoon of onion powder and a teaspoon of garlic powder over a skillet filled with bechamel sauce with ground black pepper in the middle.
  1. Step 4: Stir in the seasonings.
A person transferring uncooked small elbow pasta from a large glass bowl into a skillet filled with a creamy bechamel sauce.
  1. Step 5: Stir in the pasta and simmer until tender and the sauce has slightly thickened.
A person dumping shredded cheddar cheese and yellow American cheese from a glass bowl into a large skillet filled with creamy mac and cheese with chicken and broccoli.
  1. Step 6: Stir in the chicken and broccoli, turn off the heat, and gradually mix in the cheese until melted.

Expert Tip

To keep the broccoli bright green and tender-crisp, steam or blanch it just until vibrant, then fold it into the pasta at the very end.

🙋🏽‍♂️ Frequently Asked Questions

Can I make Creamy Mac and Cheese with Chicken and Broccoli ahead of time?

Yes, you can prepare it a day in advance, store it in the fridge, and reheat gently on the stove or in the oven with a splash of milk to loosen the sauce.

Can I freeze Creamy Mac and Cheese with Chicken and Broccoli?

You can freeze it, but the sauce may lose some creaminess when thawed. For best results, freeze in portions and reheat slowly with added milk or broth.

What type of pasta works best for Creamy Mac and Cheese with Chicken and Broccoli?

Elbow pasta is classic, but shells, rotini, or penne also hold the creamy sauce well.

How do I store leftovers of Creamy Mac and Cheese with Chicken and Broccoli?

Keep leftovers in an airtight container in the fridge for up to 3 days. Reheat on the stove or in the microwave with a splash of milk to restore creaminess.

😋 More Creamy Pasta Recipes

  • The Ultimate Macaroni and Cheese in a large cast iron skillet with a wooden spoon.
    The Ultimate Macaroni and Cheese
  • A large stainless steel saucepan filled with fettuccine with creamy sausage sauce with a wooden spoon also in the pan.
    Fettuccine with Creamy Sausage Sauce
  • A spoonful of Mac and Cheese with Roasted Cauliflower and Smoked Bacon in a white dish
    Mac and Cheese with Roasted Cauliflower and Smoked Bacon
  • A white individual pasta bowl filled with shrimp fettuccine alfredo next to a large silver skillet filled with the same.
    Shrimp Fettuccine Alfredo

Ready to make the best mac and cheese in town? Go for it!

And when you do, be sure to take a photo of it, post it on Instagram, and tag @HowToFeedaLoon and hashtag #HowToFeedaLoon!

An overhead view of a white bowl filled with a serving of creamy mac and cheese with chicken and broccoli with a gold fork sitting next to the bowl.
Print Recipe
No ratings yet

Creamy Mac and Cheese with Chicken and Broccoli

Tender chicken, crisp broccoli, and elbow pasta are coated in a rich, cheesy sauce for the ultimate comfort food that’s quick, hearty, and family-friendly.
Prep Time15 minutes mins
Cook Time20 minutes mins
Total Time35 minutes mins
Course: Entree
Cuisine: American
Servings: 6
Calories: 632kcal
Author: Kris Longwell

Equipment

  • 1 Large skillet 12 inches is ideal

Ingredients

  • 2½ cups broccoli florets
  • 2 tablespoon unsalted butter
  • 2 tablespoon all-purpose flour
  • 2 cups chicken broth
  • 2 cups half and half
  • 2 cups whole milk
  • 1 tablespoon Dijon mustard
  • 1 teaspoon onion powder
  • 1 teaspoon garlic powder
  • 2 teaspoon Kosher salt
  • 1 teaspoon black pepper
  • 12 oz elbow pasta small
  • 2½ cups chicken cooked and roughly chopped, rotisserie is perfect
  • 2 cups cheddar cheese shredded
  • 2 cups yellow American cheese shredded

Instructions

  • Steam the broccoli until tender and bright green. Set aside.
    2½ cups broccoli florets
  • In a large skillet, melt the butter over medium heat. Stir in the flour and cook, stirring often, for 1 minute.
    2 tablespoon unsalted butter, 2 tablespoon all-purpose flour
  • Slowly whisk in the broth, half and half, and milk. Whisk until all lumps are gone.
    2 cups chicken broth, 2 cups half and half, 2 cups whole milk
  • Stir in the Dijon mustard, onion powder, garlic powder, salt, and pepper.
    1 tablespoon Dijon mustard, 1 teaspoon onion powder, 1 teaspoon garlic powder, 2 teaspoon Kosher salt, 1 teaspoon black pepper
  • Add the pasta and bring to a simmer. Stirring often, cook until the pasta is tender, usually about 10 minutes.
    12 oz elbow pasta
  • Stir in the chicken and steamed broccoli. Turn off the heat and gradually stir in the cheese until melted. Serve at once. If it's too thick, add more milk or broth until the desired consistency.
    2½ cups chicken, 2 cups cheddar cheese, 2 cups yellow American cheese

Video

Notes

NOTE: Watch the video near the top of the recipe for visual guidance.
You need a total of six cups of liquid. You can use only milk, half and half, heavy cream, broth, or water, or a combination of any of these. You won’t want to skip the dairy, however. 
More helpful tips:
  • Cheese: For the smoothest sauce, shred your own cheddar instead of using pre-shredded cheese.
  • Broccoli: Don’t forget to lightly steam or blanch broccoli before adding so it stays bright and crisp-tender.
  • Reheating: Add a splash of milk when reheating to bring back the creamy texture.

Nutrition

Calories: 632kcal | Carbohydrates: 56g | Protein: 28g | Fat: 28g | Saturated Fat: 8g | Polyunsaturated Fat: 2g | Monounsaturated Fat: 4g | Trans Fat: 0.2g | Cholesterol: 104mg | Sodium: 768mg | Potassium: 582mg | Fiber: 3g | Sugar: 10g | Vitamin A: 1184IU | Vitamin C: 35mg | Calcium: 495mg | Iron: 2mg

Korean Ground Beef Stir-Fry

September 3, 2025 by Kris Longwell 8 Comments

An overhead view of a wok filled with fully cooked Korean ground beef stir-fry with a wooden spatula inserted into the side of the food.

This Korean Ground Beef Stir-Fry is a quick 30-minute meal packed with savory-sweet flavors, tender beef, and veggies for a healthy, family-friendly dinner. Tastes like Korean Steak Bulgogi, but so much easier to prepare! Serve over perfectly steamed rice for an amazing weeknight meal!

An overhead view of a wok filled with fully cooked Korean ground beef stir-fry with a wooden spatula inserted into the side of the food.
[feast_advanced_jump_to]

🥩 The Ingredients

The lean ground beef soaks up all the bold Korean seasonings, while mushrooms, bell peppers, and carrots add a pop of color, crunch, and natural sweetness. Together, they create a quick stir-fry that’s bursting with savory-sweet flavor in every bite. Find ingredient notes (including substitutions and variations) below.

An arrangement of ingredients for Korean ground beef stir-fry on a wooden grey background including ground beef, mushrooms, carrots, bell peppers, onions, scallions, rice, garlic, gingers, and seasonings.

👉 Substitutions and Variations

Substitutions:

  • Protein: Swap lean ground beef with ground turkey, chicken, or pork.
  • Mushrooms: Use zucchini, eggplant, or extra bell peppers if you don’t have mushrooms.
  • Bell Peppers: Try broccoli florets, snap peas, or green beans for a different crunch.
  • Carrots: Sub in shredded cabbage or julienned zucchini.
  • Soy Sauce: Use tamari or coconut aminos for a gluten-free option.
  • Sweetener: Replace brown sugar with honey or maple syrup.

Variations:

  • Spicy Kick: Add extra gochujang (Korean chili paste) or red pepper flakes for extra heat.
  • Low-Carb: Serve over cauliflower rice or zucchini noodles instead of regular rice.
  • Extra Flavor: Top with sesame seeds, green onions, or a drizzle of toasted sesame oil.
  • Meal Prep Friendly: Double the recipe and store portions for quick weekday lunches.

🥢 Tips & Tricks for the Best Korean Ground Beef Stir-Fry

  • Brown the beef well: Let the ground beef sear without stirring too much at first — this builds deeper flavor.
  • Cut veggies evenly: Slice mushrooms, bell peppers, and carrots into similar sizes so they cook quickly and evenly.
  • Don’t overcook the veggies: Keep them slightly crisp for the best texture and color.
  • Balance the sauce: Taste as you go — add a little extra soy sauce for saltiness, honey for sweetness, or gochujang for heat.
  • Finish with freshness: A sprinkle of green onions or sesame seeds at the end brightens up the whole dish.
  • Serve it your way: Pair with steamed rice, noodles, or keep it light with cauliflower rice.

👨‍🍳 How To Make Korean Ground Beef Stir-Fry

A person using a wooden spatula to stir simmering ground beef that is being cooked in a wok.
  1. Step 1: Cook the ground beef in your wok over high heat.
A person transferring cooked ground beef into a large colander resting on top of a ceramic bowl that is catching the rendered grease from the meat.
  1. Step 2: Once no longer pink, drain the grease from the meat (safely), and set it aside.
A person using a wooden spatula to sauté sliced mushrooms, chopped bell peppers, and shredded carrots in a large black wok.
  1. Step 3: Heat the oil over high heat and then stir-fry the mushrooms, peppers, carrots, garlic, and ginger.
A person using a wooden spatula to transfer cooked ground beef from a white bowl into a wok filled with simmering sautéed mushrooms, bell peppers, and shredded carrots.
  1. Step 4: Add the beef back into the wok and stir to combine.
A person pouring a Korean stir-fry sauce from a small glass bowl into a large wok that is filled with simmering cooked ground beef, sautéed mushrooms, and soft chopped bell peppers and shredded carrots.
  1. Step 5: Mix together the sauce ingredients, pour them into the wok, and stir-fry for another couple of minutes.
A close-up view of Korean ground beef stir-fry being served over a bed of steamed brown rice in a colorful bowl.
  1. Step 6: Serve at once over rice (if desired), and garnished with sesame seeds and chopped scallions.

🙋🏽‍♂️ Frequently Asked Questions

Can I make Korean Ground Beef Stir Fry ahead of time?

Yes, you can cook the beef and sauce in advance, then store them in the fridge for up to 3 days. Just reheat and add fresh veggies before serving for the best flavor and texture.

What can I serve with Korean Ground Beef Stir Fry?

It pairs perfectly with steamed rice, noodles, or even cauliflower rice for a lighter option. You can also add a side of kimchi for extra Korean-inspired flavor.

Is Korean Ground Beef Stir Fry gluten-free?

It can be! Just swap soy sauce for tamari or coconut aminos, and make sure any other sauces you use are certified gluten-free.

Can I make Korean Ground Beef Stir Fry spicy?

Absolutely. Stir in extra gochujang (Korean chili paste), sriracha, or red pepper flakes to add as much heat as you like.

An overhead view of Korean ground beef stir-fry in a white bowl over a bed of steamed brown rice with a pair of brown chop sticks resting on the side of the bowl.

😋 More Amazing Recipes with Ground Beef

  • A bulgogi hamburger on a brioche bun with a layer of chili sauce mayo on the bottom and kimchi on top.
    Bulgogi Burgers with Easy Kimchi
  • A skillet filled with one-pot chili mac with a layer of melted cheddar cheese over the the surface with colorful checkered napkins near the pan and two glasses of iced tea nearby.
    One-Pot Chili Mac
  • A straight-on view of two white bowls filled with Tex-Mex pasta with colorful bell peppers and cilantro sitting nearby.
    Tex-Mex Pasta with Ground Beef
  • An overhead view of a large silver saucepan filled with four salisbury steaks that are resting in a mushroom brown gravy with a wooden spoon resting nearby.
    Salisbury Steak with Mushroom Brown Gravy

Ready to make the tastiest (and easiest) stir-fry in town? Go for it!

And when you do, be sure to take a photo of it, post it on Instagram, and tag @HowToFeedaLoon and hashtag #HowToFeedaLoon!

A close-up view of a white bowl filled with a serving of Korean ground beef stir-fry sitting on a bed of cooked brown rice and garnish with sesame seeds and chopped scallions.
Print Recipe
5 from 4 votes

Korean Ground Beef Stir-Fry

A quick and flavorful weeknight dinner made with lean ground beef, colorful veggies, and bold Korean seasonings. Ready in just 30 minutes, this stir-fry is savory, slightly sweet, and perfect served over rice or noodles for a meal the whole family will love.
Prep Time15 minutes mins
Cook Time15 minutes mins
Total Time30 minutes mins
Course: Entree
Cuisine: Korean / American
Servings: 4
Calories: 435kcal
Author: Kris Longwell

Equipment

  • Wok or a large skillet

Ingredients

For the Sauce

  • ¼ cup soy sauce or low-sodium soy sauce
  • ¼ cup dark brown sugar
  • 1 tablespoon sesame oil
  • 1 tablespoon gochujang

For the Stir-Fry

  • 1 lb ground beef 85% to 93% lean
  • 1 tablespoon vegetable oil or canola
  • 1 medium onion chopped
  • 1 red bell pepper seeded and chopped
  • 2 medium carrots peeled and shredded
  • 8 oz mushrooms sliced
  • 2 teaspoon garlic minced
  • 2 teaspoon ginger fresh, minced

For Serving

  • ½ cup scallions chopped
  • steamed rice or cooked noodles
  • 1 tablespoon toasted sesame seeds

Instructions

  • In a small bowl, combine the sauce ingredients. Set aside.
    ¼ cup soy sauce, ¼ cup dark brown sugar, 1 tablespoon sesame oil, 1 tablespoon gochujang
  • Heat your wok (or skillet) over medium-high heat. Add the ground beef, and use a wooden spatula or spoon to break it up. Cook until no longer pink. Remove rendered grease and discard safely. Transfer the cooked beef to a plate and set aside.
    1 lb ground beef
  • Heat the oil over high heat. Once shimmering, add the onion, bell pepper, carrots, and mushrooms. Stir-fry until they are softened, 2 to 4 minutes. Stir in the garlic and ginger and stir-fry for another 30 seconds to 1 minute.
    1 tablespoon vegetable oil, 1 medium onion, 1 red bell pepper, 2 medium carrots, 8 oz mushrooms, 2 teaspoon garlic, 2 teaspoon ginger
  • Add the cooked beef back into the wok and stir to combine with the veggies. Pour in the sauce and stir-fry for another couple of minutes.
  • Turn off the heat and stir in most of the scallions, leaving some for garnish.
    ½ cup scallions
  • Serve at once over steamed rice (or cooked noodles), garnished with more chopped scallions and toasted sesame seeds.
    steamed rice, 1 tablespoon toasted sesame seeds

Video

Notes

NOTE: Watch the video near the top of the recipe for visual guidance.
Gochujang can be found in the Asian section of many well-stocked supermarkets, in Asian markets, or online. It has a lot of flavor but is not too spicy. For extra heat, add a pinch or two of red pepper flakes. 
Be sure to have everything prepped before you start to stir-fry. The dish comes together very quickly once you begin preparing it. 
Leftovers are delicious and will keep in an air-tight container in the fridge for 3 to 5 days. Reheat on the stove in a skillet over medium heat or in the microwave. Add a splash of broth if the leftovers are mixed with rice. 

Nutrition

Calories: 435kcal | Carbohydrates: 26g | Protein: 24g | Fat: 19g | Saturated Fat: 6g | Polyunsaturated Fat: 2g | Monounsaturated Fat: 5g | Trans Fat: 1g | Cholesterol: 81mg | Sodium: 919mg | Potassium: 795mg | Fiber: 3g | Sugar: 19g | Vitamin A: 6160IU | Vitamin C: 47mg | Calcium: 68mg | Iron: 3mg

Balsamic-Glazed Baby Back Ribs

August 31, 2025 by Kris Longwell Leave a Comment

A small baking pan lined with brown paper and topped with balsamic glazed baby back ribs with a small bowl filled with the glaze nearby.

These Balsamic-Glazed Baby Back Ribs are tender, juicy, and coated in a sweet-tangy glaze that caramelizes beautifully in the oven and on the grill. With just a handful of simple ingredients, you’ll have a dish that feels both comforting and special—perfect for weeknight dinners or entertaining. Serve with Roasted Foil Potatoes and Dill Cucumber Salad for the perfect meal!

A small baking pan lined with brown paper and topped with balsamic glazed baby back ribs with a small bowl filled with the glaze nearby.
[feast_advanced_jump_to]

🧄 The Ingredients

With just a handful of simple ingredients, these baby back ribs transform into an irresistibly tender, flavorful rack that’s impossible to resist. Find ingredient notes (including substitutions and variations) below.

An arrangement of ingredients for balsamic-glazed baby back ribs on a wooden grey background including an uncooked rack of rbis, cloves of garlic, balsamic vinegar, brown sugar, fresh rosemary, salt, and pepper.

👉 Substitutions and Variations

  • Protein Swap: Use pork spare ribs or even boneless pork chops if baby back ribs aren’t available.
  • Herb Variation: Substitute thyme or oregano for rosemary, or use a mix of dried Italian herbs for a different flavor profile.
  • Sweetener Twist: Replace dark brown sugar with honey, maple syrup, or molasses for a slightly different sweetness and glaze texture.
  • Garlic Option: Swap fresh garlic for roasted garlic or garlic powder if you want a milder or more convenient option.

See the recipe card (with video) below for a full list of ingredients and measurements.

Expert Tip

For bolder, spicier ribs, add a pinch of crushed red pepper flakes or smoked paprika to the glaze, or brush on a layer of your favorite hot sauce before finishing under the broiler.

👩🏼‍🍳 How to Prepare the Ribs for Grilling

A person using his fingers to press a balsamic and herbs marinade into an uncooked rack of baby back ribs that is resting in a large black roasting pan.
  1. Step 1: Mix together the marinade ingredients and rub them into the ribs in a roasting pan. Chill for at least 4 hours, or up to overnight.
A person pouring water from a measuring cup into a large black roasting pan that is holding a seasoned rack of baby back ribs.
  1. Step 2: Pour half a cup of water into the pan. Then cover with foil.
A person pulling back a large sheet of aluminum foil from large black roasting pan that has a roasted rack of baby back ribs in it.
  1. Step 3: Bake at 400°F for 2 hours. Remove the foil.
A person using a silicone spatula to scrape up baby back ribs pieces that are stuck to the bottom of a roasting pan that has liquid in it.
  1. Step 4: Carefully remove the ribs, pour in a cup of hot water, and scrape up the baked-on bits.
A person pouring a brown liquid from a fat separator into a black cast-iron skillet on the grate of a gas grill.
  1. Step 5: Separate the fat (see NOTES), and add to a skillet along with the balsamic vinegar and brown sugar.
A person using a large wooden spatula to stir a balsamic glaze in a black cast-iron skillet on a hot pad.
  1. Step 6: Bring to a boil and then simmer until slightly thickened, about 13 to 15 minutes (it will continue to thicken as it cools).

Expert Tip

Keep a close eye on the balsamic vinegar and brown sugar as they simmer—stir often over medium heat and remove from the skillet once the mixture thickens enough to coat the back of a spoon, to prevent burning.

If your glaze becomes too thick or starts to harden, simply whisk in a splash of water or extra balsamic vinegar over low heat until it loosens back to a smooth, pourable consistency.

🔥 How to Finish the Balsamic-Glazed Baby Back Ribs

A person using a grill brush to apply a balsamic glaze over the surface over a rack of oven-roasted baby back ribs.
  1. Step 1: Allow the glaze to cool for a few minutes, and then apply it to the topside of the ribs.
A person using a grill brush to apply a balsamic glaze onto the underside of a rack of baby back ribs being cooked on the grate of a gas grill.
  1. Step 2: Place the ribs over direct heat on your grill and apply more glaze. Grill for about 3 minutes.
A person using a grill brush to apply a balsamic glaze onto the top side of a rack of baby back ribs being cooked on the grate of a gas grill.
  1. Step 3: Gently flip the ribs over, apply more glaze, and cook for another 3 minutes. Remove the ribs from the grill.
A person using a grill brush to apply more balsamic glaze to an individual baby back rib that sitting on brown paper next to other balsamic glazed ribs.
  1. Step 4: Add more glaze to the ribs just before serving.

🍽️ How To Serve

  • Classic Cookout Style: Pair the ribs with creamy coleslaw, baked beans, and easy homemade cornbread for a backyard barbecue feel.
  • Elevated Dinner Plate: Serve with silky mashed potatoes and roasted seasonal vegetables for a hearty, comforting meal.
  • Light & Fresh: Balance the richness with a crisp green salad, grilled asparagus, or a tomato-cucumber salad.
  • Game Day Platter: Cut the ribs into individual pieces and serve as finger food with pub-style French fries, steakhouse onion rings, or gourmet beef sliders.

🙋🏽‍♂️ Frequently Asked Questions

What if I don’t have a grill to finish Balsamic Glazed Baby Back Ribs?

No problem! After baking, you can place the ribs under the broiler for a few minutes to caramelize the glaze and get that same sticky, slightly charred finish.

Can I prepare Balsamic Glazed Baby Back Ribs ahead of time?

Absolutely. You can cook the ribs in advance, refrigerate them, and then reheat with the glaze just before serving.

Can I use St. Louis-style ribs or spare ribs instead of baby back ribs in Balsamic Glazed Baby Back Ribs?

Yes, you can substitute either St. Louis-style ribs or spare ribs. Just keep in mind they’re a bit larger and meatier, so you may need to increase the cooking time slightly to ensure they become tender.

A person holding a balsamic glazed baby back rib over a trey of the entire rack of ribs with a small bowl of the glaze nearby.

😋 More Amazing Rib Recipes

  • A person holding a baby back rib that has been pulled from a rack of slow cooker baby back ribs.
    Slow Cooker Baby Back Ribs
  • A plate of mashed potatoes topped with braised beef short ribs and a tomato vegetable sauce.
    Braised Beef Short Ribs
  • An overhead view of a rack of smoked St. Louis-style ribs that have been partially cut up with a bowl of homemade barbecue sauce nearby.
    Smoked St. Louis-Style Ribs
  • Asian Braised Short Ribs on a white platter with Asian slaw
    Asian Braised Short Ribs

Ready to take ribs to the next level? Go for it!

And when you do, be sure to take a photo of it, post it on Instagram, and tag @HowToFeedaLoon and hashtag #HowToFeedaLoon!

A small baking pan lined with brown paper and topped with balsamic glazed baby back ribs with a small bowl filled with the glaze nearby.
Print Recipe
No ratings yet

Balsamic Glazed Baby Back Ribs

Tender baby back ribs coated in a sweet and tangy balsamic glaze, simmered until sticky and caramelized. A simple yet impressive dish perfect for weeknight dinners or backyard gatherings.
Prep Time15 minutes mins
Cook Time2 hours hrs 34 minutes mins
Marinating time8 hours hrs
Course: Lunch / Dinner / Cookout
Cuisine: American / Italian
Servings: 6
Calories: 2413kcal
Author: Kris Longwell

Equipment

  • 2 Large roasting pans
  • 10-inch heavy-duty skillet cast-iron works well
  • Gas, charcoal, or electric grill see NOTES if you don't have a grill
  • Brush

Ingredients

For the Ribs

  • 8 cloves garlic
  • 2 tablespoon rosemary fresh, finely chopped
  • 2 tablespoon dark brown sugar
  • 2 tablespoon balsamic vinegar
  • 1 teaspoon black pepper
  • 2 3½ lb baby back pork ribs
  • ¼ cup olive oil
  • Kosher salt
  • 1 cup water divided

For the Glaze

  • 2 cups hot water divided
  • 1 cup balsamic vinegar
  • ½ cup dark brown sugar

Instructions

Marinate and Roast the Ribs

  • Mince and then mash the garlic with the back of a spoon into a paste (or use a garlic press). Add to a small bowl, and stir in the rosemary, brown sugar, balsamic vinegar (2 tbsp), and pepper. Stir until completely combined.
    8 cloves garlic, 2 tablespoon rosemary, 2 tablespoon dark brown sugar, 2 tablespoon balsamic vinegar, 1 teaspoon black pepper
  • Place each rack of ribs in a roasting pan. Brush the oil all over the ribs, and then liberally sprinkle salt all over the ribs. Use your fingers to rub the marinade into both racks of ribs, all over. Chill the ribs (uncovered) for 8 to 24 hours.
    2 3½ lb baby back pork ribs, ¼ cup olive oil, Kosher salt
  • Preheat oven to 400°F with racks in the upper and lower thirds.
  • Add ½ cup of water to each pan. Cover with foil and roast for 2 hours, switching the position of the pans halfway through. Remove pans from the oven and then carefully remove the foil. Use two spatulas to very carefully remove the ribs from the pan to platters or a cutting board. The ribs may be slightly stuck to the pan; just use your spatula to gently free them.
    1 cup water

Make Glaze and Finish the Ribs

  • Heat 2 cups of water in the microwave or on the stove. Add 1 cup of the hot water to each of the roasting pans. Use a wooden or plastic spatula to scrape up as many of the bits on the pan as possible. Pour the liquid into a fat separator (or skim off excess grease from the surface). Pour into a 10-inch skillet along with the balsamic (1 cup) and dark brown sugar (½ cup).
    2 cups hot water, 1 cup balsamic vinegar, ½ cup dark brown sugar
  • Bring to a boil and then lower the heat to medium-low and simmer, stirring constantly until the mixture starts to thicken, about 13 to 15 minutes. Let cool for about 10 minutes, and then transfer to a heat-proof bowl.
  • Prepare your grill for direct-heat cooking over medium-hot heat.
  • Brush some of the glaze over the top side of the ribs. Gently place the ribs, meat-side down, over the heat on the grill. Cook for 3 minutes. Carefully flip the ribs and cook for another 3 minutes, basting with glaze as they cook.
  • Carefully transfer the ribs to a cutting board and apply another layer of glaze.
  • Serve at once with more glaze on the side.

Video

Notes

NOTE: Watch the video near the top of the recipe for visual guidance.
If you don’t have a grill, you can finish the ribs off under the broiler for a couple of minutes (watch closely, don’t let them burn!), or increase oven temperature to 450°F, and roast until lightly browned on top. 
Ribs can be roasted, and the glaze can be made 1 day ahead of serving. Chill separately (covered once cool). Bring to room temperature before glazing and grilling. 
Keep leftovers in an air-tight container in the fridge for 3 to 4 days. Reheat covered in foil in a 325°F oven for 15 to 20 minutes, or until heated through. 

Nutrition

Calories: 2413kcal | Carbohydrates: 32g | Protein: 1g | Fat: 20g | Saturated Fat: 1g | Polyunsaturated Fat: 1g | Monounsaturated Fat: 7g | Cholesterol: 0.2mg | Sodium: 21mg | Potassium: 111mg | Fiber: 0.5g | Sugar: 29g | Vitamin A: 23IU | Vitamin C: 2mg | Calcium: 50mg | Iron: 1mg
  • 1
  • 2
  • 3
  • …
  • 21
  • Next Page »

Welcome!

Kris & Wesley (The Loon) live for fun, food, and fabulousness. "How to Feed a Loon" is a celebration of just that. Come join us on this joyous culinary ride.

More about us

Christmas Favorites

  • An overhead view of an oval baking dish filled with homemade lobster mac and cheese topped with pink lobster claw meat and chopped parsley.
    Homemade Lobster Mac and Cheese
  • A large white platter filled with a honey mustard glazed smoked ham with two glasses of white wine and a bottle of wine nearby.
    Honey Mustard-Glazed Smoked Ham
  • A circular tin lined with brown paper filled with homemade peppermint bark, surrounded by holiday garland and more pieces of bark.
    Homemade Peppermint Bark
  • A circular dish holding Baked Brie with Cranberry-Orange Sauce and Pecans surrounded by two glasses of white wine, pieces of toast, holly, and silverware.
    Baked Brie with Cranberry-Orange Sauce and Pecans
  • An overhead view of a large cast-iron skillet filled with French onion au gratin potatoes with fresh herbs and a grey napkin near the dish.
    French Onion au Gratin Potatoes
  • A yellow rectangular baking dish filled with a classic breakfast casserole with the handles of the dish being held by a person holding two linen napkins.
    Classic Breakfast Casserole (Egg Bake)
See more Christmas →

Popular Recipes

  • best-ever chicken salad recipe
    Best-Ever Chicken Salad
  • A white soup filled with roasted tomato basil soup next to sliced grilled cheese sandwiches.
    Roasted Tomato Basil Soup
  • Mahi Mahi tacos on a wooden table in a taco holder
    Amazing Mahi Mahi Tacos
  • A lemon wedge being squeezed onto a platter of chicken francese
    Chicken Francese
  • Southern Shrimp and Cheesy Grits recipe
    Southern Shrimp and Cheesy Grits
  • Slow Roasted Pork Shoulder on a platter with a side of gravy
    Slow Roasted Pork Shoulder

Footer

↑ back to top

Explore

  • Recipe Index
  • About Us
  • Subscribe

About

  • Privacy Policy
  • Contact

Copyright © 2025 How to Feed a Loon • This website contains affiliate links, which means that if you click on a product link, we may receive a commission in return. How To Feed a Loon is a participant in the Amazon Services LLC Associates Program, an affiliate advertising program designed to provide a means for sites to earn advertising fees by advertising and linking to Amazon.com.

Rate This Recipe

Your vote:


A rating is required
A name is required
An email is required