How To Feed A Loon

  • About Us
  • Recipe Index
    • Appetizers
    • Asian
    • Breads and Doughs
    • Cajun / Creole / Louisiana
    • Breakfast / Brunch
    • Comfort Food
    • Delectable Desserts
    • Entrees / Mains
    • Instant Pot
    • Italian
    • Pizza
    • Rubs, Spices and Sauces
    • Soups & Salads
    • Sides
    • Seafood
    • Southern
    • Mexican / Tex-Mex / Cal-Mex
    • Thanksgiving
    • Vegetarian
  • Videos
    • Recipe Videos
    • Web Stories
  • Work With Us
  • Contact
  • **Premium Access**
  • Recipes
menu icon
go to homepage
  • Holiday Favorites
  • Recipes
  • About Us
  • Work With Us
  • Premium
subscribe
search icon
Homepage link
  • Holiday Favorites
  • Recipes
  • About Us
  • Work With Us
  • Premium
×
Home » Recipe Index

Caprese Salad with Grilled Peaches

August 16, 2019 by Kris Longwell 3 Comments

Caprese salad with grilled peaches on a white circular dish.

This post is kindly sponsored by Village Farms, but the recipe, photography, and opinions are 100% ours. 


Classic Caprese Salad with Grilled Peaches is a summertime dish at its very best.

We’re so excited to have teamed up with one of our favorite providers of produce on the planet.  We’re talking, of course, about Village Farms®.  And we are featuring their incredible Sinfully Sweet Campari tomatoes.

Caprese salad with grilled peaches on a white circular dish.

In addition to using some of the most delicious tomatoes we’ve ever encountered, we’re taking things even further and adding in sweet and savory grilled peaches and topping it all with a glorious balsamic reduction.

SINFULLY SWEET CAMPARI TOMATOES ARE BURSTING WITH FLAVOR

We absolutely love using produce from Village Farms®. Their produce is distributed throughout the USA and Canada and they truly capture the essence of your local farmer’s market.

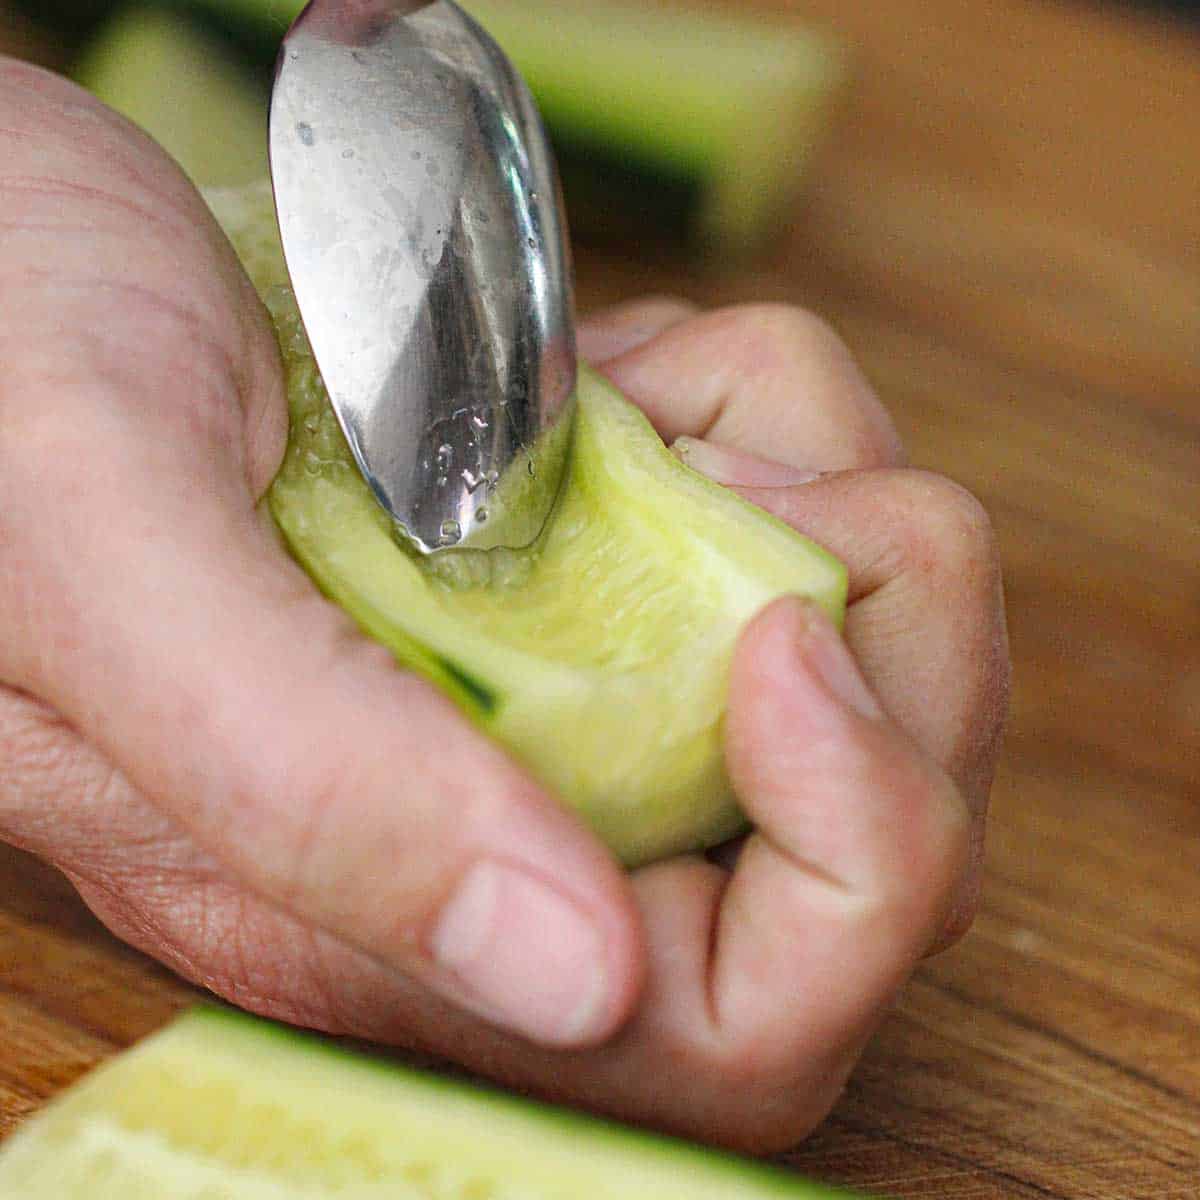
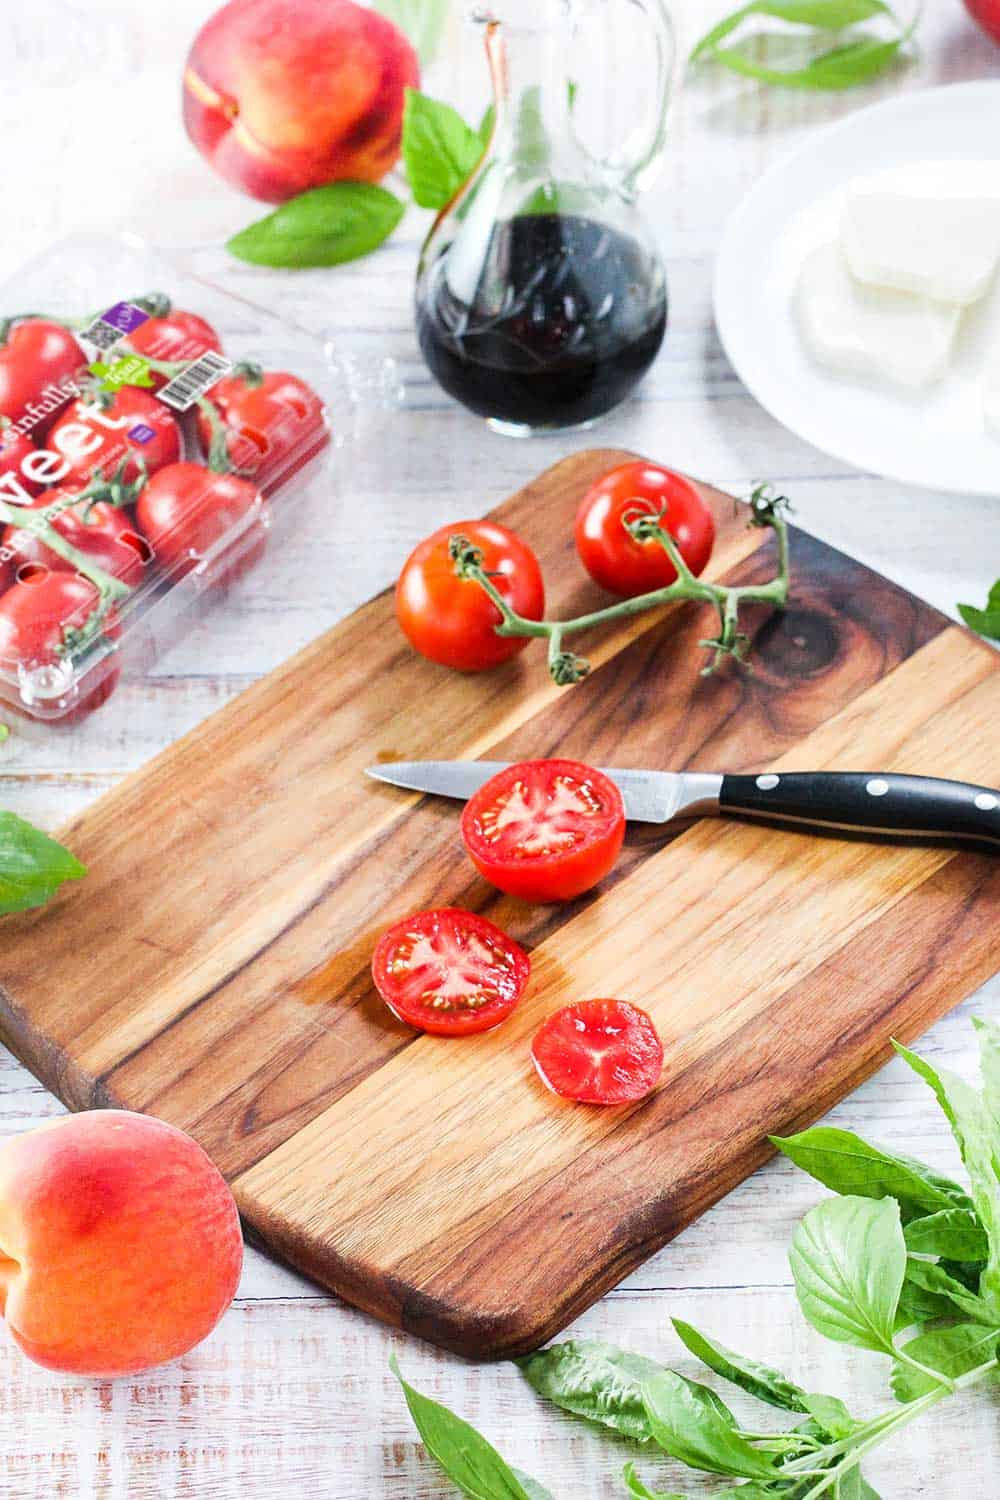
As we slice into the Sinfully Sweet Campari tomatoes, they literally burst with freshness.

The only challenge is to not eat them all up before it’s time to assemble the caprese salad with grilled peaches!

Sliced compari tomatoes on a wooden cutting board with basil nearby.

We knew we wanted to create an amazing caprese salad utilizing Village Farm’s campari tomatoes.  That was a no-brainer.

But we couldn’t just leave well enough alone. We decide peaches (grilled peaches, in fact) would elevate this already incredible salad to pretty amazing culinary heights.

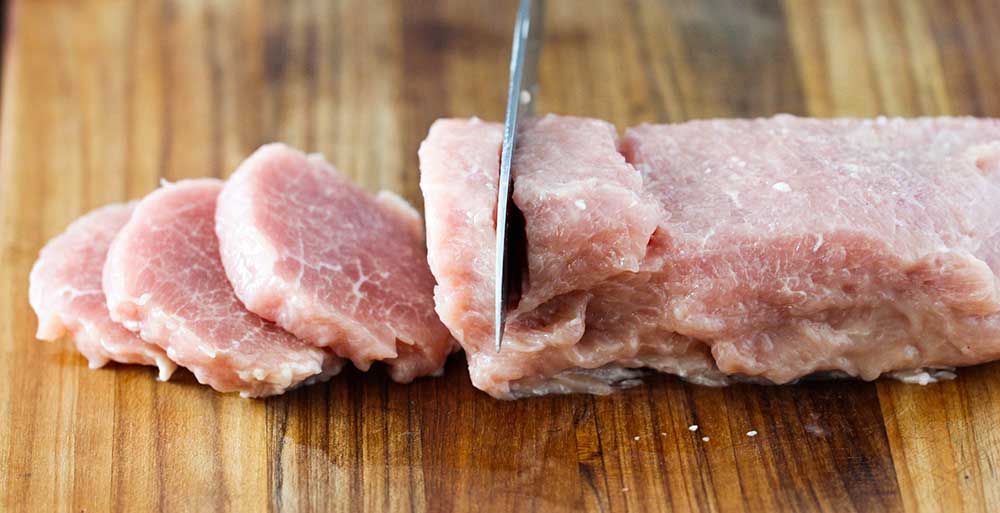
We found that slicing the peach from the outside in was the best to get perfectly round, solid slices. Once you come to the pit, turn the peach around, and start slicing the other side. Save the final center slice, with the pit still in it, for snacking!

A chef's knife slicing through a yellow peach.

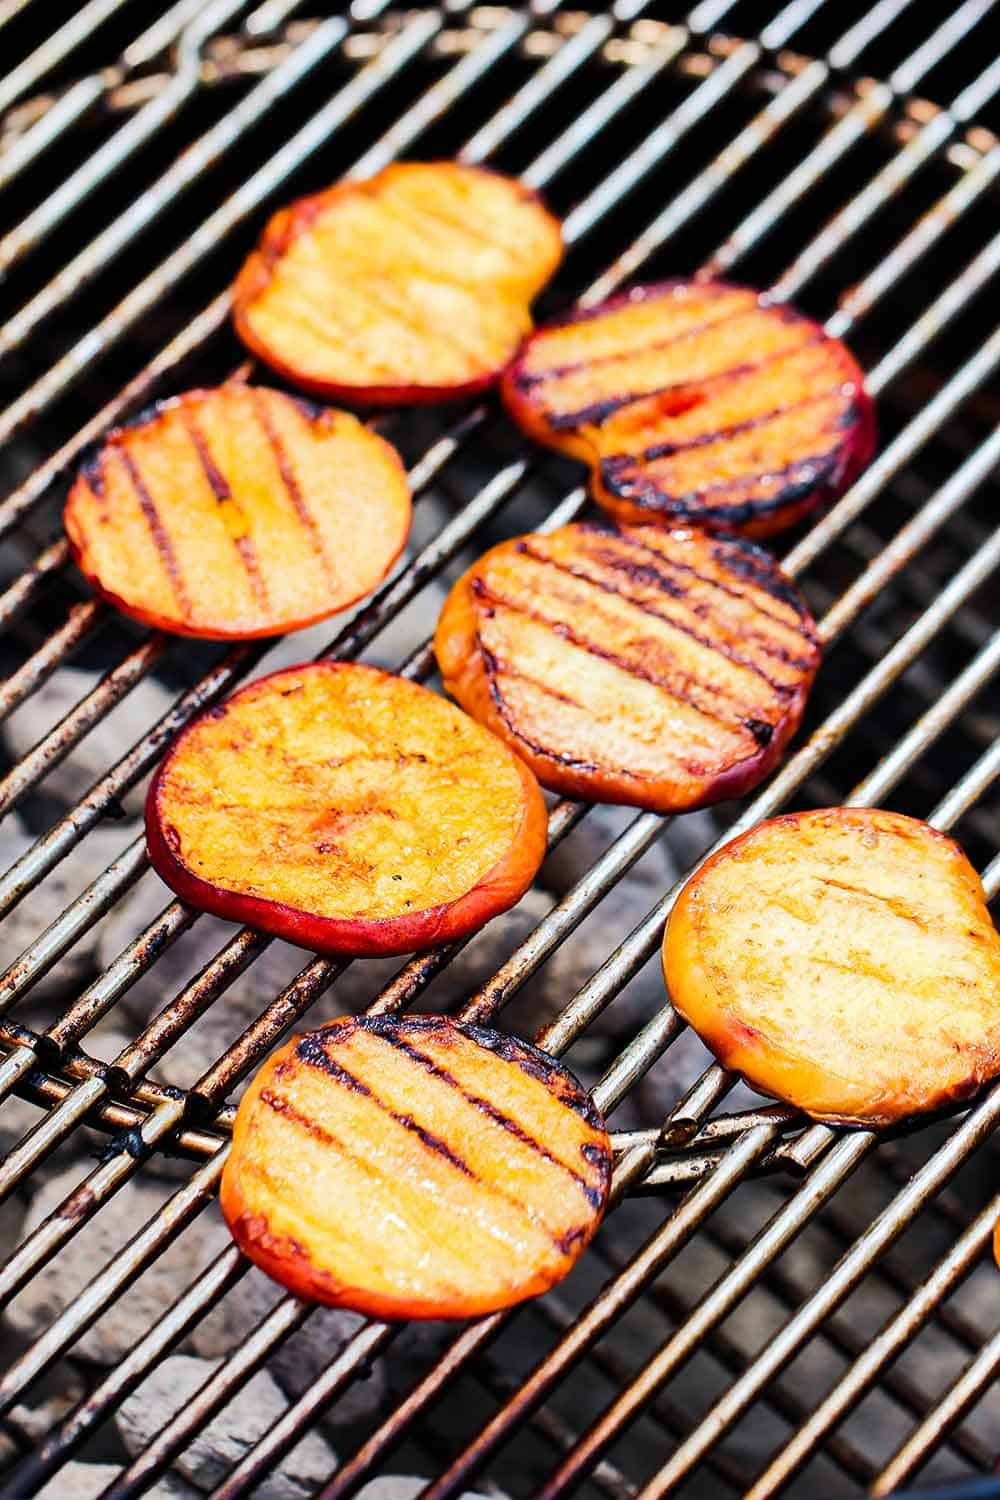
Grilling the peaches brings out even more of the natural sweetness in the fruit. For this recipe, we love going with firm, yet ripe, yellow peaches.

You’ll need to brush a little olive oil on both sides of the peach slice.  Next, get your grill nice and hot.

We used our charcoal kettle grill this time, but you could use a gas grill, electric grill, or even a hot grill skillet on your stovetop. They only take about 4 minutes per side to get perfectly cooked.

Sliced peaches on a charcoal grill

We just love using Village Farm’s Sinfully Sweet Campari tomatoes for this salad for several reasons. First, and foremost, is taste.

These tomatoes have the perfect combination of sweetness and acidity. They are also just so vibrant, juicy, and beautiful in appearance.

They are larger than a cherry tomato, but smaller than TOV (tomato on the vine). They really work perfectly for this Caprese Salad with Grilled Peaches!

A hand layering a tomato for caprese salad with grilled peaches on a white plate.

THE SECRET TO CAPRESE SALAD WITH GRILLED PEACHES

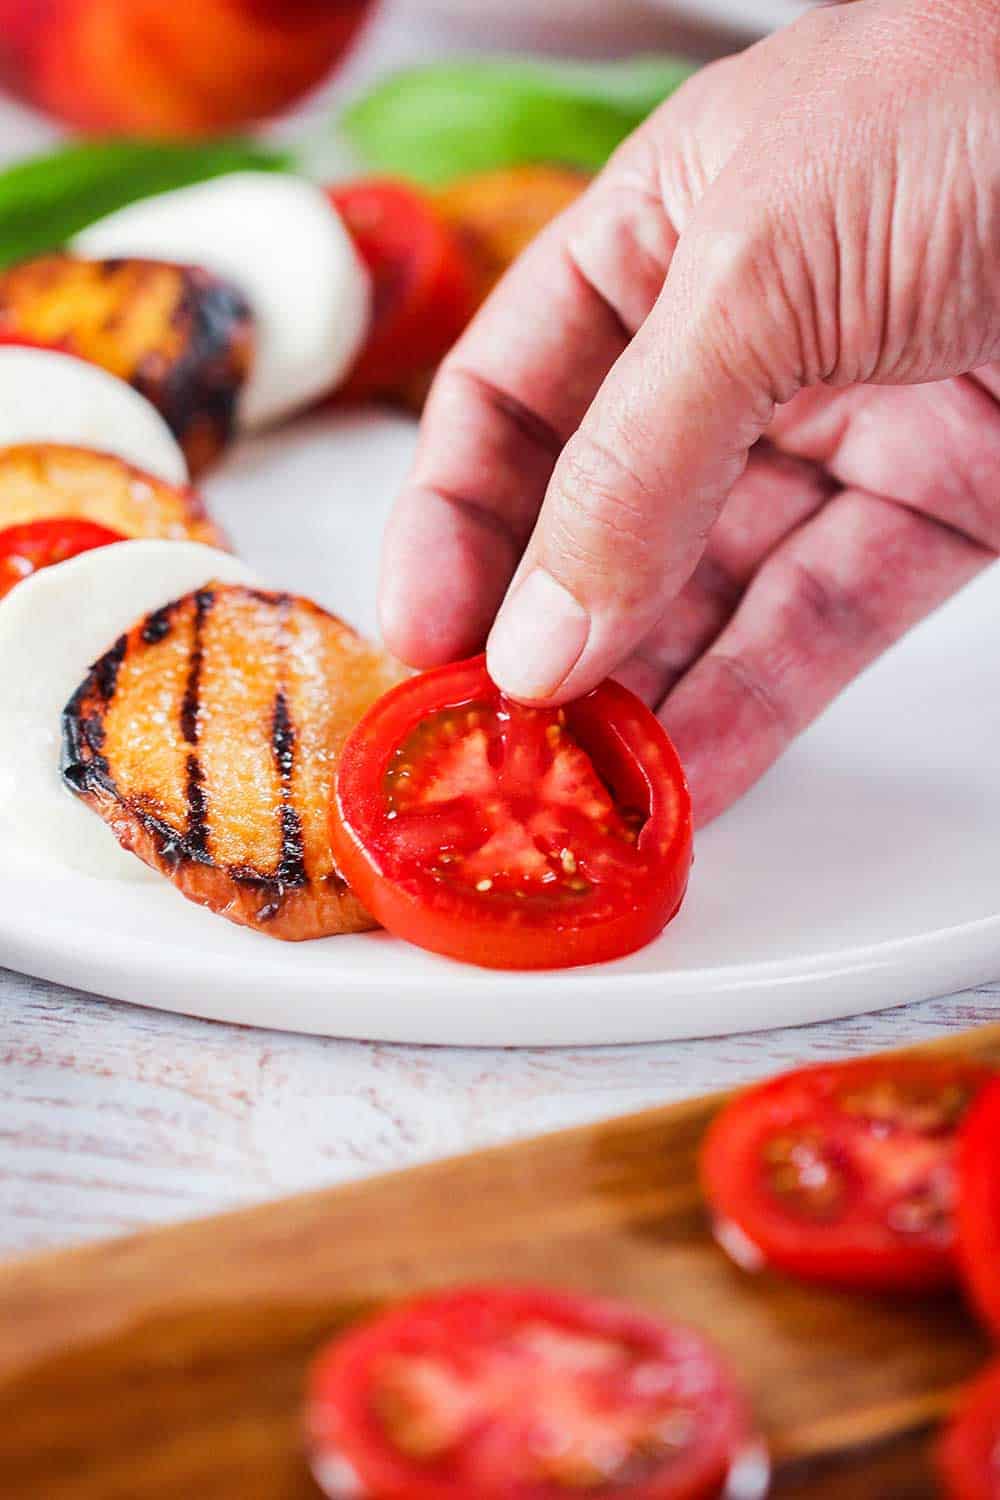
Caprese salad is a beautiful combination of fresh and simple ingredients. Going with quality is always is your best bet.

Obviously, we went with the best tomato in town with Village Farms®. No question there.  But in addition to that, choosing top-notch fresh mozzarella is recommended. And then slice it to the same thickness as the tomatoes.

We found that firm, yet ripe, yellow peaches worked beautifully. Fresh basil is a must. And then we found that using a high-quality balsamic vinegar really does make a difference in the reduction. Actually, it is amazing and brings the dish all together.

A single serving of caprese salad with grilled peaches on a white cocktail plate.

VILAGE FARMS® DELIVERS QUALITY EVERY TIME

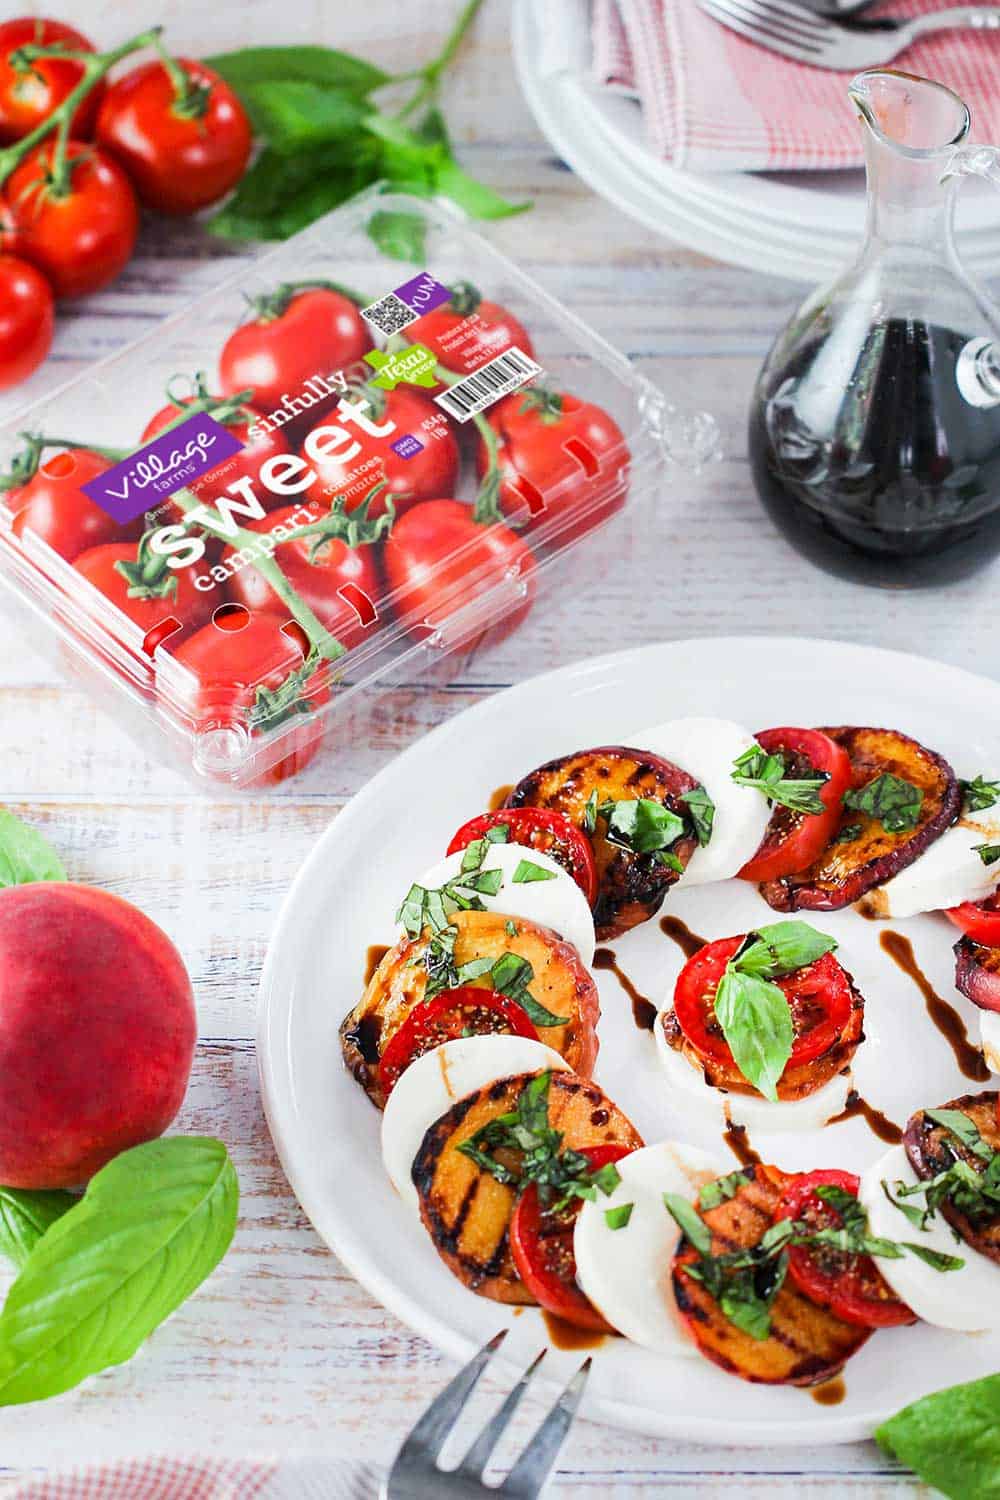
It’s really amazing to see the reaction of friends and family when we serve this Caprese Salad with Grilled Peaches featuring Village Farms® Sinfully Sweet Campari® tomatoes.

The salad is just so beautiful in presentation. And then the taste? We can honestly say it’s our favorite summertime salad of all time. The grilled peaches, along with the best tomatoes in the world, put it over the top.

The Sinfully Sweet Campari® is also a low-calorie source of vitamin C and K, supporting brain health and strengthening bones! Gorgeous, delicious and good for you! How in the world can you ever beat that!

Caprese salad with grilled peaches on a white plate next to a package of campari tomatoes.

PAIR THE SALAD WITH GRILLED PORTOBELLO PIZZAS

While you’ve got the grilled fired up, you should also make our incredible Grilled Portobello BLT “Pizzas”Grilled Portobello BLT “Pizzas”!

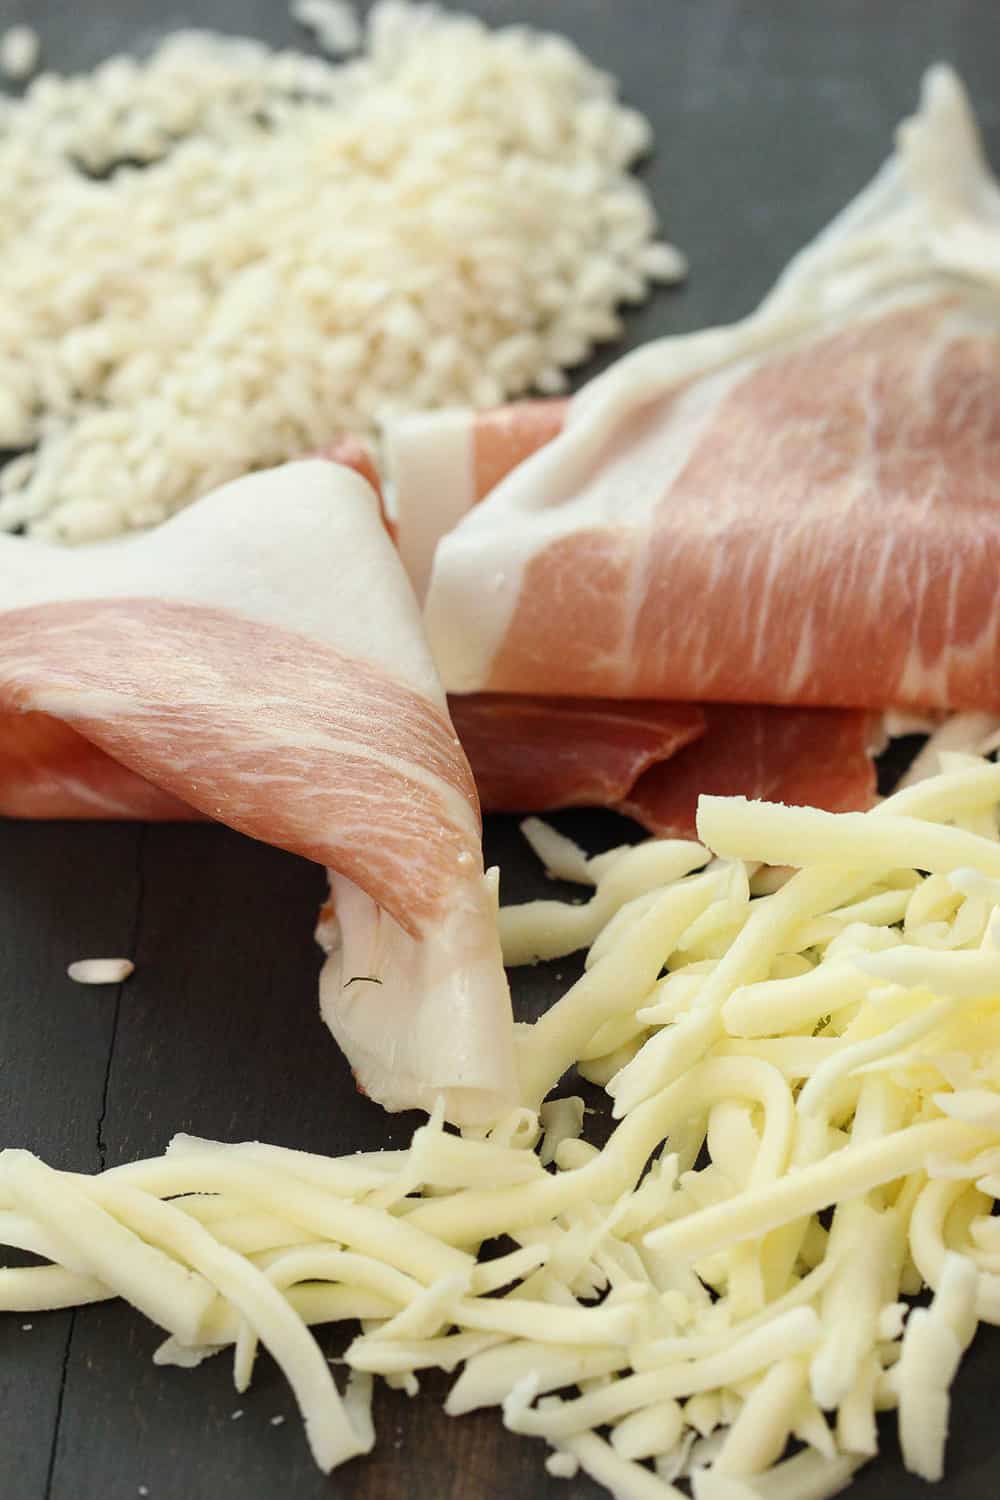
We feature Village Farms Heavenly Villagio Marzano tomatoes. The portobello cap replaces the traditional pizza crust, and we use pesto sauce, pancetta, fontina cheese, tomatoes and arugula.

These pair beautifully with the Caprese Salad with Grilled Peaches! Talk about a gorgeous presentation!

Individual servings of caprese salad next to a pizza paddle with portobello pizzas.

Ready to impress with one of the most delicious takes on one of the best summertime salads ever?

Pick up some Village Farms Sinfully Sweet Campari® tomatoes and the other ingredients, and make this amazing Caprese Salad with Grilled Peaches!

And before you devour it, be sure to snap a picture of it and post it to Instagram and tag @howtofeedaloon and @villagefarms!

Caprese Salad with Grilled Peaches on a circular white platter.
Print Recipe
5 from 1 vote

Classic Caprese Salad with Grilled Peaches

Prep Time10 minutes mins
Cook Time18 minutes mins
Total Time28 minutes mins
Course: Appetizer, Salad
Cuisine: American, Italian
Servings: 6
Calories: 186kcal
Author: Kris Longwell

Equipment

  • Charcoal, gas, or electric grill. Or, stovetop grill skillet

Ingredients

  • 1 cup balsamic vinegar
  • 6 Village Farms Sinfully Sweet Campari Tomatoes® cut into ¼" slices
  • 2 tablespoon olive oil
  • 4 yellow peaches cut into ¼" slices (see note below)
  • 12 oz fresh mozzarella cut into ¼" slices
  • 1 cup fresh basil leaves
  • Kosher salt and freshly ground pepper

Instructions

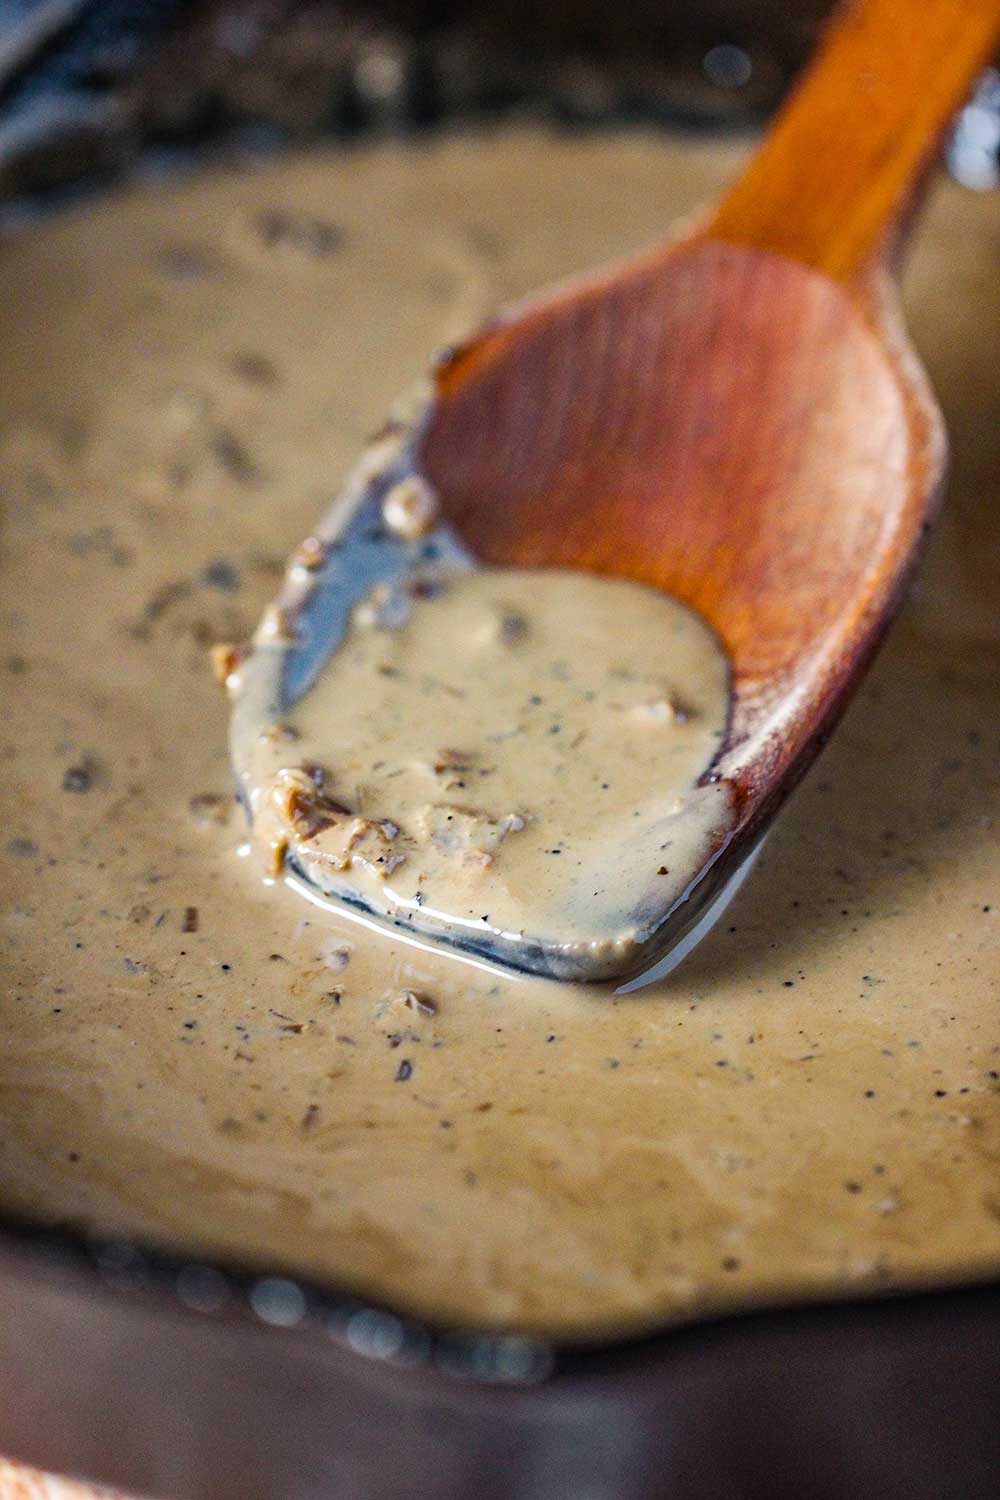
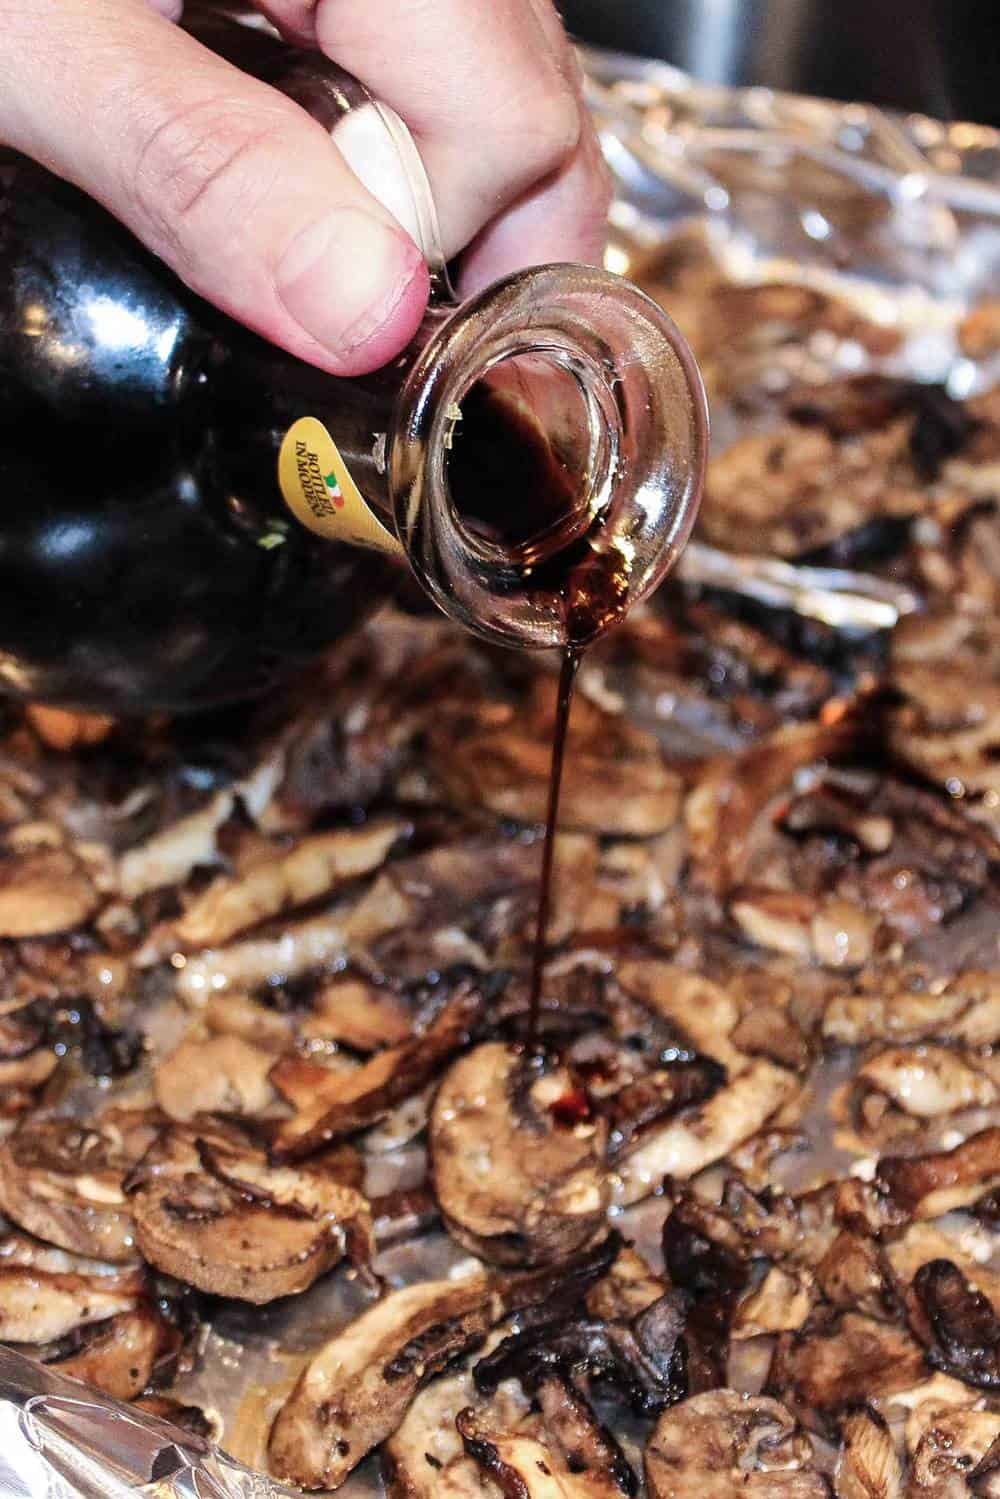
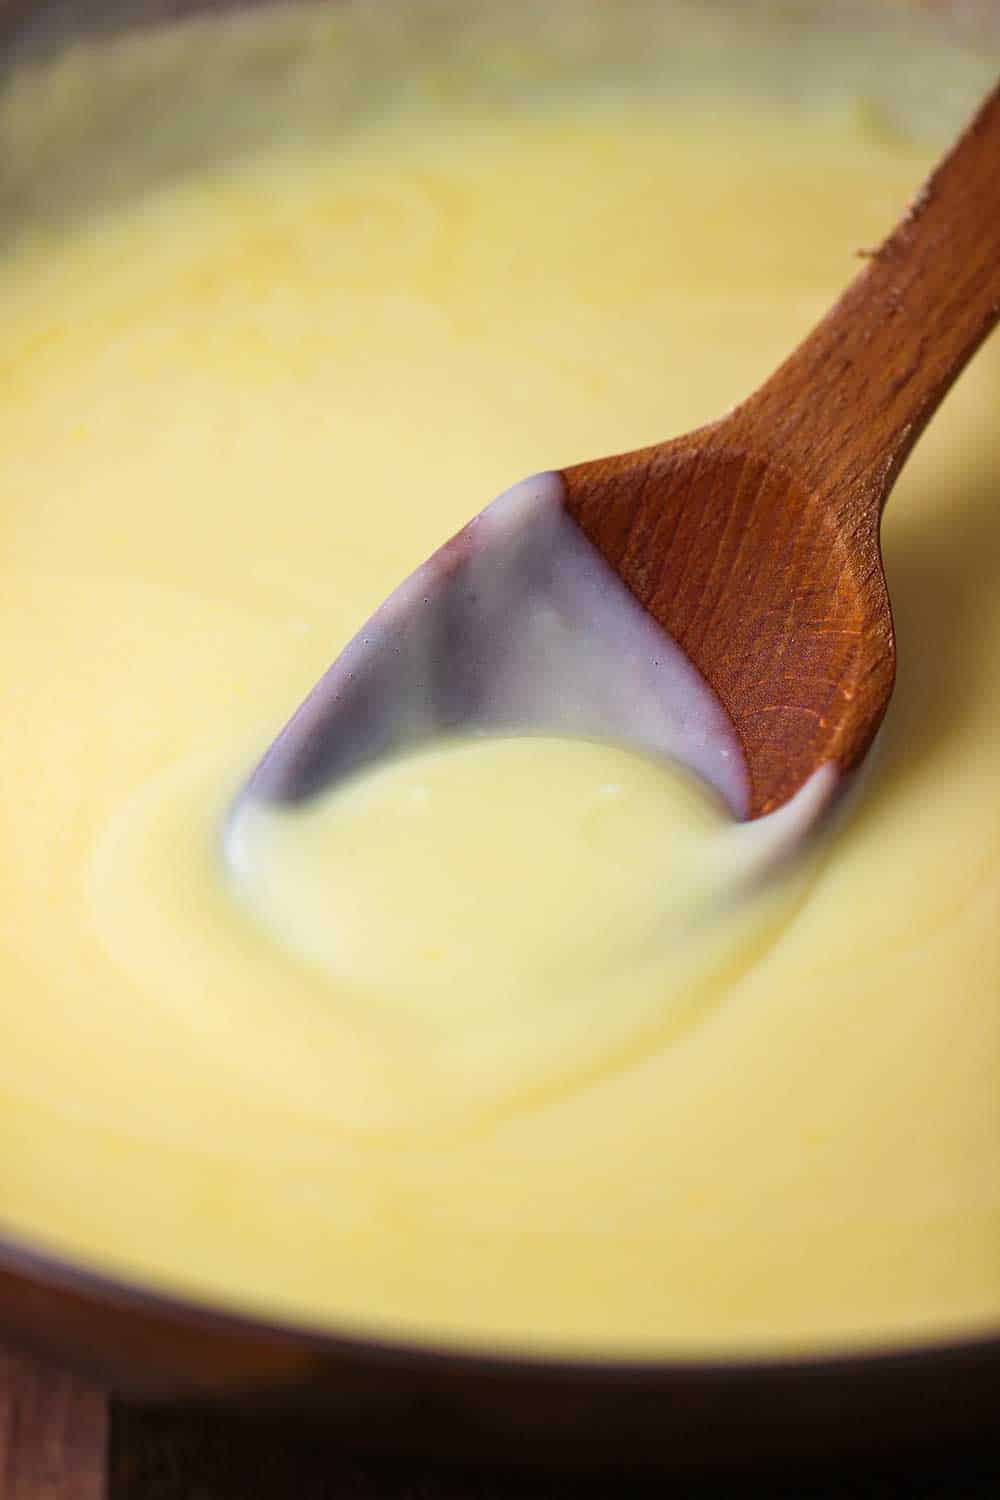
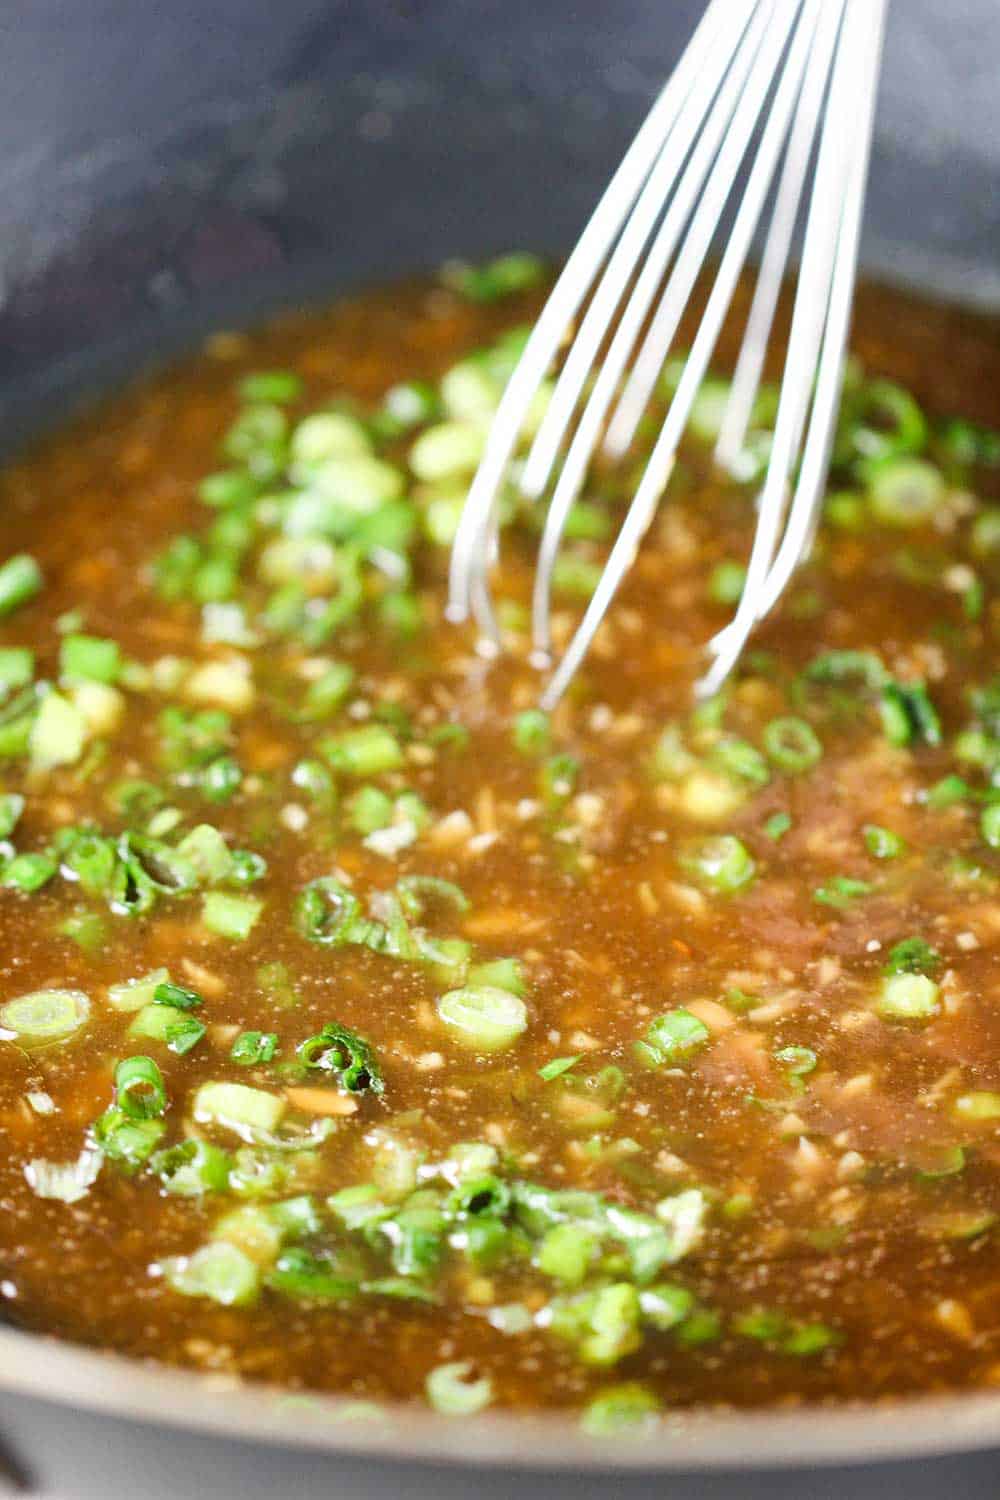
  • Place the balsamic in a small sauce pan and bring to a boil then reduce heat slightly and simmer for 12 to 15 minutes, or until reduced in half and slightly thickened. It will coat the back of a spoon once ready. Set aside.
  • Turn your grill to medium-high heat.
  • Brush oil on both sides of the peach slices and then place on the grill over direct heat. Cook for about 4 minutes per side, or until grill marks begin to appear. Remove from grill.
  • Arrange the salad by starting with a tomato slice on a platter, then place a grilled peach across half of the tomato, then placing a mozzarella slice over half of the peach, then placing a basil leaf over the mozzarella. Repeat until the platter is full and you have used all the ingredients.
  • Drizzle the balsamic reduction over the top and serve at once.

Notes

To slice the peaches, use a sharp knife and carefully slice one side of the peach off, about ¼" thick.  Moving inwards, cut another slice.  Once you reach the pit, turn the peach around and cut slices in the same manner.  Save the peach that is left around the pit for another use (or a quick snack).
We find that using a quality balsamic produces the best tasting reduction.  The reduced balsamic will stay in a container with a lid in the refrigerator for up to 2 weeks. 

Nutrition

Calories: 186kcal | Carbohydrates: 9g | Protein: 13g | Fat: 12g | Saturated Fat: 2g | Cholesterol: 45mg | Sodium: 366mg | Potassium: 102mg | Fiber: 1g | Sugar: 7g | Vitamin A: 594IU | Vitamin C: 1mg | Calcium: 305mg | Iron: 1mg

Classic Pasta Salad

August 13, 2019 by Kris Longwell 3 Comments

A white oval serving bowl filled with classic pasta salad including artichoke hearts, sun-dried tomatoes, black olives, tricolor rotini pasta, basil, tossed in homemade Italian dressing.

This Classic Pasta Salad is a fresh, colorful side dish that’s always a crowd‑pleaser. Made with tricolor rotini, mozzarella balls, basil, olives, and a zesty homemade Italian dressing, it’s light yet satisfying. Perfect served alongside BBQ favorites and grilled dishes, this salad is a must‑have for summer cookouts, picnics, and potlucks.

A white oval serving bowl filled with classic pasta salad including artichoke hearts, sun-dried tomatoes, black olives, tricolor rotini pasta, basil, tossed in homemade Italian dressing.
[feast_advanced_jump_to]

☑️ The Ingredients

Made with simple, fresh ingredients like tricolor rotini, mozzarella balls, basil, olives, marinated artichokes, and a tangy homemade Italian dressing, this pasta salad is bursting with flavor and color. Find ingredient notes (including substitutions and variations) below.

An arrangement of ingredient for Classic Pasta Salad on a grey wooden background including tricolor rotini pasta, basil, artichoke hearts, sun-dried tomatoes, mozzarella balls, olives, salt, pepper, and Italian dressing.

👉 Substitutions and Variations

  • Tricolor Rotini: Any short pasta works well—try penne, farfalle, or fusilli. Whole wheat or gluten‑free pasta can be used too.
  • Mozzarella Balls: Swap with cubed cheddar, provolone, or feta for a different flavor profile.
  • Fresh Basil: Substitute with parsley, oregano, or even baby spinach for a milder taste.
  • Marinated Artichoke Hearts: Roasted red peppers or sun‑dried tomatoes make great alternatives.
  • Black Olives: Use Kalamata olives for a brinier bite, or leave them out if you’re not a fan.
  • Homemade Italian Dressing: Bottled Italian dressing works in a pinch, or try homemade balsamic vinaigrette for a sweeter twist.

See the recipe card (with video) below for a full list of ingredients and measurements.

Expert Tip

For a heartier twist, fold in chopped Italian cured meats like salami, pepperoni, or prosciutto. They add savory depth and turn this classic pasta salad into a satisfying main dish for any cookout or potluck.

⭐️ Tips and Tricks for Perfect Classic Pasta Salad

  • Cook pasta al dente: Slightly undercooked pasta holds up better once tossed with dressing and stored.
  • Rinse after cooking: Rinsing the pasta under cold water stops the cooking process and prevents sticking.
  • Dress while warm: Tossing the pasta with a little dressing while it’s still warm helps it soak up extra flavor.
  • Make ahead: This salad tastes even better after a few hours in the fridge, giving the flavors time to meld.
  • Keep it fresh: If making ahead, reserve some dressing to add just before serving to keep the salad bright and flavorful.
  • Customize it: Mix in extras like cherry tomatoes, cucumbers, bell peppers, or even chickpeas for added color and texture.

👩🏼‍🍳 How to Make Classic Pasta Salad

A person holding a jar with a lid on it that is filled with homemade Italian dressing.
  1. Step 1: Prepare the Homemade Italian Dressing and let it chill for at least one hour. Shake it before adding to the salad.
A person transferring uncooked tricolor rotini pasta into a pot of boiling water on a gas stove.
  1. Step 2: Add the pasta to a pot of salted boiling water.
A person holding cooked tricolor rotini pasta that is fully cooked and has cooled.
  1. Step 3: Cook until soft and then drain in a colander and rinse with cool water until no longer hot.
A person using one hand to transfer of marinated artichoke hearts into a bowl of cooked pasta and his other hand transferring pieces of sun-dried tomatoes into the same bowl.
  1. Step 4: Place the cooled pasta into a large bowl and add the artichoke hearts and sliced sun-dried tomatoes.
A person pouring homemade Italian dressing from a glass jar into a glass bowl filled with cooked rotini pasta, mozzarella balls, chopped basil, artichoke hearts, and halved black olives.
  1. Step 5: Add the remaining ingredients and about a half cup of the dressing.
A person using two large wooden spoons to toss together a classic pasta salad in a large glass bowl.
  1. Step 6: Toss to coat, then cover with plastic wrap and chill for at least one hour.

🙋🏽‍♂️ Frequently Asked Questions

Can I make Classic Pasta Salad ahead of time?

Yes, this salad actually tastes better when made a few hours in advance, since the flavors have time to meld. Toss with a splash more of the dressing just before serving.

How long does Classic Pasta Salad last in the fridge?

It will stay fresh for about 3–4 days when stored in an airtight container in the refrigerator.

Can I use a different type of pasta for Classic Pasta Salad?

Absolutely—short pastas like penne, farfalle, or fusilli all work well in this recipe.

Can I make Classic Pasta Salad gluten‑free?

Yes! Simply swap the tricolor rotini with your favorite gluten‑free pasta. Be sure to cook it al dente and rinse well, since gluten‑free pasta can become sticky.

What other sides go well with Classic Pasta Salad?

Creamy potato salad, slow‑cooker corn on the cob, and Southern baked beans all make excellent companions for a cookout spread alongside this pasta salad.

A close-up view of a classic pasta salad in a white oval serving bowl topped with chopped basil.

😋 Other Classic Side Salads

  • A large white bowl of freshly prepared Cajun Pasta Salad.
    Cajun Pasta Salad
  • A large white serving bowl filled with black bean and corn salad with two gold serving spoons tucked in beside the salad.
    Zesty Black Bean and Corn Salad
  • An oval white serving bowl filled with carrot and raisin salad with a gold serving spoon inserted on the side of the bowl.
    Carrot and Raisin Salad
  • An oval white serving bowl filled with cheddar bacon Ranch pasta salad.
    Cheddar Bacon Ranch Pasta Salad

Ready to make the best pasta salad in town? Go for it!

And when you do, be sure to take a picture, post it to Instagram, and tag @HowToFeedaLoon and #HowToFeedaLoon!

A white bowl containing fresh classic pasta salad.
Print Recipe
5 from 2 votes

Classic Pasta Salad

This Classic Pasta Salad is both delicious and visually stunning. Be sure to use top-notch dressing! If not serving right away, simply add a little more dressing just before serving, and toss gently. This salad is best when served within a few hours (at the most) of preparing. And at room temperature.
Prep Time25 minutes mins
Cook Time10 minutes mins
Chill time for Italian Dressing1 hour hr
Total Time1 hour hr 35 minutes mins
Course: Salad, Side Dish
Cuisine: American, Italian
Servings: 8 people
Calories: 220kcal
Author: Kris Longwell

Ingredients

  • ½ cup Italian Dressing or good-quaity store-bought
  • 12 oz pasta tri-color rotini, or fusilli, bow tie, or elbow
  • ½ cup artichoke hearts, in oil drained, or more, if desired
  • ½ cup sun-dried tomatoes in oil drained and roughly chopped, use more, if desired
  • ½ cup mozzarella balls
  • ½ cup black olives sliced and drained, use more, if desired
  • ¼ cup fresh basil roughly chopped
  • 1 teaspoon Kosher salt
  • ½ teaspoon freshly ground black pepper

Instructions

  • Prepare the Italian dressing and chill for at least one hour.
    ½ cup Italian Dressing
  • Meanwhile, bring a large pot of liberally salted (1 tbsp) water to a boil. Add the pasta and cook until al dente. Usually 9 to 12 minutes. Drain and rinse with cool water until no longer hot. Transfer to a large bowl.
    12 oz pasta
  • Add the artichokes, sun-dried tomatoes, mozzarella balls, olives, basil, salt, pepper, and dressing.
    ½ cup artichoke hearts, in oil, ½ cup sun-dried tomatoes in oil, ½ cup mozzarella balls, ½ cup black olives, ¼ cup fresh basil, 1 teaspoon Kosher salt, ½ teaspoon freshly ground black pepper
  • Gently stir until the pasta is fully coated and all ingredients are evenly distributed. Taste and add more salt and/or dressing, if desired.
  • Serve at once, or cover with plastic wrap and refrigerate for up to 4 hours. If not serving immediately, add several tablespoons of dressing just before serving, and stir.

Video

Notes

NOTE: Watch the video near the top of the recipe for visual guidance.
We strongly suggest using the homemade Italian dressing for this salad.  It really puts it over the top.  However, a quality bottled version will work, too. 
Small to medium bite-sized pasta works well.  Rotini or fusilli are our favorites.  Tri-color is tasty and very beautiful.
This pasta salad is easily adapted to tastes. Other great additions are cucumbers, Italian cured meats, and pepperoncini peppers.
It is best served fresh, but you can make it up to a day in advance. Just add more of the dressing and toss before serving. We find that it’s still perfect after sitting in the fridge for up to 4 hours before serving. Setting the salad out an hour before serving helps the flavor and texture, too.  

Nutrition

Calories: 220kcal | Carbohydrates: 35g | Protein: 6g | Fat: 6g | Saturated Fat: 1g | Sodium: 443mg | Potassium: 215mg | Fiber: 2g | Sugar: 3g | Vitamin A: 161IU | Vitamin C: 7mg | Calcium: 20mg | Iron: 1mg

Grilled Honey Mustard Chicken Sandwich with Bacon

August 11, 2019 by Kris Longwell 10 Comments

A grilled honey mustard chicken sandwich with bacon on a sesame seed bun sitting on a withe dinner plate with a frosty glass of beer in the background.

Grilled Honey Mustard Chicken Sandwich with Bacon is a flavorful and juicy meal that combines tangy honey mustard, smoky bacon, and tender grilled chicken on a toasted bun. Serve it alongside Homemade French Fries or Classic Pasta Salad for the ultimate outdoor feast everyone will love.

A grilled honey mustard chicken sandwich with bacon on a sesame seed bun sitting on a withe dinner plate with a frosty glass of beer in the background.
[feast_advanced_jump_to]

🍯 The Ingredients

Most of the ingredients are likely already in your pantry, yet they come together to create one of the most delicious sandwiches of all time. Find ingredient notes (including substitutions and variations) below.

An arrangement of ingredients for a grilled honey mustard chicken sandwich on a wooden grey background including uncooked chicken breasts, hamburger buns, honey, yellow mustard, Italian dressing, seasonings, bacon, mayonnaise, cheddar cheese slices, and butter.

🧀 Substitutions and Variations

  • Protein – Thin chicken breasts are excellent for this sandwich. Boneless, skinless chicken thighs are wonderful, too. The dark meat is flavorful and grills wonderfully. Slices of pork tenderloin, thin boneless pork chops, or even bratwurst patties can all be substituted for the chicken.
  • Dressing ingredients – We love the tang from classic yellow mustard; however, Dijon mustard, spicy brown mustard, or even Carolina Mustard Sauce are all amazing options. Store-bought Italian dressing is perfectly fine; however, Homemade Italian Dressing is great and always nice to have on hand. For the honey, your favorite brand is perfect.
  • Cheese – You can’t go wrong here. We love sliced cheddar, but sliced Colby, Monterey Jack, Swiss, smoked Gouda, or even mozzarella are all great choices. If you love blue cheese, that will be good, too, but very prominent.
  • Bacon – Thick, center-cut bacon is our first choice. But crispy slices of pancetta or prosciutto. Pan-fried Canadian bacon is a delicious option, too!

See the recipe card (with video) below for a full list of ingredients and measurements.

Expert Tip

Try and find thin, skinless, and boneless chicken breasts from the supermarket or your butcher. Don’t get chicken tenders because they contain a tendon that is tough and not pleasant. If you can’t find thin chicken breasts, purchase the larger cutlets, place them (one at a time) in a large freezer bag, and then use the side of a mallet and pound the meat until about a ¼” thick.

🔥 How To Make Grilled Honey Mustard Sandwiches with Bacon

A person using a whisk to stir a honey mustard sauce and marinade in a shallow white bowl.
  1. Step 1: In a bowl, whisk the honey, mustard, and dressing until combined. Save some for later.
A person using a pair of tongs to lift a thin boneless chicken breast from a shallow white bowl filled honey mustard marinade.
  1. Step 2: Place the chicken cutlets in the marinade and turn until coated.
A person using a pair of tongs to lift crispy bacon from a baking sheet that the bacon was baked on.
  1. Step 3: Bake the bacon in the oven at 400°F until crispy.
A person using a pastry brush to apply a honey mustard sauce onto a thin boneless chicken breast that is being grilled on a gas grill.
  1. Step 4: Grill the marinated chicken until browned, brushing more marinade as they cook.
A close-up view of two layers of grilled chicken and crispy bacon that are topped with melty slices of cheddar cheese.
  1. Step 5: Place the chicken on a baking sheet and top with bacon and cheese, and bake until melty.
A person placing the top half of a toasted sesame seed bun on top of a grilled honey mustard sandwich with bacon on a cutting board.
  1. Step 6: Slather the extra sauce on toasted buns and add the cutlets. Add the top bun and serve!

🙋🏽‍♂️ Frequently Asked Questions

Can the bacon and marinade be made in advance?

Yes, you can cook the bacon and the marinade 4 to 5 hours in advance to save time when assembling the sandwich.

What type of bread works best for a grilled honey mustard sandwich with bacon?

A fluffy, but sturdy bun or roll is recommended. Homemade hamburger buns are perfect! But store-bought are great, too. Bigger buns work best. Brioche or ciabatta rolls are great options, as well.

Can I cook the chicken on a grill pan instead of an outdoor grill?

Absolutely! A grill pan works great and will give the chicken those delicious grill marks and smoky flavor indoors.

Can the chicken be baked instead of grilled?

Yes, the chicken can be baked in the oven at 400°F (200°C) for about 20-25 minutes until cooked through, making it a convenient alternative to grilling.

A grilled honey mustard sandwich consisting of two pieces of chicken, melty cheddar cheese, and multiple strips of crispy bacon on a toasted sesame bun.

🍔 Other Epic Sandwich Recipes

  • A Marinated Grilled Steak Sandwich on a wood cutting board
    Grilled Steak Sandwich
  • A chicken fried steak sandwich topped with sliced tomato and lettuce sitting on a wooden cutting board.
    Chicken Fried Steak Sandwich
  • A buffalo chicken sandwich on a wooden board with blue cheese dressing dripping off the side.
    Buffalo Chicken Sandwich
  • A fried fish sandwich sitting on a black plate next a lemon wedge and potato chips with a glass of beer and another plate of a fish sandwich in the background.
    Best Fried Fish Sandwich

Ready to make the best chicken sandwich on the block? Go for it!

And when you do, be sure to take a picture of it, post it on Instagram, and tag @HowToFeedaLoon and #HowToFeedaLoon!

A grilled honey mustard chicken sandwich with bacon on a sesame seed bun sitting on a withe dinner plate with a frosty glass of beer in the background.
Print Recipe
5 from 4 votes

Grilled Honey Mustard Chicken Sandwiches

This has been one of our favorite sandwiches for many, many years. Double-stack the grilled cutlets for extra-hungry guests! Be sure to save plenty of the honey-mustard sauce for serving with the sandwiches!
Prep Time20 minutes mins
Cook Time20 minutes mins
Total Time40 minutes mins
Course: BBQ
Cuisine: American
Servings: 4
Calories: 846kcal
Author: Kris Longwell

Equipment

  • Gas or charcoal grill

Ingredients

For the Marinade/Dressing

  • ½ cup yellow mustard
  • ½ cup honey
  • ½ cup Italian dressing

For the Sandwiches

  • 8 chicken breasts tskinless and bonelesshin,
  • 16 slices bacon
  • salt and pepper
  • 4 hamburger buns
  • 1 tablespoon unsalted butter for the hamburger buns
  • 4 slices sliced cheddar cheese
  • ½ cup mayonnaise optional, for garnish

Instructions

  • In a medium-sized bowl or dish, whisk together the honey, mustard, and Italian dressing. Reserve about half a cup of the dressing for slathering on the toasted buns when ready to serve.
    ½ cup yellow mustard, ½ cup honey, ½ cup Italian dressing
  • Place the chicken into the marinade are turn until all cutlets are well coated.
    8 chicken breasts
  • Preheat oven to 400°F. Place the bacon on 1 (or 2) baking sheets and bake until crisp, about 8 to 10 minutes (time will vary depending on how thick the bacon is). Flipping halfway through the baking. Set aside.
    16 slices bacon
  • Meanwhile, turn your grill to medium-high heat.
  • Grill the marinated chicken until nicely browned. Sprinkle salt and pepper over the cutlets on each side as they cook. Brush more of the marinade over the cutlets until they are golden brown and the glaze has slightly caramelized. Remove from the grill.
    salt and pepper
  • Smear softened butter on the cut side of the buns. Grill the buns until nicely browned.
    4 hamburger buns, 1 tablespoon unsalted butter
  • On a baking sheet, place 4 chicken cutlets, then criss-cross two slices of cooked bacon, and repeat this. Place cheese slices on top. Turn your broiler on high and then cook just until the cheese has melted, about 1 to 3 minutes. Keep an eye on this…don't let them burn!
    4 slices sliced cheddar cheese
  • Slather a good layer of the reserved honey mustard dressing on the toasted buns. Add mayonnaise, too, if desired. Place the prepared chicken/bacon/cheese on the buns and serve them at once.
    ½ cup mayonnaise

Video

Notes

NOTE: Watch the video near the top of the recipe for visual guidance.
Be sure to use thin, boneless, and skinless chicken breasts.  Don’t purchase the chicken tenders from the supermarket.  If you can’t find thinly sliced breasts, go with the larger cutlets and pound them until about ¼″ in thickness.  You may need to cut the cutlets in half if they are too large.
You can substitute Dijon or spicy brown mustard for the yellow, if you prefer. We think yellow works best, but that’s up to you!
You can also cook the bacon in a skillet, rather than the oven, if you prefer. Drain on a plate lined with paper towels. 
Be sure to save at least half a cup of the dressing BEFORE placing the uncooked cutlets in the marinade.  If desired, double the amount of the marinade/dressing. Discard the marinade after basting the chicken once on the grill. Use the reserved dressing for slathering on the toasted buns!

Nutrition

Calories: 846kcal | Carbohydrates: 63g | Protein: 17g | Fat: 36g | Saturated Fat: 6g | Cholesterol: 77mg | Sodium: 767mg | Potassium: 319mg | Fiber: 2g | Sugar: 41g | Vitamin A: 162IU | Vitamin C: 1mg | Calcium: 103mg | Iron: 3mg

POST UPDATE: This recipe was originally published in May 2014, but was updated with improved tweaks with new tips, and photography, and a fabulous new video in July 2025!

Homemade Italian Dressing

August 7, 2019 by Kris Longwell 6 Comments

A Mason jar filled with homemade Italian dressing with a small pile of grated parmesan cheese, dried herbs, and fresh parsley around the jar.

Homemade Italian Dressing is fresh, zesty, and so easy to make, you’ll never want to buy the bottled version again. With a simple blend of olive oil, vinegar, herbs, and spices, this classic dressing is perfect for tossing with an amazing Italian chopped salad, drizzling over grilled veggies, or a classic pasta salad. It’s bright, flavorful, and ready in minutes!

A Mason jar filled with homemade Italian dressing with a small pile of grated parmesan cheese, dried herbs, and fresh parsley around the jar.
[feast_advanced_jump_to]

🧄 The Ingredients

Fresh parsley, garlic, lemon juice, and Parmesan blend with honey, herbs, and olive oil to create a zesty, tangy-sweet Italian dressing with just the right kick. Find ingredient notes (including substitutions and variations) below.

An arrangement of ingredients on a grey wooden background for homemade Italian dressing including olive oil, garlic, parsley, honey, Parmesan cheese, honey, vinegar, red pepper flakes, and seasonings.

👉 Substitutions and Variations

Substitutions

  • Fresh parsley: Swap with fresh basil, cilantro, or even dried parsley in a pinch.
  • Fresh garlic: Use garlic powder for a milder flavor.
  • Lemon juice: Replace with lime juice or red wine vinegar.
  • Honey: Try maple syrup, agave, or sugar for sweetness.
  • White wine vinegar: Sub with apple cider vinegar, red wine vinegar, or champagne vinegar.
  • Parmesan cheese: Pecorino Romano or Asiago work well too.

Variations

  • Spicy kick: Add extra red pepper flakes or a dash of hot sauce.
  • Creamy version: Whisk in a spoonful of mayonnaise or Greek yogurt.
  • Herby twist: Mix in fresh dill, thyme, or chives for a different flavor profile.
  • Vegan option: Omit Parmesan or use a plant-based alternative.

🇮🇹 Tips & Tricks for the Best Homemade Italian Dressing

  • Emulsify well: Whisk or shake the dressing vigorously in a jar to help the oil and vinegar blend smoothly.
  • Let it rest: Allow the dressing to sit for at least 10–15 minutes before serving so the flavors can meld together.
  • Store properly: Keep in a sealed jar in the refrigerator for up to 5–7 days; shake well before each use.
  • Adjust to taste: Add more honey for sweetness, extra lemon juice for brightness, or red pepper flakes for heat.
  • Grate fresh Parmesan: Freshly grated cheese melts into the dressing better than pre-shredded.

Expert Tip

For the brightest flavor, use freshly squeezed lemon juice and freshly grated Parmesan—these fresh ingredients make the dressing taste restaurant-quality and far more vibrant than bottled versions.

😋 How to Make Homemade Italian Dressing

A person dumping grated Parmesan cheese from a small white bowl into a jar filled with white wine vinegar, Italian parsley, lemon juice, and garlic.
  1. Step 1: Add the parsley, garlic, lemon juice, honey, white wine vinegar, and Parmesan cheese into a glass jar (with a lid).
A person dumping dried herbs and onion powder from a small white bowl into a glass jar filled with the ingredients for homemade Italian dressing without the oil added yet.
  1. Step 2: Next, add the dried herbs and onion powder.
A person pouring extra-virgin olive oil from a small tube into a glass jar that is filled with the ingredients for homemade Italian dressing.
  1. Step 3: Add the extra virgin olive oil.
A person holding a jar of homemade Italian dressing with a lid screwed on and has just been vigorously shaken.
  1. Step 4: Affix the lid tightly and shake vigorously to emulsify.
A person holding a glass jar with lid that is filled with homemade Italian dressing in one hand and is getting ready to open the door of the refrigerator with his other hand.
  1. Step 5: Chill, preferably for at least 1 hour.
A person pouring homemade Italian dressing over the ingredients of a classic pasta salad in a bowl.
  1. Step 6: Serve with pasta salads and tossed salads. Or with grilled veggies.

🍽️ How to Serve

  • Toss with fresh green salads for a light, zesty flavor.
  • Drizzle over roasted or grilled vegetables.
  • Use as a marinade for chicken, shrimp, or pork.
  • Spoon over grain bowls or pasta salads for extra brightness.
  • Serve as a dip with crusty bread or fresh veggies.

🙋🏽‍♂️ Frequently Asked Questions

Can I make Homemade Italian Dressing ahead of time?

Yes, it keeps well in the refrigerator for up to 5–7 days in a sealed jar. Just give it a good shake before serving.

Is Homemade Italian Dressing gluten-free?

Yes, all the ingredients are naturally gluten-free. Just double-check labels on Parmesan and spices to be sure.

Can I make Homemade Italian Dressing without Parmesan cheese?

Absolutely—you can leave it out for a dairy-free version, or substitute with a plant-based Parmesan alternative.

How do I adjust the flavor of Homemade Italian Dressing?

Add extra honey for sweetness, more lemon juice or vinegar for tang, or an extra pinch of red pepper flakes for heat.

A person holding a jar filled with homemade Italian dressing and tilting it sideways so the contents of the jar are visible.

🥗 More Homemade Salad Dressing Recipes

  • A hand pouring homemade ranch dressing onto a green salad in a brown wooden bowl.
    Homemade Ranch Dressing
  • A person transferring homemade blue cheese dressing from a spoon onto a wedge salad that includes iceberg lettuce, chopped tomatoes, crumbled bacon, and chopped onion.
    Homemade Blue Cheese Dressing
  • A Mason jar filled with homemade balsamic vinaigrette next to a wooden salad bowl filled with salad.
    Balsamic Vinaigrette
  • A spoon drizzling avocado lime over the top of a chopped salad in a white bowl topped with grilled corn, cherry tomatoes, and pinto beans.
    Avocado Lime Dressing

Ready to make the best homemade dressing in town? Go for it!

And when you do, be sure to take a picture of it, post it on Instagram, and tag @HowToFeedaLoon and #HowTofeedaLoon!

A mason jar filled with homemade Italian dressing.
Print Recipe
5 from 1 vote

Homemade Italian Dressing

Once you make this Homemade Italian Dressing you will never want to buy the bottle variety again. And you seriously won't believe how simple it is to prepare. And what's so great is that almost all of the ingredients you probably already have in your pantry! So fresh and so delicious. One batch keeps for up 1 week in the fridge. Just give it a good shake before using.
Prep Time10 minutes mins
Resting time1 hour hr
Total Time1 hour hr 10 minutes mins
Course: Salad Dressing
Cuisine: Italian / American
Servings: 10 people
Calories: 141kcal
Author: Kris Longwell

Equipment

  • Jar with tight fitting lid, or blender

Ingredients

  • 1 tablespoon fresh parsley finely chopped
  • 2 cloves garlic minced
  • Juice from 1 lemon
  • 1 tablespoon honey
  • ⅓ cup white wine vinegar
  • 1 teaspoon dried oregano
  • 1 teaspoon dried basil
  • 1 teaspoon onion powder
  • 2 tablespoon Parmesan cheese grated
  • ¼ teaspoon red pepper flakes
  • ½ teaspoon Kosher salt
  • ¼ teaspoon freshly ground black pepper
  • ⅔ cup extra-virgin olive oil

Instructions

  • Add all the ingredients into a large jar with a tight fitting lid.
    1 tablespoon fresh parsley, 2 cloves garlic, Juice from 1 lemon, 1 tablespoon honey, ⅓ cup white wine vinegar, 1 teaspoon dried oregano, 1 teaspoon dried basil, 1 teaspoon onion powder, 2 tablespoon Parmesan cheese, ¼ teaspoon red pepper flakes, ½ teaspoon Kosher salt, ¼ teaspoon freshly ground black pepper, ⅔ cup extra-virgin olive oil
  • Fasten the lid into place and shake the jar vigorously for 1 to 2 minutes in order to emulsify (or blend) the oil with the vinegar.
  • Chill for at least one hour. Shake the jar again when ready to serve.

Video

Notes

NOTE: Watch the video near the top of the recipe for visual guidance.
You can also emulsify the dressing by using a blender or food processor.  Alternatively, slowly pour the EVOO into the other ingredients and whisk vigorously until fully blended.
A top-notch extra-virgin olive oil is recommended for the best taste.
The vigorous shaking may cause the parsley to give the dressing a slightly green hue.  This is no problem and illustrates how fresh the dressing is.
We prefer dried oregano and basil over fresh for this recipe. We’ve tested both versions, and feel the dried delivers the best flavor. 
This dressing can be used for a salad dressing, marinade, and dipping sauce. 

Nutrition

Calories: 141kcal | Carbohydrates: 2g | Protein: 1g | Fat: 15g | Saturated Fat: 2g | Cholesterol: 1mg | Sodium: 135mg | Potassium: 4mg | Fiber: 1g | Sugar: 2g | Vitamin A: 87IU | Vitamin C: 1mg | Calcium: 16mg | Iron: 1mg

Pork Dumplings with Peanut Sauce

August 4, 2019 by Kris Longwell 20 Comments

A white bowl of steamed pork dumplings with a spicy peanut sauce over the top.

Pork Dumplings with Peanut Sauce has been a favorite dish of ours since we met in NYC back in the late 80s.

The filling is savory and classic, and the sauce is velvety and luscious, with a touch of heat.

One word of warning: These dumplings are so delicious, you will find it hard to have just one, or two…or 10.

A white bowl of steamed pork dumplings with a spicy peanut sauce over the top.

PORK DUMPLINGS WITH SPICY PEANUT SAUCE ARE EASY TO MAKE AT HOME

We have been making pork dumplings at home for many, many years, and this recipe has evolved into what we think is the perfect dumpling.

These are fun to make together, and really are not terribly time-consuming.

Watch us show you how to make Pork Dumplings with Peanut Sauce!

INGREDIENTS NEEDED FOR PORK DUMPLINGS

The filling for the pork dumplings has that classic Chinese flavor profile. You will need:

  • Ground pork
  • Fresh garlic and ginger
  • Soy sauce
  • Sesame oil
  • Egg
  • Scallions

TIP: Dumpling wrappers are found in Asian markets and online. If you can’t find them, you can easily substitute wonton wrappers, which are found in the produce section of most supermarkets, near the tofu products.

Ground pork, sesame oil, fresh garlic and ginger, an soy sauce on a grey table.

HOW TO WRAP THE DUMPLINGS

Wrapping the dumplings is actually easier than you might think.

You’ll definitely want to start by wetting the edges of the wrapper with water. Only go with a teaspoon of filling; any more and it may seep out when cooking.

Use your fingers (or thumbs) to create little pleats along the edges of the wrapper once folded over.

A brush applying water along the edges of a dumpling wrapper for pork dumplings with spicy peanut sauce.
Two hands folding over the sides of a pork dumpling wrapper.
Two thumbs creating a pleat in a pork dumpling wrapper.
A hand holding a pork dumpling with pleats along the edges.

HOW TO COOK PORK DUMPLINGS

There are various ways to cook the dumplings for our Pork Dumplings with Spicy Peanut Sauce. You can pan-fry them in a little oil, boil them, or steam them.

We love using our bamboo steamer for cooking them. Be sure not to overcook them, or they will become rubbery.

We find that 20 minutes cooks the filling perfectly and keeps the wrapper soft and melt-in-your-mouth good.

Pork dumplings in a double-stack bamboo steamer.

WHAT TYPE OF PEANUT BUTTER IS BEST FOR THE SAUCE?

You will definitely want to go with a creamy peanut butter for the sauce.  For the perfect sauce, avoid the low-fat variety.

You want a velvety texture that is not too thick, yet not overly runny. You may need to add more water to thin the sauce.  Asian chili oil can be found in many well-stocked supermarkets, Asian markets, and online.

TIP: You can increase or decrease the amount of heat (spiciness) by how much chili sauce you add. Red pepper flakes also increase the heat. Our recipe has just enough spice to make you tingle, but not scream for ice.

Spicy peanut sauce being poured onto steamed pork dumplings.

Pork Dumplings have no doubt made their mark in the world of culinary history.

And we are proud to say we have tested this recipe for many years, a can confidently say these will rival your favorite Chinese restaurant any day of the year.

They are really that yummy. And if you like the looks of these dumplings, you’ll probably also love our Chinese Noodles in a Peanut Sauce. So good!

A pair of chop sticks holding up pork dumplings in a spicy peanut sauce.

OTHER CHINESE FAVORITES

These Pork Dumplings with Spicy Peanut Sauce are absolutely one of our favorite dishes. But folks, you should check out these recipes, too!

  • Sweet and Sour Pork
  • Steamed Vegetable Dumplings
  • General Tso’s Chicken
  • Sesame Chicken
  • Beef and Broccoli Stir-Fry
  • Homemade Egg Rolls

But in the meantime, how about some Pork Dumplings? Yum!

A white bowl of pork dumplings with spicy peanut sauce.

Just look at these dumplings.  Aren’t you getting excited to make them?

The filling is cooked perfectly and has the classic Chinese taste and texture.

And the sauce is to die for. And they are honestly so much fun to make. At home!

A pork dumpling split open with spicy peanut sauce drizzled on top.

Ready to make the most amazing dumplings you’ll ever have? Go for it!!

And be sure to take a picture and post on Instagram and tag @howtofeedaloon and #howtofeedaloon!

A white bowl of pork dumplings with spicy peanut sauce.
Print Recipe
4.88 from 8 votes

Pork Dumplings with Spicy Peanut Sauce

Pork Dumplings with Peanut Sauce are absolutely amazing and not hard to make! Amazing!
Prep Time30 minutes mins
Cook Time30 minutes mins
Total Time1 hour hr
Course: Appetizer
Cuisine: Asian/ Chinese
Servings: 8 people
Calories: 178kcal
Author: Kris Longwell

Equipment

  • Steamer (if steaming)

Ingredients

For the Dumplings

  • ½ lb ground pork
  • 2 cloves garlic minced
  • 2 tablespoon fresh ginger diced
  • 2 tablespoon soy sauce
  • 2 teaspoon sesame oil
  • 1 large egg
  • 2 green onions green and white parts, chopped
  • 2 teaspoon corn starch
  • Salt and pepper a pinch of each

For the Dumplings

  • 25 dumpling dough skins
  • 1 bowl of water
  • 4 large banana leaves, or parchment paper for steaming

For the Sauce

  • 1 tablespoon hot chili oil or more, to taste
  • 1 clove garlic minced
  • ⅓ cup creamy peanut butter
  • ½ cup water plus more, if neccesary to thin sauce
  • 1 tablespoon brown sugar
  • 3 tablespoon soy sauce
  • 1 tablespoon rice wine vinegar

For Garnish

  • ¼ cup scallions chopped, for garnish
  • Red pepper flakes optional, for topping

Instructions

Prepare the Filling

  • Combine the pork, garlic, ginger, soy, sesame oil, egg, green onions, cornstarch, salt, and pepper together in a medium-sized bowl. Mix well and set aside.
    ½ lb ground pork, 2 cloves garlic, 2 tablespoon fresh ginger, 2 tablespoon soy sauce, 2 teaspoon sesame oil, 1 large egg, 2 green onions, 2 teaspoon corn starch, Salt and pepper

Assemble the Dumplings

  • On a work surface, lay out 10 wrappers at a time.
    25 dumpling dough skins
  • With a spoon, scoop 1 teaspoon of the filling into the center of each square.
  • Brush the outer edges of the wrappers with water and then close them over in a triangle, or a half-moon shape.
    1 bowl of water
  • Press the dough around the filling to avoid air bubbles. If desired, use your fingers and thumbs to create small pleats along the edges of the dumplings. (See images in post for reference)
  • Repeat, until filling is all used.
  • Heat about 2 inches of water in your wok.
  • If using, tear the banana leaves so they fit snugly on each level of your steamer. (optional)
    4 large banana leaves, or parchment paper
  • Once the water is simmering, place the dumplings in your steamer, cover the steamer, and then place it in the wok.
  • Steam for 20 minutes.

Make the Peanut Sauce

  • While the dumplings are steaming, make the sauce: In a medium-size saucepan, heat the chili oil over medium-high heat. Add the garlic and cook until softened, about 2 minutes.
    1 tablespoon hot chili oil, 1 clove garlic
  • Add in the remaining sauce ingredients and stir until combined. Simmer gently for about 4 minutes, until slightly thickened. Add more water, a tablespoon at a time, if necessary. The sauce should be velvety, but not too thick.
    ⅓ cup creamy peanut butter, ½ cup water, 1 tablespoon brown sugar, 3 tablespoon soy sauce, 1 tablespoon rice wine vinegar

Assemble the Dish

  • Add the steamed dumplings to your serving bowl.
  • Ladle the peanut sauce over the top.
  • Garnish with chopped scallions and red pepper flakes a drizzle of chile oil, if desired.
    ¼ cup scallions, Red pepper flakes

Video

Notes

NOTE: Watch the video in the recipe card for visual guidance.
Do not cook the pork before steaming; the meat mixture cooks in the dumpling during the steaming (or frying or boiling) process.
Dumpling wrappers and banana leaves can be found at Asian markets and online.  Wonton wrappers can be substituted for the dumpling wrappers, and banana leaves can be replaced with parchment paper.
If you do not have a bamboo steamer, you can steam them in a large pot of water or simply boil them.  You can also pan-fry the dumplings for about 15 to 18 minutes in a large skillet over medium-high heat with a little oil.

Nutrition

Calories: 178kcal | Carbohydrates: 6g | Protein: 10g | Fat: 13g | Saturated Fat: 4g | Cholesterol: 47mg | Sodium: 706mg | Potassium: 209mg | Fiber: 1g | Sugar: 3g | Vitamin A: 99IU | Vitamin C: 2mg | Calcium: 20mg | Iron: 1mg

Banana Blueberry Muffins with Honey Nut Cheerios®

August 1, 2019 by Kris Longwell Leave a Comment

Banana Blueberry Muffins with Honey Nut Cheerios on a white platter.

Banana Blueberry Muffins with Honey Nut Cheerios® have become a staple in our house. After one try, we think they might just become the same in your house!

It is certainly no secret that Wesley (The Loon) and I love to create and devour delicious, yet sometimes slightly decadent, dishes from all types of cuisines.  Okay…sometimes even more than slightly decadent.

We live by the mantra that moderation, combined with thoughtful meal planning, is the key to keeping a healthy culinary lifestyle, while still being able to enjoy yummy dishes all-year long.

That’s why we could not be more thrilled to be teaming up with Honey Nut Cheerios to present one of the most heart healthy AND delicious muffins we’ve ever encountered.

Banana Blueberry Muffins with Honey Nut Cheerios on a white platter.

A MISSION TO INSPIRE HAPPY HEARTS

One of the things we love most about Honey Nut Cheerios is their commitment to inspiring happy hearts!

With Honey Nut Cheerios, you have the best of both worlds. It is the perfect combination of real delicious honey and whole grain oats that makes heart health enjoyable.

We knew in our happiest heart of hearts that we could take the great taste and health benefits of Honey Nut Cheerios, and make a muffin that utilizes other heart healthy ingredients, but also is absolutely delicious to eat at breakfast, or whenever snack time comes calling.

The ingredients for banana blueberry muffins are on display.

Along with being heart healthy conscious, Wesley and I have really gotten into heart healthy activities…like swimming with our dogs, namely Flo (Short for Florence). Her brother, Eb (short for Ebenezer) isn’t such a fan of the pool, but he enjoys playing life guard, keeping a close eye on us in the pool and ready to jump in at any given moment to save the day.

Flo is the blonde.  Eb is brown.  I’m trying to swim.  And Wesley, as usual, is snapping photographs, but is ready to jump in and join the active fun.

We have really enjoyed participating in Whole Heart Challenge MyFitnessPal. You should check it out, too, and join in the heart healthy fun! You’ll even have the chance to win prizes and participate in fun challenges that will help your entire lifestyle.

Keep an active lifestyle, like swimming with your pets.

Okay, back to the best (and heart healthiest) muffins in town!

Our Banana Blueberry Muffin not only includes our favorite cereal in the world, Honey Nut Cheerios, which has whole grain oats as its #1 ingredient, but we add in other healthy and tasty items such as blueberries, bananas, unsweetened almond milk, whole wheat flour and honey!

These muffins are not only loaded with flavor, but also jam-packed with hearty healthy ingredients that can also help to lower cholesterol.

Mix the banana blueberry muffin batter in a large bowl with a wooden spoon.

BANANA BLUEBERRY MUFFINS ARE PERFECT FOR KIDS AND ADULTS

Breakfast on the go is often hard to avoid, especially when kids are running to school and mom and dad are preparing for another hectic day.

These Banana Blueberry Muffins with Honey Nut Cheerios are the perfect healthy breakfast and snack-on-the go. We even make a double batch, and then freeze half of them for future yumminess!

And our favorite part of this recipe is that Honey Nut Cheerios is used as a binder within the muffin as well as a crunch topping for great taste and texture.

Sprinkle roughly chopped Honey Nut Cheerios on top of the banana blueberry muffins.

According to the Centers for Disease Control & Prevention (CDC), nearly 1 in 3 American adults have high cholesterol. People with high cholesterol have about twice the risk of heart disease as people with lower levels.

To help keep hearts healthy, medical experts recommend practicing healthy living habits, like maintaining a healthy weight, getting enough physical activity and eating a heart-healthy diet which can include foods made with whole grain oats, like Honey Nut Cheerios. (2015; cdc.gov).

Just look at these Banana Blueberry Muffins with Honey Nut Cheerios fresh out of the oven. Amazing!

Bake the banana blueberry muffins in a metal muffin tin.

These Blueberry Banana Muffins are as festive as they are delicious.

And you will not believe the smell in your kitchen as they bake.

With Honey Nut Cheerios as a main ingredient, how can you find a tastier muffin?

Place the baked banana blueberry muffins on a platter next to a box of Honey Nut Cheerios.

The muffins are so moist and flavorful by themselves.

But just for fun, we love adding another little drizzle of natural honey to the freshly baked muffins.

We are so thrilled to have partnered with Honey Nut Cheerios to bring you a heart healthy muffin! Stay active. Stay heart healthy. And stay happy!

Drizzle fresh honey on banana blueberry muffins.

Place the baked banana blueberry muffins on a platter next to a box of Honey Nut Cheerios.
Print Recipe
No ratings yet

Banana Blueberry Muffins with Honey Nut Cheerios®

These Banana Blueberry Muffins are loaded with good hearty healthy ingredients. So delicious and so good for you, too! Perfect for breakfast and snacks on the go that you can feel good about!
Prep Time15 minutes mins
Cook Time25 minutes mins
Total Time40 minutes mins
Course: Breakfast
Cuisine: American
Servings: 12
Calories: 123kcal
Author: Kris Longwell

Equipment

  • Medium muffin tin

Ingredients

DRY INGREDIENTS

  • 2 cups Honey Nut Cheerios Divided, 1 cup crushed, 1 cup roughly chopped
  • 1 & ½ cups whole wheat flour
  • 1 teaspoon ground cinnamon
  • 1 teaspoon baking soda
  • ¼ teaspoon salt
  • ¼ cup fresh blueberries

WET INGREDIENTS

  • Cooking spray for spraying the liners or muffin tin
  • 1 whole egg
  • 1 egg white
  • ½ cup honey
  • 2 bananas mashed
  • ⅓ cup nonfat plain yogurt
  • ½ cup almond milk, unsweetened
  • 1 teaspoon vanilla extract

Instructions

  • Pre-heat oven to 350°F.
  • Line muffin tins with good quality muffin liners and then spray with cooking spray. (Can omit the muffin liners, if desired, and simply spray the tin with the cooking spray).
  • In a medim-sized bowl, mix together all the dry ingredients (only 1 cup of the ground Honey Nut Cheerios), taking care to not burst any of the blueberries. Set aside.
  • In a large mixing bowl, mix together the wet ingredients. Use the back of a fork to mash the bananas (a few remaining banana chunks are fine).
  • Slowly add the dry ingredients into the wet mixutre until combined.
  • Use an ice cream scoop, or a large spoon, to carefully fill the muffin liners with the batter. You should have enough to fill 12 liners to the very top.
  • Sprinkle the remainign 1 cup of roughly chopped Honey Nut Cheerios over the tops of each muffin.
  • Bake for 25 minutes. Remove from the oven. Let cool slightly on a rack, and then remove from muffins from the tin to cool completely. The liners will pull away from the muffins easier once they have completely cooled.

Nutrition

Calories: 123kcal | Carbohydrates: 28g | Protein: 3g | Fat: 1g | Saturated Fat: 1g | Cholesterol: 14mg | Sodium: 169mg | Potassium: 159mg | Fiber: 2g | Sugar: 15g | Vitamin A: 32IU | Vitamin C: 2mg | Calcium: 25mg | Iron: 1mg

Yellow Squash Casserole

July 30, 2019 by Kris Longwell 29 Comments

A large black cast iron skillet of yellow squash casserole with a serving spoon inserted in the dish.

Yellow Squash Casserole is such an amazing summertime treat.  The dish is cheesy and creamy and bursting with yellow squash flavor.

And the dish is so easy to prepare and is on the table from start to finish in less than 45 minutes!

This is one dish that even finicky vegetable eaters will devour.

A large black cast iron skillet of yellow squash casserole with a serving spoon inserted in the dish.

HOW TO MAKE YELLOW SQUASH CASSEROLE AT HOME

Yellow squash casserole is very versatile and can be served in a variety of serving vessels.

The dish is best when served hot, but it’s so good, it’s even delicious at room temperature.

Watch us show you how fast and easy it is to make this amazing casserole!


HOW TO SLICE THE SQUASH

Slicing the squash in a uniform fashion is always best. We like to slice the squash to about ¼-inch thickness. But you could go thinner, if you desire.

Ensuring the sliced vegetables are identical in thickness will allow them to all cook evenly. You don’t want some of the squash slices to be overly soft, and some to be tough.

TIP: A sharp knife and a steady hand and eye works just fine, but a mandolin is even better.

A hand slicing a yellow squash on a mandolin over a cutting board.

Cook the squash and onion in a large skillet with a little oil until the vegetables just begin to soften, about 10 minutes.

Be sure not to cook the squash too long or it will be come “mushy” in the final dish.

Yellow squash and chopped onion cooking in a large black cast iron skillet.

Grab a large bowl, and mix together all the remaining ingredients, except the Ritz crackers.  You’ll need:

  • 8 oz. sour cream
  • ¼ cup mayonnaise (want to make it yourself? Click the link! It’s easier than you might think)
  • Salt (we like to use Kosher for a little more texture)
  • 1 & ½ cups good quality shredded sharp cheddar cheese
  • ½ cup grated Parmesan
  • 1 large egg

After these ingredients are mixed together, gently fold in the cooked squash and onion mixture.

A large glass bowl with a cooked yellow squash, cheese and cream mixture for yellow squash casserole.

ADD A BUTTERY AND CRUNCHY TOPPING TO SUMMER SQUASH CASSEROLE

If you’re going to have a luscious, cheesy and somewhat gooey filling, you are going to want to topping with a bit of a crunch (and a little extra butter).

The traditional Southern U.S. version of this recipe always uses crushed Ritz crackers as a topping. Who are we to change something that isn’t broken? We do enjoy stirring in some melted unsalted butter, just to increase the flavor as well as bind the crackers together.

We prefer a topping with texture, which is why we don’t completely pulverize the crackers, we like to leave some of the crackers roughly chopped.

TIP: Place the crackers in a large freezer bag and then crush them with the bottom of a measuring cup, or bottle, or even you hands. Don’t over crush them!

Fingers sprinkling crushed Ritz crackers over the casserole in a large black cast iron skillet.

We love serving this casserole in our large 12-inch cast iron skillet, but any 2-quart casserole dish will work. A 9″ x 9″ dish is ideal.

TIP: The casserole can be assembled up to a day in advance, refrigerated, and then baked for an extra 10 minutes (35 minutes total), before serving.

OTHER SUMMERTIME FAVORITE SIDE DISHES

  • Zucchini Fritters
  • Southern Baked Beans
  • Cucumber and Dill Salad
  • Cajun Pasta Salad
  • Squash and Zucchini Summer Salad

If you’re looking for a lighter, healthier version of a baked squash casserole, be sure to try our Yellow Squash and Tomato Casserole.

This Best-Ever Yellow Squash Casserole is always a crowd-pleasing dish. We find we seldom have left-overs, and be prepared for lots of request for the recipe!

A spoon lifting up a large helping of cooked yellow squash casserole out of the skillet.

CAN ZUCCHINI BE USED IN THIS YELLOW SQUASH RECIPE?

That’s easy to answer…YES! The yellow squash has a bit of sweeter taste, which balances beautifully against the sour cream and cheese, but zucchini is good, also.

You can certainly use a combination zucchini and yellow squash, too.

Either way, you will love the taste and texture of this delicious summertime casserole.

An overhead view of a cooked yellow squash casserole with two plates of food nearby.

Ready to make one of the best summertime recipes of all time? AWESOME!

Be sure to take a photo of the finished dish and tag #howtofeedalon and @howtofeedaloon on Instagram!

An overhead view of yellow squash casserole in a large black cast iron skillet.
Print Recipe
4.91 from 10 votes

Best-Ever Yellow Squash Casserole

Yellow Squash Casserol is a Southern U.S. staple side dish and is cheesy, creamy and loaded with summer squash taste. And what's even better, the dish is on the table from start to finish in less than 45 minutes!
Prep Time15 minutes mins
Cook Time20 minutes mins
Total Time35 minutes mins
Course: Side Dish
Cuisine: American, Southern, U.S.
Servings: 12 people
Calories: 328kcal
Author: Kris Longwell

Equipment

  • Mandolin, or sharp knife

Ingredients

  • 1 tablespoon vegetable oil
  • 2 & ½ lbs yellow squashed sliced
  • 1 cup onion chopped
  • 8 oz. sour cream
  • ¼ cup mayonnaise
  • 1 teaspoon Kosher salt
  • ½ teaspoon freshly ground black pepper
  • 1 1&2 cups cheddar cheese shredded
  • ½ cup Parmesan cheese grated
  • 1 large egg
  • 1 sleeve Ritz crackers crushed, but not completely pulverised
  • 2 tablespoon unsalted butter melted

Instructions

  • Pre-heat oven to 350°F. Lightly spray a 12-inch cast iron skillet or a 9"x9" casserole dish with cooking spray.
  • In a large skillet, heat the oil over medium-high heat. Add the sliced squash and onion and cook, stirring occassionally, until the vegetables have softened, about 10 minutes. Remove from heat and transfer to a colandar in the sink to drain.
  • In a large mixing bowl, stir together the sour cream, mayonnaise, salt, pepper, cheddar cheese, Parmesan cheese, and egg. Carfeully fold in the cooked squash mixture. Transfer to the prepared baking vessel.
  • In a separate medium bowl, use a fork to stir together the crushed crackers with the melted butter. Sprinkle the mixture all over the top of the casserole.
  • Bake for 25 minutes, uncovered, until bubbly and topping is starting to brown slightly. Remove and serve at once.

Video

Notes

Be sure to slice the squash in uniform cuts.  ¼-inch slices are a good thickness.  A mandolin ensures even slicing, but a sharp knife and a steady hand will work just fine.
Don't over sauté the squash and onion.  Cook until just soft.  The vegetables will cook more once the casserole is in the oven.
The casserole can be assembled up to a day in advance and stored in the refrigerator.  Allow to come to room temperature before baking (about 1 hour on the counter), or add an additional 10 minutes to the bake time if no time for bringing to room temperature (total bake time will be 35 minutes).
This casserole is best served hot!

Nutrition

Calories: 328kcal | Carbohydrates: 4g | Protein: 33g | Fat: 52g | Saturated Fat: 32g | Cholesterol: 91mg | Sodium: 846mg | Potassium: 176mg | Fiber: 1g | Sugar: 2g | Vitamin A: 1462IU | Vitamin C: 1mg | Calcium: 958mg | Iron: 1mg

Instant Pot Cheesy Sausage and Ham Frittata

July 23, 2019 by Kris Longwell 2 Comments

A slice of Instant Pot Cheesy Frittata on a white plate

Instant Pot Cheesy Sausage and Ham Frittata is one of our favorites for many reasons!

First, and foremost…it’s delicious!  That’s always priority #1 in the H2FaL test kitchen.

But, thanks to simplicity of a frittata, as well as the added ease of the Instant Pot, this recipe comes together very quickly and produces the most luxurious egg and cheese texture.   Amazing!

Instant Pot Cheesy Frittata

INSTANT POT CHEESY SAUSAGE AND HAM FRITTATA IS SIMPLE TO MAKE

We love everything about this incredible frittata.

And it is so simple in the Instant Pot!

Watch us show you how easy it is to make this amazing Instant Pot Cheesy Sausage and Ham Frittata!

A frittata is basically a crustless-quiche, which makes it super easy to make. This recipe uses some of our favorite breakfast or brunch ingredients and comes together for the perfect morning (or any time of the day!) dish. You can add or subtract any of the add-in ingredients to meet your own likes!

But, how can you go wrong with eggs, cheese, sausage and ham! And maybe a little green onion for a little more boost of flavor!

Another breakfast favorite is our amazing Ham and Gruyere Cheese Popovers! So good!

Instant Pot Cheesy Sausage and Ham Frittata

AN ALUMINUM ‘SLING’ HELPS TO LOWER THE DISH

I like to make a ‘sling’ from aluminum foil to help me lower and remove the dish from the Instant Pot. All you have to do is measure out a piece of sturdy foil about 24″ long, then fold it over, length-wise, halfway. Then fold the other half over.

And now you have a nice sturdy ‘sling’ to help you remove the dish from the Instant Pot, which is good, because the dish is usually piping hot!

Instant Pot Cheesy Sausage and Ham Frittata

A 1.5 quart soufflé dish works perfectly for this recipe. If you don’t have one already, you can easily order one here and have it delivered super fast!

If you’re in the mood for something really delicious for breakfast or brunch, but don’t want to spend a ton of time in the kitchen. This recipe is the one you’re looking for.

It’s so satisfying and just so delicious and literally comes together in about 40 minutes, or less. This is Instant Pot Breakfast Perfect!

Instant Pot cheesy sausage and ham frittata recipe

We love breakfast sausage and the addition of cooked ham is just perfect. You can of course cook up several strips of bacon and add at that in, too. Throw in some cooked broccoli or spinach, if you desire.

The sky is the limit here! Go for it!

Instant Pot cheesy sausage and ham frittata recipe

This Cheesy Sausage and Ham Frittata recipe is truly one of the Loon’s favorites. And I must admit, it’s one of my favorites, too. It’s classic breakfast/brunch fare.

Add some fresh fruit on the side and a nice cold glass of orange juice, and you will be so happy. All in about 40 minutes!!

Instant Pot cheesy sausage and ham frittata recipe

Now, go ahead and make this amazing Instant Pot Cheesy Sausage and Ham Frittata recipe!

A slice of Instant Pot Cheesy Sausage and Ham Frittata on a white plate
Print Recipe
5 from 2 votes

Instant Pot Cheesy Sausage and Ham Frittata

This Instant Pot Cheesy Sausage and Ham Frittata is so incredibly delicious, and thanks to the Instant Pot, so easy! It all comes together in about 40 to 45 minutes. Add or subtract of your favorite ingredients to your own tastes. But, we love this combo so much!
Prep Time15 minutes mins
Cook Time25 minutes mins
Total Time40 minutes mins
Course: Breakfast
Cuisine: American / French
Servings: 4 people
Calories: 296kcal
Author: Kris Longwell

Equipment

  • Instant Pot
  • 1.5 quart circular baking dish

Ingredients

  • 1 cup water
  • Cooking spray for greasing soufflé dish
  • 6 medium eggs lightly beaten
  • 2 tablespoon sour cream
  • ⅓ cup whole milk
  • ½ cup cooked breakfast sausage
  • ½ cup cooked ham cubed
  • ½ cup sharp cheddar cheese grated
  • ¼ cup green onions thinly sliced (optional)
  • 1 teaspoon dried mustard
  • ¼ teaspoon Kosher salt
  • ⅛ teaspoon freshly ground black pepper

Instructions

  • Pout water into the Instant Pot and lower in the steamer rack.
  • Spray a 1.5 qt. soufflé dish with cooking spray.
  • In a medium bowl, whisk the eggs, sour cream and milk together.
  • Add sausage, ham, cheeses, green onions, mustard, salt and pepper and stir until well mixed.
  • Pour the dish into the prepared soufflé dish and cover tightly with foil.
  • Make a foil sling with a 24-inch long piece of aluminum foil by folding one side over, length-wise, and then folding the other side over.
  • Place the dish on the sling and lower into the Instant Pot, folding the ends of the sling over the top of the dish (See image in post for reference).
  • Secure the lid and press MANUAL or PRESSURE COOK on HIGH for 25 minutes.
  • Let naturally release for 5 minutes then QUICK RELEASE the remaining steam.
  • Carefully use the sling to remove the dish from the Instant Pot and then carefully remove the foil.

Video

Nutrition

Calories: 296kcal


Peanut Butter Cup Ice Cream Cake

July 21, 2019 by The Loon 1 Comment

Serve Peanut butter cup ice cream cake on a white platter.

Peanut Butter Cup Ice Cream Cake with Oreo Crust and Caramel Sauce Topping. 

We defy you to find a more exciting string of words than those right there.

Folks, we’re not going to kid you here.  This ice cream cake takes some time to make.  But like most things in life, the goodness with the end result without doubt outweighs the agony of having to wait several days to dig into it.

Serve Peanut butter cup ice cream cake on a white platter.

PEANUT BUTTER CUP ICE CREAM CAKE IS MADE IN STAGES

Once you commit to making the most delicious ice cream cake you’ll ever have in your life, you’ll need to plan a little in advance.

It’s not difficult to make, you just need to allow time for a couple of the ice cream components to chill and then to freeze overnight (or for at least 6 hours, for chilling and then again freezing).

Watch us show you how to prepare this incredible Peanut Butter Cup Ice Cream Cake

PEANUT BUTTER ICE CREAM IS PERFECT FOR THIS CAKE

This peanut butter ice cream is a typical custard-based ice cream.

You’ll start by making an amazing delicious peanut butter custard on the stove.

Once the custard has just thickened enough to coat the back of your spoon, remove from heat and then stir in the cream and vanilla extract.

Pour the cream into the peanut butter custard for the peanut butter ice cream.

Next grab a fine-mesh sieve, or colander, and strain the custard into a large glass bowl.

Use the back of a wooden spoon to help the custard pass through the small holes.

Once you’ve done this, you’ve completed the first stage of this amazing dessert. This will need to chill in the refrigerator for at least 6 hours, or even better, overnight.

Strain the peanut butter custard through a sieve or colander.

AN OREO COOKIE CRUST IS DELICIOUS

Of course, you can make the crust with any cookie you like.

A peanut butter cookie, such as a Nutter Butter, would be delicious. Simply pulverize about 18 to 20 cookies, add some melted butter and vanilla, and the press into the base of a 9-inch springform pan.

But we think a good ole Oreo cookie crust just can’t be beat with this amazing ice cream cake. And you don’t even have to remove the cream filling of the cookies!

Use your hands to press the Oreo cookie crust into the base of the pan.

Now, it’s time for stage 2…Making the ice cream!

Be sure to follow your manufacturer’s instructions for churning ice cream, but all you really have to do is pour the chilled custard into the ice cream chamber, and then churn away!

After about 50 to 60 minutes, you’ll have a soft, but ready-to-eat ice cream. However, you’re not done yet. You’ll need pour this into your prepared pan. And then you guessed it, into the freezer it goes for at least 6 to 8 hours, or even better, overnight!

Pour the churned ice cream into a 9-inch springform pan with an Oreo crust.

PEANUT BUTTER ICE CREAM CAKE IS GREAT FOR BIRTHDAY PARTIES

Want to make that certain birthday person feels extra special when his or her actual birthday comes along? You can never go wrong with an ice cream cake!

Some of our other favorite ice creams flavors are:

  • Strawberry and White Chocolate Ice Cream
  • Sweet Corn and Pistachio Ice Cream
  • Fresh Blueberry Ice Cream
  • Olive Oil Ice Cream with Balsamic Strawberries

But did we mention what our all-time favorite way to eat ice cream is? Just in case you missed it:

Place a slice of peanut butter cup ice cream cake on a small white plate next to caramel sauce.

WARM CARAMEL SAUCE IS THE PERFECT TOPPING

Okay, folks, it’s time to bring this 3-part Ice Cream Cake Opera home.

It’s absolutely fantastic as is. But…once completely chilled, we like to add a little more crushed Oreos on top.

And then…get ready for it…a drizzle of homemade caramel sauce. To. Die. For. This is the ice cream cake of a lifetime.  And this ice cream cake needs to be in your life! Go for it!

Use a spoon to drizzle homemade caramel sauce onto a slice of peanut butter cup ice cream cake.

Peanut butter ice cream cake on a platter.
Print Recipe
5 from 2 votes

Peanut Butter Cup Ice Cream Cake

Peanut Butter Cup Ice Cream Cake. Oreo crust. Homemade caramel sauce. Start this amazing dessert several days in advance of serving, and you will not believe the end result you'll have on your hands. Simply amazing.
Prep Time30 minutes mins
Cook Time30 minutes mins
Chill and Freeze time16 hours hrs
Total Time17 hours hrs
Course: Dessert
Cuisine: Dessert
Servings: 12 people
Calories: 646kcal
Author: Kris Longwell

Equipment

  • Ice Cream Machine

Ingredients

FOR THE CRUST

  • 18 to 20 Oreo cookies No need to remove the centers!
  • 2 tablespoon unsalted butter melted
  • 1 teaspoon vanilla extract

FOR THE ICE CREAM

  • ¾ cup sugar
  • 3 large eggs
  • 1 cup whole milk
  • ½ cup creamy peanut butter
  • 1 & ½ cups heavy cream
  • 2 teaspoon vanilla extract
  • 1 cup chopped miniature chocolate peanut butter cup candies cut in half

FOR THE SAUCE (MAKE AHEAD)

  • Caramel Sauce - melted

Instructions

START THE ICE CREAM

  • Using a stand-mixer or a handheld mixer, beat the eggs with the sugar in a medium bowl until slightly pale and somewhat thickened, about 1 minute.
  • On the stove, in a medium sauce pan, bring the milk to a slight simmer.
  • With the mixer running, carfully beat the warmed milk into the egg/sugar mixture.
  • Pour the mixture back into the pan on the stove and stir continuously with a whisk or a wooden spoon until the custard begins to thicken. About 3 to 4 minutes. Don't let the mixutre boil, or the eggs will scramble. Remove from the heat.
  • Stir in the peanut butter and mix until fully incorporated.
  • Pour the custard through a strainer, or colander, into a large bowl. Stir in the heavy cream and vanilla. Cover with plastic wrap and place the bowl in the refrigerator for 4 to 6 hours, or overnight.

MAKE THE CRUST

  • Place the crushed Oreos, melted butter and vanilla extract in a large bowl, and mix together with a wooden spon.
  • In a 9-inch springform pan, press the Oreo mixture along the bottom, saving about a tablespoon of the mixture for topping the cake with.
  • Place in the freezer.

BACK TO THE ICE CREAM

  • Pour the refrigerated mixture into the bowl of your ice cream machine.
  • Follow the manufacturer's instructions, churning for about 50 to 60 minutes.
  • About 5 minutes before the mixing is complete, add in the chopped peanut butter cup candies.
  • Let mix completely. At this point, the ice cream will be nice and creamy.

ASSEMBLE THE CAKE

  • Take the spring form pan with the crust out of the freezer.
  • Spread the ice cream over the crust. Freeze for at least 6 hours, or, overnight.

TO SERVE

  • Remove the ice cream cake from the freezer for 15 minutes. Sprinkle the reserved Oreo cookies over the top (plus a few more, roughly chopped, if desired).
  • Take a warmed sharp knife, and gently run it along the edges of the pan. Release the pan and remove the side ring.
  • Heat the caramel sauce in a pan. (Or, serve the caramel sauce at room temperature).
  • Slice the cake, drizzle with the caramel sauce. Serve at once!

Video

Nutrition

Calories: 646kcal

Grilled Shrimp Salad with Cilantro-Lime Dressing

July 18, 2019 by Kris Longwell 19 Comments

A large rectangular white platter filled with a grilled shrimp salad with cilantro-lime dressing along with grilled corn, black beans, chopped lettuce, all on torn pieces of romaine lettuce.

Our Grilled Shrimp Salad with Cilantro-Lime Dressing is a vibrant and refreshing dish packed with smoky grilled corn, hearty black beans, and creamy avocado. We love using grilled shrimp in all its delicious forms—whether it’s classic grilled shrimp, spicy grilled buffalo shrimp, or sweet and tangy grilled BBQ shrimp—and this salad, bursting with flavor and perfect for any season.

A large rectangular white platter filled with a grilled shrimp salad with cilantro-lime dressing along with grilled corn, black beans, chopped lettuce, all on torn pieces of romaine lettuce.
[feast_advanced_jump_to]

🍤 The Ingredients

The fresh, vibrant ingredients in this salad come together to create an unforgettable, flavor-packed meal. Find ingredient notes (including substitutions and variations) below. NOTE: Soy sauce is not shown in the image. It is optional, but we think it adds a nice depth of flavor.

An arrangement of ingredients for grilled shrimp salad with cilantro-lime dressing on a grey wooden background including uncooked shrimp, two ears of corn, black beans, avocado, onion, tomato, scallions, lettuce, oil, and spices.

🌿 Substitutions and Variations

  • Protein – Shrimp is the star of this salad, but other proteins will work, too. Use the marinade with chicken breasts (or thighs) for a wonderful grilled chicken salad. For a completely vegetarian salad, use the marinade with tofu and then grill it. For the shrimp, we recommend extra-large shrimp, and it’s up to you if you want to leave the tails on or not.
  • Veggies – The sky is the limit here. The grilled corn adds an incredible depth of flavor. However, you could also use our roasted corn salsa, which is also amazing. Vary up the vegetables! Cucumbers, radishes, and carrots are wonderful additions.
  • Lettuce – We recommend romaine, but green leaf, iceberg, red leaf, or even arugula are all great options.

See the recipe card (with video) below for a full list of ingredients and measurements.

Expert Tip

The marinade/dressing can be made at least 24 hours in advance. Actually, the flavors will develop even more as they chill in the fridge. However, we don’t recommend marinating the shrimp for more than 1 hour. If you let it go too long, the acid from the lime will begin to “cook” the shrimp and start to break it down. 15 to 20 minutes is perfect!

👩🏼‍🍳 How To Make Grilled Shrimp Salad with Cilantro-Lime Dressing

A close-up view of a whisk being used to whisk a cilantro-lime dressing in a small white bowl.
  1. Step 1: Mix the marinade ingredients except for the oil, then whisk in the oil.
Uncooked shrimp piled inside a clear freezer bag also filled with a cilantro-lime marinade.
  1. Step 2: Place the shrimp in a baggie and pour half of the marinade over them. Chill for 1 hour.
A person using a large chef's knife to cut away grilled corn kernels from the cob into a large white platter.
  1. Step 3: Grill the corn and then cut the kernels off when cool enough to handle.
Three rows of marinated shrimp that are being grilled on the grate of a gas grill.
  1. Step 4: Remove the shrimp from the marinade and season them with salt and pepper, then grill until pink.
A person transferring cubed pieces of fresh avocado into a glass bowl of black beans, chopped tomatoes, and diced red onion.
  1. Step 5: Mix the vegetables, beans, and avocado. Add lettuce and remaining dressing. Gently toss.
A person using a spoon to pour a cilantro-lime dressing over a salad of grilled shrimp, corn, black beans, tomatoes, and green leaf lettuce.
  1. Step 6: Place on a platter, top with the shrimp, and drizzle on more of the dressing

Expert Tip

For the dressing, place what you didn’t use for the marinade into a jar with a tight-fitting lid. Vigorously shake the jar. This will emulsify the oil with the other ingredients. Drizzle a few spoonfuls over the salad. You will probably have some of the dressing leftover. It’s great to have on hand for other uses. It will keep in the fridge for 4 to 5 days.

🍽️ How To Serve

  • This salad truly makes for a stunning presentation. We love to mound it onto a large platter and let guests serve themselves.
  • You can also plate the salad individually and serve the dressing on the side.
  • Since it is wonderful served at room temperature, you can make all the components of the salad ahead of time and assemble just before guests arrive!
  • If preparing everything ahead of time, be sure to chill each component separately, and then let them come to room temperature 1 to 2 hours before serving. Don’t cut the avocado until the last minute.

🙋🏽‍♂️ Frequently Asked Questions

What type of shrimp is best for grilling in this grilled shrimp salad?

Large, peeled, and deveined shrimp work best for grilling as they cook quickly and hold up well on the grill. Leave the tails on or remove them; it’s a matter of taste.

Can I make the cilantro-lime dressing ahead of time for grilled shrimp salad?

Yes, the dressing can be prepared a day in advance and stored in the refrigerator to let the flavors meld.

How do I prevent the shrimp from sticking to the grill?

To prevent sticking, make sure the grill is clean and well-oiled before placing the shrimp on it, and avoid moving them too soon while cooking. You can also use a grill skillet for easy cooking.

Is the grilled shrimp salad spicy?

The salad is typically mild, but you can easily add spice by increasing red pepper flakes or a spicy seasoning to the shrimp or dressing.

Can the shrimp be baked or sautéed instead of grilled?

Yes, the shrimp can be baked in the oven or sautéed on the stove for a quick and easy alternative to grilling. Bake at 350°F for about 15 minutes (or until pink). Sauté in olive oil over medium heat for about 10 to 12 minutes (or until pink).

A white salad plate filled with a serving of grilled shrimp salad with cilantro-lime dressing with a stemless glass of rosé wine nearby.

🥗 More Amazing Entrée Salads

  • An overhead view of a grilled chicken salad salad that consists of rows of grilled pesto chicken, asparagus, mushrooms, and salads of cucumbers, tomatoes, and chickpeas.
    Grilled Chicken Salad with Vegetables
  • An oval white platter filled with a large serving of green bean and tomato salad topped with a scallion buttermilk dressing, scallions, and chopped fresh herbs.
    Green Bean and Tomato Salad with Scallion Buttermilk Dressing
  • An overhead view of long oval blue and white platter filled with a colorful Thai beef salad with strips of grilled steak, cherry tomatoes, and herbs in a Thai sauce.
    Thai Beef Salad
  • A shallow white bowl filled with best-ever ham salad surrounded by a plate of green leaf lettuces, slices of bread, plates, and glasses of iced tea.
    Best-Ever Ham Salad

Ready to make the best entrée salad of the summer? Go for it!

And when you do, be sure to take a photo of it, post it on Instagram, and tag @HowToFeedaLoon and hashtag #HowToFeedaLoon!

A white salad plate filled with a serving of grilled shrimp salad with cilantro-lime dressing with a stemless glass of rosé wine nearby.
Print Recipe
4.88 from 8 votes

Grilled Shrimp Salad with Cilantro-Lime Dressing

This salad has been an all-time favorite for many, many years. All components (except cutting the avocado) can be made ahead of time. Simply assemble the salad, placing the cooked shrimp on top, just before serving. Amazingly delicious!
Prep Time15 minutes mins
Cook Time15 minutes mins
Marinating time1 hour hr
Total Time1 hour hr 30 minutes mins
Course: Entree / Seafood, Salad
Cuisine: American Southern, Tex-Mex
Servings: 8 people
Calories: 219kcal
Author: Kris Longwell

Equipment

  • Grill (or can use skillet on stove or in pan in oven)
  • Skewers or grill pan

Ingredients

For the Marinade / Dressing

  • ½ cup fresh lime juice
  • 2 tablespoon soy sauce
  • 1 fresh jalapeño cored with seeds and ribs removed
  • 3 cloves garlic minced
  • Pinch red pepper flakes or more, for added spice
  • 1 tablespoon ground cumin
  • 1 cup fresh cilantro chopped
  • ¾ cup extra-virgin olive oil

For the Salad

  • 1 lb shrimp extra-large, deveined and peeled
  • 2 ears fresh corn shucked and silk removed
  • extra-virgin olive oil for brushing the corn
  • Salt and pepper
  • 1 medium tomato cored and diced
  • 1 15 oz can black beans drained and rinsed
  • ¼ cup red onion chopped
  • ¼ cup green onions green and white parts, chopped
  • 1 jalapeño seeds and ribs removed, finely chopped
  • 1 avocado skin and pit removed, roughly chopped
  • 1 Romaine lettuce roughly chopped

Instructions

  • Make the dressing/marinade in a medium-sized bowl by mixing together the lime juice, soy sauce, jalapeno, garlic, red pepper flakes, cumin, and cilantro. Slowly whisk in the extra-virgin olive oil.
    ½ cup fresh lime juice, 2 tablespoon soy sauce, 1 fresh jalapeño, 3 cloves garlic, Pinch red pepper flakes, 1 tablespoon ground cumin, 1 cup fresh cilantro, ¾ cup extra-virgin olive oil
  • Add the shrimp to a large plastic ziplock bag, or a bowl, and pour enough of the marinade into the bag to fully coat the shrimp. Close the baggie (or cover the bowl with plastic wrap) and place it in the refrigerator for 15 minutes to 1 hour. Save the remaining marinade for the dressing (there should be approximately ½ to ¾ cup left).
    1 lb shrimp
  • Heat your grill to medium heat. Brush the oil over the corn and then sprinkle all over with salt. Add the corn to the grill, over direct heat, and cook until the kernels are starting to brown. About 8 minutes, turning the corn over a time or two while cooking. Remove and set aside to cool.
    2 ears fresh corn, extra-virgin olive oil, Salt and pepper
  • Once the corn is cool enough to handle, set one corn upright on a large platter or a shallow bowl, and then with the other hand, carefully use a large knife to cut the kernels from the cob. Repeat with the other ear of corn. Set aside.
  • Take the shrimp from the marinade and place them on skewers, careful not to overcrowd each skewer with the shrimp (don't squeeze too many shrimp on a skewer: otherwise, they won't cook evenly). Lightly salt and pepper the shrimp before grilling. Alternatively, cook on the grill on a grill pan, or sear in a skillet over medium-high heat on the stove, or in a cast-iron skillet in a 350° oven for about 10 minutes. Discard the marinade.
  • Meanwhile, in a medium bowl, mix together the corn, beans, tomatoes, red and green onions, and pepper. Gently stir in the avocado. Gently toss with about ½ cup of the dressing. Save the rest for serving on the side.
    1 medium tomato, 1 15 oz can black beans, ¼ cup red onion, ¼ cup green onions, 1 jalapeño, 1 avocado
  • Place the chopped romaine on a plate and top with the veggies. Place the shrimp over the top of the salad, drizzle on a little more dressing, and serve at once.
    1 Romaine lettuce

Video

Notes

NOTE: Watch the video near the top of the recipe for visual guidance.
All components (except the avocado) of this salad can be prepared ahead of time and kept chilled in the refrigerator until 2 hours before serving. Let everything come to room temperature, and then assemble the salad as indicated in the recipe.  Peel and chop the avocado soon before serving. Add as you are assembling the salad. 
Sometimes we add the lettuce with the vegetables and then toss it all with the dressing. We usually place the romaine on the platter as the foundation, and then place the dressed veggies over the lettuce, and then top with the shrimp. Either way works great. We think the bed of lettuce version makes a prettier presentation, but that’s up to you. 

Nutrition

Calories: 219kcal | Carbohydrates: 9g | Protein: 14g | Fat: 8g | Saturated Fat: 2g | Cholesterol: 143mg | Sodium: 701mg | Potassium: 317mg | Fiber: 3g | Sugar: 2g | Vitamin A: 397IU | Vitamin C: 12mg | Calcium: 97mg | Iron: 2mg

Classic Gazpacho

July 16, 2019 by The Loon 8 Comments

Pour classic gazpacho into chilled shot glasses for serving outside.

Classic Gazpacho is just that: Classic.

It is the quintessential summer culinary creation.

Go with the freshest produce from your farmer’s market and let Mother Nature deliver the goods. And wow, oh wow…does she ever!

Pour classic gazpacho into chilled shot glasses for serving outside.

CLASSIC GAZPACHO IS EASY TO MAKE AT HOME

Once you gather up the beautiful produce for gazpacho, the work is almost done.

A medium-sized food processor makes this iconic soup come together in minutes!

Watch us show you how to make Classic Gazpacho at home!


SEEK OUT A FARMER’S MARKET FOR MAKING GAZPACHO

We just love hitting our local farmer’s market during the spring and summer months to make classic warm weather dishes, such as gazpacho.

This is one dish you won’t want to skimp on freshness, that’s why seeking out the freshest produce around is worth the effort.

WHAT PRODUCE TO LOOK FOR

  • Tomatoes: We love Heirloom tomatoes
  • Cucumbers: We go with the large variety and not English cukes, though they would work, too.
  • Bell peppers: We love selecting multiple colors: Green, Red, Yellow and Oranage
  • Onion: Yellow or red is just fine!
  • Fresh aarsley: Always go with fresh herbs!
  • Fresh jalapeño: Remove the seeds and ribs to eliminate extra heat
  • Garlic: Minced!

Seek out produce from a farmer's market and place in a basket.

FINELY CHOP, BUT DON’T PUREE

We prep the ingredients in stages for our Classic Gazpacho and we use a food-processor to help us get just the perfect texture.

When you place the various ingredients in the food processor, be sure to pulse until you reach the desired consistency.

We think the perfect gazpacho is still a little chunky, and not completely liquefied. But, that’s a matter of taste and completely up to you and your preferences!

Process the cucumber and bell peppers first. Remove, and then process the onion and the parsley. Remove, and the pulse the tomatoes for about 15 seconds. It’s okay if the tomatoes become almost all liquid…that’s good for gazpacho.

Chop the cucumber and bell peppers in a food processor. Chop the onion and parsley in the food processor. Liquify the tomatoes in a food processor.

SERVE CLASSIC GAZPACHO CHILLED OR AT ROOM TEMP

We find that after mixing all the components together for the gazpacho, the flavors are so amazing, it’s really good to serve as is.

We do suggest, however, that you chill the soup for a couple hours, covered, in the refrigerator.

Even if you want to serve at room temperature, chilling the gazpacho for a couple hours will just help all the flavors meld together and heighten the taste even more.  Just remove after chilled, place on the kitchen counter until it’s room temperature, usually a couple hours.

Served the classic gazpacho in a large chilled bowl.

The fresh produce are the true stars of Classic Gazpacho. Although you can make this anytime of the year that you can get your hands on the produce, but summertime, when the produce is at it’s peak, is when this soup is off-the-charts delicious.

This soup is perfect for brunch, a baby or wedding shower, or easy-breezy Sunday on the patio.  Another amazing chilled soup recipe is our Watermelon Gazpacho with Jalapeño and Mint!

Gazpacho finds its roots in Spanish and Portuguese kitchens, but after one taste, it will be a soup you’ll want to serve time and time again during those gorgeous warm and sunny months!

WHAT TO SERVE ALONG SIDE GAZPAHCO

Best-Ever Chicken Salad
Broccoli and Cheddar Quiche
Cajun Pasta Salad
Blue Lagoon Cocktail

We love to serve our Classic Gazpacho in chilled shot glasses, too.  Talk about a shot of pure deliciousness!

Pour classic gazpacho into chilled shot glasses for serving at a party.

Pour gazpacho into chilled shot glasses for serving.
Print Recipe
5 from 1 vote

Classic Gazpacho

You can't get much more delicious and refreshing than Classic Gazpacho. This recipe is wonderful. The fresh garlic and jalapeno add a bit of a kick. But not too much! Set in the fridge for at least a couple hours to really let the flavors meld. Amazing!
Prep Time20 minutes mins
Chill2 hours hrs
Total Time2 hours hrs 20 minutes mins
Course: Soup
Cuisine: Spanish
Servings: 8
Calories: 126kcal
Author: Kris Longwell

Equipment

  • Food processor

Ingredients

  • 1 medium cucumber peeled, seeded, and coarsely chopped
  • 1 medium green bell pepper cored, seeded and coarsely chopped
  • 1 medium red bell pepper cored, seeded and coarsely chopped
  • 1 medium yellow onion coarsely chopped
  • ⅓ cup fresh parsley chopped
  • 2 ½ lb ripe tomatoes peeled (heat in boiling water for about 1 minute, then peel away the skin), and coarsely chopped
  • 1 cup tomato juice
  • ¼ cup red wine vinegar
  • 3 tablespoon extra-virgin olive oil
  • 3 garlic cloves minced
  • 1 jalapeno seeded and minced
  • 2 teaspoon salt

Instructions

  • In a food processor, finely chop (but don't puree) the cucumber and bell peppers.
  • Add to a large mixing bowl.
  • Add to food processor the onion and parsley. Chop, but don't puree.
  • Add the onion/parsley mixture to the cucumber/pepper mixture.
  • Add to food processor the tomatoes and pulse for about 15 to 30 seconds. (They will be very liquidy).
  • Add tomatoes to the veggies in the bowl.
  • Add to the bowl the tomato juice, red wine vinegar, olive oil, garlic, jalapeno and salt.
  • Stir well and refrigerate for at least 2 hours.
  • Serve in chilled vessels.

Video

Notes

Gazpacho can be served room temperature or chilled.  Serve in a large soup bowl or in individual chilled shot glasses.  Chilling the gazpacho for at least 2 hours helps the flavors to meld.  If you prefer to serve at room temperature, chill the soup, then let it sit out for another couple hours.  

Nutrition

Calories: 126kcal


Carnitas Tacos

July 13, 2019 by Kris Longwell 4 Comments

Place the shredded pork carnitas on a corn tortilla with pico de Gallo, cilantro and fresh lime.

Carnitas Tacos are truly an amazing Mexican treat.

We slow-cook a beautiful boneless pork shoulder for 10 hours until it becomes tender enough to shred with a couple forks.

And then, we assemble one of the best tacos you’ll ever have.

Place the shredded pork carnitas on a corn tortilla with pico de Gallo, cilantro and fresh lime.

CARNITAS TACOS ARE EASY TO MAKE AT HOME

As mentioned, we love to use our slow-cooker to gently simmer the pork all day (or night).

Simply put all the ingredients in your slow-cooker, then slow cook for 8 to 10 hours on low (or 4 to 6 on high), and get ready for amazing carnitas.

Watch us show you how easy it is to make these amazing Carnitas Tacos!


HOW TO MAKE AUTHENTIC CARNITAS…WELL, ALMOST

Carnitas are believed to have their origins in the Mexican state of Michoacán. Traditionally, small pieces of pork are cooked slowly in pork lard until very tender.

When developing our version of carnitas, we opted to bypass the lard and instead slow-cook a pork shoulder in our 6-qt slow-cooker in a medley of amazing aromatics.

The addition of citrus, soda (with sugar) and Mexican beer helps round out the flavors perfectly. Some folks also add whole milk, which is delicious, as well.

pork shoulder with citrus, herbs, Dr. Pepper and beer are used to slow cook the pork.

If you don’t have a slow cooker, you can certainly braise the pork in your oven.

If braising in the oven, pre-heat to 350°F, place the pork in a large Dutch oven, then add the remaining ingredients, cover, and roast for about 2 ½ hours.

We find that the slow-cooker, on low for 10 hours, produces the most shreddable pork imaginable, but braising in the oven is good, too.

Place the pork shoulder into the slow cooker with aromatics, citrus and liquids.

HOW TO SHRED THE CARNITAS

After the pork shoulder has slow cooked (preferably on low for 10 hours), carefully remove the meat from the vessel and place on a large baking sheet.

Save about 1 to 1 & ½ cups of the cooking liquid. This stuff is loaded with flavor.

At this point, all you need is a couple of forks to start pulling apart the meat. The meat will be so fall-apart tender, that you will have no problem at all shredding the meat. And the smell? Oh, it’s insanely delicious. But just wait.

Use two forks to shred the cooked pork apart for carnitas tacos.

In the traditional way of preparing carnitas, once the meat has become fall apart tender from cooking in the lard for hours, it’s time to crisp the meat up.

We achieve this at home by placing the meat under the broiler for about 5 to 10 minutes, until nice and crisp.

But before we do this, we pour the reserved cooking liquid all over the meat. Since broilers drastically vary from one to another, keep an eye on the meat! Once the meat has reached a nice brown, crispy exterior, get a large wooden spoon, stir around the meat, and stick back under the broiler for a few more minutes. We want the carnitas to be crispy all over on the outside, but still super tender on the inside!

Place the pork on a large baking sheet and crisp under a broiler for about 8 minutes.

SERVE CARNITAS TACOS WITH TRADITIONAL GARNISHES

First of all, you need a tortilla to place the amazing carnitas into. You can use corn or flour (we love corn, but that’s up to you). Gently heat the tortillas before serving. TRICK: Turn on your grill or gas burner, and quickly heat them over the heat. You’ll get a little char and warm them just enough, but don’t over do it, or they will dry out!

Other traditional garnishes include:

  • Pico de Gallo
  • Fresh cilantro
  • Guacamole
  • Fresh lime

Pork carnitas tacos with traditional garnishes and a glass of beer.

There is just something magical and extraordinary about homemade carnitas tacos. And if you love these tacos, you will absolutely flip for our homemade birria tacos!

We love to invite friends over for a festive taco party and let everyone build their own tacos!

The shredded pork also freezes beautifully for up to months. But good luck not eating all these amazing tacos in one sitting! They’re that incredibly delicious!

Stack three carnitas tacos on a taco stand.

A white platter with three Carnitas Tacos
Print Recipe
5 from 2 votes

Carnitas Tacos

Carnitas Tacos are Mexican-style shredded pork tacos that are bursting with amazing flavor and texture. Slow-cooked with incredible aromatics, citrus, soda and Mexican beer. Finished off under the broiler for a quick crisping. Taco perfection!
Prep Time15 minutes mins
Cook Time10 hours hrs
Under the broiler8 minutes mins
Total Time10 hours hrs 23 minutes mins
Course: Entree / Slow Cooker
Cuisine: Tex-Mex, Mexican
Servings: 8 people
Calories: 368kcal
Author: Kris Longwell

Equipment

  • 6-qt Slow-Cooker or Large Dutch Oven

Ingredients

FOR THE SPICE RUB

  • 3 teaspoon Kosher salt
  • 2 teaspoon Mexican oregano
  • 1 teaspoon dried cumin
  • 1 tablespoon ancho chile powder or regular chile powder
  • 1 teaspoon ground cinnamon

EVERYTHING ELSE

  • 1 4 to 5 lb boneless pork shoulder such as a Boston butt, can also use bone-in
  • 1 large white onion sliced
  • 4 garlic cloves roughly chopped
  • 2 bay leaves
  • Juice of 1 lime don't discard the squeezed lime
  • Juice of 2 oranges don't discard the squeezed oranges
  • 1 cup Mexican beer lager is good
  • 1 cup Dr. Pepper of Coca-Cola with real sugar, if available (if not, just regular soda will work)
  • Coarse sea salt (optional) for finishing the cooked meat

SERVED WITH

  • 8 to 12 corn or flour tortillas warmed
  • chopped onion
  • pico de gallo
  • fresh cilantro
  • fresh guacamole
  • fresh lime wedges

Instructions

  • Mix all the spice ingredients together in a small bowl.
  • Rub enough of the spice mixture over the pork to cover. Save the extra spice mixture.
  • Place a layer of onions on the bottom of the slow cooker and then place the meat on top. Add the remaining ingredients, incluing the squeezed lime and oranges, as well as the remaining spice mixture.
  • Cook on low for 8 to 10 hours (or on high for 4 to 6 hours)
  • Use two large spatulas to remove the pork to a large baking sheet. The meat will be extremely tender. Save 1 to 1 & ½ cups of the liquid from the slow cooker.
  • Use two forks to shred the meat. Pour the reserved liquid all over the pulled meat.
  • Place under a broiler on high for 4 to 8 minutes, keeping an eye on it as it cooks...don't let it burn! Turn the meat half-way through to ensure meat is gets crispy all over. Taste and sprinkle with more coarse sea salt, if desired.
  • Served at once with warmed tortillas and garnishes.

Video

Notes

To braise the pork in the oven, simply rub the pork with the spice mixture, then add all ingredients into a large roasting pan, with lid (a large Dutch oven works well) and place in a pre-heated oven at 350°F for 2 & ½ hours, or until very tender. 

Nutrition

Calories: 368kcal

Easy Pesto Sauce

July 9, 2019 by Kris Longwell 6 Comments

A bowl of easy pesto sauce in a small white bowl next to scattered pine nuts, a head of garlic, and fresh basil leaves.

Easy Pesto Sauce is incredibly fresh and bursting with vibrant flavors, making it an easy way to elevate your pasta, sandwiches, and more. Just a spoonful adds a delicious, herbaceous boost that transforms everyday dishes into something extraordinary.

A bowl of easy pesto sauce in a small white bowl next to scattered pine nuts, a head of garlic, and fresh basil leaves.
[feast_advanced_jump_to]

🌿 The Ingredients

With just a handful of simple ingredients, pesto sauce comes together to create a deeply flavorful and aromatic addition to any dish.

An arrangement of ingredients on a white wooden background including pine nuts, lemon juice, Parmesan cheese, fresh basil, olive oil, salt, pepper, and garlic.

👩🏼‍🍳 How To Make Easy Pesto Sauce

A person transferring toasted pine nuts from a small white bowl into the bowl of a food-processor that is filled with fresh basil, garlic, and grated Parmesan cheese.
  1. Step 1: In the bowl of your food processor, add the basil, garlic, Parmesan cheese, and toasted pine nuts.
A person holding a spoonful of chopped basil, pine nuts, and garlic over a food processor.
  1. Step 2: Process until uniformly chopped.
A person pouring extra-virgin olive oil through the tube of a food processor into the bowl that is processing pesto sauce.
  1. Step 3: With the motor on LOW, slowly add the EVOO through the tube of the food processor.
A person holding a heaping spoonful of easy pesto sauce over a small glass jar that is partially filled with the rest of the sauce.
  1. Step 4: Transfer to a jar with a tight-fitting lid. Keep in the fridge for up to 1 week.

🍽️ How To Serve

  • This sauce is very versatile. It’s best served at room temperature.
  • Remove the sauce from the fridge for 1 to 2 hours before serving.
  • This is wonderful when tossed with pasta for a great, simple pasta salad.
  • It makes a wonderful sauce for pizza. We use it in our BLT Pizza.
  • The sauce makes a wonderful condiment for most sandwiches. We use it on our Italian-Style Panini. Amazing!

Expert Tip

If you want to serve pesto with pasta, such as our Spaghetti with Pasta, we recommend blanching the basil first by simmering the fresh leaves for about 1 minute in boiling water, then transferring them to an ice bath. The blanching gives the pesto a milder basil flavor, which we feel works best for the dish.

🙋🏽‍♂️ Frequently Asked Questions

Can I make pesto sauce in a blender instead of a food processor?

You’ll get much better consistency with a food processor. We don’t recommend using a blender.

How do I prevent easy pesto sauce from turning brown after making it?

To keep pesto bright green, store it in an airtight container and drizzle a thin layer of olive oil on top before refrigerating.

Can I freeze easy pesto sauce made in a food processor?

Absolutely! Pesto freezes well—portion it into ice cube trays or small containers for easy use later without losing flavor.

A person using a spoon to spread easy pesto sauce over toasted French bread on a cutting board with a jar of the sauce nearby.

😋 Other Easy Delicious Sauces

  • A wooden spoon holding up a large spoonful of homemade marinara sauce over a pot filled with the simmering sauce.
    Homemade Marinara Sauce
  • A person holding up a spoonful of homemade romesco sauce from a food processor.
    Easy Romesco Sauce
  • A small white bowl filled with authentic chimichurri sauce with a spoon with some of the sauce nearby all on a white background.
    Easy Chimichurri Sauce
  • A hand using a small spoon to drizzle homemade tzatziki sauce over the end of a chicken gyro that is sitting next to a small jar of the sauce on a white platter.
    Homemade Tzatziki Sauce

Ready to make the freshest, tastiest pesto sauce in town? Go for it!

And when you do, be sure to take a photo of it, post it on Instagram, and tag @HowToFeedaLoon and hashtag #HowToFeedaLoon

A bowl of easy pesto sauce in a small white bowl next to scattered pine nuts, a head of garlic, and fresh basil leaves.
Print Recipe
5 from 3 votes

Easy Pesto Sauce

Easy Pesto Sauce really is easy. Perfect for pasta or sandwiches, or on a pizza! So packed with flavor and so easy!
Prep Time15 minutes mins
Total Time15 minutes mins
Course: Sauce
Cuisine: Italian
Servings: 6 people
Calories: 143kcal
Author: Kris Longwell

Equipment

  • Food processor

Ingredients

  • 5 teaspoon pine nuts toasted
  • 2 cups fresh basil
  • 3 cloves garlic roughly chopped
  • 1 tablespoon fresh lemon juice from one medium lemon
  • ⅓ cup Parmesan cheese grated
  • Kosher salt and black pepper
  • ⅓ cup extra-virgin olive oil

Instructions

  • Toast the pine nuts. Keep an eye on them, they burn easily! Set aside until ready to make the pesto.
    5 teaspoon pine nuts
  • In a food processor, add the basil, pine nuts, garlic, lemon juice, Parmesan cheese, and a pinch of salt and pepper. Process until thoroughly chopped. Remove the lid and scrape the sides of the mixture back down into the base of the processor, or blender.
    2 cups fresh basil, 3 cloves garlic, 1 tablespoon fresh lemon juice, ⅓ cup Parmesan cheese, Kosher salt and black pepper
  • Place the lid back on, and with the motor running, slowly add the olive oil through the feed tube. Process until smooth, about 1 minute. Turn off the motor.
    ⅓ cup extra-virgin olive oil
  • Keep in an air-tight container in the fridge for up to 1 week, or freeze for up to 3 months.

Video

Notes

NOTE: Watch the video near the top of the recipe for visual guidance.
Add the oil slowly, keeping an eye on the consistency. The pesto should be ‘runny.’ Depending on how tightly you packed the basil when measuring it, you may need less (or more) of the oil called for. 
The pesto will thicken in the fridge. Allow it to come to room temperature (on the counter for an hour or two) until ready to serve. Give it a good stir first. 
It will keep in a jar with a lid in the fridge for up to 10 to 14 days. 

Nutrition

Calories: 143kcal | Carbohydrates: 1g | Protein: 3g | Fat: 11g | Saturated Fat: 3g | Polyunsaturated Fat: 2g | Monounsaturated Fat: 6g | Cholesterol: 4mg | Sodium: 90mg | Potassium: 45mg | Fiber: 0.2g | Sugar: 0.1g | Vitamin A: 466IU | Vitamin C: 2mg | Calcium: 83mg | Iron: 0.5mg

Arancini (Italian Rice Balls)

July 3, 2019 by Kris Longwell 25 Comments

Split the arancini open and see the melted cheese and prosciutto

Arancini, also known as Italian Rice Balls, is one of our all-time favorites.

There is just something so tantalizingly delicious about these little balls of yumminess.

These are quickly deep-fried to golden crispy perfection.  The risotto delivers superior flavor.

Split the arancini open and see the melted cheese and prosciutto

ARANCINI IS EASY TO MAKE AT HOME

There are few simple tricks to making perfect risotto, which we show you step-by-step.

The rest is a snap!

Watch us show you how to make perfect Arancini in your own kitchen!

Arancini means ‘little oranges’ in Italian because they sort of look like little oranges once they come out of the fryer. All we know is they are nothing but pure deliciousness. These are very popular in Sicily and throughout Italian restaurants throughout the world.

Once you have made the risotto, it is important to let the rice mixture cool completely before rolling into balls.

If the risotto is too wet, then you can add more binding ingredients, such as more parmesan cheese or bread crumbs.

Arancini

Wet your hands when rolling the balls. Or, you might find that dusting your hands with flour will help. The risotto will be sticky, but once you dredge the arancini in the flour, egg and bread crumbs, they will hold together.

You can choose whatever filling you like for your Arancini. Sweet baby peas are popular along with a rich meat sauce. We love the simplicity of good-quality prosciutto and mozzarella. Ooey gooey, and oh so amazing!

They only take a few minutes to fry up to a golden perfection. If you are making a large batch of arancini, fry them in batches and keep the finished rice balls in a low-temp oven until ready to serve.

These are delicious served with homemade marinara. But honestly, they are so scrumptious as they are…you won’t even probably take the time to dip them in a sauce.

Arancini

Ready to make these incredible balls of Italian deliciousness? They are easier than you’d think. Go for it and ENJOY!!

A white platter with Arancini
Print Recipe
5 from 7 votes

Arancini (Italian Rice Balls)

This Arancini (Italian Rice Balls) recipe is pure appetizer perfection. Lightly fried to golden perfection. We love filling them with good-quality prosciutto and mozzarella. Small peas and meat sauce are a popular filling, too. These are perfect by themselves, but they are great with marinara for dipping, too. Pure deliciousness! Be sure to read the NOTE below!
Prep Time20 minutes mins
Cook Time45 minutes mins
Total Time1 hour hr 5 minutes mins
Course: Appetizer
Cuisine: Italian
Servings: 8 people
Calories: 436kcal
Author: Kris Longwell

Ingredients

  • 3 oz. prosciutto chopped
  • 3 oz. mozzarella shredded
  • 3 to 5 cups chicken stock
  • 1 tablespoon unsalted butter
  • ¼ cup shallots chopped
  • 1 cup Arborio rice
  • ¼ cup dry white wine
  • Kosher salt
  • ½ cup Parmesan cheese grated
  • 4 eggs divided
  • 1 cup all-purpose flour
  • 2 cups bread crumbs fine crumbs are best
  • Canola or vegetable oil for frying

Instructions

  • Combine the proscuitto and mozzarella in a bowl and set aside. (This will be the filling)
  • In a medium pot, heat the stock to a simmer.
  • Meanwhile, in a large heavy skillet or pot (preferably a Dutch oven), melt the butter over medium-high heat.
  • Add the shallots and cook until translucent, about 4 minutes.
  • Add the rice and cook until lightly toasted, about 8 minutes.
  • Add the wine and cook until almost evaporated, about 4 minutes.
  • Ladle over enough of the hot stock to cover the rice.
  • Stir frequently with a wooden spoon until almost all liquid is absorbed, about 8 minutes.
  • Add more stock and continue stirring until absorbed.
  • Add stock again, until absorbed and creamy and rice is soft (about 25 minutes total). Taste rice, if still not soft, continue adding hot stock and stirring until rice is soft and creamy. Don't let the risotto be too wet! Remove from the heat.
  • Add ¾ teaspoon salt, Parmesan cheese and 2 eggs and gently mix to incorporate. Set aside and let cool completely.
  • Heat the oil over medium-high heat until it reaches 365°F.
  • Spread the flour on a plate and the bread crumbs in a separate plate.
  • Add the remaining eggs and 2 tablespoons of water in a medium bowl.
  • In another bowl, mix together prosciutto and mozzarella.
  • At this point, the risotto will be sticky. However, if the mixture is too wet to roll a ball, then gradually add in more parmesan cheese and bread crumbs until you can just form a ball. The balls will stay together after you dredge them. Wet hands (or lightly floured hands) help when dredging.
  • Scoop about ¼ cup of the risotto (rice mixture) into the palm of your hand and place 1 portion of the prosciutto/mozzarella cheese mixture on top. Shape the rice into a ball and add more risotto, if necessary.
  • Roll the ball in flour, and then dip into the egg mixture to coat completely, shaking off excess.
  • Finally, roll the ball in the bread crumbs and place on a rack.
  • Repeat this process with remaining ingredients. Depending on the size of the rice balls, you wil have between 8 to 12 balls.
  • Using a slotted spoon, transfer the balls (a few at a time) to the hot oil and fry until golden, about 2 to 3 minutes.
  • Remove with slotted spoon and place on a rack. (Keep finished arancini in a warm oven).

Video

Notes

This bears repeating: The cooked risotto will be sticky. However, if the mixture is too wet to roll into individual balls, then gradually add in more parmesan cheese and bread crumbs until you can just form a ball. The balls will stay together after you dredge them. Wet hands (or lightly floured hands) help when dredging.  Moist is good...it makes the arancini very creamy on the inside and crispy on the outside. 

Nutrition

Calories: 436kcal

Classic Cioppino (San Francisco-Style Seafood Stew)

June 30, 2019 by Kris Longwell 29 Comments

Classic cioppino in a large blue Dutch oven.

Classic Cioppino is a hearty Italian seafood stew that became famous in San Francisco.  San Francisco is one of our favorite cities in the world, with one of the key reasons being the food.

Of course, with the city snuggly tucked into the gorgeous San Fran Bay, the seafood is bountiful.

Every time we hit this magical city, we have to get a bowl of the heartwarming dish.

Classic cioppino in a large blue Dutch oven.

HOW TO MAKE CLASSIC CIOPPINO

Talk about a show-stopper of a dish.

Watch us show you how easy it is to make Classic Cioppino at home!


This amazing stew starts with with a sautéed trilogy of flavorful aromatics of onion, red bell pepper, and celery.

And that’s just the start.

You’ll need a large pot for this classic cioppino, and I really love using my large Dutch oven.

onion, red pepper and celery sautéing for Cioppino

A SAN FRANCISCO STAPLE

Cioppino is a seafood lover’s dream stew.

We love using fresh crab legs, and meaty mussels, delicious clams and shrimp, and amazing chunks of white fish like halibut or cod.

This stew is truly something to behold.

Crab, mussels and other seafood on a cutting board for cioppino

Cioppino was created in San Francisco by Italian fishermen. The history is fascinating…learn more here.

It’s truly a gorgeous pot of deliciousness and is really a lot of fun to prepare.

The tomato base is so flavorful and intensely flavorful.

As this stew simmers on the stove, you won’t believe the smell coming from your kitchen.

Tomatoes stewing for classic cioppiono

During our last staying San Fran, I found a couple of local foodie folks who shared their recipe for Classic Cioppino with me.  I came home and played around with it, and this version is what we love and takes us back to the magical city by the bay every time.

It is a beautiful dish, and it even looks like it must be super labor-intensive to make – but surprisingly, it’s really not.  You’ll need just a couple of hours to bring this iconic dish to the table.  And talk about a great thing to serve during the holidays, or anytime you want something special for loved ones.

This is now an instant classic in our home.  Try it…you’ll love it.  You can make the tomato base sauce the day before.  Then just reheat, add the fish, and cook until ready (about 8 minutes)!!

Another awesome seafood dish is our Seaside Ceviche  or our Braised Halibut with Kale, Beans, and Tomatoes

Classic cioppino in a pot

Classic cioppino in a large blue Dutch oven pot
Print Recipe
4.91 from 10 votes

Classic Cioppino (San Francisco-Style Seafood Stew)

This Classic Cioppino is a true favorite Italian seafood stew originating in the incredible city of San Francisco. It is beautiful, and actually quite easy to make. You just need a couple hours from start to finish. Plus, you can tweak to you own tastes. Enjoy!!
Prep Time30 minutes mins
Cook Time1 hour hr 30 minutes mins
Total Time2 hours hrs
Course: Seafood
Cuisine: Italian
Servings: 6 people
Calories: 280kcal
Author: Kris Longwell

Ingredients

  • 2 tablespoon olive oil
  • 2 tablespoon unsalted butter
  • 2 medium yellow onions chopped
  • 4 cloves garlic minced
  • ½ red bell pepper cored, seeded, chopped (about ½ cup)
  • ½ cup celery chopped
  • ¼ flat-leaf parsley chopped
  • 1 28 oz. can whole tomatoes San Marzano are excellent, with juice
  • 2 8 oz bottles clam juice
  • 1 cup dry white wine Sauvignon blanc is good
  • 2 bay leafs
  • 1 tablespoon dried basil
  • ½ teaspoon dried oregano
  • ½ teaspoon dried thyme leaves
  • ½ teaspoon crushed red pepper flake
  • ½ teaspoon salt more to taste
  • Juice of 1 lemon about 2 teaspoons
  • 12 small hard-shell clams in shell
  • 12 mussels in shell
  • 1 lb extra-large shrimp peeled and deveined
  • 1 lb bay scallops
  • 1 lb firm white fish fillets cod, halibut, haddock are all good choices
  • 2 lbs fresh steamed crab legs

Instructions

  • In a large soup pot, or preferably large Dutch oven, over medium-low heat, heat olive oil, then add butter and let melt. Add onions, garlic, bell pepper, celery and parsley. Cook until soft, about 8 minutes.
  • Add tomatoes (break them up with your hands as you add them to the pot), and add the juice from the can.
  • Add the clam juice, wine, bay leaf, basil, oregano, thyme, red pepper flakes, salt, and lemon juice; bring to just a boil, then reduce heat and simmer for 1 hour.
  • NOTE: At this point, stock may be refrigerated, covered and kept up to 2 days before serving. Just bring the stock back to a boil about 20 minutes before serving, lower the heat, and progress with the recipe.
  • Scrub the clams and mussels with a small stiff brush under cold running water; remove beards from mussels.
  • Discard any open clams or mussels. Let cold water run over shells for 5 minutes (shaking every minute, or so).
  • Gently stir into the sauce the clams, mussels, shrimp, scallops, and fish fillets. Cover the dish and let simmer for 7 - 8 minutes, until the clams and mussels open. Discard any shells that have not opened.
  • Add the crab legs and steam until heated through, another 2 - 3 minutes.
  • Try not to stir too much (it will break up the fish), and don't overcook!!
  • Remove the bay leaves. Adjust seasonings
  • Ladle sauce and seafood into large bowls and serve with toasted bread.

Video

Nutrition

Calories: 280kcal

Southern Tomato Pie

June 28, 2019 by Kris Longwell 31 Comments

An untouched tomato pie in a white ceramic pie dish with three colorful baked heirloom tomatoes on the top of the pie.

Southern Tomato Pie is a truly magical culinary masterpiece and the quintessential summer dish. Made with fresh, vibrant ingredients straight from the farmer’s market and a simple homemade pie crust, this savory pie easily earns its place among your favorite summertime classics.

An untouched tomato pie in a white ceramic pie dish with three colorful baked heirloom tomatoes on the top of the pie.
[feast_advanced_jump_to]

🍅 The Ingredients

Farm-fresh vegetables and herbs, combined with quality cheese, crispy bacon, and a flaky homemade pie crust, come together to make this tomato pie truly unforgettable. Find ingredient notes (including substitutions and variations) below.

An arrangement of ingredients for Southern tomato pie on a grey wooden background including heirloom tomatoes, pie dough, fresh herbs, mayonnaise, Dijon, onion, bacon, an egg, shredded cheese, salt, and pepper.

🧀 Substitutions and Variations

  • Tomatoes – Heirloom tomatoes are colorful, flavorful, and hold up well in baking. However, any type of tomato will work. Try to avoid hot-house tomatoes, as they aren’t as flavorful. Ripe, juicy tomatoes are best.
  • Cheese – You can’t go wrong with your choice of cheese. Any cheese that melts well is perfect. We love the combination of cheddar and Gruyére, but Monterey Jack, Fontina, Swiss, and mozzarella are all excellent options. Any type of blue cheese would be good, but it will have a stronger flavor profile.
  • Bacon – If you want the pie to be vegetarian, leave the bacon out. Other substitutions (or additions) such as cooked, cubed pancetta, prosciutto, sausage (Italian or breakfast), and even pepperoni, are amazing!
  • Herbs – Fresh is definitely best, but in a pinch, you can use dried herbs. You’ll use half of the amount called for in the recipe. Basil and oregano are wonderful, but you can also use fresh rosemary, thyme, mint, sage, or marjoram.

See the recipe card (with video) below for a full list of ingredients and measurements.

👩🏼‍🍳 How To Start a Southern Tomato Pie

A partially baked pie crust in a white ceramic pie dish resting on a baking rack on a wooden cutting board.
  1. Step 1: Par-bake the pie dough for 15 minutes.
A person sprinkling Kosher salt over slices of red, orange, and yellow heirloom tomatoes that are resting on paper towels in a baking pan.
  1. Step 2: Place the sliced tomatoes on paper towels on a baking sheet and salt them.
A person placing salted slices of colorful heirloom tomatoes onto a wire baking rack on a silver sheet pan.
  1. Step 3: After 15 minutes, place the salted tomatoes on a baking rack on a baking sheet. Bake the tomatoes for 45 minutes.
A person dumping chopped onions from a small glass bowl into a cast-iron skillet that is filled with crispy chopped bacon that is simmering in bacon grease.
  1. Step 4: Cook the bacon until it starts to crisp, then add the onion and cook a few minutes.
Red, yellow, and orange slices of heirloom tomatoes that have been roasted on a baking rack in a silver sheet pan.
  1. Step 5: Remove the tomatoes and let them cool for 20 minutes on the rack.
A person using a large wooden spoon to stir together a mixture of shredded cheese, crispy chopped bacon, and a raw egg in a glass bowl.
  1. Step 6: Mix together the mayonnaise, bacon/onion, Dijon, egg, and both cheeses

Expert Tip

One problem some home cooks have is that when baked, the tomatoes exude a lot of water and make the pie crust soggy. Placing them on paper towels and then sprinkling salt on them naturally brings out the moisture. Roasting them concentrates the flavor and also helps to remove excess water.

👨‍🍳 How To Build and Bake a Southern Tomato Pie

A person using a spoon to add a cheese, bacon, and mayonnaise mixture into the bottom of a pie dish lined with a partially baked pie crust.
  1. Step 1: Add one-third of the filling to the crust.
A person sprinkling chopped fresh herbs over the tops of sliced heirloom tomatoes that are resting on a cheese and mayonnaise mixture in a partially baked pie crust in a pie dish.
  1. Step 2: Next, add a layer of tomatoes. Sprinkle on salt, pepper, and half of the herbs.
A person adding sliced heirloom tomatoes onto layers of a mayonnaise and cheese mixture, herbs, and more heirloom tomatoes in a pie dish lined with a partially baked pie crust.
  1. Step 3: Repeat this process.
A person sprinkling shredded cheddar cheese over the top of an un-baked Southern tomato pie.
  1. Step 4: Add one more layer of the filling and sprinkle more cheese.
A person placing slices from a red, orange, and yellow heirloom tomato on top of an un-baked Southern tomato pie.
  1. Step 5: Add the 3 remaining tomatoes on top.
A person sprinkling chopped fresh herbs over a baked Southern tomato pie resting on a baking rack on a wooden cutting board.
  1. Step 6:
    Bake for 40 minutes and then let rest for 1 hour. Top with chopped fresh herbs.

🍽️ How To Serve and Store

  • It’s very hard to resist digging into this amazing pie as soon as it comes out of the oven.
  • But try and resist; if you slice into the pie too soon, the filling will spread. If you’re okay with that, then go for it. This pie is incredible hot, warm or room temperature.
  • For storing, cover with plastic wrap (or place in an air-tight container with a lid), and refrigerate. Take the pie out of the fridge 1 to 2 hours before serving.
  • If desired, you can briefly microwave a slice to warm it up before digging in.

🙋🏽‍♂️ Frequently Asked Questions

Can I use store-bought pie crust instead of homemade for Southern Tomato Pie?

Yes, store-bought pie crust works well and can save time, though a homemade crust adds extra flakiness and flavor.

What type of tomatoes are best for Southern Tomato Pie?

Ripe, juicy tomatoes like heirloom or vine-ripened tomatoes are ideal for the best flavor and texture.

Can I make Southern Tomato Pie ahead of time?

Absolutely! You can assemble the pie a day in advance and refrigerate it, then bake it fresh before serving.

Is Southern Tomato Pie a healthy dish?

While Southern Tomato Pie features fresh vegetables and herbs, it is also rich in cheese and bacon, so it’s best enjoyed as an occasional indulgence rather than a daily health food.

A slice of Southern tomato pie with a sprig of fresh basil on top all resting on a white dessert plate.

😋 Other Amazing Tomato Recipes

  • A straight-on view of a baked tomato galette with gruyere cheese and caramelized onions sitting next to a sprig of thyme and two tomatoes on a vine.
    Tomato Galette with Gruyère and Caramelized Onions
  • Looking straight down at a tomato tart with corn with fresh tomatoes nearby.
    Tomato Tart with Fresh Corn and Herbs
  • An overhead view of four large tomatoes that have been split in half and roasted with bread crumbs in the cavity.
    Stuffed Tomatoes
  • An overhead view of a platter filled with sliced tomatoes that are red, purple, and yellow and topped with scallions, olive oil, and balsamic vinegar.
    Heirloom Tomato Salad

Ready to make the best summertime pie on the block? Go for it!

And when you do, be sure to take a photo of it, post it on Instagram, and tag @HowToFeedaLoon and hashtag #HowToFeedaLoon!

A close-up view of a tomato pie in a white ceramic pie dish with three colorful baked heirloom tomato slices on top with chopped parsley sprinkled on the surface of the pie.
Print Recipe
5 from 10 votes

Southern Tomato Pie

Southern Tomato Pie is the perfect summer dish. Use your favorite variety of fresh tomatoes, and cheeses….go with a wonderful pie crust, basil, and a touch of onion. Wow! Amazing!!
Prep Time20 minutes mins
Cook Time1 hour hr 20 minutes mins
Resting time1 hour hr
Total Time2 hours hrs 40 minutes mins
Course: Brunch, lunch
Cuisine: American
Servings: 8 people
Calories: 412kcal
Author: Kris Longwell

Equipment

  • baking pan with a baking rack
  • 9-inch pie dish
  • Pie weights or dried beans or rice

Ingredients

Pie Crust

  • 1 pie crust

For the Tomato Pie

  • 3 lbs tomatoes sliced
  • Kosher salt
  • 4 slices bacon roughly chopped
  • 1 small onion finely diced
  • ½ cup mayonnaise
  • 1 tablespoon Dijon mustard
  • 1 egg
  • 1 cup Cheddar cheese shredded
  • 1 cup Gruyére cheese shredded
  • ½ teaspoon ground black pepper
  • ½ cup basil fresh, chopped
  • ¼ cup oregano chopped

Instructions

  • Preheat the oven to 425°F.
  • Par-bake the pie crust: Place the pie dough in the pie dish. Now, line with parchment paper. Add weights, or 1 cup dried beans, or 1 cup dried rice on top. Bake for 15 minutes.
    1 pie crust
  • Meanwhile, layer one (or two, if needed) baking sheets with paper towels. Place the sliced tomatoes on the paper towels and sprinkle salt over the tops of the tomatoes. Let them rest for 15 to 20 minutes.
    3 lbs tomatoes, Kosher salt
  • Remove the pie from the oven, and then remove the parchment paper and weights. Let cool completely.
  • Reduce the oven to 350°F.
  • On a separate baking sheet with a rack, place all but 3 of the tomatoes and roast in the oven for 40 to 45 minutes. Hold the 3 tomatoes for topping the pie after assembling.
  • Meanwhile, heat a medium-sized skillet over medium-high heat. Add the bacon and cook until just starting to crisp and the grease is being rendered.
    4 slices bacon
  • Add the chopped onion and cook until translucent, about 4 to 5 more minutes. Use a slotted spoon to transfer to a plate lined with paper towels. Set aside.
    1 small onion
  • Once the tomatoes are done roasting, remove from the oven and let cool for at least 20 minutes, still on the rack(s).
  • Make the filling by mixing together in a medium bowl the mayonnaise, cooked bacon/onion mixture, Dijon mustard, egg, and both cheeses. Stir until completely combined.
    ½ cup mayonnaise, 1 tablespoon Dijon mustard, 1 egg, 1 cup Cheddar cheese, 1 cup Gruyére cheese
  • Add a thin layer of the filling to the par-baked pie crust. Use a knife to spread the filling.
  • Next, using a spatula, carefully add a layer of the roasted tomatoes. Sprinkle freshly ground black pepper over the tomatoes.
    ½ teaspoon ground black pepper
  • Now, sprinkle half the fresh basil and fresh oregano on top of the tomatoes.
    ½ cup basil, ¼ cup oregano
  • Repeat this layering of filling, tomatoes, pepper and herbs. Add one more layer of the filling on top. Sprinkle more shredded cheese to cover any gaps.
  • Add the three remaining tomatoes on top and sprinkle on a little more of the herbs.
  • Bake for 40 minutes, until bubbly and lightly browned on top.
  • Let rest for 1 hour (if served sooner, the filling will still be somewhat fluid). Serve warm or at room temperature.

Video

Notes

NOTE: Watch the video near the top of the recipe for visual guidance.
The tomatoes are somewhat fragile after roasting. Carefully use a small spatula (and your hands) to transfer them from the baking rack to the pie. 
In the video, we used a combination of Fontina and Cheddar; we also enjoy a combination of Gruyére and Cheddar. Go with your favorite melting cheese(s), and you can’t go wrong. 
The pie can be assembled up to a day in advance, refrigerated (covered), and then baked the next day. 
Leftovers will keep in an air-tight container in the fridge for 4 to 5 days. Let it come to room temperature before serving. Gently reheat in the microwave, if desired. 

Nutrition

Calories: 412kcal | Carbohydrates: 20g | Protein: 14g | Fat: 32g | Saturated Fat: 11g | Polyunsaturated Fat: 8g | Monounsaturated Fat: 10g | Trans Fat: 0.04g | Cholesterol: 66mg | Sodium: 497mg | Potassium: 521mg | Fiber: 3g | Sugar: 5g | Vitamin A: 1865IU | Vitamin C: 24mg | Calcium: 323mg | Iron: 2mg

Steak au Poivre

June 25, 2019 by Kris Longwell 12 Comments

Steak au Poivre on a white plate with a fork nearby.

Steak au Poivre.

Oh, Yes.  This has been a Loon favorite for many years. And for good reason.

The seared peppered steaks and the black pepper cream sauce is something truly special.  Perfect with a side of Steakhouse Creamed Spinach, Ultimate Mac ‘n Cheese, or French Potatoes Gratin!

Steak au Poivre on a white plate with a fork nearby.

STEAK AU POIVRE IS EASY TO MAKE AT HOME

All you need is a simple spice grinder, or a sturdy skillet, a few good cuts of meat, top-notch Cognac…and cream…and you are good to go with this amazing dish.

This is a dish made to impress.

And you won’t believe how easy it is to make at home! Watch us show you how to make Steak au Poivre!

Steak au Poivre is one of those dishes that you don’t want to skimp on ingredients.

The key components of the dish are simple and straightforward, but should be good-quality.

For steak, we love a good New York Strip Steak which is a cut of meat from the short loin of the cow. For the sauce, we recommend a quality Cognac or brandy. Our favorite is Hennessy. Top-notch cream, beef stock and black peppercorns help to round out this amazing dish.

New York Strip Steak and Cognac are used in Steak au Poivre.

CRACK THE PEPPER BEFORE DREDGING

It is very important to crack the peppercorns before dredging the steak in the pepper. If you don’t do this, the pepper-flavor will be too overpowering for most guests.

You can crack the peppercorns by several different methods. We use an old coffee grinder nowadays as our spice grinder. You can also use a mortar and pestle. Of, just place the peppercorns in a plastic baggie, and then take a blunt object, such as a heavy skillet, or even a wine bottle (carefully), and smash the peppercorns until they have become cracked and a little powdery.

Once you reach the right consistency, spread the pepper onto a plate or platter, and then gently apply the pre-salted steaks to the cracked pepper all over. Shake excess off. You don’t want the steaks to be 100% covered in the pepper. Again, this would result in too much pepper for the steak. Remember, there is also cracked pepper in the au poivre sauce.

Spread the uncooked strip steaks in the cracked black peppercorns.

Cover the strip steak all over with the cracked black peppercorns.

SEAR THE STEAKS FIRST

It’s important to liberally add course sea salt or Kosher salt to the steaks before dredging in the pepper.

As shown above, press the steaks into the cracked peppercorn all over until the steak has a nice (but not too much) coating of the pepper.

Crank your skillet (preferably cast iron) up to high, and then sear each side for 2 minutes, and then lower the heat to medium, and cook each side for another 4 to 5 minutes per side until internal temperature reaches 135°F for medium/medium-rare.

Sear the steaks in a hot cast iron skillet.

While preparing the sauce, keep the steaks warmed with a foil tent, or in a low-temp (200°F) oven.

Each layer of the sauce will reduce as it cooks, which will concentrate the flavors and deliver unmatched taste.

Once ready, the sauce will just coat the back of a wooden spoon.

Cook the Steak au Poivre sauce in a large skillet with a wooden spoon.

“au POIVRE” MEANS “WITH PEPPER”

When ordering Steak au Poivre at some steak houses, you may only get a steak that has a layer of pepper on the exterior of the meat. Others, you may get a seared steak that only has an au Poivre sauce poured over the top.

We think the perfect Steak au Poivre has both. But just the right amount of pepper on the steak and in the sauce.

When done right…it’s quite possibly the best steak you’ll ever eat.

Slice the steak and then pour the au poivre sauce over the top and serve with a good brandy.

When you are ready to impress, and without killing yourself in the kitchen, this Steak au Poivre dish will send your guests home with rave reviews.

Here are a few of our other favorite beef dishes:

  • Cowboy Ribeye Steak with Chimichurri Sauce
  • Filet Mignon with Borderlaise Sauce
  • Beef Brisket with Carrots and Apricots
  • Steak with Gorgonzola and Caramelized Onion Sauce
  • Stuffed Flank Steak

But for now, ladies and gentleman, the time has come to make our most favorite steakhouse dish of all time: Steak au Poivre. Yes. Yes. Yes!

Serve the steak au poivre on a white plate with extra sauce on the side.

Sliced strip steak with au poivre sauce poured over the top.
Print Recipe
4.58 from 7 votes

Steak Au Poivre

Steak au Poivre is amazing. A bit of a kick with the fresh ground pepper, and the super luscious sauce makes this classic steak amazing. Break up the whole peppercorns with a heavy skillet between two pieces of wax paper or a spice grinder.
Prep Time15 minutes mins
Cook Time45 minutes mins
Total Time1 hour hr
Course: French
Cuisine: French
Servings: 8 people
Calories: 386kcal
Author: Kris Longwell

Equipment

  • Spice Grinder OR Coffee Grinder OR Heavy Skillet

Ingredients

FOR THE STEAKS

  • 6 strip steaks (i.e, New York strip) about 1 inch thick, each
  • Coarse sea salt, or Kosher salt
  • ½ cup black peppercorns cracked, divided (save some for the sauce)
  • 2 tablespoon unsalted butter

FOR THE SAUCE

  • 1 tablespoon unsalted butter
  • ¾ cup shallots (usally one large shallot will be enough) finely diced
  • 1 cup good-quality Cognac or brandy
  • ½ cup red wine Cabernet, Zinfandel
  • 2 cups beef stock
  • 1 cup heavy cream
  • 1 tablespoon balsamic vinegar
  • 1 tablespoon cracked black peppercorns
  • 1 teaspoon Kosher salt to taste

Instructions

PREPARE THE STEAKS

  • Liberally salt the steaks.
  • Spread ¼ cup of the cracked pepper on a clean surface. Dredge the steaks through the pepper, shaking off excess. Don't try to cover the entire steaks in the pepper. There should still be red visible from the steaks after they have been dredged.
  • Melt butter in a large saute pan over high heat. Working in batches, add the steaks and sear each side for 2 minutes. Lower the heat to medium and continue to cook the steaks for another 8 minutes, about 4 minutes per side for medium-rare (135°F) or 5 to 6 minutes per side for medium (155°F). Remove and tent under foil, or place on a baking rack and pan and keep warm in a low-temp oven (200°).

MAKE THE SAUCE

  • In the same skillet, melt the butter over medium-high heat.
  • Add the shallots and saute until the shallots are soft, about 2 minutes. Stirring frequently with a wooden sppon.
  • Add Cognac and wine (stand back - it may flame!). Bring to a strong simmer and cook until reduced to about ½ cup, about 6 to 7 minutes.
  • Add the stock and bring to a boil. Cook for 12 minutes until thickened and almost syrupy.
  • Turn off the heat and stir in the cream. Turn the heat back to medium, and cook until thickened again, about 8 minutes. Stirring frequently.
  • Add the reserved cracked pepper (about ¼ cup), balsamic vinegar, and salt, to taste.

ASSEMBLE THE DISH

  • Remove the steaks from the oven and place on warmed plates.
  • Spoon a layer of the sauce over the top of each steak and place the remaining sauce in a bowl for passing at the table. Serve at once!

Video

Nutrition

Calories: 386kcal

Stewed Okra and Tomatoes

June 20, 2019 by Kris Longwell 48 Comments

A white bowl holding stewed okra and tomatoes.

Stewed Okra and Tomatoes are just so delicious.

This dish is truly a comfort dish like no other. Just so warm, delicious, and utterly satisfying. And comes together in about 35 minutes!  You might also like Skillet Okra with Garlic, Fried Okra, or Classic Shrimp and Okra Gumbo, or even Chicken and Andouille Sausage Gumbo with Okra.

A white bowl holding stewed okra and tomatoes.

STEWED OKRA AND TOMATOES ARE EASY TO MAKE AT HOME

This dish really is delicious any time of the year. Summertime is great, but they are a favorite during the holiday season, too.

And..this dish is surprisingly easy to prepare!

Watch us show you how simple it is to make Stewed Okra and Tomatoes!

Fresh okra is great, but obviously isn’t always in season. Frozen okra that has been thawed works perfectly fine, too.

Okra, when prepare correctly, is so delicious.

fresh okra held by two hands

So, okra can be a little slimy, (I know, I hate that word), so give these sliced gems a quick fry in some bacon fat (or vegetable oil) and you won’t believe how good this dish turns out.

You’ll notice as you sauté these in a nice hot skillet, the ‘slime-factor’ goes away.

cut okra in a hot skillet and wooden spoon
Fried okra is a popular dish, especially in the South, but let me tell you, Stewed Okra with Tomatoes is something special.

The smell as it simmers on the stove is incredible. Stewed Okra and Tomatoes is just the best.

Mmmmmm.

Fresh okra in a skillet with tomatoes

This has without a doubt been been a favorite dish in our house for many years.

It is now a staple on our Thanksgiving table. But also a summertime favorite, too!

It is easy to prepare, and you can even make it in advance, and then re-heat just before serving.

Stewed okra with tomatoes in a bowl with a silver spoon

We just can’t say enough about this amazing Stew Okra and Tomatoes recipe.

Make this and we feel quite certain you and your loved ones will love it as much as we do!

Let’s hear it for OKRA!!

stewed okra with tomatoes

stewed okra with tomatoes
Print Recipe
5 from 18 votes

Stewed Okra and Tomatoes

Stewed Okra and Tomatoes is such a delicious dish and is literally exploding with flavor. An all-time favorite!  Great on a holiday table, too!
Prep Time15 minutes mins
Cook Time25 minutes mins
Total Time40 minutes mins
Course: Side Dish
Cuisine: Side dish
Servings: 4 people
Calories: 315kcal
Author: Kris Longwell

Ingredients

  • 2 tablespoon quality olive oil
  • 4 cups trimmed fresh okra cut into 1 & ½ inch slices
  • 1 tablespoon bacon fat or vegetable oil
  • ½ medium yellow onion thinly sliced
  • 1 jalapeno stemmed, seeded, and finely chopped
  • 3 garlic cloves minced
  • 1 tablespoon tomato paste
  • 1 28 oz can whole tomatoes drained and roughly chopped (We love San Marzano!)
  • 1 teaspoon Kosher salt
  • ½ teaspoon freshly ground black pepper
  • 4 fresh bay leaves
  • 1 teaspoon fresh rosemary chopped
  • ½ teaspoon red pepper flakes
  • 2 tablespoon red wine vinegar
  • 1 & ½ cups chicken stock or vegetable stock

Instructions

  • Heat the olive oil in a large skillet over medium-high heat.
  • Add the okra and saute for 5 to 8 minutes until the okra starts to slightly brown and most of the 'slime' has disappeared. Set aside.
  • In a medium skillet, heat the bacon fat over medium-high heat. Add the onion, jalapeno, and garlic and saute for 3 minutes.
  • Add the tomato paste, tomatoes, salt, pepper, bay leaves, rosemary, red pepper flakes, and vinegar.
  • Cook for 10 minutes, until the tomatoes start to break down and start forming something like a paste.
  • Add the stock and simmer for 15 minutes longer over low heat.
  • Stir the okra into the tomato sauce, raise the heat to medium, and simmer for another 10 minutes.
  • Taste, and adjust seasonings, as needed. Remove bay leaves and serve at once.

Video

Notes

This dish can easily be prepared a day in advance and re-heated 30 minutes before serving.  Add a little more stock to thin the dish, if desired. 

Nutrition

Calories: 315kcal

Cajun Pasta Salad

June 18, 2019 by Kris Longwell 39 Comments

A large white bowl of freshly prepared Cajun Pasta Salad.

Cajun Pasta Salad.  Now, that’s something special.

Nothing spells summer much more than a good outdoor BBQ.  And the best BBQ’s have amazing side dishes.

This Cajun Pasta Salad recipe is one of our all-time favorites.

A large white bowl of freshly prepared Cajun Pasta Salad.

CAJUN PASTA SALAD IS EASY TO MAKE AT HOME

You can easily prepare the pasta ahead of time, as well as the dressing.

Right before serving, mix the dressing with the cooled cooked pasta (and a little more water, if needed), and you’re good to go!

Watch us show you how easy it is to make Cajun Pasta Salad!


CAJUN PASTA SALAD IS A NICE CHANGE OF PACE

There is a slight kick to this pasta salad, but it’s a good kick!.

The flavors compliment each other so well.

Of course, if you don’t like bell peppers or shallots, just leave them out! But we think they add a nice, but subtle, dimension to the salad.

Sprinkle chopped parsley on top of the cajun pasta salad for garnish.

The seasonings in the dressing really provide a delicious depth to the salad.

If you can’t find cajun seasoning, just get a large bowl, and mix together 1 tablespoon of the following:

  • Garlic powder
  • Italian seasoning
  • Paprika
  • Kosher salt

And then 1 teaspoon of the following:

  • Black pepper
  • Cayenne pepper
  • Ground thyme
  • Onion powder

If you are interested in other amazing BBQ side dishes, try one of these favorites:

  • Homemade Coleslaw
  • Southern Baked Beans
  • Slow-Cooker Corn on the Cob
  • Cool Cucumber and Dill Salad

In the meantime, be sure to make this amazing Cajun Pasta Salad!

A white bowl full of Cajun pasta salad with a gold spoon nearby.

MIX THE PASTA WITH THE DRESSING SOON BEFORE SERVING

Once you mix the pasta with the dressing, if you are not serving the pasta salad immediately, cover with plastic wrap and keep in the refrigerator until ready to serve.

We recommend not putting the pasta salad together until close to serving time.

If you have stored in the fridge, mix again with a couple tablespoons of water to help thin the dressing a bit.

Use a large spoon to dish out the salad.

A large white bowl of Cajun Pasta Salad with a gold spoon nearby.
Print Recipe
4.36 from 14 votes

Cajun Pasta Salad

This Cajun Pasta Salad is just so good! Really bursting with flavor. Just a little kick, but nothing too much. Perfect for a Summer BBQ!! Yum! If you make this ahead of time (say several hours early...add a little extra water, as it will thicken as it sits in the fridge).
Prep Time20 minutes mins
Cook Time10 minutes mins
Total Time32 minutes mins
Course: Salad
Cuisine: Cajun
Servings: 8 people
Calories: 295kcal
Author: Kris Longwell

Ingredients

  • Kosher salt
  • 1 lb elbow macaroni
  • 2 tablespoon good-quality olive oil divided
  • ½ cup shallots finely minced
  • 1 cup red bell pepper cored, seeded, and finely chopped
  • 1 cup celery finely chopped
  • 1 teaspoon smoked paprika
  • 1 teaspoon Cajun seasoning
  • 2 teaspoon Kosher salt
  • 1 teaspoon freshly ground black pepper
  • 3 tablespoon Creole/Cajun, or whole grain Dijon mustard see Note
  • 1 ½ cups mayonnaise
  • 3 tablespoon red wine vinegar
  • 1 tablespoon fresh lemon juice
  • 1 teaspoon hot sauce ie, Tobasco, Crystals
  • ¼ cup fresh parsley chopped, for garnish

Instructions

  • Bring a pot of salted water to a boil and add the pasta and cook for 9 minutes, until tender.
  • Drain in colander and rinse with cool water.
  • Transfer to a large bowl and mix in 1 tablespoon olive oil.
  • In a separate medium bowl, combine the remaining ingredients, including the remaining 1 tablespoon olive oil. Add 1 to 2 tablespoons water, to thin slightly.
  • Adjust seasonings, to taste.
  • Add the macaroni and mix.
  • Top with chopped parsley.

Video

Notes

If you can't find Creole or Cajun mustard, any kind of whole grain, or spicy, or even just Dijon work just fine. 
You can make the pasta several hours before serving. Just rinse after cooking, then toss with the oil then cover with plastic wrap.  No need to refrigerate.
You can also make the dressing several hours before serving, after mixing together, cover with plastic wrap, and keep in the refrigerator.
Just before serving, mix pasta with dressing and a couple tablespoons of water.  You don't want the dressing too thick.  Best served at room temperature. 

Nutrition

Calories: 295kcal

Italian-Style Panini

June 16, 2019 by Kris Longwell 9 Comments

A stack of Italian-style Paninis with a beer in the background.

Italian-Style Panini.  This is one panini for the record books.  This brings together some of our most favorite tastes into one mouth-watering sandwich.

Of course, we recommend making your own pesto, especially since it’s just so darn easy to make, but, you can certainly get quality store-purchased as well.

Wow, this is delicious.

A stack of Italian-style Paninis with a beer in the background.

ITALIAN-STYLE PANINI IS EASY TO MAKE AT HOME

These are sone of the best sandwiches we ever made in the H2FaL, and you won’t believe how easy they are to prepare!

Watch us show you how simple (and fun) it is to make Italian-Style Paninis!


I absolutely love pulling out my trusty grill pan and getting it nice and hot. Then, I just grab another heavy skillet, and place it right on top of the sandwich. I love getting new gadgets and appliances as much as anybody, probably even more than most, but I haven’t gotten a panini press because my grill pan / heavy skillet technique works so perfectly. But hey, a panini press would be pretty awesome, too.

Either way, you’re going to get an over-the-top Italian-style panini with this recipe!

Here’s the grill pan I use almost every single week.  I’ve had it for years and it works like a charm!

Just look at that…

Italian-Style Panini recipe

We love Italian cured meats. The combination of salami, soppressata, prosciutto and mortadella is just heavenly.

All of the meats can be found in a well-stocked deli section of most major supermarkets.

This combined with good-quality mozzarella, bread, and pesto…oh, my mouth is watering just thinking about it.

Italian-Style Panini recipe

Of course, if you want to go the vegetarian route, that can be just as delicious, too.

Go with roasted red peppers and baked eggplant, and you will not be disappointed.

But…if you’re in the mood for a classic Italian-Style Panini recipe…look no further. You have just hit the panini jackpot. Just incredible!

Italian-Style Panini recipe

A stack of Italian-style Paninis with a beer in the background.
Print Recipe
5 from 2 votes

Italian-Style Panini

This Italian-Style Panini recipe is one for the record books. The Italian cured meats, along with the fresh pesto and mozzarella cheese work beautifully with the grilled bread. This incredible sandwich pairs nicely with a crisp wheat beer. Doesn't get much better than this!
Prep Time10 minutes mins
Cook Time15 minutes mins
Total Time25 minutes mins
Course: lunch
Cuisine: Italian
Servings: 4
Calories: 528kcal
Author: Kris Longwell

Equipment

  • Panini press
  • OR - Grill skillet
  • OR- Sturdy skillet

Ingredients

  • 8 slices Firm whole grain bread
  • Fresh Pesto click for recipe, or use store-bought
  • ¼ lb thinly sliced whole-milk mozzarella
  • ¼ lb thinly sliced salami
  • ¼ lb thinly sliced soppressata
  • ¼ lb thinly sliced prosciutto
  • ¼ lb thinly sliced mortadella
  • ¼ cup unsalted butter room temperature

Instructions

  • Pre-heat oven to 200°F.
  • Lay out 4 slices of bread and spread the pesto on top of each slice.
  • Next, add to those 4 slices, the cheese. Then layer a few slices of each meat on top.
  • Top with another cheese slice and then top with bread slices.
  • Spread butter on the top of each sandwich.
  • Heat a grill pan (you can also use a heavy frying pan) over medium-high heat, or heat your panini press.
  • Depending on the size of your pan, add 1 or 2 sandwiches, buttered side down first.
  • Place a heavy pan on top of the sandwiches.
  • Cook until the undersides are lightly browned and show grill marks, about 2 - 3 minutes. Adjust the heat if cooking too quickly. Add butter to the top piece, while cooking the panini.
  • Flip the sandwiches, add the heavy pan on top of the sandwich, and brown the other side, for another 2 -3 minutes. The cheese should be melting by now.
  • If you are using a panini press, the total cook time is about 5 minutes.
  • Remove from the pan and place on a baking sheet and keep warm in the oven while preparing the other sandwiches in the same manner.
  • Cut each sandwich in half (on the diagonal is nice) and serve immediately.

Video

Nutrition

Calories: 528kcal

I

Easy Cucumber and Dill Salad

June 14, 2019 by Kris Longwell 10 Comments

A white oval serving dish filled with sliced cucumber and dill salad with sprigs of fresh dill in front of the bowl.

Cucumber and Dill Salad is refreshingly delicious and one of our all-time favorite summer salads. The perfect side for Marinated Grilled Chicken, Smoked St. Louis-Style Ribs, or Best-Ever Cheeseburger. And it is so simple to prepare!

A white oval serving dish filled with sliced cucumber and dill salad with sprigs of fresh dill in front of the bowl.
[feast_advanced_jump_to]

🥒 The Ingredients

A handful of fresh ingredients like crisp cucumber and fragrant dill come together perfectly to create a bright, delicious salad bursting with flavor. Find ingredient notes (including substitutions and variations) below.

An arrangement of ingredients for cucumber and dill salad on a wooden grey background including two cucumbers, Dijon, oil, vinegar, sugar, chopped dill, salt, and pepper.

🌿 Substitutions and Variations

  • Veggies – While cucumbers are the star of this dish, you can also include other vegetables (or fruits) such as tomatoes, watermelon, zucchini, and/or squash.
  • Herbs – Fresh dill adds a wonderful depth of flavor. Dried dill can be substituted, but you’ll need only 2 teaspoons. Other herbs, such as thyme, rosemary, or marjoram, are all acceptable substitutions.
  • Vinegar – White wine is recommended, but most varieties will work, including distilled white, apple cider, Champagne, or even red wine vinegar.

See the recipe card (with video) below for a full list of ingredients and measurements.

Expert Tip

For an attractive presentation, use a vegetable peeler to peel off strips of the cucumber skin, leaving strips of the skin on the vegetable. The striped look is festive!

👩🏼‍🍳 How to Make Easy Cucumber and Dill Salad

A person using a small whisk to mix vinegar, Dijon mustard, salt, and sugar in a small glass bowl.
  1. Step 1: In a bowl, whisk the vinegar, mustard, salt, and sugar
A person using a whisk to emulsify olive oil that is being poured into a bowl of a Dijon vinaigrette.
  1. Step 2: Slowly whisk in the oil.
A person holding a halved cucumber in his hand and using a spoon to scoop out the seeds with his other hand.
  1. Step 3: Halve the cucumbers lengthwise and remove the seeds with a spoon
A person using a chef's knife to slice a halved cucumber into slices on a wooden cutting board.
  1. Step 4: Cut the cucumbers into slices
A person transferring chopped fresh dill from a small white bowl into another glass bowl filled with sliced cucumber.
  1. Step 5: Add the dill and toss the cucumbers with the vinaigrette.
A person transferring a freshly prepared cucumber and dill salad from a glass bowl into a white serving bowl.
  1. Step 6: Transfer to a bowl and serve at once

🍽️ How To Serve

  • Though this dish will be delicious when prepared hours in advance, it’s best when prepared within an hour of serving. The cucumbers will release water as they rest.
  • The dish is wonderful served chilled or at room temperature. Be sure to give the salad a stirring every now and then to help redistribute the dressing.
  • We love to serve this salad alongside other great sides such as Best-Ever Potato Salad, Classic Pasta Salad, and Southern Baked Beans.

🙋🏽‍♂️ Frequently Asked Questions

What type of cucumber is best for cucumber and dill salad?

English cucumbers or Persian cucumbers are ideal because they have fewer seeds and a thinner skin, making the salad more tender and refreshing. But regular cucumbers work great, too.

Can I prepare the cucumber and dill salad ahead of time?

Yes, the salad can be made two or three hours in advance and refrigerated to allow the flavors to meld, but it’s best enjoyed the same day for maximum crispness.

Is the cucumber and dill salad healthy?

Yes, this salad is light, low in calories, and packed with fresh vegetables and herbs, making it a healthy and refreshing choice.

An white oval serving bowl filled with cucumber and dill salad with a spoon inserted on the side.

🥙 Other Classic Side Dishes

  • An overhead view of a white serving bowl filled with a Caprese pasta salad with a wooden spoon in the salad next to a patterned napkin and a bowl of cherry tomatoes.
    Caprese Pasta Salad
  • An overhead view of a white bowl that is filled with a large serving of Mexican street corn salad (equites) with a small bowl of crumbled cheese and a fresh jalapeño sitting nearby.
    Mexican Street Corn Salad (Esquites)
  • Slow-cooker corn on the cob cutlets resting in a large white ceramic platter with fresh ears of corn nearby.
    Slow Cooker Corn on the Cob
  • An overhead view of a white serving bowl filled with a mound of Best German Potato Salad that is topped with chopped crispy bacon and snipped chives.
    Best German Potato Salad

Ready to make the best side dish at the cookout? Go for it!

And when you do, be sure to take a photo of it, post it on Instagram, and tag @HowToFeedaLoon and hashtag #HowToFeedaLoon!

A white oval serving dish filled with sliced cucumber and dill salad with sprigs of fresh dill in front of the bowl.
Print Recipe
5 from 3 votes

Easy Cucumber and Dill Salad

This Easy Cucumber & Dill Salad is so incredibly simple yet so flavorful. The cucumber and the dill match beautifully, and the slightly sweet and tart dressing is just perfect. This is one of those salads that doesn't stay around long on the serving table. Double the recipe to feed a group! Delicious!
Prep Time15 minutes mins
Total Time15 minutes mins
Course: Salad
Cuisine: Salad
Servings: 6 people
Calories: 63kcal
Author: Kris Longwell

Equipment

  • Vegetable peeler optional

Ingredients

  • 4 teaspoon white wine vinegar
  • 4 teaspoon Dijon mustard
  • 1 teaspoon Kosher salt
  • 3 teaspoon sugar
  • 2 tablespoon olive oil
  • 2 large cucumbers peeled, if desired
  • 4 tablespoon dill fresh, finely chopped

Instructions

  • Whisk together the vinegar, mustard, salt, and sugar, and then whisk in the oil in a slow stream.
    4 teaspoon white wine vinegar, 4 teaspoon Dijon mustard, 1 teaspoon Kosher salt, 3 teaspoon sugar, 2 tablespoon olive oil
  • Halve the cucumbers lengthwise and remove the seeds with a small spoon; cut the halves crosswise into ¼" or ⅛" slices.
    2 large cucumbers
  • Toss the cucumbers and dill with the vinaigrette.
    4 tablespoon dill
  • Serve and enjoy!

Video

Notes

NOTE: Watch the video near the top of the recipe for visual guidance.
We don’t recommend making the salad more than 2 or 3 hours in advance. The cucumbers will release water as they rest. The salad will still be tasty, but the cucumbers will become a bit mushy in all the liquid. 
The vinaigrette can be made up to 24 hours in advance. 

Nutrition

Calories: 63kcal | Carbohydrates: 4g | Protein: 1g | Fat: 5g | Saturated Fat: 1g | Polyunsaturated Fat: 1g | Monounsaturated Fat: 3g | Sodium: 427mg | Potassium: 135mg | Fiber: 1g | Sugar: 3g | Vitamin A: 90IU | Vitamin C: 3mg | Calcium: 16mg | Iron: 0.3mg

Beef and Broccoli Stir-Fry

June 11, 2019 by Kris Longwell 3 Comments

A bowl full of beef and broccoli stir-fry with chop sticks.

Beef and Broccoli Stir-Fry is Chinese comfort food at its very best.

So easy to prepare at home and we promise, so much better than take-out!

We love Beef and Broccoli Stir-Fry so much, and so will you!

A bowl full of beef and broccoli stir-fry with chop sticks.

HOW TO MAKE BEEF AND BROCCOLI STIR-FRY AT HOME

Making this dish at home is so much easier than you might think! We LOVE to stir fry…learn all about this amazing technique of cooking here.

We highly recommend using your trusty wok, but if you don’t have a wok…then go with a sturdy large skillet.

Watch us show you how easy it is to prepare Beef and Broccoli Stir-Fry at home!


A WOK RING KEEPS YOUR WOK SECURE

We can stress enough about the importance of using a wok ring when cooking on your kitchen stove-top.

The ring holds the circular, concave shaped wok in place, rather than just sitting wobbly on your burner.

After the aromatics are quickly cooked in the oil, add the thinly slice beef. TIP: Place the steaks in the freezer for 30 minutes, then use a sharp knife to easily cut paper-thin slices!

Cut the beef very thinly for stir-frying in a large wok.

INGREDIENTS NEEDED FOR THE SAUCE

  • Fish sauce (optional, but so good)
  • Corn starch
  • Sherry (don’t use cooking Sherry!)
  • Oyster sauce (easily found in most well-stocked supermarkets)
  • Lime juice
  • Sugar
  • Garlic
  • Chili sauce (also easily found in most well-stocked supermarkets)
  • Fresh cilantro
  • Coriander seeds (optional, but add lots of flavor)

Corn starch will thicken the beef and broccoli stir-fry sauce.

THAI RED PEPPERS ADD COLOR AND A LITTLE HEAT

We just love adding Thai red peppers to our Beef and Broccoli Stir-Fry.

As they stir-fry, they impart just a little heat, and the color is absolutely gorgeous.

We usually find these at our favorite local Asian market, but this dish is so good, even if you leave the peppers out.

A bowl of beef and broccoli stir-fry with Jasmine rice.

JASMINE RICE IS PERFECT FOR BEEF AND BROCCOLI STIR-FRY

We just love using Jasmine rice with this dish. It’s also very easy to prepare.

In a medium pan, add one cup of uncooked rice along with 1 ½ cups of water and ½ teaspoon of salt. Bring to a boil, then cover with a lid and reduce heat to low. Simmer for 16 minutes.

Remove and fluff with a fork. We love to place the cooked rice into a nice serving bowl, and then spoon the stir-fry on top. So delicious!

Cooked beef and broccoli stir-fry in a large serving dish.

OTHER FAVORITE ASIAN DISHES

We love all kinds of Asian dishes, but here are some of our all-time favorites:

  • Vegetable Stir-Fry
  • General Tso’s Chicken
  • Pork Dumplings in Peanut Sauce
  • Kung Pao Shrimp
  • Sautéed Baby Bok Choy
  • Stir-Fry Chicken and Broccoli with Mushrooms
  • Chinese Pot Stickers
  • Beef and Broccoli Chow Fun

Now, in the meantime, go make this amazing Beef and Broccoli Stir-Fry!


A blue bowl of beef and broccoli stir-fry.
Print Recipe
5 from 1 vote

Beef and Broccoli Stir-Fry

This beef and broccoli is the perfect mixture of a Chinese classic, with a twist of Thai hints. Make with Jasmine rice!
Prep Time20 minutes mins
Cook Time15 minutes mins
Total Time35 minutes mins
Course: Entree
Cuisine: Asian/ Chinese
Servings: 4 people
Calories: 298kcal
Author: Kris Longwell

Ingredients

  • 4 tablespoon soy sauce
  • 1 heaping tsp brown sugar
  • 1 lb sirloin steak sliced thinly
  • 2 tablespoon sesame oil for stir-frying, plus a little more for garnish
  • 1 cup shallots chopped
  • 2 tablespoon fresh ginger minced
  • 1 head broccoli roughly chopped

FOR THE STIR-FRY SAUCE

  • 2 tablespoon fish sauce* substitute: water
  • 2 tablespoon corn starch
  • 3 tablespoon dry Sherry
  • 2 tablespoon oyster sauce*
  • 3 tablespoon fresh lime juice
  • 2 teaspoon sugar
  • 3 cloves garlic minced
  • 1 teaspoon chili sauce*
  • 1 tablespoon cilantro chopped
  • 1 teaspoon coriander seeds*
  • *Find in the Asian section of you supermarket or at an Asian market

Instructions

  • Combine together in a cup the soy sauce and sugar, stirring to dissolve the sugar.
  • Pour this mixture over the strips of beef and mix well.
  • Set aside to marinate as you prepare the rest of this fab dish.

MAKE THE STIR-FRY SAUCE

  • Place the fish sauce (or water) in a medium-sized bowl.
  • Add the cornstarch, stirring to dissolve.
  • Now, add all the other stir-fry sauce ingredients. Mix well.

STIR-FRY AND FINISH OFF THE DISH

  • Warm your wok over medium-high heat.
  • Add the oil.
  • When shimmering, add the shallots and ginger and stir-fry for 1 to minutes, until soft.
  • Now, add the beef with the soy sauce marinade.
  • Stir-fry for 5 minutes, or until beef is lightly cooked and just no longer pinc.
  • Add the stir-fry sauce.
  • Add the broccoli plus ¼ cup of water.
  • Stir-fry until the broccoli is bright, and softened (about 5 minutes), the sauce will slightly thicken.
  • Remove from heat. Taste. Adjust seasonings.
  • Drizzle sesame oil over and serve immediately with Thai Jasmine rice.

Video

Notes

If you prefer very soft broccoli, you can steam the chopped broccoli first, before adding to the wok.  Alternatively, boil the chopped broccoli for about 3 to 5 minutes ahead of time. 

Nutrition

Calories: 298kcal

New York-Style Cheesecake with Strawberry Glaze

June 9, 2019 by Kris Longwell 8 Comments

New York Style Cheesecake with strawberry glaze on a white plate with a cup off coffee.

New York-Style Cheesecake with Strawberry Glaze sort of speaks for itself. If you’ve ever had it (and who hasn’t), you probably gasp a bit with every bite, and then…wow…could I ever make this at home?

Well, you can. Without a doubt.

Ready?

New York Style Cheesecake with strawberry glaze on a white plate with a cup off coffee.

NEW YORK-STYLE CHEESECAKE IS EASY TO MAKE AT HOME

If you like an airy, yet amazing cheesecake, you’ll flip for this New York Cheesecake with Strawberry Glaze.

Watch us show you how easy it is to make this at home!

These flavors are sublime and the buttery graham craker crust is just too much.

The custard filling for the cheese cake is truly spectacular.

Custard pouring into a springform pan for New York Cheese Cake.

HOW TO MAKE A NEW YORK CHEESECAKE LIKE THE PROS

This New York-Style Cheese Cake takes a little time and patience, but boy, oh boy, is it worth it.

The cheesecake alone is worth an award. And simply follow our step-by-step instructions, and you’ll have the perfect cheesecake. Don’t forget your 9-inch spring form pan!

And did we mention the graham cracker crust? So buttery and delicious!

And of course, fresh strawberries are perfect. Oh, yes.

New York Cheese Cake on a tin pie plate.

STRAWBERRIES MAKE A DELICIOUS TOPPING TO A NEW YORK-STYLE CHEESECAKE

As if this New York-Style Cheesecake isn’t good enough by itself, we might as well amp up the flavors and add a nice topping.

Any kind of berry would work, but we think strawberries are the perfect topping.

New York Cheese Cake with a hand placing fresh sliced strawberries on top.

Making a little glaze to help with the topping is a snap, and adds even more flavor.

Wow…now we’re really talking.

Mmmm.

Brush applying a strawberry glaze on top of a New York cheese cake.

Other awesome desserts:

Rustic Ricotta Cheesecake

Banana Pudding Trifle with Meringue

Blueberry Buttermilk Pie

Crème Brûlée

But this New York-Style Cheesecake? Talk about a slice of heaven.

A slice of New York Cheese Cake with Strawberry Glaze sitting next to a cup of coffee and fresh strawberries.

NY CHEESECAKE IS CLASSIC

We absolutely love everything about a New York Cheesecake.  We love all kinds of cheesecakes, but New York is our favorite!

And after lots of testing and trying different techniques, we really believe this is about as good as they come.

When you make this incredible cheesecake, please let us know what you think. We really hope you love it as much as we do!

New York Cheese Cake with Strawberry Glaze

New York Style Cheese Cake with strawberries on top sitting next to a cup of coffee.
Print Recipe
5 from 1 vote

New York-Styled Cheese Cake with Strawberry Glaze

This is classic New York-Styled Cheese Cake. The stawberry glaze on top and the buttery graham cracker crust are the perfect compliments to this classic cheese cake. This is the real deal.  Cheese cake perfection. 
Prep Time45 minutes mins
Cook Time2 hours hrs
Total Time2 hours hrs 45 minutes mins
Course: Dessert
Cuisine: Dessert
Servings: 10 people
Calories: 480kcal
Author: Kris Longwell

Equipment

  • 9-inch springform pan

Ingredients

GRAHAM CRACKER CRUST

  • 12 Graham crackers
  • 6 tablespoon unsalted butter melted
  • 2 tablespoon sugar
  • Pinch Kosher salt

CHEESE CAKE

  • 2 ½ lbs cream cheese room temp
  • 1 teaspoon vanilla extract
  • 1 teaspoon lemon zest
  • 1 ¾ cups sugar
  • 3 tablespoon all-purpose flour
  • Pinch Kosher salt
  • 5 eggs
  • 2 egg yolks
  • ¼ cup heavy cream

STRAWBERRY TOPPING

  • 1 quart fresh strawberries hulled and sliced
  • ¼ cup water
  • 1 tablespoon cornstarch
  • 1 tablespoon unsalted butter
  • ⅓ cup sugar

Instructions

  • Pre-heat the oven to 350 F.

GRAHAM CRACKER CRUST

  • Ground the graham crackers in a food processor until fine.
  • Add the cracker crumbs into a medium bowl and add the butter, sugar and salt. Mix until well blended.
  • Grease (or butter) a spring form pan, bottom and sides.
  • Press the crumb mixture into the bottom of a spring form pan. Use the bottom of a measuring cup, or bottle, to compact the crumbs. Use a spoon along the edges.
  • Bake the crust for 15 minutes.  Remove from oven to cool. 

CHEESE CAKE

  • Add 2 layers of foil on the exterior of the spring form pan.
  • Heat a medium-large pot of water to a boil.
  • In a stand mixer, beat the cream cheese until fluffy. Add the vanilla and lemon zest.
  • In a separate bowl, combine 1 & ¾ cups of the sugar, the flour and salt.
  • Gradually blend the sugar mixture into the cheese mixture.
  • Beat in the eggs and egg yolks, one at a time.
  • Add the cream. Beat well...for about 2 minutes on medium.
  • Place prepared spring form pan into roasting pan.
  • Ladle boiling water into the roasting pan, until water reaches about half way up the pan.
  • Pour the batter into the pan.
  • Bake for 45 minutes. Then lower the heat to 300F.
  • Bake for another 30 minutes.
  • Turn off oven, but leave cake in the oven for 1 hour, leaving the door ajar.
  • Remove the cake and cool completely on a wire rack
  • Place cake in fridge, and cool for 6 hours, or overnight.

STRAWBERRY GLAZE AND FINISHING THE CHEESE CAKE

  • Crush just enough strawberries to make about ½ cup.
  • Boil the crushed berries with the water and the cornstarch for 2 minutes, stirring often.
  • Add the butter and sugar...mix until fully incorpated.
  • Arrange the non-crushed sliced strawberries on top of the cake and then pour the glaze over the top.
  • Chill for about another hour.
  • Remove the sides of the spring form pan.  Slice and serve!

Video

Nutrition

Calories: 480kcal

Southern Chicken Fried Steak

June 6, 2019 by Kris Longwell 23 Comments

A crispy Southern chicken fried steak on a white dinner plate topped with cream gravy and next to a pile of mashed potatoes.

Southern Chicken Fried Steak with Cream Gravy epitomizes comfort food, offering a crispy, golden-brown coating that encases tender meat, all smothered in a rich, savory gravy. This classic dish is perfectly complemented by buttery mashed potatoes, creating a hearty meal that warms the soul and satisfies the heart.

A crispy Southern chicken fried steak on a white dinner plate topped with cream gravy and next to a pile of mashed potatoes.
[feast_advanced_jump_to]

🥩 The Ingredients

With just a handful of ingredients, chicken fried steak transforms into a tender cut of meat enveloped in a perfectly crispy exterior, showcasing the magic of simple cooking techniques. Find ingredient notes (including substitutions and variations) below.

The ingredients for chicken fried steak with cream gravy arranged on a wooden background, including tenderized beef steak, flour, eggs, milk, heavy cream, seasonings, and a small bowl of cream for the gravy, all neatly organized for easy preparation.

🐔 Substitutions and Variations

  • Protein – Naturally, beef is the key ingredient for this dish. However, the recipe works perfectly with thin chicken breasts and Southern-fried pork cutlets. See more about the best type of beef in the FAQs below.
  • Cornstarch – The cornstarch helps to create an even more crunchy exterior, but all-purpose flour can be substituted. The cornstarch also helps the batter adhere to the steak.
  • Seasonings – We use a combination of liquid flavor enhancers, including Worcestershire sauce and hot sauce. Soy sauce is a good substitution. For the spices, you can use any or none of them, depending on your preferences. Just don’t forget salt. You’ll need to lightly season the steaks as well as the batter.
  • Oil – Vegetable oil is best for deep-frying the steaks. However, shortening or canola oil are acceptable choices. Avoid oils that have a distinct flavor, such as olive oil.

See the recipe card (with video) below for a full list of ingredients and measurements.

👩🏼‍🍳 How To Make Southern Chicken Fried Steak

Uncooked tenderized cube steaks that have been seasoned with Worcestershire sauce, hot sauce, and seasoned salt on a cutting board.
  1. Step 1: Season steaks with Worcestershire sauce, seasoned salt, hot sauce, and black pepper.
A person dredging a tenderized cubed steak in a pan filled with cornstarch.
  1. Step 2: Dredge the steaks in cornstarch.
A person dragging a cubed steak through a chicken fried steak batter in a cake pan.
  1. Step 3: Dip steaks into a mixture of flour, beef stock, milk, egg, chili powder, paprika, salt, and pepper. 
A person dredging a cube steak that has been dipped into a wet batter through seasoned flour in a square pan.
  1. Step 4: Shake off excess and dredge through the seasoned flour.
Two chicken fried steaks being fried in hot oil in a skillet.
  1. Step 5: Fry in hot oil until golden
Crispy Southern fried steak cutlets resting on a baking rack on a baking sheet.
  1. Step 6: Drain on paper towels.

Expert Tip

If you like a super crunchy chicken fried steak, then do a double dredge. Once you dredge the cutlet through the flour, submerge it back into the batter and then again into the flour. This will probably require you to increase the amount of batter you prepare.

🍶 How To Make Cream Gravy

Two small balls of bacon grease in a large skillet just starting to melt over medium heat.
  1. Step 1: Melt bacon grease over medium heat in a skillet.
A person using a wooden spoon the incorporate flour into melted bacon grease in a large skillet.
  1. Step 2: Whisk in the flour and cook, stirring often, for 1 minute.
A person using a whisk to stir in milk into a roux in a large silver skillet.
  1. Step 3: Whisk in the milk and cream and stir until lumps are gone.
A person stirring a wooden spoon into a thickened cream gravy in a large silver skillet.
  1. Step 4: Stir until thickened.
A person sprinkling, salt, pepper, and adobo seasoning in to cream gravy in a large skillet.
  1. Step 5: Season with salt and pepper. 
A white ceramic gravy boat filled with cream gravy on a white dinner plate.
  1. Step 6: Transfer to gravy boat and serve at once! 

🍽️ How To Serve

  • If serving a group, we place the warmed cutlets on a platter with a large fork and let guests serve themselves with the gravy passed on the side.
  • The classic side dishes to chicken fried steak are buttery mashed potatoes, Southern-style green beans, and Southern-fried okra.
  • These steaks also make unbelievably delicious chicken fried steak sandwiches, similar to the legendary DQ Dude served at Dairy Queen.

🙋🏽‍♂️ Frequently Asked Questions

Can Southern Chicken Fried Steak be made in advance?

Yes. You can prepare them about an hour before serving them and then keep them warm in a low-temp oven (225°F) on a rack in a baking sheet until ready to serve. They are still delicious hours after they are prepared, but they start to lose their wonderful crunchiness.

Why won’t the batter stick to the steak while it’s frying?

Your oil may be too deep. Place just enough oil in the skillet to barely cover the steaks as they fry. Their weight will hold down the cutlet as it cooks; ensuring the batter will adhere to the meat.

Why is it called chicken fried steak?

The technique for frying the steak is similar to frying chicken.

A person pouring cream gravy from a gravy boat over the top of Southern chicken fried steak on a white dinner plate.

😋 Other Classic Southern Recipes

  • A platter filled with Southern fried chicken surround by bowls filled with green beans, mashed potatoes, and biscuits.
    Southern Fried Chicken
  • A white bowl holding stewed okra and tomatoes.
    Stewed Okra and Tomatoes
  • A basket lined with red and white checkered wax paper and filled with Southern-fried shrimp along with a lemon wedge and small bowl of cocktail sauce.
    Southern-Fried Shrimp with Homemade Cocktail Sauce
  • A close-up view of a slow cooker chopped brisket sandwich with barbecue sauce drizzled over the top of the meat with a couple of pickle slices and a thinly slice of onion on top, too.
    Slow Cooker Chopped Brisket Sandwiches

Ready to make the best dish this side of Fort Worth, Texas? Go for it!

And when you do, be sure to take a photo of it, post it on Instagram, and tag @HowToFeedaLoon and hashtag #HowToFeedaLoon!

A crispy Southern chicken fried steak on a white dinner plate topped with cream gravy and next to a pile of mashed potatoes.
Print Recipe
4.80 from 10 votes

Southern Chicken Fried Steak

Southern Chicken Fried Steak is a staple down South. We developed this recipe about 15 years ago, and think it will rival any Chicken Fried Steak you'll ever try. Yummy yum yum!
Prep Time20 minutes mins
Cook Time20 minutes mins
For the Gravy (can be made ahead)15 minutes mins
Total Time55 minutes mins
Course: Entree
Cuisine: American
Servings: 6 people
Calories: 594kcal
Author: Kris Longwell

Equipment

  • 1 large (12-inch) sturdy skillet ie, cast-iron

Ingredients

For the Steaks

  • vegetable oil for frying
  • 6 8 oz. cubed steaks or round sirloin steaks, tenderized
  • 2 tablespoon Worcestershire sauce
  • 2 tablespoon seasoned salt, such as Adobo divided
  • Fresh cracked black pepper to taste
  • 2 tablespoon Louisiana hot sauce
  • 1 cup corn starch
  • 3 cups all-purpose flour divided
  • ½ cup beef stock
  • 1 cup milk might need more if batter is too thick
  • 1 egg
  • 1 tablespoon chili powder
  • 1 teaspoon smoked paprika
  • 1 teaspoon onion salt or regular salt
  • ½ teaspoon black pepper

For the Gravy

  • 2 tablespoon bacon grease or butter
  • 2 to 3 tablespoon flour
  • 2 cups milk
  • 1 cup heavy cream
  • salt and pepper to taste
  • 1 teaspoon Adobo seasoning optional

Instructions

Make the Chicken Fried Steaks

  • In a large skillet, add just enough of the oil so it reaches about ¼ inch up the side. Heat to 350°F, or until a pinch of bread tossed in sizzles and turns a nice golden brown in a couple of minutes.
    vegetable oil, 6 8 oz. cubed steaks
  • Season one side of the steaks with Worcestershire sauce, Adobo, and pepper.
    2 tablespoon Worcestershire sauce, 2 tablespoon seasoned salt, such as Adobo, Fresh cracked black pepper
  • Season the other side with hot sauce, Adobo, and pepper.
    2 tablespoon Louisiana hot sauce
  • On a platter or plate, spread the cornstarch.
    1 cup corn starch
  • In a medium bowl, make a wet batter by mixing 1½ cups flour with the stock, milk, egg, chili powder, paprika, salt, and pepper. (If too thick, add more milk…the consistency should be like a thin/runny milkshake)
    3 cups all-purpose flour, ½ cup beef stock, 1 cup milk, 1 egg, 1 tablespoon chili powder, 1 teaspoon smoked paprika, 1 teaspoon onion salt, ½ teaspoon black pepper
  • On a separate platter, add remaining flour plus 1 tablespoon of the Adobo seasoning, mix well.
  • Dredge the prepared steaks in the cornstarch.
  • Add the steaks to the wet batter. Let the excess drip off.
  • Add to the flour mixture.
  • Working in batches, carefully place the steaks in the hot oil.
  • Cook for about 8 minutes, or until golden brown. Approx. 4 minutes per side
  • Drain for a couple of minutes on a plate lined with paper towels. (Keep cooked steaks in low-temp oven (200°F) until ready to serve.)

Make the Gravy

  • Heat the bacon grease (or butter) over medium heat.
    2 tablespoon bacon grease
  • Add the flour, and stir to incorporate. Add more flour if too wet (should resemble wet sand). Cook for 3 to 5 minutes, stirring frequently.
    2 to 3 tablespoon flour
  • Gradually add the milk and cream, whisking vigorously until lumps are gone. Continue to stir with a wooden spoon until thickened.
    2 cups milk, 1 cup heavy cream
  • Add salt (and seasoned salt, if using) and pepper, to taste.
    salt and pepper, 1 teaspoon Adobo seasoning
  • Pour gravy over cooked steaks.

Video

Notes

NOTE: Watch the video near the top of the recipe for visual guidance.
Look for tenderized cubed steaks or thin-cut sirloin steaks in the meat department of your supermarket. You can go with a more expensive cut of meat, if desired. We’ve done this recipe with a ribeye steak, and the result was amazing.  I (Kris) did this when competing on Guys Grocery Games, and it was a HUGE hit with Guy and the judges. But, cubed steaks are traditional and delicious. 
Leftovers will keep wrapped in foil in the fridge for several days. Reheat (in foil) in a low-temp oven (225°F) until heated through, or nuke in the microwave. The steaks won’t be very crispy, but they will still be yummy. They make amazing sandwiches!

Nutrition

Calories: 594kcal | Carbohydrates: 79g | Protein: 14g | Fat: 25g | Saturated Fat: 14g | Polyunsaturated Fat: 2g | Monounsaturated Fat: 7g | Trans Fat: 0.003g | Cholesterol: 92mg | Sodium: 602mg | Potassium: 429mg | Fiber: 3g | Sugar: 8g | Vitamin A: 1385IU | Vitamin C: 1mg | Calcium: 205mg | Iron: 4mg

Diner-Style Coleslaw

June 4, 2019 by Kris Longwell 10 Comments

An overhead view of a bowl of diner-style coleslaw with a serving spoon inserted into the side of the dish.

Homemade Diner-Style Coleslaw is the perfect side dish for picnics or BBQs, offering a refreshing and crunchy complement to outdoor meals. It pairs wonderfully with juicy burgers and flavorful grilled chicken, enhancing every bite.

An overhead view of a bowl of diner-style coleslaw with a serving spoon inserted into the side of the dish.
[feast_advanced_jump_to]

🍶 The Ingredients

Simple, fresh ingredients come together in coleslaw to create a crisp, flavorful dish that far surpasses store-bought versions. Find ingredient notes (including substitutions and variations) below.

An arrangement of ingredients for diner-style coleslaw on a grey wooden background including cabbage, carrot, onion, relish, mayonnaise, sugar, sour cream, and seasonings.

🥕 Substitutions and Variations

  • Vegetables – This is the main ingredient for slaw and shouldn’t be omitted. We recommend shredding the cabbage to make the slaw easy to eat. You can use your food processor, box grater, or a sharp knife. For slaw that is not as finely chopped, we recommend softening the cabbage with salt sprinkled over it for about 30 minutes (then a good rinse). Go with green cabbage, or a combination of red and green cabbage. Carrots add flavor and color, but can be omitted if desired. Shredded radishes are a wonderful addition.
  • Dressing – We think homemade mayonnaise, or Duke’s Mayonnaise, combined with sour cream, makes the perfect dressing. However, buttermilk can be substituted for the sour cream for a slightly thinner dressing.
  • Vinegar – A classic coleslaw dressing needs a little acid to brighten the flavor. Lemon juice is ideal. Any vinegar will work, including white wine vinegar, apple cider vinegar, or Champagne vinegar.
  • Sugar – This is a matter of taste. Our recipe gives a touch of sweetness, but not overly sweet. If you prefer a sweeter slaw, increase the sugar to a quarter cup.

See the recipe card (with video) below for a full list of ingredients and measurements.

Expert Tip

We love adding red cabbage to our coleslaw, but use it sparingly. The red will bleed into the rest of the slaw and turn it purple. It’s not unattractive, but it doesn’t have the typical appearance of classic coleslaw. Going with 100% green cabbage is perfectly fine!

👩🏼‍🍳 How To Make Diner-Style Coleslaw

A person using lifting shredded green cabbage from the bowl of a food processor.
  1. Step 1: Shred the cabbage and carrots in your food processor or with a box grater.
A person using two large wooden spoons to toss together shredded green cabbage, red cabbage, and shredded carrot in a large glass bowl.
  1. Step 2: Toss together cabbage, carrots, and onions in a bowl
A person whisking a creamy dressing for coleslaw in a small glass bowl sitting on a wooden cutting board.
  1. Step 3: In a small bowl, stir dressing ingredients until smooth.
A person pouring a creamy poppyseed dressing into a bowl filled with shredded cabbage, carrots, and sweet dill relish.
  1. Step 4: Pour over vegetables and toss to coat 
A person opening a refrigerator door with one hand and holding a glass bowl filled with diner-style coleslaw in the other hand.
  1. Step 5: Chill for 1 hour
A person using two large wooden spoons to toss diner-style coleslaw in a large glass bowl.
  1. Step 6: Toss again and serve.

Expert Tip

We don’t recommend assembling the slaw more than 1 to 2 hours before serving. The slaw will become soggy if it sits in the fridge for too long. It will be tasty, but the texture won’t be ideal. Prep the vegetables and prepare the dressing up to 24 hours in advance. Then assemble an hour before serving for best results.

🙋🏽‍♂️ Frequently Asked Questions

What type of cabbage is best for Diner-Style Coleslaw?

Green cabbage is most commonly used for diner-style coleslaw, but you can also mix in some red cabbage for added color and crunch.

How do I prevent coleslaw from becoming soggy?

To keep coleslaw crisp, drain any excess moisture from the cabbage. Add the dressing no more than an hour before serving. Toss well just before serving.

Can I make Diner-Style Coleslaw ahead of time?

Yes, you can prepare coleslaw a few hours in advance, but it’s best to mix the dressing and cabbage right before serving to maintain freshness and texture.

😋 Other Classic BBQ Side Dishes

  • An overhead view of best-ever potato salad in a large colorful serving bowl with a sprig of fresh dill resting on top.
    Best-Ever Potato Salad
  • An oval white serving bowl filled with cheddar bacon Ranch pasta salad.
    Cheddar Bacon Ranch Pasta Salad
  • A large white serving bowl filled with black bean and corn salad with two gold serving spoons tucked in beside the salad.
    Zesty Black Bean and Corn Salad
  • Stir a batch of cooked Southern Baked Beans with a wooden spoon in a large cast iron skillet.
    Southern Baked Beans

Ready to make the best side dish on the block? Go for it!

And when you do, be sure to take a photo of it, post it on Instagram, and tag @HowToFeedaLoon and hashtag #HowToFeedaLoon!

An overhead view of a bowl of diner-style coleslaw with a serving spoon inserted into the side of the dish.
Print Recipe
5 from 1 vote

Homemade Coleslaw

Diner-Style Coleslaw is delicious and so much better than store-bought. It's simple to make and bursting with flavor. Perfect for picnics, BBQs, or, any time of the year! Go with fresh cabbage, it makes it so much better!
Prep Time15 minutes mins
Resting time30 minutes mins
Total Time45 minutes mins
Course: Side
Cuisine: American
Servings: 8 people
Calories: 153kcal
Author: Kris Longwell

Equipment

  • Food processor with shred attachment or a box grater, or large sharp knie

Ingredients

  • 4 cups green cabbage shredded
  • ½ cup red cabbage shredded
  • 1 medium carrot shredded, about 1 cup
  • ½ cup red onion finely chopped
  • 3 tablespoon sweet relish
  • ½ cup mayonnaise
  • ¼ cup sour cream
  • 3 tablespoon sugar
  • 1 tablespoon fresh lemon juice
  • 1 tablespoon white wine vinegar
  • 1 teaspoon celery seed
  • 1 teaspoon salt
  • ½ teaspoon ground black pepper

Instructions

  • Use your food processor (with shredding attachment), box grater, or sharp knife to shred the cabbage and carrot.
    4 cups green cabbage, ½ cup red cabbage, 1 medium carrot
  • Place the cabbage, carrots, onion, and relish in a large bowl. Toss to mix.
    ½ cup red onion, 3 tablespoon sweet relish
  • In a medium bowl, whisk together all the other ingredients.
    ½ cup mayonnaise, ¼ cup sour cream, 3 tablespoon sugar, 1 tablespoon fresh lemon juice, 1 tablespoon white wine vinegar, 1 teaspoon celery seed, 1 teaspoon salt, ½ teaspoon ground black pepper
  • Add the dressing to the cabbage mixture, and stir until fully mixed.
  • Place in the fridge for 1 hour.
  • Remove from the fridge just before serving, and give a good stir with a large fork.

Video

Notes

NOTE: Watch the video near the top of the recipe for visual guidance.
The veggies can be prepped up to a day in advance. Keep in an air-tight container.
Dressing can be made up to 3 days in advance. Dress the salad one hour before serving.
If serving outdoors in warm weather, consider placing the salad vessel in a large bowl of ice.  The salad will stay fresh for 3 to 4 hours. 

Nutrition

Calories: 153kcal | Carbohydrates: 11g | Protein: 1g | Fat: 12g | Saturated Fat: 2g | Polyunsaturated Fat: 6g | Monounsaturated Fat: 3g | Trans Fat: 0.03g | Cholesterol: 10mg | Sodium: 442mg | Potassium: 131mg | Fiber: 1g | Sugar: 9g | Vitamin A: 1494IU | Vitamin C: 17mg | Calcium: 35mg | Iron: 0.5mg

World’s Best Veggie Burger

June 2, 2019 by Kris Longwell 13 Comments

A veggie burger with melting cheese on a wooden board.

We know it’s a pretty bold (and somewhat overly confident) statement to call our veggie burger the World’s Best Veggie Burger recipe…but…

Have you tried it yet?

I mean, just look at it…

World's Best Veggie Burger recipe

HOW TO MAKE THE WORLD’S BEST VEGGIE BURGER

It does take a little planning, and you may need to make a quick trip to a health food market, but honestly, we find everything we need at Whole Foods.

Watch us show you how to make this incredible burger at home!


I have been playing around with this recipe for quite a while…and all the work finally paid off.   There is no one ingredient that overpowers.  The potato and bulgar serve as the perfect binder.

The pulverized nuts also act as a binder and give such a depth of flavor and texture, too.

World's Best Veggie Burger recipe

The flavor is honestly spot on and it has wonderful depth of taste.

The roasted kidney beans and beets are secret ingredients that help bring it all together.

World's Best Veggie Burger recipe

But why stop there?

Roasted mushrooms with a little layer of balsamic vinegar adds so much flavor.

You won’t believe how delicious this burger is!

World's Best Veggie Burger recipe

Many people have problems when they bring a veggie burger to the grill..it just falls apart.  We do not have that problem with ours.  Of course, you can easily cook these up in a nice hot skillet, too.   And they freeze beautifully.  I make a batch, and then we enjoy them for weeks to come.

Blending all the ingredients is fun and the smell is just amazing.

World's Best Veggie Burger recipe

We love using our awesome hamburger press for making the perfectly sized patty!

There is no replacement for an authentic juicy hamburger, let’s be clear about that.

But, trust me, this is the best veggie burger you’ll ever try.  And the flavor is unmatched.

World's Best Veggie Burger recipe

And go with the chimichuri mayonnaise as the perfect flavor-punch condiment; but to keep it really healthy, substitute Greek yogurt for the mayo…it’s through-the-roof YUM!!!  150% Loon Approved!

Now, make this amazing World’s Best Veggie Burger recipe!

World's Best Veggie Burger
Print Recipe
5 from 3 votes

World's Best Veggie Burger

I can honestly say this is the World's Best Veggie Burger! I wouldn't say it if it wasn't true! It takes a little effort, but most really good things do. But you'll have enough to freeze and enjoy for weeks. Amazing!
Prep Time40 minutes mins
Cook Time10 minutes mins
Chilling time1 hour hr
Total Time1 hour hr 50 minutes mins
Course: lunch, Sandwich
Cuisine: Healthy
Servings: 6 people
Calories: 279kcal
Author: Kris Longwell

Equipment

  • Grill or Cast Iron Skillet

Ingredients

  • 2 small potatoes yellow, peeled
  • 1 medium beet about the size of an egg, peeled and shredded (a box grater works well)
  • 1 15 oz. can red kidney beans drained
  • 8 oz. cremini mushrooms sliced
  • 8 oz. shiitake mushrooms sliced
  • 1 tablespoon fresh thyme chopped (or 1 teaspoon dried)
  • 3 tablespoon extra-virgin olive oil or, as needed
  • 2 tablespoon balsamic vinegar
  • Kosher salt and freshly ground black pepper
  • 1 cup bulgur cooked
  • 1 cup tamari almonds or cashews*
  • 2 large eggs
  • 2 tablespoon Greek yogurt or mayonnaise
  • ¾ cup Panko bread crumbs
  • 2 scallions sliced
  • 4 garlic cloves minced
  • 1 teaspoon smoked paprika
  • ½ teaspoon liquid smoke
  • Swiss cheese sliced
  • Whole wheat buns toasted
  • Sliced tomatoes lettuce and red onion, for garnish
  • Chimichurri Mayonnaise you can substitute Greek yogurt for the mayo, if you prefer
  • *Available at many super markets at specialty stores (ie, Whole Foods) and health food stores

Instructions

  • Boil, steam, or microwave the potatoes until cooked, then roughly chop, and set aside.
  • Pre-heat oven to 400 F.
  • Line 2 baking sheets with foil and lightly spray with cooking oil. On the first sheet, add the beets on one side, and the beans on the other. Toss them with a little of the EVOO and salt and pepper.
  • Place mushrooms on the 2nd baking sheet. Toss with the EVOO, thyme and salt and pepper.
  • Place both baking sheets in the oven. Remove the beets/beans after 15 minutes and the mushrooms after 25 minutes.
  • Pour the balsamic vinegar over the mushrooms and gently mix with a wooden spoon.
  • Meanwhile, cook the bulgar. Follow package instructions. You'll need 1 cup. Set aside.
  • Using a large food processor, pulse the nuts until finely chopped.
  • Add in the cooked potato and pulse until well incorporated into the nuts.
  • Add the beets, beans, mushrooms, bulgar, eggs, yogurt, bread crumbs, scallions, garlic, paprika, liquid smoke, ½ teaspoon salt and pepper, to taste.
  • Pulse until mostly smooth, but still a few mushroom pieces are visible.
  • Place in a bowl, cover with plastic wrap, and put in fridge for an hour to firm up.
  • Remove from fridge and form patties.
  • Cook on a hot grill, or in a medium-high hot skillet, until slightly browned (about 4 to 6 minutes per side, depending on size of patties)
  • Top with Swiss cheese until just melted.
  • Toast the buns and serve garnished with tomatoes, lettuce, red onion and Chimichurri Mayo.

Video

Notes

Although these veggie burgers resemble real hamburgers, the texture is slightly different.  The burgers are 'wetter' than meat burgers.  Therefore, we find that cooking them on the grill in a gill pan, or a cast iron skillet will ensure they stay together in a patty shape.  They also will firm up as they cook. 

Nutrition

Calories: 279kcal | Carbohydrates: 40g | Protein: 11g | Fat: 10g | Saturated Fat: 2g | Cholesterol: 71mg | Sodium: 125mg | Potassium: 794mg | Fiber: 8g | Sugar: 5g | Vitamin A: 371IU | Vitamin C: 11mg | Calcium: 78mg | Iron: 4mg


Classic Pasta Carbonara

June 1, 2019 by The Loon 14 Comments

A large colorful pasta bowl filled with creamy pasta carbonara.

Classic Pasta Carbonara is an iconic Italian dish that showcases the incredible flavors of just a few key ingredients, including eggs, cheese, pancetta, and black pepper, resulting in a rich and satisfying meal. To elevate your dining experience, pair it with a creamy Caesar salad and indulgent cheesy garlic bread for the perfect culinary combination.

A large colorful pasta bowl filled with creamy pasta carbonara.
[feast_advanced_jump_to]

🥚The Ingredients

The humble ingredients come together to create the perfect pasta dish, delivering a deliciously rich flavor and creamy texture that highlights the beauty of simplicity in Italian cuisine. Find ingredient notes (including substitutions and variations) below.

An arrangement of ingredients for pasta carbonara including pecornio romono cheese, parsley, pancetta, pasta, and whole eggs.

🧀 Substitutions and Variations

  • Pasta – Any long form of pasta will work for the dish. We love bucatini, which is a thick, tubular pasta. But spaghetti, linguine, or fettuccine are all great options, too.
  • Cheese – For the best dish, we highly recommend using block cheese that you fresh grate just before preparing the dish. Parmesan cheese is a fine substitution for the Pecorino Romano.
  • Pork – To keep the dish vegetarian, simply omit the pancetta. Cubed pancetta can usually be found near the deli section of most well-stocked supermarkets. Chopped thick bacon is a good substitution. If you can get your hands on it, guanciale (pork jowl bacon) is delicious and used in Classic Bucatini all’Amatriciana.
  • Parsley – Fresh is best. We don’t recommend dried parsley for the dish.

See the recipe card (with video) below for a full list of ingredients and measurements.

Expert Tip

Although guanciale is the protein commonly used in Italian kitchens, cured pancetta is also very popular, and is much more readily available in most well-stocked supermarkets.

How To Make Classic Pasta Carbonara

Cubed pancetta being sautéed in a large skillet being stirred with a wooden spatula.
  1. Step 1: Sauté the cubed pancetta in a large skillet. Remove and then sauté the garlic.
Dried pasta standing upright in a pasta pot filled with boiling water.
  1. Step 2: Add pasta to salted boiling water. 
A person whisking egg yolks and grated Romano cheese in a large shallow pasta bowl.
  1. Step 3: Mix the eggs and cheese together in a large pasta bowl. 
A person transferring cooked cubed pancetta into a shallow pasta bowl filled with an egg and cheese mixture.
  1. Step 4: Stir the cooked pancetta into the egg and cheese mixture. 
A person using two wooden utensils to toss cooked pasta with an egg and cheese mixture with crispy pancetta.
  1. Step 5: Add the cooked pasta and season with pasta with salt and pepper.  
A person adding pasta water from a metal measuring cup into a large pasta bowl filled with pasta carbonara.
  1. Step 6: Stir in pasta water to reach the desired consistency.  

🍽️ How To Serve

  • This dish is best served immediately after it is prepared.
  • Toss the hot pasta with the egg and cheese mixture and pasta water and then serve immediately. We even love to do this final step at the table and let guests serve themselves (or we plate for them).
  • Wine Pairing: A dry white is perfect, such as Chardonnay or Sauvignon blanc. However, the sauce is luxurious and a red blend would be wonderful, too.

🔥 How To Store and Reheat

  • This is one of those dishes that should not be made far in advance of serving. In fact, don’t start making it until you are close to serving.
  • If you have leftovers, store them in an air-tight container with a lid and refrigerate for no more than several days.
  • Reheat in a skillet on the stove over medium heat. You’ll need to loosen the sauce with a splash of broth or water. Milk can be added to provide more creaminess.

Frequently Asked Questions

Are the eggs cooked in Pasta Carbonara?

The eggs will cook when the hot pancetta and hot pasta are mixed with them. However, precautions should be taken when serving anyone with a compromised immune system.

Can Pasta Carbonara be made in advance?

We don’t recommend it. The sauce will thicken and never regain the silky texture when the dish first comes together. Leftovers are still tasty, though.

What pasta is used in Pasta Carbonara

Bucatini is very traditional, but spaghetti is perfect, too. Linguine and fettuccine are great options, too.

A person using a two serving utensils to lift up a large amount of pasta carbonara from a large shallow pasta bowl.

🍝 Other Classic Italian Pasta Recipes

  • A large, deep skillet filled with Bucatini all’Amatriciana with a block of cheese nearby.
    Bucatini all’Amatriciana
  • A white pasta bowl with a wide lip is filled with a serving of pasta pomodoro.
    Pasta Pomodoro
  • An overhead view of a large stainless steel skillet filled with spaghetti all vongole with opened clams resting on top of the cooked pasta and two serving utensils inserted into the side of the dish.
    Spaghetti alle Vongole (Pasta with Clam Sauce)
  • A large white oval serving platter filled with pasta alla Norma with a wooden spoon in the side all next to two glasses of red wine.
    Pasta alla Norma

Ready to make the best pasta dish this side of Rome? Go for it!

And when you do, be sure to take a photo of it, post it on Instagram, and tag @HowToFeedaLoon and hashtag #HowToFeedaLoon!

A plate of pasta carbonara with a fork in the center of the pasta that is twirling the noodles.
Print Recipe
5 from 5 votes

Classic Pasta Carbonara

This Classic Pasta Carbonara is amazing in it's simplicity and incredible flavors. We love to use a pasta called bucatini – which is a fat, tubular spaghetti – but really, any good pasta will work. So easy for a busy week night. Enjoy!
Prep Time10 minutes mins
Cook Time12 minutes mins
Total Time22 minutes mins
Course: Italian
Cuisine: Italian
Servings: 4 people
Calories: 380kcal
Author: Kris Longwell

Ingredients

  • 8 ounces pancetta diced, or quality slab bacon
  • 5 cloves garlic minced
  • 1 lb dry bucatini or spaghetti
  • 4 eggs
  • ¾ cup Parmigiano-Reggiano cheese freshly grated, or Parmesan or Pecorino-Romano
  • Salt and freshly ground pepper to taste
  • ¼ cup fresh flat-leaf parsley chopped

Instructions

  • Bring a pot of salted water to a boil to cook the pasta.
  • Heat a large skillet over medium heat.
  • Add the pancetta to the skillet. Cook until the fat has rendered, about 4 minutes.
    8 ounces pancetta
  • Drain excess fat…there should be about 2 tablespoons left in the skillet.
  • Add the garlic and cook until golden, about 5 minutes.
    5 cloves garlic
  • Meanwhile, add the pasta to the boiling water and cook following package directions (usually, about 9 – 12 minutes for al dente).
    1 lb dry bucatini
  • Add the eggs and cheese to a large pasta bowl and mix thoroughly.
    4 eggs, ¾ cup Parmigiano-Reggiano cheese
  • Add the cooked pancetta/garlic mixture to the egg/cheese mixture and stir to combine.
  • Once ready, drain the pasta, but be sure to reserve about 1 cup of the pasta liquid.
  • Immediately add the pasta to the egg/cheese/pancetta mixture and fully incorporate.
  • Add salt and pepper to taste, about 1 teaspoon salt and ½ teaspoon pepper.
    Salt and freshly ground pepper
  • Mix in half of the parsley.
    ¼ cup fresh flat-leaf parsley
  • Add about a ½ to ¾ cup of the pasta water to thin the sauce a little.
  • Plate the pasta and garnish with additional cheese and parsley.

Video

Notes

NOTE: Watch the video near the top of the recipe for visual guidance.
Be careful when adding the salt.  The pancetta is somewhat salty to begin with.  A good helping of freshly ground pepper deepens the flavor.  
You can also use grated Parmesan or Pecorino-Romano Cheese.  

Nutrition

Calories: 380kcal | Carbohydrates: 3g | Protein: 20g | Fat: 28g | Saturated Fat: 12g | Polyunsaturated Fat: 5g | Monounsaturated Fat: 8g | Trans Fat: 0.1g | Cholesterol: 214mg | Sodium: 741mg | Potassium: 226mg | Fiber: 0.2g | Sugar: 0.4g | Vitamin A: 721IU | Vitamin C: 6mg | Calcium: 261mg | Iron: 1mg

Instant Pot Beef Short Ribs

May 28, 2019 by Kris Longwell 16 Comments

Place the Instant Pot Beef Short Ribs on a serving plate with mashed potatoes.

Instant Pot Beef Short Ribs.

If ever there was a dish that was tailor-made for an Instant Pot, it’s Beef Short Ribs.

This recipe makes fall-off-the-bone ribs in only about an hour and a half, from start to finish.

And taste?  Simply amazing.  

Place the Instant Pot Beef Short Ribs on a serving plate with mashed potatoes.

INSTANT POT BEEF SHORT RIBS ARE EASY TO MAKE

Short ribs typically take hours in the oven or in your slow cooker. But with the Instant Pot, they pressure cook for only 40 minutes.

Watch us show you how easy it is to make these incredible short ribs!


After braising in a red wine tomato sauce, they are so tender, the meat practically falls off the bone.

Insanely tender and just so delicious.

These ribs do render a decent amount of fat. We like to strain the sauce after pressure cooking, and the pour the sauce into a fat separator. If you don’t have one of the amazing (and in-expensive) tools, you can spoon the grease off the top of the sauce.

Instant Pot Beef Short Ribs recipe

When you’re ready to impress, look no further than this amazing recipe.  A they cook so fast, you can easily have this dream of carnivores dish on the table on a busy weeknight.

Whip up a batch of mashed potatoes served right alongside the prepared carrots, and you’ve got a dish you and your loved ones won’t soon forget.

(Note: The cooked carrots are delicious, but you may want to prepare more for the table).

Instant Pot Beef Short Ribs recipe

Looking for more awesome Instant Pot recipes? Try these:

  • Instant Pot Honey Balsamic Chicken with Carrots
  • Instant Pot Italian Beef Short Ribs
  • Instant Pot Teriyaki Salmon
  • Instant Pot cheesy Sausage and Ham Frittata
  • Instant Pot Chocolate Marble Cheesecake

Now, let’s make these amazing Instant Pot Beef Short Ribs!

Instant Pot Beef Short Ribs on a white plate next to a red patterned napkin
Print Recipe
4.86 from 7 votes

Instant Pot Beef Short Ribs

These Instant Pot Beef Short Ribs are fall-off-the-bone tender and exploding with flavor. They take about an hour and a half from start to finish. The meat is so tender, in fact, removing them from the Instant Pot to a platter takes a steady hand and a metal spatula, or two. But wait until you take that first bite! Incredible. Goes beautifully with homemade mashed potatoes!
Prep Time20 minutes mins
Cook Time1 hour hr
Total Time1 hour hr 20 minutes mins
Course: Entree
Cuisine: American
Servings: 4 people
Calories: 364kcal
Author: Kris Longwell

Ingredients

  • Kosher salt
  • 4 lbs bone-in beef short ribs about 6 - 8 ribs, 2 inches in length each
  • 2 tablespoon olive oil plus additional, if necessary
  • 2 medium-sized carrots peeled and cut into ¼-inch rounds
  • 1 medium onion chopped
  • 2 garlic cloves minced
  • 1 tablespoon tomato paste
  • ½ cup red wine
  • 1 cup beef stock
  • 1 teaspoon dried thyme
  • 1 bay leaf
  • Freshly ground black pepper
  • 1 tablespoon light brown sugar

Instructions

  • Liberally salt the ribs on all sides.
  • Turn the Instant Pot to Saute on High.
  • Heat 2 tablespoons olive oil and then add the ribs in a single layer without overlapping (you'll probably need to do this in a couple batches).
  • Sear the ribs for 3 to 4 minutes on each side.
  • Transfer to a plate and set aside.
  • If pot is dry, add a little more oil.
  • Add the carrots, onion, and garlic.
  • Add ½ teaspoon salt and stir until vegetables soften, about 3 minutes.
  • Stir in the tomato paste and cook for 2 minutes.
  • Add the wine and stir, scraping the bottom to set loose any caramelized bits.
  • Bring the liquid to a boil and cook until reduced by about a third, about 4 to 5 minutes.
  • Add the stock, thyme, and bay leaf. Then nestle the ribs into liquid. They won't be completely submerged.
  • Lock the lid into place, turn the valve to Sealing. Press Cancel and then press "Meat" or "Meat/Stew" and set on High. and set the timer to 40 minutes.
  • After cooking, naturally release for 20 minutes, then quick release for any remaining pressure.
  • Unlock and remove the lid.
  • Carefully transfer the ribs to a platter. They will be very tender, so be gentle!
  • Tent the ribs loosely with foil while you finish the sauce.
  • Strain the sauce into a large pot through a coarse strainer and then pour into a fat separator (or use a spoon to remove the fat from the surface of the sauce).
  • Place the cooked vegetables on a serving dish and tent with foil.
  • Pour the sauce back into the pot
  • Select Saute and adjust the heat to Normal.
  • Add the brown sugar and then bring the sauce to a simmer, stirring frequently until the sauce is the consistency of gravy, about 10 minutes.
  • Taste and add more salt, if necessary.
  • Pour some sauce over the cooked ribs and pass the rest at the table.
  • Serves with vegetables. Enjoy!

Video

Nutrition

Calories: 364kcal

Banana Pudding Trifle with Meringue

May 25, 2019 by Kris Longwell 8 Comments

A trifle filled with layers of banana pudding and topped with meringue

Banana Pudding Trifle with Meringue is something that dreams are made of.

It brings back every delicious memory as a kid when you dug into that bowl of magical banana pudding.

This is the real deal.  Topped with a beautiful meringue!

A trifle filled with layers of banana pudding and topped with meringue

BANANA PUDDING TRIFLE IS NOT HARD TO MAKE

Many of the main components of a banana pudding trifle can be prepared in advance.

Such as the pudding, the whipped cream, and even the meringue.

Watch us show you how easy it is to make this amazing Banana Pudding Trifle with Meringue!

It bears repeating, banana pudding brings back so many wonderful childhood memories for so many of us.

We like to use bananas that are nicely ripened. They have just the right texture.

The other classic ingredients bring it all together, from the vanilla wafers to the whipped cream and, of course, the homemade vanilla pudding.

Eggs, bananas, sugar and cream for banana pudding.

THE LAYERS OF WHIPPED CREAM AND PUDDING ARE BEAUTIFUL

The whipped cream comes together in a matter of minutes.

We like to start with a metal bowl that has been chilled in the freezer for at least 15 minutes.

Add the cream, sugar, and vanilla, and then mix (we use a hand mixer) on high until thickened, about 4 to 5 minutes.  The cream will keep wonderfully intact in the refrigerator for up to 24 hours.

A metal bowl containing freshly prepared whipped cream

The vanilla pudding is a little more involved, but not too much.

Start by mixing the dry ingredients in a large skillet over NO heat. Then blend in the milk, then egg yolks, then butter. Still over NO heat.

Now, turn on the heat to medium, stirring constantly. Add the vanilla, and continue stirring until the mixture has thickened. Turn off the heat, transfer to a bowl, and refrigerate for at least 4 to 5 hours. It will thicken a little more as it cools.

A wooden spoon finishes off homemade pudding for banana pudding

USE A BLOW TORCH FOR THE MERINGUE

The meringue we use for this banana pudding trifle is a quick version, but it works perfectly for what’s needed.

You can make this in advance, but we recommend using it within a couple of hours of preparing; otherwise, the meringue may start to separate.

Rather than browning the finished trifle in an oven, we use a Kitchen Torch.  Just like that…we have a beautifully browned meringue!

Freshly made meringue in a silve pan for banana pudding trifle.

BANANA PUDDING TRIFLE IS A REAL CROWD-PLEASER

This beautiful banana pudding trifle makes enough to feed a gathering of about 10 to 12 hungry people.

After assembling, it’s best to let it chill for several hours, or even better, overnight.

Bring this to your next BBQ or church potluck, and you’ll be the star of the day. It’s really that good.

Banana Pudding Trifle with Meringue on a wood table.

Banana Pudding next to a patterned napkin and a stack of white plates
Print Recipe
5 from 3 votes

Banana Pudding Trifle with Meringue

This Banana Pudding Trifle with Meringue is the stuff dreams are made of. One bite conjures delicious childhood memories of every kid's favorite (or at least one of them) desserts. Made from scratch, not hard to make...and absolutely heavenly.
Prep Time40 minutes mins
Cook Time20 minutes mins
Chilling Time6 hours hrs
Total Time7 hours hrs
Course: Dessert
Cuisine: American
Servings: 12 people
Calories: 512kcal
Author: Kris Longwell

Ingredients

For the Whipped Cream

  • 4 tablespoon sugar
  • 2 cups heavy cream
  • ½ teaspoon vanilla extract

For the Pudding

  • 1 cup sugar
  • 3 tablespoon cornstarch
  • ¼ teaspoon Kosher salt
  • 3 cups whole milk
  • 4 large egg yolks room temp, save the egg whites for the meringue
  • 3 tablespoon butter unsalted, chilled and cubed
  • 1½ teaspoon vanilla extract

For the Meringue

  • 4 large egg whites room temp
  • ¼ teaspoon cream of tartar
  • ½ cup sugar
  • ½ teaspoon vanilla extract

For Assembling the Trifle

  • 50 to 70 vanilla wafers about 1 & ½ boxes
  • 5 to 7 large bananas ripe, but firm - peeled and sliced

Instructions

Make the Whipped Cream.

  • Place a metal mixing bowl in the freezer for at least 15 minutes.
  • Add the sugar, cream, and vanilla to the bowl and mix on high until thickened, about 4 to 5 minutes. Chill in the refrigerator until ready to use.
    4 tablespoon sugar, 2 cups heavy cream, ½ teaspoon vanilla extract

Make the Pudding

  • In a large skillet, over NO heat, mix together the sugar, cornstarch, and salt.
    1 cup sugar, 3 tablespoon cornstarch, ¼ teaspoon Kosher salt
  • Pour in the milk, using a whisk to fully incorporate and dissolve the sugar and cornstarch.
    3 cups whole milk
  • Whisk in the egg yolks until fully incorporated. Now, mix in the chilled butter
    4 large egg yolks, 3 tablespoon butter
  • Turn the heat on to medium, and stir frequently to avoid scrambling the eggs. Cook until the mixture begins to thicken, about 5 to 8 minutes. Reduce the heat to low, stirring constantly, and simmer for 1 more minute.
  • Remove from the heat and then stir in the vanilla.
    1½ teaspoon vanilla extract
  • Let cool slightly, then transfer to a bowl and chill in the refrigerator until completely cooled. About 2 to 3 hours. The pudding will thicken slightly more as it chills.

Make the Meringue (No more than 2 hours before assembling)

  • In a metal mixing bowl, beat the egg whites on medium speed until foamy.
    4 large egg whites
  • Add the cream of tartar and increase the speed to high and beat until soft peaks begin to form.
    ¼ teaspoon cream of tartar
  • Add the vanilla and sugar and beat until peaks are just stiff. Don't overmix them, or they might start to separate.
    ½ cup sugar, ½ teaspoon vanilla extract

Assemble the Trifle

  • In your trifle, first add a layer of vanilla wafers, then add a layer of sliced bananas. Now, spread half of the whipped cream.
    50 to 70 vanilla wafers, 5 to 7 large bananas
  • On top of the whipped cream, add another layer of wafers, then bananas. Next, spread half of the pudding.
  • Repeat this process with the remaining whipped cream and pudding. Add another layer of wafers and bananas on top of the second layer of pudding.
  • Use a spatula to add all of the meringue on top of the bananas. If desired, use a kitchen torch to slightly brown the meringue.
  • Chill for 4 hours, or overnight.

Video

Notes

NOTE: Watch the video near the top of the recipe for visual guidance.
If desired, you can top the trifle with some of the whipped cream rather than making the meringue. 
Leftovers will keep in an air-tight container in the fridge for 3 to 4 days. 

Nutrition

Calories: 512kcal | Carbohydrates: 67g | Protein: 6g | Fat: 22g | Saturated Fat: 8g | Cholesterol: 130mg | Sodium: 238mg | Potassium: 369mg | Fiber: 2g | Sugar: 47g | Vitamin A: 889IU | Vitamin C: 5mg | Calcium: 106mg | Iron: 1mg

Southern Baked Beans

May 23, 2019 by The Loon 11 Comments

Stir a batch of cooked Southern Baked Beans with a wooden spoon in a large cast iron skillet.

Southern Baked Beans.  Truly a beautiful thing.

This is one of the best side dishes you’ll make. We promise you that.

Even folks who don’t like beans rave to us about this recipe.

Stir a batch of cooked Southern Baked Beans with a wooden spoon in a large cast-iron skillet.

SOUTHERN BAKED BEANS ARE EASY TO PREPARE

You can prepare this dish in a Dutch oven, or, as we like to do, in a large cast-iron skillet. Just make sure you are able to cover the oven-ready vessel.

And you’ll be surprised how simple it is to prepare these amazing baked beans.

Watch us show you how much fun it is to prepare Southern Baked Beans at home!

The ingredients come together to bring that classic BBQ taste.

Savory matched against sweet just can’t be beat.

And did we mention smoked bacon and brisket? Oh yes we did.

Bowls of ingredients ranging from tomatoes, BBQ sauce, brown sugar and brisket for baked beans.

CANNED BEANS WORK PERFECTLY FOR THIS DISH

If you were making Boston Baked Beans, then I would recommend soaking the beans overnight and then slow simmering for a minimum of 6 hours in a low-temp oven.

But these Southern Baked Beans are so loaded with flavor, canned beans are just fine!

We love to go with Great Northern White beans!

A hand holding drained and rinsed Great Northern white beans.

In a large skillet, start by cooking 10 strips of your favorite type of bacon.

We love maple black pepper bacon, but you go with your favorite. Smoked bacon will always add more flavor.

Just as the bacon starts to render fat, add the chopped onion and cook until tender, about 5 minutes.

Cook smoked bacon and onion in a large skillet as a base for the baked beans.

GENTLY COMBINE ALL THE INGREDIENTS BEFORE BAKING

After all the ingredients have been added, gently mix everything until the beans are nicely coated.

We seldom have overflow as the beans cook in the oven, but just for good measure, we add a large baking sheet on the rack under the beans…just in case there is spillage.

The beans are so beautiful, even at this point…but just wait. It gets so much better!

Pre-cooked beans in a sauce in a large cast iron skillet for Southern Baked Beans.

After the beans have baked for a good 2 hours, carefully remove from the oven and let rest for at least 10 minutes.

Get ready to salivate as you remove the lid or the foil from these succulent Southern Baked Beans.

Give the beans a good stir with a wooden spoon. Just incredible.

Stir the baked beans with a wooden spoon after they have baked.

SOUTHERN BAKED BEANS ARE THE PERFECT SIDE DISH

These baked beans are delicious; they are practically a meal by themselves.

But paired with a cold beer and your favorite BBQ dishes, you’ll be in Southern bliss.

Other BBQ favorite side dishes are:

Best-Ever Potato Salad
Slow-Cooker Corn on the Cobb
Cheddar Bacon Ranch Pasta Salad
The Ultimate Macaroni and Cheese
Best-Ever Yellow Squash Casserole

These beans reheat beautifully for about 45 minutes in a low-temp oven of 200°F.

Now, hurry, and make these incredible Southern Baked Beans!

Southern Baked Beans are spooned into to crocks for eating next to a cold beer.

Southern baked beans in a cast iron skillet with a wooden spoon.
Print Recipe
5 from 3 votes

Southern Baked Beans

The perfect BBQ side dish. These truly will be the best baked beans you've ever had. Bring these to a BBQ, and you'll be very popular. We promise - 100% Loon Approved.
Prep Time20 minutes mins
Cook Time2 hours hrs 15 minutes mins
Resting time10 minutes mins
Total Time2 hours hrs 45 minutes mins
Course: Side
Cuisine: American
Servings: 8 people
Calories: 399kcal
Author: Kris Longwell

Ingredients

  • 10 slices smoked bacon roughly chopped
  • 1 cup onion chopped
  • 2 cups barbecue sauce
  • 1 cup dark brown sugar
  • 1 cup beef stock
  • 1 cup brisket roughly chopped
  • ¼ cup molasses
  • ¼ cup maple syrup
  • 4 16 oz. cans Great Northern White Beans, or Navy drained and rinsed
  • 1 16 oz. can whole, peeled tomatoes drained and roughly chopped
  • 1 tablespoon dry ground mustard
  • 2 teaspoon Kosher salt
  • Freshly ground black pepper to taste

Instructions

  • Preheat oven to 325°F.
  • Cook bacon in a large skillet over medium heat until bacon is crispy. Drain on a paper towel-lined plate. Remove all but about 2 tablespoon of bacon grease.
    10 slices smoked bacon
  • Heat the bacon grease, then add onions and cook until soft and translucent, about 5 minutes.
    1 cup onion
  • Stir in the cooked bacon, BBQ sauce, brown sugar, beef stock, brisket, molasses, maple syrup, beans, tomatoes, mustard, salt, and pepper, and bring to a boil.
    2 cups barbecue sauce, 1 cup dark brown sugar, 1 cup beef stock, 1 cup brisket, ¼ cup molasses, ¼ cup maple syrup, 4 16 oz. cans Great Northern White Beans, or Navy, 1 16 oz. can whole, peeled tomatoes, 1 tablespoon dry ground mustard, 2 teaspoon Kosher salt, Freshly ground black pepper
  • Cover with foil and place in the oven, and bake for 90 minutes.
  • Remove from oven and let rest for at least 10 minutes. Remove lid/foil and stir with a wooden spoon. The sauce will have thickened. Serve warm.

Video

Notes

NOTE: Watch the video in the recipe card for visual guidance.
This makes a big batch of beans. It can easily serve 8 to 12 people. The recipe can easily be halved for serving fewer guests. 
Leftovers are delicious. Keep them in an air-tight container in the fridge for 4 to 5 days. Reheat in a covered dish in the oven at 325°F for 20 to 25 minutes, or until heated through and bubbly. 

Nutrition

Calories: 399kcal | Carbohydrates: 74g | Protein: 15g | Fat: 12g | Saturated Fat: 2g | Polyunsaturated Fat: 0.4g | Monounsaturated Fat: 2g | Cholesterol: 36mg | Sodium: 1736mg | Potassium: 684mg | Fiber: 1g | Sugar: 65g | Vitamin A: 161IU | Vitamin C: 2mg | Calcium: 91mg | Iron: 2mg

Slow Cooker Corn on the Cob

May 21, 2019 by Kris Longwell 17 Comments

Slow-cooker corn on the cob cutlets resting in a large white ceramic platter with fresh ears of corn nearby.

Slow Cooker Corn on the Cob is such an easy way to prepare everyone’s favorite side dish. Of course, there are different methods for cooking corn on the cob, but steaming it in your slow cooker retains the sweet, delicious flavor, yet gives you the freedom to tend to other tasks while the corn gently cooks. Perfect served along marinated grilled chicken, the best-ever cheeseburger, or country-style pork ribs!

Slow-cooker corn on the cob cutlets resting in a large white ceramic platter with fresh ears of corn nearby.
[feast_advanced_jump_to]

🌽 The Ingredients

With just a few simple ingredients, slow cooker corn on the cob combines natural sweetness and buttery goodness to create irresistibly tender, melt-in-your-mouth corn. Find ingredient notes (including substitutions and variations) below.

An arrangement of ingredients for slow cooker corn on the cob on a grey wooden background including ears of corn in their husks, a stick of butter, salt, and water.

👉 Substitutions and Variations

  • Corn – Fresh is best, by a long shot. However, if you can’t get fresh corn, frozen will work. Let the corn thaw and then proceed with the recipe.
  • Butter – The sweetness of the corn is enhanced with sweet, melted butter. However, for a healthier version, omit the butter (or cut back on it), and brush the cobs with olive oil. No need to add more oil before removing the cooked corn.
  • Seasonings – Salt is quintessential. However, the addition of freshly ground pepper is wonderful, as well. Amp up the flavors with a pinch of garlic powder, onion powder, and even cayenne pepper. Dried herbs are delicious, too. If using fresh, don’t stir them in until just before you serve the corn.

See the recipe card (with video) below for a full list of ingredients and measurements.

Expert Tip

The corn will become melt-in-your-mouth tender as it slow cooks in the water and butter. We recommend cooking the corn on LOW for 6 to 7 hours. However, you’ll need to give them a stirring now and then, especially in the last few hours of cooking. If you don’t stir them, the cobs on the bottom will brown, and maybe even burn a bit.

🍽️ How To Make Slow Cooker Corn on the Cob

A person using a large chef's knife to cut a freshly shucked ear corn in half on a wooden cutting board.
  1. Step 1: Shuck the ears of corn and cut them in half.
A person pouring water from a 1-cup plastic measuring cup into the base of a black slow cooker.
  1. Step 2: Add the water to your slow cooker.
A person holding a shucked corn cob that has been cut in half and is being held on a white plate while the other hand brush butter on it.
  1. Step 3: Brush the corn with melted butter.
A person using his fingers to sprinkle Kosher salt over uncooked ears of corn the have been cut in half and are resting on a wooden cutting board.
  1. Step 4: Salt the corn pieces.
A pile of corn on the cob that is being slowly cooked in the base of a black slow cooker.
  1. Step 5: Place in your slow cooker and cook on LOW for 6 to 8 hours, turning occasionally.
A person dumping pads of butter from a small glass bowl into the base of a black slow cooker that is filled with cooked slow cooker corn on the cob.
  1. Step 6: Just before serving, stir in 4 tablespoons of butter.

🍽️ How To Serve

  • This corn on the cob is ideal when you have a gathering of friends and family coming over.
  • You can even prep the corn the night before, just keep the shucked and cut corn in a covered container.
  • Start the slow-cooking early, and then go about your other business.
  • Once guests arrive, the corn will be perfectly cooked and will stay nice and warm until ready to be eaten.
  • Serve directly from your slow cooker, or even better, transfer to a serving bowl or platter with tongs.

🙋🏽‍♂️ Frequently Asked Questions

How long should I cook corn on the cob in a slow cooker?

Typically, corn on the cob takes about 2 to 3 hours on high or 6 to 7 hours on low in a slow cooker for perfectly tender results.

Do I need to add water or any liquid when making slow cooker corn on the cob?

Yes, adding a small amount of water or broth helps create steam, ensuring the corn cooks evenly and stays moist.

Can I add seasonings or butter before cooking the corn in the slow cooker?

Absolutely! Adding butter, salt, and your favorite seasonings before cooking infuses the corn with extra flavor, making it even more delicious.

Can the corn be kept warm on the WARM setting in the slow cooker until ready to serve?

Yes, the corn can be kept warm on the WARM setting in the slow cooker for up to an hour without overcooking, making it convenient to serve whenever you’re ready.

A close-up view of slow cooker corn on the cob cutlets stacked on each other in a white platter with a wide lip.

😋 More Amazing Corn Sides

  • A row six ears of Mexican street corn, eloté, resting on sheets of brown paper with lime wedges scattered around them.
    Elote (Easy Mexican Street Corn)
  • A large white serving bowl filled with black bean and corn salad with two gold serving spoons tucked in beside the salad.
    Zesty Black Bean and Corn Salad
  • A square white baking dish filled with corn casserole next to a plate filled with the same.
    Corn Casserole
  • A cast-iron skillet filled with Mexican cream corn topped with crumbled queso fresco, chopped tomatoes, and chopped cilantro.
    Mexican Cream Corn

Ready to make the best corn on the cob with hardly any effort? Go for it!

And when you do, be sure to take a photo of it, post it on Instagram, and tag @HowToFeedaLoon and hashtag #HowToFeedaLoon!

Slow-cooker corn on the cob cutlets resting in a large white ceramic platter with fresh ears of corn nearby.
Print Recipe
5 from 5 votes

Slow-Cooker Corn on the Cob

Slow Cooker Corn on the Cob is just amazing. The corn is steamed perfectly and isn't overcooked, but juicy, plump, and bright yellow. And so easy! Cook low and slow, while you are able to tend to other tasks! Like jumping in the pool! Get ready for lots of 'oohs' and 'ahs' with this incredible corn!
Prep Time10 minutes mins
Cook Time6 hours hrs
Course: Vegetable – Side Dish
Cuisine: American
Servings: 8 people
Calories: 179kcal
Author: Kris Longwell

Equipment

  • 6, 7, or 8-quart slow cooker

Ingredients

  • ¾ cup water
  • 1 stick unsalted butter divided
  • 8 ears fresh corn shucked and cut into halves
  • Salt to taste
  • Freshly ground black pepper to taste (optional)

Instructions

  • Pour the water into the slow cooker pot.
    ¾ cup water
  • Melt half of the butter (4 tbsp) and then brush each piece of corn with the butter.
    1 stick unsalted butter, 8 ears fresh corn
  • Salt each piece of corn and place it in the slow-cooker. Pepper them, too, if desired.
    Salt, Freshly ground black pepper
  • Cook on high for 2 to 3 hours or low for 6 to 7 hours. If necessary, keep the corn warm with the 'warm' setting on the slow cooker.
  • Just before serving, cut the remaining 4 tablespoon of butter into chunks and add to the corn. Gently stir with a wooden spoon.

Video

Notes

NOTE: Watch the video near the top of the recipe for visual guidance.
Keep an eye on the corn. You’ll need to give the corn a good stir every 30 minutes to an hour, especially after the corn has been cooking for a few hours on LOW or one hour on HIGH. There may be some brown spots on the corn from the slow cooker, but it won’t be burnt.  But still, watch out for over-browning. 
You can prep the corn the night before serving. Shuck the corn, cut it, and store it in an air-tight container in the fridge until ready to butter and add to your slow cooker.
The corn is best served warm, but it’s still delicious the next day. Leftovers will keep for about 1 day, then they lose the buttery texture. 

Nutrition

Serving: 8g | Calories: 179kcal | Carbohydrates: 17g | Protein: 3g | Fat: 13g | Saturated Fat: 8g | Polyunsaturated Fat: 1g | Monounsaturated Fat: 3g | Trans Fat: 0.5g | Cholesterol: 30mg | Sodium: 16mg | Potassium: 246mg | Fiber: 2g | Sugar: 6g | Vitamin A: 521IU | Vitamin C: 6mg | Calcium: 6mg | Iron: 0.5mg

Cajun Baked Shrimp

May 17, 2019 by Kris Longwell 14 Comments

Baked cajun shrimp in a black cast iron skillet.

Cajun Baked Shrimp is one of those dishes that you will want to come back to time and time again.

The taste is out of this world.

And it literally only takes about 20 minutes to prepare.

Baked cajun shrimp in a black cast iron skillet.

CAJUN BAKED SHRIMP IS EASY TO PREPARE

We love everything about this dish. The flavor is through-the-roof good.

Watch us show you how easy it is to make Cajun Baked Shrimp at home…in minutes!


One of the most wonderful things about this dish is that most of the ingredients you already have in your pantry.

If you can’t find cajun seasoning, just get a large bowl, and mix together 1 tablespoon of the following:

  • Garlic powder
  • Italian seasoning
  • Paprika
  • Kosher salt

And then 1 teaspoon of the following:

  • Black pepper
  • Cayenne pepper
  • Ground thyme
  • Onion powder

A collection of ingredients for making Cajun bake shrimp

SIMPLY MIX THE SAUCE INGREDIENT IN THE DISH

All you have to do is grab an oven ready dish (we love our cast iron skillet) and mix all the ingredients together.

Toss the shrimp to coat. Then bake in a piping hot oven (450°F)…for only 10 minutes!!

Give the shrimp a good scooch around one or two times while baking!

Stir the shrimp with a wooden spoon halfway through cooking.

GRILLED BREAD IS PERFECT FOR SOAKING UP THE JUICE

Grab a baguette, slice it on the diagonal, brush the slices with a little olive oil.

And then throw on a hot grill, griddle, or in a toaster oven.

The sauce is begging for bread to soak it up!!

Grill baguette slices for soaking up the Cajun juices.

There is truly something magical about Cajun cuisine.

This Cajun Baked Shrimp has just a touch of heat which is perfectly matched against the sweetness of the honey, and the tartness from the lemon juice.

The shrimp is cooked perfectly in only 10 minutes!

A fork holding a Cajun baked shrimp.

CAJUN BAKED SHRIMP IS BEST SERVED OVER RICE

And folks, if you’re going to make this amazing shrimp, then why not go the distance and make our incredible Authentic Cajun Dirty Rice.

This dish is a show-stopper, like no other. And may we remind you…it only takes 15 to 20 minutes to prepare!

Go for it!

A white bowl containing Cajun bake shrimp, dirty rice and grilled bread.

Bake Cajun Baked Shrimp in a black cast iron skillet.
Print Recipe
5 from 5 votes

Cajun Baked Shrimp

This baked shrimp is Cajun at its best. Pour the sauce over Cajun Dirty Rice and serve with andouille sausage. Oh my.
Prep Time15 minutes mins
Cook Time10 minutes mins
Total Time25 minutes mins
Course: Cajun, Entree / Seafood
Cuisine: Cajun
Servings: 4 people
Calories: 224kcal
Author: Kris Longwell

Ingredients

  • ½ cup olive oil
  • 2 tablespoon Cajun or Creole seasoning
  • 2 tablespoon fresh lemon juice
  • 2 tablespoon fresh parsley chopped
  • 2 tablespoon honey
  • 2 tablespoon soy sauce
  • ¼ teaspoon cayenne pepper optional
  • 1 lb uncooked large shrimp shelled, deveined
  • Lemon wedges
  • French bread

Instructions

  • Combine first 7 ingredients in a large oven proof dish.  (A 12-inch cast iron skillet or 9x13 casserole dish works well). 
  • Add shrimp and toss to coat.
  • Refrigerate for 1 hour. (This isn't required, but just makes the shrimp even more delicious). 
  • Pre-heat oven to 450 F.
  • Bake until shrimp are cooked through, stirring occasionally, about 10 minutes.
  • Garnish with lemon wedges and serve with grilled French bread and Authentic Cajun Dirty Rice. 

Video

Nutrition

Calories: 224kcal

Sautéed Soft-Shell Crabs

May 10, 2019 by Kris Longwell 3 Comments

Three sautéed soft-shell crabs in a silver skillet.

Sautéed Soft-Shell Crabs are truly something special.  Simply one of the most delicious seafood dishes we’ve ever encountered.

And now, thanks to the most amazing seafood market in the world, Citarella, we are able to make them at home.

What a spectacular treat.

Two sautéed soft-shell crabs on a white plate with red cabbage and corn salad next to it.

CITARELLA IS UNMATCHED IN FRESHNESS AND QUALITY

As usual, our shipment from Citarella came pristinely packaged with all ingredients sufficiently chilled, very fresh, and most importantly – cleaned.  When purchasing live soft-shell crabs, it’s important to ask your fishmonger to clean them for you.  Citarella delivered beautifully cleaned soft-shell crabs (which also means the crabs are no longer alive) and ready to be cooked.

Once again, we had faith in Joe Gurrera, owner of Citarella, that we would receive only the highest quality in soft-shell crabs, but also in his guidance in preparing the dish. We followed his recipe and tips to a “T” from his critically-acclaimed cookbook “Joe Knows Fish.”  Joe says when preparing this amazing dish, you need whole, live, cleaned soft-shell crabs and that they should be cooked with 24 to 48 hours of picking them, or, ideally sooner.

To that point, we are elated to announce that as a “How To Feed a Loon” reader, Citarella is offering you FREE SHIPPING on any fresh seafood order of $150 or over when you order online. Simply use Promo Code: LOONFREE now through May 25th, 2019. This really is incredible and we hope you take advantage!

A hand holding two cleaned soft-shell crabs.

Joe explains that for optimal freshness and taste, the crabs that were shipped to us (and all Citarella customers) are caught in a pot, then put into open saltwater tanks, where they can be observed as they shed their shells.

It is a time-sensitive process.  There are people watching them around the clock because the crabs shed at all times and have to be pulled from the water shortly thereafter – if not, they become a hard-shell crab.    Joe says the crustaceans can molt up to an impressive twenty-three times in eighteen to twenty-four months!

All they require is a light dusting of flour before they go into a large slightly oiled skillet to be cooked.

Fingers sprinkling flour over a soft-shell crab.

“Joe Knows Fish” is such an amazing book because Joe understands how to teach the home cook to prepare the fish carefully, but also expertly.

Another great aspect of the book is Joe recommends the perfect side dish for most of the seafood recipes.  And he even includes the recipes for each side dish.

With our sautéed soft-shell crabs he suggested Red Cabbage Slaw and Corn & Edamame Salad.

A white bowl of red cabbage slaw with a silver spoon.

As with almost all of Joe’s seafood recipes, the side dish recipes are fresh and not overly complicated.

This simple, straightforward approach is our favorite way to cook.

Let the ingredients shine.  And boy, do they ever.

A white bowl of fresh corn and edamame salad with a sliver spoon.

SOFT-SHELL CRABS ARE SAUTÉED FOR ONLY A FEW MINUTES

Now, back to the all-star headliner of this meal:  Soft-shell crabs!

Once lightly sautéed, they become golden and sweet and the briny meat stays juicy.

Joe says the key is to not overcook the crab.  The goal is get the soft-shell exterior nice and crispy while keeping the meat plump and tender.  And YES!!  You eat the entire crab!

A close-up view of two sautéed soft-shell crabs in a skillet.

If you’re looking for a true knock-out seafood meal, you’ve come to the right place.

Soft-shell crabs are insanely delicious and surprisingly easy to prepare. When you start with the freshest, most delicious soft-shell crabs available, from Citarella, then you can rest assured that you’ll produce a meal that you and your loved ones will remember for a very long time.

Some of our other favorite recipes from Joe Knows Crab are:

  • Grilled Swordfish Steaks
  • Sautéed Wild Striped Bass
  • Fried Oysters and Littleneck Clams
  • Spaghetti Vongole

But in the meantime, look at these soft-shell crabs!

Three sautéed soft-shell crabs in a silver skillet.

sautéed soft shell crabs in a silve skillet
Print Recipe
5 from 1 vote

Sautéed Soft-Shell Crabs

Sautéed Soft-Shell Crabs are a seafood lover's dream come true.  We get our soft-shell crabs from Citarella, because we know they are the best and the fresh crabs anywhere.  Preparation is simple and the results are incredible.  We've also included two side dishes that compliment the soft-shell crabs perfectly: Red Cabbage Slaw and Corn & Edamame Salad. 
Prep Time5 minutes mins
Cook Time5 minutes mins
Total Time10 minutes mins
Course: Entree / Seafood
Cuisine: American
Servings: 2 people
Calories: 216kcal
Author: Kris Longwell

Ingredients

FOR THE SAUTÉED SOFT-SHELL CRABS

  • 4 whole live soft-shell crabs cleaned
  • ½ cup Wondra flour or all-purpose flour
  • ½ cup extra-virgin olive oil
  • Sea salt and freshly ground pepper to taste

FOR THE RED CABBAGE SLAW

  • ¼ cup distilled white vinegar
  • 1 teaspoon cane sugar
  • 1 teaspoon sea salt
  • ¼ cup extra-virgin olive oil
  • 1 medium red cabbage about 1 ¼ lbs, cored and very thinly sliced, about 6 cups
  • freshly ground pepper to taste

FOR THE CORN & EDAMAME SALAD

  • 2 tablespoon extra-virgin olive oil
  • 4 ears corn shucked and kernels cut off the cob
  • 8 oz edamame shelled (2 cups), thawed if frozen
  • Sea salt and freshly ground pepper to taste

Instructions

SAUTÉED SOFT-SHELL CRABS

  • Rinse the crabs with cold water and pat them dry with paper towel. 
  • Dust the crabs with flour by sprinkling a light layer onto each side and shaking off any excess.
  • Pour a very thin layer of olive oil into a large shallow skillet and heat over medium heat until it starts to shimmer.  Sauté the crabs for 1 ½ to 2 minutes per side.
  • Sprinkle with salt and pepper to taste.  Serve immediately.

RED CABBAGE SLAW

  • In a large bowl, combine the vinegar, sugar, and salt.  Whisk until the sugar and salt dissolves.
  • Add the olive oil and whisk until combined.  Put the cabbage in the bowl and toss until fully coated with the dressing.  Season with pepper to taste. Let stand at room temperature for 30 minutes before serving.

CORN & EDAMAME SALAD

  • Heat the olive oil in a medium sauté pan over medium heat.  Add the corn and cook for 1 to 2 minutes.  Add the edamame and continue to cook until it's just warmed through.
  • Season the mixture with salt and pepper to taste and serve immediately or at room temperature. 

Nutrition

Calories: 216kcal

Penne alla Vodka

May 7, 2019 by Kris Longwell 11 Comments

Penne alla Vodka in a skillet with a wooden spoon in the pasta.

Penne alla Vodka is without doubt one of our all-time favorite Italian-American pasta dishes.  It is truly the definition of “make-you-feel-good” food.

Going the distance and making the homemade marinara is a must. And then the dish comes together very quickly.

This is the real deal. 

Penne alla Vodka in a skillet with a wooden spoon in the pasta.

HOW TO MAKE CLASSIC PENNE ALLA VODKA

Penne all Vodka is not difficult to make at home, especially if you make the marinara sauce in advance.

Watch us show you how easy (and fun) it is to make this classic Italian dish at home!

Well, as mentioned, the basis for an outstanding Penne alla Vodka dish is a robust Homemade Marinara.

This can easily be made in advance. We make a large batch and then freeze in several storage containers.

This marinara is bursting with Italian flavors and is just so wonderful.

Classic Penne alla Vodka recipe

Start building the flavor profile off by sautéing onions, garlic, herbs, and red pepper flakes.

The smell emanating from your kitchen will begin to attract the attention of hungry house dwellers before you know it.

Mmmmm.

Classic Penne alla Vodka recipe

Now, let’s really fire things up!

Very carefully, add the vodka and then use a long match to ignite the alcohol. Be careful when doing this, and be sure to stand back.

This is a technique called flambé and though it’s not completely necessary, it does improve the overall flavor of the sauce.

classic penne alla vodka recipe

Next goes in the prepared marinara sauce.

And then what gives the dish it’s classic pink appearance is the addition of cream. We think just a touch of heavy cream gives the sauce a wonderful texture and luxurious taste.

Oh, yes…cream.

classic penne alla vodka recipe

WHY WE LOVE THIS PASTA SO MUCH

Americans are just crazy about this dish. And I can tell you one thing…the Loon and I are two Americans that flip for a good Penne alla Vodka.

Some might ask, but why vodka? Does it really enhance the flavor? I’ve had a basic marinara sauce with sautéed aromatics, and it’s good. But there is something about adding vodka to the sauce and then flambeing it that in my estimation…really does make a difference.

Learn more about the origins of Classic Penne Alla Vodka from SeriousEats.com

In the meantime, just feast your eyes on this…

Classic Penne alla Vodka recipe

If you love this classic Italian-American dish, you’ve got to check out our recipes for:

Classic Chicken Piccata

Succulent Shrimp Scampi

Authentic Chicken Marsala

Chicken Crusted Parmesan with Vodka Sauce

But in the meantime, you should really whip up a batch of this amazing Classic Penne alla Vodka.

Classic Penne alla Vodka recipe

Penne alla vodka in a large skillet with a wooden spoon.
Print Recipe
5 from 6 votes

Classic Penne alla Vodka

This Classic Penne alla Vodka is just that:  Classic, vintage and perfectly Italian-American at it best.  Make the Homemade Marinara to ensure the best taste you could ever imagine. This is pasta comfort heaven. 
Prep Time20 minutes mins
Cook Time50 minutes mins
Total Time1 hour hr 10 minutes mins
Course: Entree
Cuisine: Italian
Servings: 4 people
Calories: 296kcal
Author: Kris Longwell

Ingredients

  • ¼ cup olive oil
  • ½ onion, chopped
  • 3 cloves garlic, minced
  • ¼ cup fresh basil, chopped
  • 3 tablespoon fresh parsley, chopped
  • ¼ teaspoon red pepper flakes (use ½ teaspoon for more heat)
  • ⅓ cup vodka
  • 4 cups homemade marina sauce (click link below for complete recipe)
  • ½ cup heavy cream
  • 12 oz dried penne
  • 1 cup Romano cheese
  • Kosher salt and black pepper

Instructions

  • Make the homemade marinara sauce and set aside (can be made up to 3 days in advance, stored in the refrigerator). 
  • In a large pan, heat the olive oil over medium-high heat.
  • When the oil is just starting to smoke, add the onions and lower the heat to medium.  Cook until starting to soften, about 3 minutes.
  • Add the garlic and cook for another 2 minutes.
  • Add the basil, parsley, and red peppers (to taste), cooking and stirring for about 30 seconds.
  • Remove the pan from the heat and carefully add the vodka (stand back when doing this).  If the vodka does not flame, very carefully light a long match and ignite.  (again, stand back).  
  • Once flame has died down, return the pan to the heat and add the marinara sauce and simmer for about 5 to 6 minutes.
  • Add the cream and bring to a boil.  Boil for 3 minutes until slightly thickened.
  • Meanwhile, cook the penne in a salted pot of water for 8 minutes, or until al dente.
  • Drain the pasta.  Bring the sauce to a simmer again and stir in ½ cup of the Romano cheese, and season with salt and pepper.
  • Add the pasta to the sauce and mix well over low heat until penne is fully coated. Serve with remaining cheese on the side.

Video

Nutrition

Calories: 296kcal

Chile Rellenos Stuffed with Mexican Queso

May 5, 2019 by Kris Longwell 17 Comments

Two Chile rellenos in a red sauce in a cast iron skillet

Chile Rellenos Stuffed with Mexican Queso has been a favorite Mexican dish of ours for many, many years.

So flavorful, yet not too spicy, with a simple, deeply flavorful sauce.

This is Mexican comfort at its most satisfyingly delicious.

Two Chile rellenos in a red sauce in a cast iron skillet

HOW TO MAKE AUTHENTIC CHILE RELLENOS

You can roast the chili in a variety of ways, from broiling to grilling, or, by the method we love, roasting over a gas flame!

Talk about building a flavor sensation.

When roasting the peppers over a hot flame, turn them frequently until they are charred and blistered.

We use all four burners to get them roasted quicker!

Chilles Rellenos recipe

For the batter, bringing the egg whites to stiff peaks ensures the batter is light and fluffy when quickly fried.

Let’s hear it for stiff peaks!

You can use a stand mixer or a hand-held mixer. Or, a good ole whisk with a lot of elbow grease!

Two hands holding a pabloano pepper that has been dipped in batter.

A SIMPLE RED SAUCE IS PERFECT FOR CHILES RELLENOS

You can make the simple, yet super flavorful red sauce ahead of time.

It’s not a thick sauce, yet compliments the stuffed chilis perfectly.

Oh, nothing better than a nice tomato-based sauce with some simple aromatics. Straining the sauce before cooking it down slightly produces a silky and smooth texture.  And so delicious!

Red sauce in a cast iron skillet with a wooden spoon for Chile rellenos.

Carefully cut a slit in the side of the roasted, skinned pepper.

You’ll need to handle the pepper gently, because once the skin comes off, it is a little more fragile.

Ready! Set! Stuff!

Chilles Rellenos recipe

You’ll want to go with a good melting cheese to stuff the chilis with.

We love using Asadero, or Chihuahua, or Oaxaca, but if you can’t find any of those, you can use good ole Monterrey Jack, or even cheddar.

Mmmmmm….cheese, please.

Chilles Rellenos recipe

THE BATTER FOR CHILE RELLENOS IS LIGHT AND AIRY

Once the batter is ready and the chilis have been stuffed, it’s time to coat the peppers.

It may require a couple of dips and rolls in the batter. And don’t worry if the pepper isn’t 100% covered in the batter. It will still fry up beautifully.

We’re getting close now!!

A chile relents frying in a large pot of hot oil.

To prevent any cheese spilling out of the chili into the hot oil, we carefully lower the coated peppers into the hot oil and then spoon more hot oil over the area where the seam is.

This will firm up the batter and make a seal so the cheese doesn’t come out. This isn’t difficult, but it may take you a couple of tries to find the best technique that works for you.

Yum.

chile rellenos in a white bowl.

CHILE RELLENOS CAN GET STARTED THE DAY BEFORE

Prepare the chiles and sauce a day ahead, and then quickly make the batter and fry ’em up just before ready to serve!

This dish is sure to please.  It never fails to impress at our house.

The cheese, just look at that melty cheese!

Chile rellenos that is cut in half in a white bowl.

OTHER MEXICAN DISHES TO TRY

Authentic Beef Chimichanga

Steak Fajita Quesadilla
Albondigas (Mexican Meatballs)
Mexican Rice
Mexican Black Beans
Veracruz-Style Shrimp Enchiladas

But for now, go and make this amazing Chile Rellenos Stuffed with Mexican Queso Recipe!

You will be so very glad that you did!

This is Mexican cuisine at its very best!

Chile rellenos in a cast iron skillet.

Chile rellenos in a black cast iron skillet.
Print Recipe
4.84 from 6 votes

Chiles Rellenos Stuffed with Mexican Queso

Chili Rellenos Stuffed with Mexican Queso is a Mexican classic. It is pure Mexican comfort food at its best. Stuff with a soft Mexican cheese such as Asadero or Chihuahua, or Monterey Jack. The chili can be roasted and stuffed and chilled a day ahead, as well as the sauce. An instant-read thermometer helps to ensure the oil reaches 350°F perfectly...otherwise, test with a pinch of bread. Once sizzles quickly, it's ready. Enjoy!
Prep Time50 minutes mins
Cook Time30 minutes mins
Total Time1 hour hr 20 minutes mins
Course: Mexican
Cuisine: Mexican
Servings: 4 people
Calories: 657kcal
Author: Kris Longwell

Ingredients

For the Sauce

  • 1½ lbs tomatoes chopped, or 1 28 oz. can of whole tomatoes, with juice
  • 1 cup chicken stock or vegetable stock, or water
  • ¼ cup onion chopped
  • 2 cloves garlic minced
  • 1 tablespoon distilled white vinegar
  • 1 teaspoon sugar
  • 1 teaspoon Mexican oregano dried, or regular oregano
  • 1¼ teaspoon Kosher salt
  • 2 tablespoon corn oil

For the Chiles

  • 4 large poblano chiles about 1 lb
  • ½ lb Asadero cheese or Chihuahua or Monterey Jack cheese, coarsely grated
  • 2 to 3 cups corn oil or vegetable oil, for frying
  • 4 large eggs separated
  • ½ teaspoon Kosher salt
  • 1¼ cup all-purpose flour divided

Instructions

Make the Sauce

  • Puree all sauce ingredients (except oil) in a blender until smooth, then strain through a mesh sieve into a bowl, pressing on solids, then discarding them.
    1½ lbs tomatoes, 1 cup chicken stock, ¼ cup onion, 2 cloves garlic, 1 tablespoon distilled white vinegar, 1 teaspoon sugar, 1 teaspoon Mexican oregano, 1¼ teaspoon Kosher salt
  • Heat oil in a deep, heavy large skillet over medium heat until it shimmers.
    2 tablespoon corn oil
  • Carefully pour in the sauce and simmer gently, stirring occasionally, for about 10 minutes. (Sauce will still be thin).
  • Taste, and season with pepper and more salt, if desired.
  • Set aside, but keep warm over low heat.

Roast, Stuff, and Fry the Chiles

  • Roast chiles on their sides over a gas flame over medium heat, turning with tongs, until skins are blistered and slightly charred, 4 - 6 minutes. (Or, broil on a rack about 2 inches from the heat)
    4 large poblano chiles
  • Transfer to a large bowl and cover with plastic wrap; let stand for 20 minutes. (This can be done ahead of time.)
  • Carefully rub off skins from chiles, leaving stems attached.
  • Cut a slit lengthwise in each chile using kitchen shears or a sharp knife.
  • Carefully cut out the ribs and the seedpod. Clean out all seeds with a wet paper towel, if necessary (Leaving the seeds will make the peppers hotter).
  • Stuff chiles with cheese and enclose filling by overlapping the slit slightly, then transfer to a plate. (All of this can be done the day before.)
    ½ lb Asadero cheese
  • Heat ½-inch of the oil in another large heavy skillet over medium heat until it registers 350°F on a thermometer.
    2 to 3 cups corn oil
  • While the oil heats, beat egg whites with ½- teaspoon salt, using an electric mixer until they just hold stiff peaks.
    4 large eggs, ½ teaspoon Kosher salt
  • Whisk in the yolks, two at a time, just until incorporated. Next, whisk in ¼ cup flour.  
    1¼ cup all-purpose flour
  • Spread 1 cup of flour onto a plate. Generously dust chiles with the flour, coating all sides. Gently shake off excess flour. 
  • When oil is ready, dip chilies, 1 at a time, into egg batter, spooning it over chile to cover completely.
  • Fry the chiles, turning once, until golden on all sides (Lap oil over any lighter areas, 4 to 5 minutes).
  • Transfer chilies with a slotted spoon to paper towels to drain. At this point, you can heat your oven to 300°F, place the chiles on a baking rack, and then bake for 15 minutes. This will keep the chees nice and melty, crisp up the exterior, and render out a little more excess grease. Remove from oven.
  • Meanwhile, re-heat the sauce.
  • Ladle sauce onto plates and place a chili on top of the sauce.

Video

Notes

NOTE: Watch the video in the recipe card for visual guidance.
  • Chile choice: Poblano chiles are traditional and offer mild heat. For spicier rellenos, substitute Hatch or Anaheim chiles.
  • Roasting tips: Roast chiles until skins are fully blistered for easy peeling. Steam in a covered bowl or bag for 10 minutes before peeling.
  • Cheese options: Asadero and Oaxaca are classic, but Monterey Jack, Pepper Jack, or Chihuahua cheese all melt beautifully. Avoid pre‑shredded cheese.
  • Batter success: Separate eggs while cold, then bring to room temperature before whipping whites for a lighter, fluffier batter.
  • Frying advice: Keep oil at 350°F (175°C). If the oil is too cool, the batter will absorb oil; too hot, and it will brown before cooking through.
  • Make‑ahead: Chiles can be roasted, peeled, and stuffed up to 1 day ahead; batter and fry just before serving for the best texture.

Nutrition

Calories: 657kcal | Carbohydrates: 49g | Protein: 9g | Fat: 28g | Saturated Fat: 6g | Polyunsaturated Fat: 5g | Monounsaturated Fat: 7g | Trans Fat: 0.4g | Cholesterol: 2mg | Sodium: 756mg | Potassium: 816mg | Fiber: 6g | Sugar: 11g | Vitamin A: 2026IU | Vitamin C: 156mg | Calcium: 47mg | Iron: 3mg

Farm Fresh Corn Chowder

May 3, 2019 by The Loon 18 Comments

A green bowl full of farm fresh corn chowder with ears of corn nearby.

Farm Fresh Corn Chowder pretty much says it all.

In a word: Comfort. In two words: Comfortingly delicious.

This chowder is wonderful anytime of the year, but when corn is at its peak, this is about the best soup you’ll ever try (and make!).

A green bowl full of farm fresh corn chowder with ears of corn nearby.

FARM FRESH CORN CHOWDER IS EASY TO MAKE

For many soups, we love using homemade stock, but that’s not always possible. A good quality store-bought stock will work just fine in this recipe.

Be sure to get the freshest ingredients available for this amazing corn chowder.

Watch us show you how easy it is to make Farm Fresh Corn Chowder!


You may wonder what the difference is between “soup” and “chowder.” Well, they are quite similar, however, chowder is usually thick and is often cream-based, but not always. All we know, this corn chowder is off-the-charts good.

We think the smoked bacon adds such a depth of flavor to this chowder, that we strongly encourage you to visit the butcher in your market and get 6 thick slices of his or her best smoked bacon.

Yukon gold potatoes, a red bell pepper, and fresh thyme add such amazing flavor! And of course: ground cumin. YES!

Ears of corn, potatoes, uncooked bacon and red bell pepper for corn chowder.

USE FRESH CORN WHENEVER POSSIBLE

Fresh corn right off the cob is absolutely the best for this corn chowder.

The corn is sweet and the milky liquid from the cob is so flavorful.

Carefully use a large, sharp knife to remove the kernels from the cob. Four ears of corn should get you about 2 cups of corn. It’s always safe to have an extra ear of corn on hand, just for a little extra, if needed. Plus, we love to sprinkle some freshly cut kernels as a garnish to the soup just before serving. It adds a wonderful texture and taste to the chowder.

A hand using a large knife to remove corn kernels from an ear of corn.

SAUTÉING THE VEGGIES IN BACON GREASE ADDS FLAVOR

After cooking the cut bacon in a large pot (such as a Dutch oven), you’ll need to remove all but about 1 to 2 tablespoons of the bacon grease.

We always save our unused bacon grease for another use (such as Restaurant-Quality Hash Browns!).

Add a couple pats of butter to the hot pot, then toss in the onions, red bell peppers, thyme, and cumin, and cook until soft and translucent, about 8 minutes. This makes a beautiful foundation for this Farm Fresh Corn Chowder!

Chopped onion, red bell pepper sautéing in a blue Dutch oven.

Let’s keep building this corn chowder! It’s time to add the stock, corn, and potatoes.

Bring it to a boil then cover for just 10 minutes.

After removing the lid, you’ll see the potatoes are nice and tender and the corn is perfectly cooked. Using a wooden spoon, we like to smash some of the cooked potatoes and corn against the side of the pot. This naturally helps to thicken the chowder and adds a nice texture.

A wooden spoon smashing cooked potatoes and corn on the side of a blue Dutch oven for corn chowder.

CREAM ADDS A VELVETY RICHNESS TO THE CORN CHOWDER

The last ingredient that we think puts this Farm Fresh Corn Chowder over the top is a bit of heavy cream.

It may seem a little indulgent, but the cream adds a lush texture to the chowder and melds beautifully with the other ingredients.

Stir in the cream until fully incorporated.

A dairy bottle of cream being poured into a large pot of farm fresh corn chowder.

The corn is the star of this chowder, no doubt, but the potatoes and other ingredients complement each other so beautifully.

Every spoonful provides layer after delicious layer of culinary delights.

Just amazing.  A few other of our favorite recipes that showcase fresh corn are: Jalapeño Sweet Creamed Corn, Zesty Black Bean and Sweet Corn Salad, and Cowboy Cornbread!

A spoon holding a spoonful of farm fresh corn chowder.

CORN CHOWDER IS COMFORT FOOD AT ITS BEST

As we may have mentioned, Farm Fresh Corn Chowder is absolutely one of our favorite comfort soups to make. If you like this, however, you’ll probably also love our:

Portuguese-Style Clam Chowder
Cream of Mushroom Soup
Lobster Bisque

And another awesome thing about this Corn Chowder is that it comes together in only about 30 to 40 minutes.

So, hurry and go make this spectacular Farm Fresh Corn Chowder recipe!. You and your family will be so glad you did!

A green bowl containing farm fresh corn chowder.

A green bowl of farm fresh corn chowder.
Print Recipe
5 from 10 votes

Farm Fresh Corn Chowder

This Farm Fresh Corn Chowder will just make you smile. Make it in the summer when you can get corn fresh from the farm, or even in the colder months, when you can use frozen corn. Either way, It's just so good. Of course, the homemade chicken stock brings it to incredible heights. So amazingly good!
Prep Time15 minutes mins
Cook Time40 minutes mins
Total Time55 minutes mins
Course: Soup
Cuisine: American
Servings: 8 people
Calories: 268kcal
Author: Kris Longwell

Ingredients

  • 4 ears fresh yellow sweet corn have an extra on hand, just in case
  • 6 slices thick cut bacon cut into ½-inch dice
  • 2 tablespoon unsalted butter
  • 1 medium yellow onion diced
  • ½ large red pepper cut into ½-inch dice
  • 1 tablespoon fresh thyme chopped
  • 1 teaspoon ground cumin
  • 4 Yukon gold potatoes peeled and cut in ½-inch dice
  • 3 cups chicken stock
  • 1 teaspoon Kosher salt
  • ½ teaspoon freshly ground black pepper
  • 2 tablespoon cornstarch stirred and dissolved into 2 tablespoon of water
  • ¾ cup heavy cream
  • 2 tablespoon chives minced, for garnish

Instructions

  • Husk the corn and remove the silk.
  • Cut the kernels from the cobs into a bowl. This should give you a couple cups of corn.  Set a handful aside for garnish. 
  • Heat a 3 to 4-quart heavy pot over low heat and add the diced bacon.
  • Once it has rendered a few tablespoons of fat, increase the heat to medium and cook until the bacon is crisp and golden brown.
  • Pour off all but 1 to 2 tablespoons of the bacon fat, leaving the bacon in the pot.
  • Add the butter, onion, bell pepper, thyme, and cumin and sauté, stirring occasionally for about 8 minutes - until onions and peppers are soft.
  • Add the corn kernels, potatoes, and stock.  Turn up the heat, cover, and boil, for 10 minutes.
  • Carefully remove the lid, and then use the back of your spoon to smash some of the corn kernels and potatoes against the side of the pot.
  • Reduce the heat to medium and add the salt and pepper.
  • Stir the cornstarch mixture and slowly pour it into the pot, stirring constantly.
  • As soon as the chowder has come back to a boil and thickened slightly, remove from the heat and stir in the cream.
  • Taste, and adjust the seasoning if necessary.
  • Remove from heat and allow the flavors to meld for about an hour.
  • When ready to serve, reheat the chowder over low heat, but don't let it boil.
  • Ladle into bowls and sprinkle with chopped chives and reserved corn kernels. 

Video

Nutrition

Calories: 268kcal

Classic Chicken Piccata

April 30, 2019 by Kris Longwell 18 Comments

An overhead view of a beaded white platter filled with a row of freshly prepared classic chicken piccata cutlets with lemon wedges placed along the side of the dish.

Classic Chicken Picatta is Italian-American food at its very best. Getting the chicken breasts nice and thin helps to deliver the classic texture. Serve with homemade focaccia bread and a Caesar salad for a perfect feast. And the dish comes together in about 30 minutes. Dinner perfection!

An overhead view of a beaded white platter filled with a row of freshly prepared classic chicken piccata cutlets with lemon wedges placed along the side of the dish.
[feast_advanced_jump_to]

🍋 The Ingredients

With just a handful of simple ingredients, Classic Chicken Piccata comes together to create a luxurious, restaurant-quality dish that’s timeless, elegant, and bursting with bright lemon-butter flavor. Find ingredient notes (including substitutions and variations) below.

An arrangement of ingredients for homemade chicken piccata on a grey wooden background including thin chicken breast cutlets, olive oil, flour butter, wine, chicken stock, seasonings, lemons, parsley, and capers.

📝 Notes & Variations

  • Chicken Cutlets: Use thinly sliced chicken breasts for quick, even cooking. If your chicken breasts are thick, slice them in half horizontally and gently pound them to about ¼-inch thickness for tender, juicy results.
    Variation: Try the same sauce with veal or turkey cutlets for a delicious twist on the classic.
  • Flour: Lightly dredging the chicken in flour helps create a golden crust and slightly thickens the sauce.
    Substitute: Use gluten-free flour or almond flour for a gluten-free version.
  • Olive Oil & Butter: The combination of olive oil and butter imparts a rich, balanced flavor and prevents the butter from burning.
    Variation: For extra richness, finish the sauce with an extra pat of butter right before serving.
  • White Wine: Adds depth and acidity to the sauce. Choose a dry white wine like Sauvignon Blanc or Pinot Grigio.
    Substitute: Use extra chicken stock with a teaspoon of white wine vinegar or fresh lemon juice if you prefer not to cook with wine.
  • Chicken Stock: Enhances the sauce’s body and savory flavor.
    Tip: Use low-sodium stock so you can better control the saltiness of the final dish.
  • Lemon Zest & Juice: The bright, tangy flavor defines Chicken Piccata. Fresh lemon juice is essential—avoid bottled versions for the best taste.
    Variation: Add a few thin lemon slices to the pan for a beautiful presentation and extra citrus aroma.
  • Capers: Nonpareil capers are small, tender, and mild—perfect for this dish. Rinse them before adding to remove excess brine.
    Variation: For a brinier punch, add a splash of caper juice to the sauce.
  • Italian Parsley: Adds freshness and color at the end.
    Variation: Substitute with fresh basil or chives for a slightly different herbal note.

See the recipe card (with video) below for a full list of ingredients and measurements.

🔥 Tips & Tricks for the Best Classic Chicken Piccata

  • Don’t over-reduce:
    The sauce should be silky and spoonable, not too thick. It will continue to thicken slightly as it cools.
  • Pound the chicken evenly: Even thickness ensures the cutlets cook quickly and stay tender. About ¼ inch thick is ideal for that delicate, melt-in-your-mouth texture.
  • Don’t overcrowd the pan: Cook the cutlets in batches if needed. Overcrowding lowers the pan temperature and prevents that beautiful golden crust from forming.
  • Deglaze properly: After removing the chicken, pour in the white wine and gently scrape up the browned bits (fond) from the pan—this is where the deep, savory flavor comes from.
  • Balance the sauce: Taste before serving—add a touch more lemon juice for brightness or a small knob of butter for a creamier finish.
  • Serve immediately: Chicken Piccata is best enjoyed fresh from the pan when the chicken is crisp and the sauce is glossy and warm.

👩🏼‍🍳 How To Make Classic Chicken Piccata

A person wearing a black latex glove dredging a seasoned thin chicken cutlet through flour that is on a platter.
  1. Step 1: Season the pounded cutlets with salt and pepper and then dredge them through the flour.
Two thin chicken breast cutlets being searing in olive oil in a large stainless steal skillet.
  1. Step 2: Working in batches, sear the cutlets over medium heat until browned and cooked through. Set aside.
A large stainless steel skillet filled with simmering butter, white wine, and garlic.
  1. Step 3: Deglaze the pan with the stock and wine. Add the lemon juice, zest, and garlic, and simmer for 2 minutes.
Four seared seasoned thin chicken cutlets resting in a lemon and white wine sauce in a large skillet.
  1. Step 4: Add the chicken back to the sauce and simmer for another 3 minutes.
A person transferring capers from a small white bowl over chicken piccata cutlets that are simmering in a lemon and white wine sauce in a skillet.
  1. Step 5: Add the capers and simmer for another minute.
A person using a wooden spoon to stir pads of butter that is in the process of being melted in a pan filled with homemade chicken piccata and lemon wedges.
  1. Step 6: Turn off the heat and add a few lemon slices and butter. Stir until melted. Serve immediately with chopped Italian parsley as garnish.

Expert Tip

Be sure to get the cutlets fully coated with the flour, but you’ll need to shake off excess before adding them to the skillet. Once in the hot oil, move them around a little in the skillet to keep them from sticking too much. There will be some of the flour that will stick and brown in the skillet. This is good because it will add flavor once you deglaze the pan.

🍽️ How to Serve

  • With pasta: Serve the chicken and sauce over a bed of angel hair, spaghetti, or linguine to soak up every drop of the lemon-butter goodness.
  • With rice or grains: Pair with creamy risotto, lemon orzo, or herbed couscous for a light and elegant side.
  • With vegetables: Complement the bright flavors with steamed asparagus, roasted green beans, or sautéed spinach.
  • With potatoes: Try buttery mashed potatoes or crispy roasted baby potatoes for a heartier meal.
  • As a lighter option: Serve the chicken over a fresh arugula salad with shaved Parmesan and a drizzle of olive oil and lemon juice.
  • Garnish beautifully: Top with extra fresh parsley, a few lemon slices, and a spoonful of the pan sauce for a classic, bistro-style presentation.

🙋🏽‍♂️ Frequently Asked Questions

Can I make Classic Chicken Piccata ahead of time?

Yes! You can cook the chicken and make the sauce up to a day in advance. Store them separately, then reheat gently in a skillet and combine just before serving to keep the chicken tender and the sauce silky.

What’s the best wine to use in Classic Chicken Piccata?

A dry white wine like Sauvignon Blanc, Pinot Grigio, or Chardonnay works beautifully. Avoid sweet wines, as they can overpower the lemon and caper flavors.

Can I make Classic Chicken Piccata without wine?

Absolutely. Substitute the wine with extra chicken stock and add a teaspoon of white wine vinegar or a squeeze of lemon juice for acidity.

How do I keep the chicken from getting soggy in Classic Chicken Piccata?

Don’t let the chicken sit in the sauce for too long before serving. You can even spoon the sauce over the chicken right before plating to maintain its light crispness.

Is Classic Chicken Piccata gluten-free?

Traditionally, it’s not, since the chicken is dredged in all-purpose flour. However, you can easily make it gluten-free by using rice flour, almond flour, or a 1:1 gluten-free flour blend for dredging—the flavor and texture stay just as delicious.

Two white dinner plates filled with servings of homemade chicken piccata and linguine with two glasses of white wine near the plates.

🇮🇹 Other Classic Italian Chicken Recipes

  • A black dinner plate filled with a serving of chicken Parmesan (Parmigiana) resting on a bed of cooked linguine and marinara sauce.
    Chicken Parmesan (Parmigiana)
  • An oval white platter filled with chicken marsala with a serving spoon off to the side.
    Authentic Chicken Marsala
  • A straight-on view of a white dinner plate that is holding a serving of chicken saltimbocca with a white wine butter sauce next to roasted baby potatoes and an arugula salad.
    Chicken Saltimbocca with White Wine Sauce
  • A lemon wedge being squeezed onto a platter of chicken francese
    Chicken Francese

Ready to make the best Italian-American dish in town? Go for it!

And when you do, be sure to take a photo of it, post it on Instagram, and tag @HowToFeedaLoon and hashtag #HowToFeedaLoon!

An overhead view of an elegant white dinner plate filled with a serving of homemade chicken piccata with a pile of linguine and a lemon wedge off to the side.
Print Recipe
5 from 6 votes

Classic Chicken Piccata

This recipe will rival your favorite Italian-American restaurant. This dish is as big in taste as it is beautiful in presentation. And best of all, it comes together in about half an hour, or so. Serve with pasta or rice and a nice white wine.
Prep Time15 minutes mins
Cook Time20 minutes mins
Total Time35 minutes mins
Course: Entree
Cuisine: Italian
Servings: 4
Calories: 348kcal
Author: Kris Longwell

Equipment

  • Large skillet 12 to 18-inch is ideal

Ingredients

  • 4 chicken cutlets boneless, skinless cutlets. See NOTES
  • Kosher salt and black pepper
  • 1 cup all-purpose flour
  • ¼ cup olive oil
  • ¾ cup chicken stock
  • ½ cup dry white wine
  • 1 tablespoon lemon zest finely chopped
  • ¼ cup fresh lemon juice
  • ¼ cup capers nonpareil, drained
  • 3 tablespoon unsalted butter
  • 2 tablespoon flat-leaf parsley chopped, for garnish

Instructions

  • Place one chicken breast in a large plastic baggie, and using a meat pounder, pound until about ¼-inch thick. Repeat with other chicken breasts.
    4 chicken cutlets
  • Sprinkle the chicken evenly with salt and pepper.
    Kosher salt and black pepper
  • Spread the flour on a plate.
    1 cup all-purpose flour
  • Coat the chicken cutlets with the flour, and shake off any excess.
  • In a large saute pan, heat the olive oil over medium-high heat.
    ¼ cup olive oil
  • When the oil is hot, carefully add the chicken. Don't overcrowd the pan.
  • Cook for about 4 minutes on each side, or until it's golden brown all over. (The chicken will not be completely cooked through at this point.)
  • Set the cutlets aside on a plate to collect any accumulated juices.
  • Remove oil from the pan and return to medium heat.
  • Add the stock, wine, lemon zest, and juice. Increase the heat to high and cook for about 2 minutes.
    ¾ cup chicken stock, ½ cup dry white wine, 1 tablespoon lemon zest, ¼ cup fresh lemon juice
  • Add the chicken back to the sauce, and simmer for another 3 minutes.
  • Add the capers and heat for 1 minute.
    ¼ cup capers
  • Remove from the heat and gently stir in the butter around the chicken until melted and slightly thickened.
    3 tablespoon unsalted butter
  • Serve on warmed platter, or individual plates, and garnish with chopped parsley.
    2 tablespoon flat-leaf parsley

Video

Notes

NOTE: Watch the video near the top of the recipe for visual guidance.
If you can’t find thinly sliced chicken breasts, purchase regular-sized (large) boneless, skinless breasts. Place the cuts (one at a time) in a plastic baggie and pound them until they are thin (¼-inch). 
Leftovers will keep covered in the fridge for up to 5 days. Reheat in a skillet with additional chicken broth or covered in a 325°F oven until heated through, usually about 15 to 20 minutes. 

Nutrition

Calories: 348kcal | Carbohydrates: 27g | Protein: 4g | Fat: 18g | Saturated Fat: 7g | Polyunsaturated Fat: 2g | Monounsaturated Fat: 12g | Trans Fat: 0.3g | Cholesterol: 23mg | Sodium: 351mg | Potassium: 107mg | Fiber: 1g | Sugar: 1g | Vitamin A: 448IU | Vitamin C: 5mg | Calcium: 20mg | Iron: 2mg

POST UPDATE: This post was originally published in September 2017, but was updated with improved tweaks to the recipe, with new tips and photography, and a fabulous new video in October 2024.

Classic Eggs Benedict

April 28, 2019 by Kris Longwell 5 Comments

A serving of eggs Benedict on a white plate with a glass cup of coffee and a carafe of orange juice in the background.

Classic Eggs Benedict is brunch perfection, combining perfectly poached eggs with a rich and creamy (and easy) hollandaise sauce. This simple yet elegant dish delivers the timeless taste and beautiful presentation that make any brunch special.

A serving of eggs Benedict on a white plate with a glass cup of coffee and a carafe of orange juice in the background.
[feast_advanced_jump_to]

🥚 The Ingredients

The simple ingredients of this classic recipe come together harmoniously to create a rich, flavorful, and unforgettable dish. Find ingredient notes (including substitutions and variations) below.

An arrangement of ingredients for Eggs Benedict on a white background including whole eggs, lemon juice, butter, vinegar, Canadian bacon, English muffins, chives, salt, pepper, and paprika.

👉 Substitutions and Variations

  • Protein – Canadian bacon (or Irish bacon) is traditional, but you can switch out the ham for a sausage patty (Egg Blackstone) or even a crab cake (Crab Cake Benedict).
  • Vegetables – The addition of sautéed spinach or a roasted tomato in place of the bacon is delicious and makes the dish vegetarian.
  • Bread – Toasted English muffins are traditional, but you could substitute toasted Country White Bread or Southern Buttermilk Biscuits. Leave the bread out to keep the dish gluten-free.

See the recipe card (with video) below for a full list of ingredients and measurements.

Expert Tip

Hollandaise sauce can be easily reheated by warming it in the microwave in 30-second intervals or gently heating it in a small saucepan over simmering water to maintain its creamy texture.

👩🏼‍🍳 How To Make Classic Eggs Benedict

A person transferring an egg from a small white bowl into a pot of swirling boiling water in a pot on a stove.
  1. Step 1: Use the spiral vortex method to poach the eggs in hot water.
Hollandaise sauce in the bottom of a blender with the point of one the blades slightly visible.
  1. Step 2: Make the Easy Blender Hollandaise Sauce.
Several slices of seared Canadian bacon in a silver skillet.
  1. Step 3: Sear the Canadian bacon until lightly browned
One halved toasted English muffin sitting on wooden cutting board next to a pile of chopped chives and a pile of whole chives.
  1. Step 4: Toast the halved English muffins and chop the chives.
A white dinner plate filled with a pair toasted English muffins each topped with crispy Canadian bacon slices and a poached egg.
  1. Step 5: On a plate, place the English muffins, and top with Canadian bacon and then the egg.
Hollandaise sauce being poured from a glass gravy boat over a poached egg resting on crispy Canadian bacon and a toasted English muffin on a white plate.
  1. Step 6: Pour the Hollandaise sauce over the top, then garnish as desired.

🍽️ How To Serve

  • This dish is best served immediately after it’s prepared. The Hollandaise sauce can be made 1 to 2 hours in advance. Simply reheat in the microwave or on the stove (add a couple of splashes of water). Have all ingredients prepped and ready to go, and then it comes together in minutes.
  • If serving more than a couple of guests, you can keep the poached eggs warm in a bowl of warm tap water. Use a slotted spoon to remove them and place them on the warm Canadian bacon.
  • We love to serve the dish with Crispy Hash Browns or Breakfast Potatoes and fresh fruit.

🙋🏽‍♂️ Frequently Asked Questions

Can I make Hollandaise sauce ahead of time for Eggs Benedict?

Yes, you can prepare the blender Hollandaise sauce ahead of time and store it in the refrigerator for up to a couple of hours; just reheat gently before serving to maintain its smooth texture.

How do I prevent the Hollandaise sauce from breaking when making it in a blender?

To prevent the sauce from breaking, use room temperature ingredients, add the melted butter slowly while blending, and avoid overheating by reheating gently if needed.

How do restaurants make the poached eggs so fluffy for Eggs Benedict?

The vortex method. Simmer water with a splash of vinegar, create a whirlpool with the handle of a spatula, then carefully add cracked eggs, turn off the heat, and let them rest for 3-4 minutes until the whites are set but yolks remain runny.

A person using a fork to pierce open a poached egg with a runny yolk spilling over the sides of an Eggs Benedict.

🌞 Other Classic Brunch Recipes

  • A serving of huevos rancheros on a black plate garnished with crumbled Cotija cheese and chopped fresh cilantro.
    Authentic Huevos Rancheros
  • A Croque Madame sandwich with a sunny side egg resting on top of it on a black plate.
    Croque Madame
  • An antique plate holding ricotta pancakes with a strawberry on top and syrup being poured on top.
    Ricotta Lemon Pancakes with Vanilla Sauce
  • A plate filled with Southern biscuits and gravy sitting next to a white mug of black coffee and a glass of orange juice.
    Southern Biscuits and Gravy

Ready to make the best brunch dish in town? Go for it!

And when you do, be sure to take a photo of it, post it on Instagram, and tag @HowToFeedaLoon and hashtag #HowToFeedaLoon!

A white plate filled with two Eggs Benedict with toasted English muffins, Canadian bacon, poached eggs, Hollandaise sauce, and garnished with paprika and snipped chives.
Print Recipe
No ratings yet

Classic Eggs Benedict

Classic Eggs Benedict is the iconic brunch dish that is absolutely a taste sensation with every bite.  Using the Easy Hollandaise Sauce recipe and creating a fluffy, could-like poached eggs via the vortex method, you will not believe how easy it is to produce restaurant-quality Eggs Benedict for you and your loved ones in your own kitchen.  In no time at all!
Prep Time10 minutes mins
Cook Time20 minutes mins
Total Time25 minutes mins
Course: Breakfast / Brunch
Cuisine: American
Servings: 4 people
Calories: 512kcal
Author: Kris Longwell

Equipment

  • 1 Blender for the Hollandaise sauce
  • 1 Large pot to prepare the poached eggs

Ingredients

  • 1 cup Easy Hollandaise Sauce
  • 8 large eggs
  • Distilled white vinegar
  • 2 tablespoon unsalted butter
  • 16 slices Canadian bacon or ham medallions
  • 4 English muffins split in half and toasted
  • 2 tablespoon chives finely chopped
  • 1 tablespoon smoked paprika for garnish

Instructions

Do Ahead

  • Make the Easy Blender Hollandaise Sauce. Meanwhile, bring a large pot of water to a strong simmer.
    1 cup Easy Hollandaise Sauce

Prepare the Poached Eggs – Vortex Method.

  • Once water is simmering or boiling, and working in batches of two eggs at a time, crack each egg into a small vessel, just large enough to hold it.  Add a small spoonful of the vinegar on top of each egg.
    8 large eggs, Distilled white vinegar
  • Lower the handle of a large spoon into the boiling water and begin to vigorously stir the water in one direction to create a swirling vortex.  Quickly, but carefully, lower the eggs into the swirling water and then immediately turn off the heat.  Allow the eggs to sit in the water for EXACTLY three minutes.  
  • Use a slotted spoon to carefully remove the cooked eggs from the water.  Place the eggs into a bowl of warmed water and repeat this process with the remaining eggs, being sure to return the water to a boil before proceeding with each set of eggs. 

Prepare the Remaining Ingredients and Assemble

  • If necessary, warm the sauce in the microwave on high for about 30 seconds just before serving. 
  • Heat a large skillet over medium-high heat and add the butter.  Add the Canadian bacon and quickly cook until lightly browned on each side, about 2 minutes per side (don't overcook!). Set aside. Toast the English muffins.
    2 tablespoon unsalted butter, 16 slices Canadian bacon, 4 English muffins
  • On a plate, place the two halved and toasted English muffins.  Using a slotted spoon, carefully place one poached egg on each muffin.  Pour the Hollandaise sauce over each egg (about 1 to 2 tablespoons each).  Repeat with the remaining 3 plates.
  • Top with snipped chives and a small sprinkle of paprika, if desired.  Serve at once!
    2 tablespoon chives, 1 tablespoon smoked paprika

Video

Notes

NOTE: Watch the video near the top of the recipe for visual guidance.
If the Hollandaise sauce is too thick, add drops of warm water until the desired consistency is reached. 
3 minutes in the hot water will give you poached eggs with a runny yolk. If you want the yolks to be less runny, allow them to stay in the water for 4 to 5 minutes. 

Nutrition

Calories: 512kcal | Carbohydrates: 30g | Protein: 41g | Fat: 24g | Saturated Fat: 9g | Polyunsaturated Fat: 3g | Monounsaturated Fat: 9g | Trans Fat: 0.3g | Cholesterol: 444mg | Sodium: 1439mg | Potassium: 651mg | Fiber: 2g | Sugar: 1g | Vitamin A: 1642IU | Vitamin C: 1mg | Calcium: 102mg | Iron: 3mg

Fried Oysters and Littleneck Clams

April 26, 2019 by Kris Longwell 5 Comments

A turned-over bucket with fried oysters and clams paling out of the pale.

Fried Oysters and Littleneck Clams.  Few words can conjure up more memories of fun, deliciousness, and days on the boardwalk than those.

And when you start with fresh oysters and littleneck clams from the greatest seafood market in the world, Citarella, you are on the road to some spectacular food and fabulous times.

Incredible taste and texture.  It just doesn’t get better than these Fried Oysters and Littleneck Clams!

A turned-over bucket with fried oysters and clams paling out of the pale.

OYSTERS AND CLAMS ARE PERFECT FOR FRYING

Joe Gurrera is well-known as a highly knowledgable fishmonger and chef, as well as owner of the prestigious Citarella Gourmet Market.

This recipe comes from his critically acclaimed book: Joe Knows Fish. He explains that when he has a “fry night,” he likes to fry up a variety of things.

Although oysters and clams are perfect for frying, they have slightly different fry times in the hot oil, so ALWAYS fry them separately!

Fried sage is a perfect garnish for the fried oysters and littleneck clams.

Fresh oysters and sage leaves on a wooden bench.

ORDER SHUCKED OR UN-SHUCKED OYSTERS AND CLAMS FROM CITARELLA

It is truly amazing how fresh the seafood is when a shipment from Citarella arrives at your doorstep.

The ingredients are expertly packaged and delivered ice cold, even when shipped across the country.

As a “How To Feed a Loon” reader, we are thrilled to offer you FREE SHIPPING on any fresh seafood order of $150 or over when you order online. Simply use Promo Code: LOONFREE now through May 11th, 2019. This really is a great offer and we strongly urge you to give Citarella a try…the seafood is unmatched in freshness and quality.

You can trust us on this.

A bowl of shucked oysters and a bowl of shucked clams for fried oysters and clams.

It is noteworthy how simple the preparation is in this recipe for Fried Oysters and Littleneck Clams.  The freshness of the main ingredients are what make the dish shine.

A simple dredging of flour is all that is required.  Then add a liberal sprinkling of coarse sea salt just after they come out of the hot oil. Perfection!

These incredible lightly breaded bivalve mollusks are heavenly!

A hand holding raw oyster that have been dredged in flour for fried oysters.

Fried Oysters and Littleneck Clams are the perfect appetizer.

Joe reminds us, however, that when frying the oysters and the clams, be sure to keep them separate. The oysters fry for 15 seconds longer than the clams. As Joe says: “DON’T WALK AWAY or even think about cracking open a beer” until you take them out of the fryer, then you can enjoy them together!

We added them together here in the spider for the beautiful picture…but we fried them separately! Do as Joe says, and you will NOT be disappointed!

A wire spider holding fried oysters.

CITARELLA DELIVERS THE HIGHEST QUALITY SEAFOOD…ALWAYS

We’ve said if before, but it bares repeating: You simply cannot do better than Citarella when you are looking to prepare an amazing seafood dish, such as these Fried Oysters and Littleneck Clams!

And remember, use Promo Code: LOONFREE for 100% FREE shipping for any seafood order of $150 or over, now through May 11th, 2019.* If you are interested in ordering food items that aren’t seafood, simply call 212-874-0383 and the expert Customer Care Team will add the items to your shipment. No problem!

And trust us when we (and Joe) tell you, these Fried Oysters and Littleneck Clams are truly something to celebrate. Order the oysters and clams from Citarella, and get ready for one of the most delicious seafood treats you and your loved ones will ever try!

Fried oysters and littleneck clams with fried sage tumbling out of a sliver pale.

*Deliveries only made in the continental United States.

A turned-over bucket with fried oysters and clams paling out of the pale.
Print Recipe
5 from 3 votes

Fried Oysters and Littleneck Clams

Fried Oysters and Littleneck Clams are just divine.  So fresh and yummy on the inside and crunch and delicious on the outside.  Starting with fresh oysters and clams from Citarella Gourmet Market ensures best quality delivered to your doorstep.  You are just going to love these incredible fried mollusks!
Prep Time10 minutes mins
Cook Time10 minutes mins
Total Time20 minutes mins
Course: Appetizer
Cuisine: Seafood
Servings: 4 people
Calories: 268kcal
Author: Kris Longwell

Ingredients

  • 2 quarts canola, grapeseed, or other high-heat cooking oil for frying
  • ½ cup Wondra flour or all-purpose flour
  • 1 dozen raw littleneck clams cleaned and shucked
  • 1 dozen raw oysters cleaned and shucked
  • Sea salt to taste
  • Fresh sage leaves quick-fried, for garnish
  • Tobasco, or other hot sauce to taste, optional

Instructions

  • Pour the oil into a large pot, Dutch oven, or fryer.  It should be at least 2 inches deep.  Heat the oil to 375°F. If you don't own a candy or oil thermometer, simply sprinkle a pinch of flour into the oil.  If it sizzles, it's ready.
  • Meanwhile, put the flour in a shallow dish.  Dredge the clams in flour and set aside.  Repeat with the oysters, keeping the clams and oysters separate.
  • When the oil is hot, using a slotted spoon or spider, fry one test clam to ensure your oil is at the correct temperature.  If your test is successful and the clam is pale golden, using a slotted spoon or spier, lower half of the clams into the oil and fry for 45 seconds, then transfer to a plate or baking sheet lined with paper towels to drain.  Sprinkle liberally with salt.  Repeat the process with the remaining clams, letting the oil return to temperature before frying the next batch.
  • Next, fry half of the oysters. Using a slotted spoon or spider, lower half of the oysters into the oil and fry for 1 minute, then transfer to a plate or baking sheet lined with paper towels to drain.  Sprinkle liberally with salt.  Repeat the process with the remaining oysters, letting the oil return to temperature before frying the next batch. 
  • Garnish the clams and oysters with fried sage leaves and serve with hot sauce, if desired. 

Nutrition

Calories: 268kcal

Best-Ever Potato Salad

April 23, 2019 by Kris Longwell 9 Comments

An overhead view of best-ever potato salad in a large colorful serving bowl with a sprig of fresh dill resting on top.

Best-Ever Potato Salad is so refreshing and the perfect side dish! It is creamy without being ladled with mayonnaise. The dill, fresh lemon, and Dijon brighten the dressing perfectly. And it comes together in less than 30 minutes! The perfect side dish to grilled BBQ chicken, best-ever cheeseburger, or smoked St. Louis-style ribs!

An overhead view of best-ever potato salad in a large colorful serving bowl with a sprig of fresh dill resting on top.
[feast_advanced_jump_to]

🥔 The Ingredients

This recipe uses just a handful of fresh, vibrant ingredients that come together perfectly to create a simple yet delicious side dish. Find ingredient notes (including substitutions and variations) below.

An arrangement of ingredients for best-ever potato salad on a grey wooden background including bowls filled with red onion, celery, mayonnaise, Dijon, cubed potatoes, lemon juice, vinegar, chopped dill, salt, and pepper.

🌿 Substitutions and Variations

  • Potatoes – We find that yellow or gold potatoes deliver superior taste and give a velvety texture. However, russet potatoes work well, too. Red potatoes have a slightly different texture, but they will work, as well. For a unique twist, try adding a combination of red with sweet potatoes.
  • Herbs – Fresh dill works wonderfully with the lemon juice and mayonnaise. Dried won’t give as bright a flavor profile, but can be used in a pinch. Rosemary and/or thyme can be substituted.
  • Mayonnaise – Homemade mayonnaise brings this salad to the next level, but if you go this route, remember that it has raw egg yolks in it and is good for serving to anyone with a compromised immune system, including the elderly and young children. Greek yogurt can be substituted, if desired.

See the recipe card (with video) below for a full list of ingredients and measurements.

Expert Tip

Try to cut the potatoes into a uniform size, so they will cook evenly. Cook them in boiling water until just tender. Once they can easily be pierced with a sharp knife, they are done. Don’t overcook them! If you do, the salad will be mushy.

👩🏼‍🍳 How To Make Best-Ever Potato Salad

A person dumping peeled and cubed yellow potatoes into a pot filled with boiling water.
  1. Step 1: Add the potatoes to a pot filled with water and bring to a boil. Cook until tender.
A person dumping freshly boiled cubes of yellow potatoes into a glass bowl with chopped onion and celery in the bottom.
  1. Step 2: Drain the potatoes and transfer them to a bowl filled with the onion and celery.
A whisk being used to stir the dill and mayonnaise dressing in a glass bowl that will be used for potato salad.
  1. Step 3: In a bowl, whisk the mayonnaise, Dijon, salt, pepper, vinegar, lemon juice, and dill.
A person pouring freshly prepared dill and mayonnaise dressing over cooked potatoes that have been tossed with chopped red onion and celery in a glass bowl.
  1. Step 4: Pour the dressing over the cooled potatoes and gently stir to coat.
A person spreading plastic wrap over the top of a glass bowl that is filled with freshly prepared best-ever potato salad.
  1. Step 5: Cover with plastic wrap, serve within 2 hours, or refrigerate overnight.
A person placing a sprig of fresh dill on the top of a bowl of best-ever potato salad in a white bowl on a wooden cutting board.
  1. Step 6: Serve, garnish with a sprig of dill

🍽️ How To Store and Serve

  • We find that once the dressing has fully coated the potatoes, you can simply cover with plastic wrap and then serve within a couple of hours.
  • Alternatively, you can place the prepared salad in the refrigerator and let it rest for 8 to 12 hours, or overnight. This is awesome, too, as the flavors meld even more.
  • If you place it in the fridge, we recommend you set the salad out until it comes to room temperature for a couple of hours, and then give the salad a few good turns with a wooden spoon.

Expert Tip

We find that the dressing is more creamy when the salad is at room temperature. If you are serving outside on a hot day, place the bowl of potato salad on a dish filled with ice.

🙋🏽‍♂️ Frequently Asked Questions

Can I make this potato salad ahead of time?

Yes, potato salad tastes even better when made a few hours ahead or the day before, allowing the flavors to meld.

What type of potatoes work best for this salad?

Potatoes like Yukon gold, yellow, or red potatoes hold their shape well and are perfect for a creamy potato salad.

Can I substitute mayonnaise with a healthier alternative?

Absolutely! You can use Greek yogurt or a mix of Greek yogurt and mayonnaise for a lighter, tangier version.

A person raising a wooden spoon filled with a serving of best-ever potato salad over a bowl of the same.

😋 More Amazing “Best Ever” Salads

  • Three tuna salad sandwiches sitting a white lunch plate next to a colorful napkin.
    Best-Ever Tuna Salad
  • A white oval serving bowl filled with classic pasta salad including artichoke hearts, sun-dried tomatoes, black olives, tricolor rotini pasta, basil, tossed in homemade Italian dressing.
    Classic Pasta Salad
  • Best-ever egg salad on a white plate with pickles nearby
    Best-Ever Egg Salad
  • A shallow white bowl filled with best-ever ham salad surrounded by a plate of green leaf lettuces, slices of bread, plates, and glasses of iced tea.
    Best-Ever Ham Salad

Ready to make the best side dish in town? Go for it!

And when you do, be sure to take a photo of it, post it on Instagram, and tag @HowToFeedaLoon and hashtag #HowToFeedaLoon!

A colorful serving bowl filled with homemade best-ever potato salad with fresh dill and a wooden spoon inserted into the side of the salad.
Print Recipe
5 from 3 votes

Best-Ever Potato Salad

This Best-Ever Potato Salad is really so delicious and is just the perfect side-dish for a BBQ or picnic. You can make this a couple of hours in advance and serve it as is. You can also place it in the fridge and chill for up to 12 hours. Just let it come back to room temperature and then stir. Either way, it's always a crowd-pleaser and so delicious!
Prep Time15 minutes mins
Cook Time20 minutes mins
Total Time35 minutes mins
Course: Salad
Cuisine: American
Servings: 8 people
Calories: 376kcal
Author: Kris Longwell

Equipment

  • Large pot for boiling potatoes in water
  • Coleander Or pasta pot

Ingredients

  • 3 lbs gold potatoes washed, peeled and cubed
  • Kosher salt and fresh ground black pepper
  • ½ cup celery finely chopped
  • ½ cup red onion finely chopped
  • 1¼ cup mayonnaise
  • 1 tablespoon Dijon mustard
  • 2 tablespoon white wine vinegar
  • Juice of 1 lemon about 1 tbsp
  • ¼ cup dill fresh, finely chopped

Instructions

  • Place the potatoes in a big pot with enough water to cover by 1 inch.
    3 lbs gold potatoes
  • Season liberally with salt and bring to a boil.
    Kosher salt and fresh ground black pepper
  • Cook until the potatoes are just tender when pierced, about 8 to 10 minutes. Once a knife can easily pierce one of the potato pieces, they are ready. Don't overcook!
  • Drain the potatoes.
  • Place the chopped celery and onion in the bottom of a large bowl. Add the hot potatoes and stir with a large wooden spoon until fully combined. 
    ½ cup celery, ½ cup red onion
  • To facilitate cooling, spread the potatoes out onto a large baking sheet.  
  • Meanwhile, in a medium bowl, mix together the mayonnaise, Dijon, 1 teaspoon salt, a pinch of black pepper, vinegar, lemon juice, and dill. Whisk until fully combined.
    1¼ cup mayonnaise, 1 tablespoon Dijon mustard, 2 tablespoon white wine vinegar, Juice of 1 lemon, ¼ cup dill
  • Return the cooled potatoes with celery and onion into the large serving bowl. Pour the dressing over the potatoes and gently stir with wooden spoon until the spuds are fully coated. 
  • Cover with plastic wrap. Serve within 2 hours at room temperature. Or, refrigerate for up to 12 hours or overnight. It's best if allowed to return to room temperature before serving. Give the salad a few good mixes with the wooden spoon. 
  • Garnish with a sprig of dill, if desired.

Video

Notes

NOTE: Watch the video near the top of the recipe for visual guidance.
Fresh dill is best for this salad. It delivers much better flavor than dried. However, dried can be used in a pinch. If you do use dried, go with 2 tbsp. 
Leftovers will keep in an air-tight container with a lid in the fridge for up to 5 days. The salad can be frozen, but it may lose its creamy texture after thawing. 

Nutrition

Calories: 376kcal | Carbohydrates: 31g | Protein: 4g | Fat: 18g | Saturated Fat: 4g | Polyunsaturated Fat: 11g | Monounsaturated Fat: 6g | Trans Fat: 0.1g | Cholesterol: 15mg | Sodium: 260mg | Potassium: 769mg | Fiber: 4g | Sugar: 2g | Vitamin A: 169IU | Vitamin C: 36mg | Calcium: 32mg | Iron: 2mg

POST UPDATE: This was originally published in June 2019, but was updated with improved tweaks to the recipe with new tips and photography and fabulous new video in July 2025!

Black and Bleu Burger

April 21, 2019 by Kris Longwell 7 Comments

A black and bleu burger with two pickle slices stuck in the top of the bun with a tooth pick all on a white plate next to crosshatch fried and two spears of pickles and two glasses of dark beer in the background.

If you’re looking to take burger night up a notch, this Grilled Black and Bleu Burger is the way to do it. Juicy beef patties are seasoned with bold blackened spices, then grilled to perfection and topped with creamy, tangy bleu cheese.

A straight-on view of a black and bleu burger that consists of a blackened hamburger, melty blue cheese, a tomato slice, and two slices of red onion on a toasted bun.
[feast_advanced_jump_to]

🥬 The Ingredients

Juicy beef, zesty blackened spices, and creamy bleu cheese team up to make a burger so bold and tasty, you’ll remember it long after the last bite. Find ingredient notes (including substitutions and variations) below.

An arrangement of ingredients for a black and bleu burger on a wooden grey background including ground beef, blue cheese, blackening seasonings, pickles, buns, mayonnaise, lemon juice, lettuce, red onion, and tomato slices.

👉 Substitutions and Variations

Substitutions

  • Ground beef: Swap with ground turkey, chicken, or lamb for a lighter or different flavor.
  • Bleu cheese: Use gorgonzola, feta, goat cheese, or sharp cheddar if you prefer a milder taste.
  • Blackening seasoning: Make your own with paprika, cayenne, garlic powder, onion powder, and thyme, or use Cajun seasoning for a shortcut.
  • Buns: Try brioche, pretzel buns, ciabatta, or even lettuce wraps for a low-carb option. If you’re feeling adventurous, make homemade hamburger buns!

Variations

  • Spicy Kick: Add jalapeños, pepper jack cheese, or a drizzle of hot sauce.
  • Loaded Burger: Top with caramelized onions, crispy bacon, or sautéed mushrooms.
  • Lighter Version: Use lean ground turkey and reduced-fat cheese.
  • Gourmet Twist: Add arugula, roasted red peppers, or a balsamic glaze for extra flair.
  • Mini Sliders: Make smaller patties and serve on slider buns for parties or appetizers.

See the recipe card (with video) below for a full list of ingredients and measurements.

🔥 Tips and Tricks for Perfect Black and Bleu Burgers

  • Keep it juicy: Don’t overwork the ground beef when forming patties—gentle handling keeps them tender.
  • Make an indent: Press a small dimple in the center of each patty before grilling to prevent it from puffing up.
  • Season generously: Coat the patties well with blackening spices for bold flavor that stands up to the bleu cheese.
  • Grill hot and fast: High heat gives the burgers a smoky char while sealing in juices.
  • Balance the cheese: Bleu cheese is strong—start with a little, then add more to taste.
  • Rest before serving: Let burgers sit for a few minutes after grilling so the juices redistribute.

🍽️ How to Serve

  • Serve on toasted brioche or pretzel buns with crisp lettuce, tomato, and red onion.
  • Pair with classic sides like French fries, sweet potato fries, or homemade onion rings.
  • Add a fresh touch with a simple green salad or creamy coleslaw.
  • For drinks, try a cold lager, a hoppy IPA, or a bold red wine like Zinfandel.
  • Finish the meal with something light and sweet, like fresh fruit or lemon bars.

Expert Tip

For the perfect melt, transfer the burgers to a 350°F oven for 2–3 minutes right after grilling—this softens the bleu cheese just enough to get creamy without losing its bold flavor.

👩🏼‍🍳 How to Make a Black and Blue Burger

A person holding blackening seasoning in his hand over a bowl of the same.
  1. Step 1: In a small bowl, combine the blackening seasonings.
A close-up view of a Cajun mayonnaise mixture in a small glass bowl.
  1. Step 2: In another small bowl, combine the Cajun mayonnaise ingredients.
Two uncooked beef patties that are coated with a blackening seasoning on a wooden cutting board next to crumbled blue cheese.
  1. Step 3: Form the patties and then liberally coat them with the blackening seasoning.
Two blackened hamburger patties that are being cooked on a grass grill.
  1. Step 4: Grill until medium (140°F to 145°F).
A person placing crumbled blue cheese on top of a cooked blackened hamburger patty.
  1. Step 5: Place some of the crumbled blue cheese on top of the patties and bake in a 350°F oven for a couple of minutes, until the cheese has just melted.
A person placing the top of a toasted hamburger bun on top of a black and bleu burger that consists of Cajun mayonnaise, lettuce, blackened burger, melty blue cheese, onions, lettuce, and pickles.
  1. Step 6: Toast the buns and build the burgers with the Cajun mayonnaise and your favorite toppings.

🙋🏽‍♂️ Frequently Asked Questions

Can I make Black and Bleu Burgers indoors without a grill?

Yes, you can cook the patties in a cast-iron skillet or on a stovetop grill pan, then finish them in the oven to melt the cheese.

What type of beef works best for Black and Bleu Burgers?

An 80/20 ground beef blend (80% lean, 20% fat) gives the juiciest results, but leaner blends can also be used if you prefer.

Can I prepare Black and Bleu Burgers ahead of time?

You can form the patties a day in advance and keep them refrigerated until ready to grill. Just season right before cooking for the best flavor.

Is a Black and Bleu Burger spicy?

The blackening seasoning adds a smoky kick with a touch of heat, but you can easily adjust the spice level by using less cayenne or choosing a milder seasoning blend.

A black and bleu burger with two pickle slices stuck in the top of the bun with a tooth pick all on a white plate next to crosshatch fried and two spears of pickles and two glasses of dark beer in the background.

🍔 Other Amazing Burger Recipes

  • A person holding a best-ever cheeseburger consisting of a juicy beef burger topped with melting cheddar cheese, lettuce, tomato, red onion, and pickles all sandwiched between a toasted homemade hamburger bun.
    Best-Ever Cheeseburger
  • A mushroom Swiss burger on a white plate next to a small bowl of ketchup and and a beer.
    Mushroom Swiss Burger
  • Two plates filled with curry turkey burgers with grilled pineapple sitting next to a pile of sweet potato French fries.
    Curry Turkey Burgers With Grilled Pineapple
  • A fully cooked salmon burger on a hamburger bun, garnished with lettuce, tomato, and red onion all sitting on a white plate.
    Salmon Burger

Ready to make the most rocking burger on the block? Go for it!

And when you do, be sure to take a photo of it, post it on Instagram, and tag @HowToFeedaLoon and hashtag #HowToFeedaLoon!

A black and bleu burger with two pickle slices stuck in the top of the bun with a tooth pick all on a white plate next to crosshatch fried and two spears of pickles.
Print Recipe
5 from 1 vote

Black and Blue Burger

This Rockin’ Black and Bleu Burger brings all the right flavors together for a HUGE taste sensation with every bite. A little kick, a little tang, and a whole lot of flavor. Woo hoo!
Prep Time20 minutes mins
Cook Time15 minutes mins
Total Time35 minutes mins
Course: Grilling
Cuisine: American
Servings: 4 people
Calories: 653kcal
Author: Kris Longwell

Equipment

  • Gas, charcoal, or electric grill

Ingredients

For the Blackening Seasoning

  • 2 teaspoon dried oregano
  • 2 teaspoon dried thyme seeds
  • 1½ tablespoon smoked paprika
  • 1 teaspoon cayenne pepper
  • 1 teaspoon black pepper
  • 1 tablespoon Kosher salt
  • 1½ tablespoon garlic powder
  • 1 tablespoon onion powder

For the Cajun Mayonnaise

  • ¾ cup mayonnaise homemade or good quality jarred
  • 1 tablespoon fresh lemon juice
  • 1 teaspoon Cajun seasoning
  • ¼ teaspoon hot pepper sauce

For the Burgers

  • 2 lbs ground beef 80% or 85% is good
  • 2 cups blue cheese crumbled
  • green leaf lettuce cut into pieces
  • tomatoes sliced
  • red onion sliced
  • bread and butter pickle
  • 4 Kaiser rolls halved
  • 1 tablespoon unsalted butter melted

Instructions

Make the Rub

  • Mix together all the rub ingredients in a small bowl
    2 teaspoon dried oregano, 2 teaspoon dried thyme seeds, 1½ tablespoon smoked paprika, 1 teaspoon cayenne pepper, 1 teaspoon black pepper, 1 tablespoon Kosher salt, 1½ tablespoon garlic powder, 1 tablespoon onion powder

Make the Cajun Mayonnaise.

  • Mix together all the mayo ingredients in a small bowl, cover with plastic wrap, and place in the fridge until ready to use.
    ¾ cup mayonnaise, 1 tablespoon fresh lemon juice, 1 teaspoon Cajun seasoning, ¼ teaspoon hot pepper sauce

Make the Burgers

  • Prepare your grill to medium-high heat, for direct heat cooking.
  • Form 4 to 5 patties out of the beef (about ⅓ lb each).
    2 lbs ground beef
  • Dredge the patties in the rub until completely covered, set aside.
  • Grill the burgers over direct heat to your liking (145°F. for medium).
  • Meanwhile, brush the buns with a good helping of the melted butter.
  • When burgers are almost done, place about ¼ cup of cheese on top (or more or less, whatever you like). Close the grill lid to allow the cheese to melt.  Or, once the burgers are cooked to your liking, place the bleu cheese on top of the patties and place them under a broiler for about 1 minute, or until melted and slightly browned. 
    2 cups blue cheese
  • Butter the buns and then place them on the grill, and cook them until they are toasted on the bottom sides (about 1 to 2 minutes).
    4 Kaiser rolls, 1 tablespoon unsalted butter

Assemble the Burger

  • Slather a good helping of the Cajun mayo on the bottom bun.
  • Place the burger on top of the mayo.
  • Now, top with the tomato, lettuce, onion, and pickles (optional).
    green leaf lettuce, tomatoes, red onion, bread and butter pickle
  • Top with the toasted buns.

Notes

NOTE: Watch the video near the top of the recipe for visual guidance.
  • Cheese Options: If bleu cheese is too strong, try gorgonzola, feta, or even sharp cheddar for a milder flavor.
  • Grill or Oven: After grilling, place burgers in a 350°F oven for a couple of minutes to gently melt the cheese.
  • Make Ahead: Patties can be formed up to a day in advance and stored in the fridge—just season right before grilling for the freshest flavor.

Nutrition

Calories: 653kcal | Carbohydrates: 8g | Protein: 55g | Fat: 26g | Saturated Fat: 9g | Polyunsaturated Fat: 5g | Monounsaturated Fat: 7g | Trans Fat: 3g | Cholesterol: 237mg | Sodium: 702mg | Potassium: 936mg | Fiber: 2g | Sugar: 1g | Vitamin A: 2380IU | Vitamin C: 1mg | Calcium: 422mg | Iron: 6mg

Sweet and Sour Pork

April 18, 2019 by Kris Longwell 10 Comments

A long white platter filled with sweet and sour pork with chop sticks nearby.

Sweet and Sour Pork is insanely delicious.

This recipe will even rival your favorite upscale Chinese restaurant.

And it’s so much better than you would get with take-out.  It’s that good.

A long white platter filled with sweet and sour pork with chop sticks nearby.

SWEET AND SOUR PORK IS EASY TO PREPARE AT HOME

This dish has it all. Crispy pork with a succulent sweet and sour sauce that simply cannot be beat.

Watch us show you how easy it is to prepare Sweet and Sour Pork!

The ingredients for Sweet and Sour Pork are classic Chinese ingredients, however, we provide some viable substitutes in the recipe if you can’t find some items.

Shaoxing rice wine is common in Chinese cuisine, both as a wine and as an ingredient for cooking.  Now days, you can likely find it in well-stocked supermarkets in the Asian food aisle.  Of course, you can follow the link we provided to easily have a bottle shipped right to your doorstep.

Black Chinese Vinegar, or Chinkiang, can also be found in many markets, but if not…have it shipped right to you!

A steel wok filled with the ingredients to make sweet and sour pork.

PORK TENDERLOIN WORKS PERFECTLY

We love getting a pork tenderloin (not a pork loin) and slicing it into ½-inch medallions.

We then cut the medallions into ½-inch strips.

If the strips are more than an inch long, cut them in half.

An uncooked pork tenderloin on a cutting board with a chef's knife next to it.
A knife slicing through an uncooked pork tenderloin on a cutting board.
A hand and knife cutting a pork tenderloin into strips for Sweet and Sour Pork.

After marinating the pork strips in the Shaoxing wine (or medium-dry Sherry), it’s time to place them in the batter.

The batter is simple…eggs and cornstarch.

Cornstarch is standard in Chinese cooking, and helps to make the pork strips extra crispy.

A glass bowl of uncooked pork strips in an egg.

A DOUBLE-FRY MAKES THE PORK SUPER CRISPY

When using your wok to deep-fry, it’s important to make sure your wok is very secure.

A wok ring works perfectly.

For the first fry, bring the oil temperature to 300°F.

Deep fried pork strips in a metal spatula for Sweet and Sour Pork.

USE A CLEAN WOK TO MAKE THE SWEET AND SOUR PORK SAUCE

Once the pork is fried and crispy, keep it warm in a low-temperature oven.

Now it’s time to make the incredible sauce. You’ll need a clean wok. If you have two woks, grab the spare.

If not, no problem! Carefully discard the oil, wipe out the wok, and heat 2 tablespoons of peanut oil over medium heat. Stir fry the garlic and ginger, and then add the stock. Once it comes to a boil, add in the pre-made sauce. It will thicken quickly. Simply stir in the chopped scallions and then the sesame oil.

A wok filled with sweet and sour sauce with scallions and a whisk.

At this point, the dish is ready for plating.

You can simply pour the sauce over the fried pork, or you can do what we love to do, and to toss the pork in the wok with the sauce.

The pork will stay nice and crisp, even as the strips submerge into the sublime sauce.  Mmmmm….Just look at this:

Fried pork strips in sweet and sour sauce in a wok for sweet and sour pork.

Folks, we’re not joking around here. This is the best Sweet and Sour Pork in town. We promise.

The dark and tangy sauce is the perfect match agains the super crispy fried pork pieces.

We love it served with white or brown rice, or simply a lovely side of steamed vegetables, such as broccoli.

Just amazingly delicious.

A close up view of a platter of Sweet and Sour Pork.

A white platter holding Sweet and Sour Pork with chop sticks nearby.
Print Recipe
5 from 1 vote

Sweet and Sour Pork

Sweet and Sour Pork is a Chinese dish favorite and this recipe will rival even the best upscale Chinese restaurant.  The pork strips are super crispy and are bathed in a succulent dark and tangy sauce.  This is so much better than that synthetic-looking orange concoction you will find in most take-out places.  This is the real deal. 
Prep Time20 minutes mins
Cook Time20 minutes mins
Marinating30 minutes mins
Total Time40 minutes mins
Course: Entree
Cuisine: Chinese
Servings: 2 people
Calories: 426kcal
Author: Kris Longwell

Ingredients

  • ¾ lb pork tenderloin
  • Peanut oil for frying (you'll need some for sautéing, too)

FOR THE BATTER

  • 2 large eggs
  • ½ cup corn starch

FOR THE MARINADE

  • ½ teaspoon salt
  • 2 teaspoon Shaoxing rice wine or medium-dry sherry

FOR THE SAUCE

  • ¼ teaspoon salt
  • 3 tablespoon granulated sugar
  • 2 tablespoon Black Chinese vinegar
  • 1 teaspoon light soy sauce
  • 3 ¾ teaspoon corn starch
  • 3 scallions, green parts only chopped, plus some sliced, for garnish
  • 3 tablespoon peanut oil
  • 2 teaspoon garlic minced
  • 2 teaspoon fresh ginger root finely chopped
  • ¾ cup chicken stock
  • 1 teaspoon sesame oil
  • 1 tablespoon white sesame seeds lightly toasted

Instructions

  • Place the tenderloin in the freezer for 15 to 20 minutes.  Remove from freezer, and then slice ½-inch medallions.  Next, cut the medallions into ½-inch strips.  If a strip is longer than 1 inch in length, slice in half. Put strips into a medium-sized bowl.
  • Add the wine and salt to the pork strips, mix well, cover with plastic wrap, and place in the fridge for 30 minutes.
  • For the sauce, combine the salt, sugar, vinegar, soy sauce, and cornstarch in a small-medium bowl. 
  • Pour enough oil into your wok (or large sturdy pot, such as a Dutch oven) until it's about 1-inch deep.  Heat over medium heat until it reaches 300°F.  A candy thermometer helps with this. 
  • In a medium-sized bowl, add the eggs and gently beat together.  Add the corn starch and mix until completely mixed and a thick batter has formed.
  • Add the pork strips to the batter and mix until completely coated. 
  • Drop some of the battered strips into the oil, adding them individually to prevent sticking, and stir with forks, or metal tongs, to separate. 
  • Fry the strips for about 3 minutes, until they are just cooked through.  Remove and drain on a plate lined with paper towels.  Repeat with the remaining strips until you have cooked all of them.
  • Increase the heat until it reaches 375°F.  Add the pork strips in one or two batches and deep-fry them until they are crisp and golden.  Remove, drain, and place on a serving dish. 
  • To prepare the sauce, either carefully discard the oil from the wok and then and wipe it clean with a towel, or use a second wok.  Heat 3 tablespoons of oil over medium heat.
  • Add the garlic and ginger and stir-fry for about 30 seconds, until they are fragrant. Add the stock and bring to a boil.  Add the prepared sauce from the small bowl.
  • Stir briskly as the liquid thickens, then add the scallions and sesame oil, stirring a few times.
  • Either pour the sauce over the pork strips, or add the pork strips to the sauce in the wok to coat and then transfer to a serving dish. Top with sliced scallions and toasted sesame seeds. Serve immediately with steamed rice or vegetables. 

Video

Nutrition

Calories: 426kcal
  • « Previous Page
  • 1
  • …
  • 15
  • 16
  • 17
  • 18
  • 19
  • …
  • 21
  • Next Page »

Welcome!

Kris & Wesley (The Loon) live for fun, food, and fabulousness. "How to Feed a Loon" is a celebration of just that. Come join us on this joyous culinary ride.

More about us

Christmas Favorites

  • An overhead view of an oval baking dish filled with homemade lobster mac and cheese topped with pink lobster claw meat and chopped parsley.
    Homemade Lobster Mac and Cheese
  • A large white platter filled with a honey mustard glazed smoked ham with two glasses of white wine and a bottle of wine nearby.
    Honey Mustard-Glazed Smoked Ham
  • An overhead view of a large oval white platter holding green beans almondine with a bottle of wine and two glass of white wine nearby.
    Green Beans Almondine (Classic French Green Bean Recipe)
  • A circular tin lined with brown paper filled with homemade peppermint bark, surrounded by holiday garland and more pieces of bark.
    Homemade Peppermint Bark
  • A circular dish holding Baked Brie with Cranberry-Orange Sauce and Pecans surrounded by two glasses of white wine, pieces of toast, holly, and silverware.
    Baked Brie with Cranberry-Orange Sauce and Pecans
  • An overhead view of a large cast-iron skillet filled with French onion au gratin potatoes with fresh herbs and a grey napkin near the dish.
    French Onion au Gratin Potatoes
See more Christmas →

Popular Recipes

  • best-ever chicken salad recipe
    Best-Ever Chicken Salad
  • A white soup filled with roasted tomato basil soup next to sliced grilled cheese sandwiches.
    Roasted Tomato Basil Soup
  • Mahi Mahi tacos on a wooden table in a taco holder
    Amazing Mahi Mahi Tacos
  • Southern Shrimp and Cheesy Grits recipe
    Southern Shrimp and Cheesy Grits
  • Slow Roasted Pork Shoulder on a platter with a side of gravy
    Slow Roasted Pork Shoulder
  • this is a baked jumbo crab au gratin in mini cast iron skillets
    Jumbo Lump Crab Au Gratin

Footer

↑ back to top

Explore

  • Recipe Index
  • About Us
  • Subscribe

About

  • Privacy Policy
  • Contact

Copyright © 2025 How to Feed a Loon • This website contains affiliate links, which means that if you click on a product link, we may receive a commission in return. How To Feed a Loon is a participant in the Amazon Services LLC Associates Program, an affiliate advertising program designed to provide a means for sites to earn advertising fees by advertising and linking to Amazon.com.

Rate This Recipe

Your vote:


A rating is required
A name is required
An email is required